
Operation Guide
Page 2
...Sony recommends that you use standard size DV cassettes or mini DV cassettes. Types of "Memory Stick" you can be used with "Memory Stick" compatible equipment, insert the "Memory Stick Duo" into the Memory Stick Duo Adaptor. 2 Your camcorder does not support the Cassette Memory function (p. 107). When recording in HDV..., DVCAM and DV formats. The HDV format • Digital high-definition (HD) video signals are recorded and...
...Sony recommends that you use standard size DV cassettes or mini DV cassettes. Types of "Memory Stick" you can be used with "Memory Stick" compatible equipment, insert the "Memory Stick Duo" into the Memory Stick Duo Adaptor. 2 Your camcorder does not support the Cassette Memory function (p. 107). When recording in HDV..., DVCAM and DV formats. The HDV format • Digital high-definition (HD) video signals are recorded and...

Operation Guide
Page 4
...regions. The function that the image device (CMOS sensor) reads out image signals, the subjects passing by Carl Zeiss, in Germany, and Sony Corporation, and produces superior images. It adopts the MTF measurement system for the DVCAM format only. MTF= Modulation Transfer Function. Features available... media, etc. • TV color systems differ depending on the icons used for the HDV format only. Also, the lens for illustration purposes are captured using your camcorder is not compatible with a Carl Zeiss lens, which was developed jointly by the frame rapidly might appear ...
...regions. The function that the image device (CMOS sensor) reads out image signals, the subjects passing by Carl Zeiss, in Germany, and Sony Corporation, and produces superior images. It adopts the MTF measurement system for the DVCAM format only. MTF= Modulation Transfer Function. Features available... media, etc. • TV color systems differ depending on the icons used for the HDV format only. Also, the lens for illustration purposes are captured using your camcorder is not compatible with a Carl Zeiss lens, which was developed jointly by the frame rapidly might appear ...

Operation Guide
Page 6
... Using the menu items 62 Menu items 64 (CAMERA SET) menu 67 Settings to adjust your camcorder to the recording conditions (GAIN SETUP/BACK LIGHT/STEADYSHOT, etc.) (AUDIO SET) menu 74 Settings for the audio recording (HDV 2CH/4CH/XLR SET, etc.) (DISPLAY SET) menu 76 Display settings of the display and... the viewfinder (MARKER/VF B.LIGHT/DISP OUTPUT, etc.) (IN/OUT REC) menu 80 Recording settings, input and output settings (REC FORMAT/HDV PROGRE./VIDEO OUT/EXT REC CTRL, etc.) (TC/UB SET) menu 85 (TC PRESET/UB PRESET/TC LINK, etc.) (MEMORY SET) menu 87 Settings for...
... Using the menu items 62 Menu items 64 (CAMERA SET) menu 67 Settings to adjust your camcorder to the recording conditions (GAIN SETUP/BACK LIGHT/STEADYSHOT, etc.) (AUDIO SET) menu 74 Settings for the audio recording (HDV 2CH/4CH/XLR SET, etc.) (DISPLAY SET) menu 76 Display settings of the display and... the viewfinder (MARKER/VF B.LIGHT/DISP OUTPUT, etc.) (IN/OUT REC) menu 80 Recording settings, input and output settings (REC FORMAT/HDV PROGRE./VIDEO OUT/EXT REC CTRL, etc.) (TC/UB SET) menu 85 (TC PRESET/UB PRESET/TC LINK, etc.) (MEMORY SET) menu 87 Settings for...

Operation Guide
Page 7
Additional Information Maintenance and precautions 107 HDV format and recording/playback 107 Compatibility of the DVCAM/DV formats 108 About the "Memory Stick 110 About i.LINK 111 About x.v.Color 112 About handling of your camcorder 113 Specifications 117 Quick Reference Identifying parts and controls 121 Indicators for the LCD screen and viewfinder 128 Index ...132 7
Additional Information Maintenance and precautions 107 HDV format and recording/playback 107 Compatibility of the DVCAM/DV formats 108 About the "Memory Stick 110 About i.LINK 111 About x.v.Color 112 About handling of your camcorder 113 Specifications 117 Quick Reference Identifying parts and controls 121 Indicators for the LCD screen and viewfinder 128 Index ...132 7

Operation Guide
Page 13
To remove the shoulder strap Pull in the same way. Continued , 13 HDV/DV jack (6-pin) b Notes • You cannot use the HDV/DV jack when the Memory Recording Unit is attached to your camcorder. To remove the Memory Recording Unit Slide the unit upward while pushing the RELEASE lever of the arrow while...
To remove the shoulder strap Pull in the same way. Continued , 13 HDV/DV jack (6-pin) b Notes • You cannot use the HDV/DV jack when the Memory Recording Unit is attached to your camcorder. To remove the Memory Recording Unit Slide the unit upward while pushing the RELEASE lever of the arrow while...
Operation Guide
Page 15
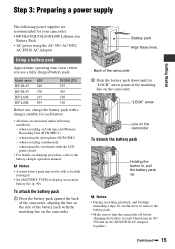
...; Set [BATTERY TYPE] to display an accurate battery life (p. 90). when recording continuously - Model name HDV BP-GL65 240 BP-GL95 370 BP-L60S 215 BP-L80S 295 DVCAM (DV) 255 385 230 310 Before...AC-DN2/DN10 AC Adaptor together). "LOCK" arrow LOCK Line on both tape and Memory Recording Unit (HVR-MRC1) - Continued , 15 when using the AC-550, AC-DN2, AC-DN10 AC Adaptor Using...pack with the LCD panel closed • For details on charging procedure, refer to turn the camcorder off before changing the battery (except when using the viewfinder with a charger suitable for each battery....
...; Set [BATTERY TYPE] to display an accurate battery life (p. 90). when recording continuously - Model name HDV BP-GL65 240 BP-GL95 370 BP-L60S 215 BP-L80S 295 DVCAM (DV) 255 385 230 310 Before...AC-DN2/DN10 AC Adaptor together). "LOCK" arrow LOCK Line on both tape and Memory Recording Unit (HVR-MRC1) - Continued , 15 when using the AC-550, AC-DN2, AC-DN10 AC Adaptor Using...pack with the LCD panel closed • For details on charging procedure, refer to turn the camcorder off before changing the battery (except when using the viewfinder with a charger suitable for each battery....

Operation Guide
Page 25
...). 1 Open the shutter of the lens hood. 2 Set the POWER switch to ON and the CAMERA/VCR switch to record movies. • This camcorder can record movies in HDV or DVCAM (DV) format. CAMERA POWER ON OFF VCR Continued , 25 Recording/Playback Recording Recording lamp REC START/STOP button C Recording lamp TALLY...
...). 1 Open the shutter of the lens hood. 2 Set the POWER switch to ON and the CAMERA/VCR switch to record movies. • This camcorder can record movies in HDV or DVCAM (DV) format. CAMERA POWER ON OFF VCR Continued , 25 Recording/Playback Recording Recording lamp REC START/STOP button C Recording lamp TALLY...

Operation Guide
Page 26
...; To turn off the front recording lamp, set the TALLY switch to 16:9. Recording (Continued) 3 Press the REC START/STOP button A (or B, C). When recording in HDV format, the aspect ratio is convenient. To stop the movie recording, press the REC START/STOP button again. z Tips • When recording in DVCAM (DV...
...; To turn off the front recording lamp, set the TALLY switch to 16:9. Recording (Continued) 3 Press the REC START/STOP button A (or B, C). When recording in HDV format, the aspect ratio is convenient. To stop the movie recording, press the REC START/STOP button again. z Tips • When recording in DVCAM (DV...

Operation Guide
Page 27
...on the "Memory Stick Duo." z Tips • See page 130 for Sony "Memory Stick Duo." z Tips • Image sizes of still images are for indicators that appear on the screen during movie recording. Playing back in HDV format/DVCAM (DV) format (16:9): 1.2M - The actual number of recordable...than 35W. Recording in DVCAM (DV) format (16:9): 0.2M - Continued , 27 Playing back in DVCAM (DV) format (4:3): 0.9M - Playing back in your camcorder. Capacity of the "Memory Stick Duo" (MB) and the number of recordable pictures 1.2M 0.9M VGA 1440 × 1080 × 640 × 810 ...
...on the "Memory Stick Duo." z Tips • See page 130 for Sony "Memory Stick Duo." z Tips • Image sizes of still images are for indicators that appear on the screen during movie recording. Playing back in HDV format/DVCAM (DV) format (16:9): 1.2M - The actual number of recordable...than 35W. Recording in DVCAM (DV) format (16:9): 0.2M - Continued , 27 Playing back in DVCAM (DV) format (4:3): 0.9M - Playing back in your camcorder. Capacity of the "Memory Stick Duo" (MB) and the number of recordable pictures 1.2M 0.9M VGA 1440 × 1080 × 640 × 810 ...

Operation Guide
Page 31
z Tips • The focal distance is magnified by about 1.5 times when [SCAN TYPE] in [HDV PROGRE.] or [DV PROGRE.] of the (IN/ OUT REC) menu is set the PEAKING switch to ON, the detail of an image on the screen ... to the mode B position. In mode B, the focal distance is assigned. The focal distance is displayed on the screen. If you release the button, your camcorder returns to the original size when you press the button again. It is not available during the auto focus. 1 Assign [FOCUS INFNTY] to an ASSIGN...
z Tips • The focal distance is magnified by about 1.5 times when [SCAN TYPE] in [HDV PROGRE.] or [DV PROGRE.] of the (IN/ OUT REC) menu is set the PEAKING switch to ON, the detail of an image on the screen ... to the mode B position. In mode B, the focal distance is assigned. The focal distance is displayed on the screen. If you release the button, your camcorder returns to the original size when you press the button again. It is not available during the auto focus. 1 Assign [FOCUS INFNTY] to an ASSIGN...

Operation Guide
Page 33
... shutter speed. Adjusting the gain You can manually adjust and fix the shutter speed. The lamps above the respective switches will flash when your camcorder cannot detect the ND filter positions (1/2/3/4). You can set for the selected GAIN switch position appears on the screen when you set the shutter ...on the shutter speed mode and the setting of a moving subject look still or emphasize the movement of [SCAN TYPE] ( (IN/OUT REC) menu t [HDV PROGRE.] or [DV PROGRE.]). To adjust the gain automatically Set the AGC switch E to ON, or set the CAMERA MODE switch F to AUTO, other manually...
... shutter speed. Adjusting the gain You can manually adjust and fix the shutter speed. The lamps above the respective switches will flash when your camcorder cannot detect the ND filter positions (1/2/3/4). You can set for the selected GAIN switch position appears on the screen when you set the shutter ...on the shutter speed mode and the setting of a moving subject look still or emphasize the movement of [SCAN TYPE] ( (IN/OUT REC) menu t [HDV PROGRE.] or [DV PROGRE.]). To adjust the gain automatically Set the AGC switch E to ON, or set the CAMERA MODE switch F to AUTO, other manually...

Operation Guide
Page 45
... different audio settings to the AUDIO INPUT1 (L) jack through the AUDIO INPUT4 jack. If your camcorder to MIC+48V. b Notes • For stereo recording, set CH2 of the (AUDIO SET) menu. z Tips • Sony recommends that inputted to CH2 by recording the same audio input with CH2 of the REC CH... IN4 CH1 CH2 2CH MODE 1 Set the REC CH SELECT switch. Select the recording audio input to MIC. To record different audio inputs from [HDV 2CH/4CH] (for HDV, p. 74) or [DV AU.MODE] (for that does not need a power supply, set the audio level manually for the audio input to...
... different audio settings to the AUDIO INPUT1 (L) jack through the AUDIO INPUT4 jack. If your camcorder to MIC+48V. b Notes • For stereo recording, set CH2 of the (AUDIO SET) menu. z Tips • Sony recommends that inputted to CH2 by recording the same audio input with CH2 of the REC CH... IN4 CH1 CH2 2CH MODE 1 Set the REC CH SELECT switch. Select the recording audio input to MIC. To record different audio inputs from [HDV 2CH/4CH] (for HDV, p. 74) or [DV AU.MODE] (for that does not need a power supply, set the audio level manually for the audio input to...

Operation Guide
Page 56
... Scan). z Tips • See page 130 for indicators displayed on the DV format tape in the SP mode. Playback (Continued) b Notes • Your camcorder automatically goes into a stopped state when it is in pause for more than 3 minutes. • The screen may temporarily go blank losing images and sound... when signals switch between HDV and DVCAM (DV) during playback of a tape in which HDV format and DVCAM (DV) format are mixed. • You cannot play back movies recorded in HDV format on DVCAM (DV) format video cameras or mini DV players....
... Scan). z Tips • See page 130 for indicators displayed on the DV format tape in the SP mode. Playback (Continued) b Notes • Your camcorder automatically goes into a stopped state when it is in pause for more than 3 minutes. • The screen may temporarily go blank losing images and sound... when signals switch between HDV and DVCAM (DV) during playback of a tape in which HDV format and DVCAM (DV) format are mixed. • You cannot play back movies recorded in HDV format on DVCAM (DV) format video cameras or mini DV players....

Operation Guide
Page 59
... playback of the movie record in the following sequence: AUDIO t OUTPUT t ASSIGN t EXT DEVICE (when an external device is indicated with your camcorder (Status check) You can check the settings of the following sequence: AUDIO t OUTPUT t ASSIGN t CAMERA t EXT DEVICE (when an external device...set to CAMERA, the display changes in the following items. • Audio setup such as microphone volume level (p. 74) • Output signal setup ([VCR HDV/DV], etc.) (p. 80) • Functions assigned to the ASSIGN buttons (p. 48) • Camera setup (p. 67) • External devices 1 Push the...
... playback of the movie record in the following sequence: AUDIO t OUTPUT t ASSIGN t EXT DEVICE (when an external device is indicated with your camcorder (Status check) You can check the settings of the following sequence: AUDIO t OUTPUT t ASSIGN t CAMERA t EXT DEVICE (when an external device...set to CAMERA, the display changes in the following items. • Audio setup such as microphone volume level (p. 74) • Output signal setup ([VCR HDV/DV], etc.) (p. 80) • Functions assigned to the ASSIGN buttons (p. 48) • Camera setup (p. 67) • External devices 1 Push the...

Operation Guide
Page 60
... audio To SDI To S video To i.LINK To video To component input jack jack jack input jack input jack input jack 60 VIDEO OUT switch HDV/DV HDV/ DV jack Component video cable (optional) Video cable (optional) i.LINK cable (optional) DC IN 12V DC OUT 12V LANC AUDIO INPUT3 AUDIO INPUT4 S VIDEO... supports SDI audio input via an SDI cable. When using the VIDEO OUT jack, set the VIDEO OUT switch to a monitor or recorder without an HDV/DV jack, use audio and video cables as below.
... audio To SDI To S video To i.LINK To video To component input jack jack jack input jack input jack input jack 60 VIDEO OUT switch HDV/DV HDV/ DV jack Component video cable (optional) Video cable (optional) i.LINK cable (optional) DC IN 12V DC OUT 12V LANC AUDIO INPUT3 AUDIO INPUT4 S VIDEO... supports SDI audio input via an SDI cable. When using the VIDEO OUT jack, set the VIDEO OUT switch to a monitor or recorder without an HDV/DV jack, use audio and video cables as below.
Operation Guide
Page 61
... to the operating instructions of your monitor. • A video signal and an audio signal are outputted together when your camcorder is connected to an external device via the HDV/DV jack, or the quality or type of SDI input jack of your monitor may not recognize video signals. •... connected device is output through two channels. The [SDI/CMPNT] settings in the (IN/OUT REC) menu is set your monitor to recognize your camcorder via the HDV/DV jack, the audio is appropriate for receiving an SDI video signal. - Recording/Playback b Notes • Set (IN/OUT REC) menu t [VIDEO OUT...
... to the operating instructions of your monitor. • A video signal and an audio signal are outputted together when your camcorder is connected to an external device via the HDV/DV jack, or the quality or type of SDI input jack of your monitor may not recognize video signals. •... connected device is output through two channels. The [SDI/CMPNT] settings in the (IN/OUT REC) menu is set your monitor to recognize your camcorder via the HDV/DV jack, the audio is appropriate for receiving an SDI video signal. - Recording/Playback b Notes • Set (IN/OUT REC) menu t [VIDEO OUT...

Operation Guide
Page 64
... HANDLE ZOOM D.EXTENDER FADER SMTH SLW REC INTERVAL REC DV FRAME REC SHOT TRANSITION S.TRANS/F.MARK x.v.Color COLOR BAR FLANGE BACK (AUDIO SET) menu (p. 74) z - z - z - z - z - z - z - z - z - z - z - z - HDV 2CH/4CH DV AU.MODE AU.LMT CH1,2 AU.LMT CH3,4 XLR SET z - z - 64 z - z - z - z - Available menu items (z) vary depending on the CAMERA/VCR switch position...
... HANDLE ZOOM D.EXTENDER FADER SMTH SLW REC INTERVAL REC DV FRAME REC SHOT TRANSITION S.TRANS/F.MARK x.v.Color COLOR BAR FLANGE BACK (AUDIO SET) menu (p. 74) z - z - z - z - z - z - z - z - z - z - z - z - HDV 2CH/4CH DV AU.MODE AU.LMT CH1,2 AU.LMT CH3,4 XLR SET z - z - 64 z - z - z - z - Available menu items (z) vary depending on the CAMERA/VCR switch position...

Operation Guide
Page 65
... DISP SHUTTER DISP LCD COLOR LCD BL LEVEL VF B.LIGHT VF COLOR LETTER SIZE REMAINING DISP OUTPUT (IN/OUT REC) menu (p. 80) REC FORMAT VCR HDV/DV HDV PROGRE. DV PROGRE. z z z z z z z z z z z z z z z z z VCR z z z z z z z -
... DISP SHUTTER DISP LCD COLOR LCD BL LEVEL VF B.LIGHT VF COLOR LETTER SIZE REMAINING DISP OUTPUT (IN/OUT REC) menu (p. 80) REC FORMAT VCR HDV/DV HDV PROGRE. DV PROGRE. z z z z z z z z z z z z z z z z z VCR z z z z z z z -

Operation Guide
Page 74
... the SEL/PUSH EXEC dial. (AUDIO SET) menu Settings for the audio recording (HDV 2CH/ 4CH/XLR SET, etc.) The default settings are selected. HDV 2CH/4CH You can set the clipping-noise reduction function for HDV format recording. Signals from AUDIO INPUT1 (L)-4 are recorded in CH1 and CH2 (p. 45... ineffective when you set the CH1/CH2 switch to MAN. B FS48K ( ) Records in the [FS48K] mode. b Notes • When recording in the HDV format, sound is automatically recorded in the 16-bit mode (1 stereo sound with B. b Notes • This function is available only when you set the CH3...
... the SEL/PUSH EXEC dial. (AUDIO SET) menu Settings for the audio recording (HDV 2CH/ 4CH/XLR SET, etc.) The default settings are selected. HDV 2CH/4CH You can set the clipping-noise reduction function for HDV format recording. Signals from AUDIO INPUT1 (L)-4 are recorded in CH1 and CH2 (p. 45... ineffective when you set the CH1/CH2 switch to MAN. B FS48K ( ) Records in the [FS48K] mode. b Notes • When recording in the HDV format, sound is automatically recorded in the 16-bit mode (1 stereo sound with B. b Notes • This function is available only when you set the CH3...

Operation Guide
Page 79
.... VF B.LIGHT You can adjust the brightness of the LCD panel. Using the Menu FOCUS DISP You can select how to the period that your camcorder reads image data from the image sensor is defined as 360 degrees. DEGREE Displays the shutter speed in meters. When [SCAN TYPE] is set to... the color level of the viewfinder. Continued , 79 LCD COLOR You can select how to [60], 1/60 second is calculated based on [SCAN TYPE], see [HDV PROGRE.] (p. 81) or [DV PROGRE.] (p. 82). The degree is defined as 360 degrees. -
.... VF B.LIGHT You can adjust the brightness of the LCD panel. Using the Menu FOCUS DISP You can select how to the period that your camcorder reads image data from the image sensor is defined as 360 degrees. DEGREE Displays the shutter speed in meters. When [SCAN TYPE] is set to... the color level of the viewfinder. Continued , 79 LCD COLOR You can select how to [60], 1/60 second is calculated based on [SCAN TYPE], see [HDV PROGRE.] (p. 81) or [DV PROGRE.] (p. 82). The degree is defined as 360 degrees. -
