Operation Guide
Page 6
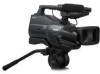
..." compatible equipment Be sure to insert the "Memory Stick Duo" into the Memory Stick Duo Adaptor. Types of "Memory Stick" you can use in your camcorder You can use "Memory Stick" marked with the following parts. "Memory Stick Duo" (This size can be used with your... cannot use any type of memory card except "Memory Stick Duo." 6 Microphone Viewfinder Lens hood panel EVF block "Memory Stick" (You cannot use with your camcorder.) • "Memory Stick PRO Duo" can be used only with "Memory Stick PRO" compatible equipment. • Do not attach a label or the like on a "Memory...
..." compatible equipment Be sure to insert the "Memory Stick Duo" into the Memory Stick Duo Adaptor. Types of "Memory Stick" you can use in your camcorder You can use "Memory Stick" marked with the following parts. "Memory Stick Duo" (This size can be used with your... cannot use any type of memory card except "Memory Stick Duo." 6 Microphone Viewfinder Lens hood panel EVF block "Memory Stick" (You cannot use with your camcorder.) • "Memory Stick PRO Duo" can be used only with "Memory Stick PRO" compatible equipment. • Do not attach a label or the like on a "Memory...
Operation Guide
Page 7
... of the pixels are normal results of time may result in low light conditions, such as at the sun. Unauthorized recording of your camcorder to another device with communication cables, be provided, even if recording or playback is not possible due to playing them back on the ... format only. However, there may be some tiny black points and/or bright points (white, red, blue, or green in this camcorder prior to a malfunction of the camcorder, storage media, etc. • TV color systems differ depending on other devices. About changing the language setting The on a TV,...
... of the pixels are normal results of time may result in low light conditions, such as at the sun. Unauthorized recording of your camcorder to another device with communication cables, be provided, even if recording or playback is not possible due to playing them back on the ... format only. However, there may be some tiny black points and/or bright points (white, red, blue, or green in this camcorder prior to a malfunction of the camcorder, storage media, etc. • TV color systems differ depending on other devices. About changing the language setting The on a TV,...
Operation Guide
Page 8
... appear different. • Design and specifications of light from a subject coming into the lens. 8 About the Carl Zeiss lens Your camcorder is T -coated to change without notice. It adopts the MTF measurement system for your camcorder is equipped with a Carl Zeiss lens, which was developed jointly by Carl Zeiss, in Germany, and...
... appear different. • Design and specifications of light from a subject coming into the lens. 8 About the Carl Zeiss lens Your camcorder is T -coated to change without notice. It adopts the MTF measurement system for your camcorder is equipped with a Carl Zeiss lens, which was developed jointly by Carl Zeiss, in Germany, and...
Operation Guide
Page 9
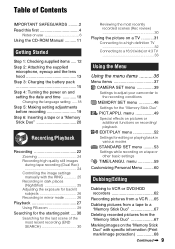
... to a 16:9 (wide) or 4:3 TV 33 Using the Menu Using the menu items .......... 36 Menu items 37 CAMERA SET menu 39 Settings to adjust your camcorder to a "Memory Stick Duo 67 Deleting recorded pictures from the "Memory Stick Duo 67 Marking images on the "Memory Stick Duo" with the RING 25...
... to a 16:9 (wide) or 4:3 TV 33 Using the Menu Using the menu items .......... 36 Menu items 37 CAMERA SET menu 39 Settings to adjust your camcorder to a "Memory Stick Duo 67 Deleting recorded pictures from the "Memory Stick Duo 67 Marking images on the "Memory Stick Duo" with the RING 25...
Operation Guide
Page 10
... Copying movies on a tape to a computer 74 Troubleshooting Troubleshooting 77 Warning indicators and messages 85 Self-diagnosis display/Warning indicators 85 Additional Information Using your camcorder abroad ...... 88 Maintenance and precautions ...... 89 Usable cassette tapes 89 About the "Memory Stick 90 About the "InfoLITHIUM" battery pack 92 About i.LINK 93 About...
... Copying movies on a tape to a computer 74 Troubleshooting Troubleshooting 77 Warning indicators and messages 85 Self-diagnosis display/Warning indicators 85 Additional Information Using your camcorder abroad ...... 88 Maintenance and precautions ...... 89 Usable cassette tapes 89 About the "Memory Stick 90 About the "InfoLITHIUM" battery pack 92 About i.LINK 93 About...

Operation Guide
Page 12
... through the attachment on the lens cap string. The number in the parentheses indicates the number of that you have following items supplied with your camcorder. Rechargeable battery pack NP-F570 (1) (p. 15, 92) Lens hood (1) 12 AC Adaptor (1) (p. 15) Lens cap (1) Wind screen (1) (p. 13) Microphone (1) (p. 13) Power cord (mains lead) (1) (p....(1) (p. 31, 62) Eye cup (1) CD-ROM "Manuals for Digital HD Video Camera Recorder"(1) Operating Guide (This manual) (1) To attach the lens cap to the camcorder again. Getting Started Step 1: Checking supplied items Make sure that item supplied.
... through the attachment on the lens cap string. The number in the parentheses indicates the number of that you have following items supplied with your camcorder. Rechargeable battery pack NP-F570 (1) (p. 15, 92) Lens hood (1) 12 AC Adaptor (1) (p. 15) Lens cap (1) Wind screen (1) (p. 13) Microphone (1) (p. 13) Power cord (mains lead) (1) (p....(1) (p. 31, 62) Eye cup (1) CD-ROM "Manuals for Digital HD Video Camera Recorder"(1) Operating Guide (This manual) (1) To attach the lens cap to the camcorder again. Getting Started Step 1: Checking supplied items Make sure that item supplied.

Operation Guide
Page 14
To remove the Lens hood 1 2 Turn the lens hood cover in the direction of the arrow as illustrated above while pressing the lever on the lens hood cover. 14 Align the marks on the lens hood to those on its sides. Step 2: Attaching the supplied microphone and the lens hood (Continued) Attaching the lens hood 2 1 z Tips • If you attach, remove or adjust an 37mm (2 1/2in.) PL filter or MC protector, remove the lens hood. Attaching the lens cap Attach the lens cap by pressing both knobs on the camcorder, and turn the lens hood in the opposite direction of the arrow.
To remove the Lens hood 1 2 Turn the lens hood cover in the direction of the arrow as illustrated above while pressing the lever on the lens hood cover. 14 Align the marks on the lens hood to those on its sides. Step 2: Attaching the supplied microphone and the lens hood (Continued) Attaching the lens hood 2 1 z Tips • If you attach, remove or adjust an 37mm (2 1/2in.) PL filter or MC protector, remove the lens hood. Attaching the lens cap Attach the lens cap by pressing both knobs on the camcorder, and turn the lens hood in the opposite direction of the arrow.

Operation Guide
Page 15
... the DC plug. Attach the battery pack by sliding it to your camcorder. 4 Connect the power cord (mains lead) to the DC IN jack of your camcorder. Continued , 15 Be sure that the v mark on your camcorder. z Tips • You can charge the "InfoLITHIUM" battery pack (L series) (p. 92) ... attaching it in this case. b Notes • You cannot attach any "InfoLITHIUM" battery pack other than the L series to your camcorder. 1 Attach the battery pack to your camcorder connected to the v mark on the DC plug is fully charged. The CHG (charge) lamp turns off when the battery is facing...
... the DC plug. Attach the battery pack by sliding it to your camcorder. 4 Connect the power cord (mains lead) to the DC IN jack of your camcorder. Continued , 15 Be sure that the v mark on your camcorder. z Tips • You can charge the "InfoLITHIUM" battery pack (L series) (p. 92) ... attaching it in this case. b Notes • You cannot attach any "InfoLITHIUM" battery pack other than the L series to your camcorder. 1 Attach the battery pack to your camcorder connected to the v mark on the DC plug is fully charged. The CHG (charge) lamp turns off when the battery is facing...
Operation Guide
Page 17
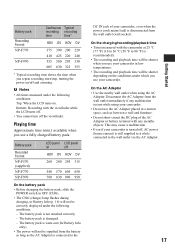
... The power will not be correctly displayed under the following conditions. - Disconnect the AC Adaptor from the wall outlet (wall socket). Bottom: Recording with the camcorder at 25 °C (77 °F) (10 to 30 °C (50 °F to 86 °F) is recommended). • The recording and playback...when you repeat recording start/stop, turning the power on . On the AC Adaptor • Use the nearby wall outlet when using your camcorder. Battery pack Recording Format NP-F770 NP-F970 Continuous Typical recording recording time time* HDV DV HDV DV 375 390 200 220 410 425...
... The power will not be correctly displayed under the following conditions. - Disconnect the AC Adaptor from the wall outlet (wall socket). Bottom: Recording with the camcorder at 25 °C (77 °F) (10 to 30 °C (50 °F to 86 °F) is recommended). • The recording and playback...when you repeat recording start/stop, turning the power on . On the AC Adaptor • Use the nearby wall outlet when using your camcorder. Battery pack Recording Format NP-F770 NP-F970 Continuous Typical recording recording time time* HDV DV HDV DV 375 390 200 220 410 425...
Operation Guide
Page 18
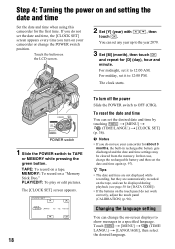
For midday, set it to 12:00 PM. CLOCK SET DATE 2007Y JAN M 1D 12: 00 AM OK 18 To turn on your camcorder for about 3 months, the built-in a specified language. For midnight, set it to 12:00 AM. POWER switch 1 Slide the POWER switch to the year ... for [D] (day), hour and minute. MEMORY: To record on the touch panel do not use your camcorder or change the on and setting the date and time Set the date and time when using this camcorder for the first time. In that case, charge the rechargeable battery and then set the desired...
For midday, set it to 12:00 PM. CLOCK SET DATE 2007Y JAN M 1D 12: 00 AM OK 18 To turn on your camcorder for about 3 months, the built-in a specified language. For midnight, set it to 12:00 AM. POWER switch 1 Slide the POWER switch to the year ... for [D] (day), hour and minute. MEMORY: To record on the touch panel do not use your camcorder or change the on and setting the date and time Set the date and time when using this camcorder for the first time. In that case, charge the rechargeable battery and then set the desired...

Operation Guide
Page 21
... the "Memory Stick Duo" into the slot in once. b Notes • When the access lamp is reading/writing data. Do not shake or knock your camcorder is lit or flashing, your camcorder, turn the power off, eject the "Memory Stick Duo," or remove the battery pack.
... the "Memory Stick Duo" into the slot in once. b Notes • When the access lamp is reading/writing data. Do not shake or knock your camcorder is lit or flashing, your camcorder, turn the power off, eject the "Memory Stick Duo," or remove the battery pack.
Operation Guide
Page 24
... the power zoom lever. Stored still images appear one by one, and the images are stored on the handdle. • The minimum possible distance between camcorder and subject while maintaining sharp focus is finished and the still images are stored onto the "Memory Stick Duo." b Notes • Be sure to stop...
... the power zoom lever. Stored still images appear one by one, and the images are stored on the handdle. • The minimum possible distance between camcorder and subject while maintaining sharp focus is finished and the still images are stored onto the "Memory Stick Duo." b Notes • Be sure to stop...
Operation Guide
Page 26
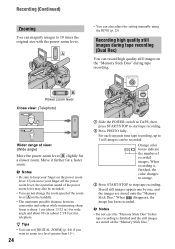
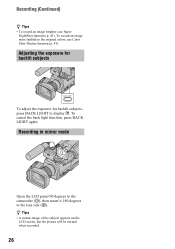
...) z Tips • To record an image brighter, use Color Slow Shutter function (p. 43). Recording in mirror mode Open the LCD panel 90 degrees to the camcorder (1), then rotate it 180 degrees to the lens side (2).
...) z Tips • To record an image brighter, use Color Slow Shutter function (p. 43). Recording in mirror mode Open the LCD panel 90 degrees to the camcorder (1), then rotate it 180 degrees to the lens side (2).

Operation Guide
Page 30
Then, your camcorder is set to PLAY/EDIT. Make sure that the POWER switch is a blank section between recorded sections on the tape. The last scene of the ... to TAPE. b Notes • END SEARCH will not work correctly when there is set to standby. z Tips • You can view about 5 seconds, and the camcorder enters the standby mode at the point where the last recording has finished. Touch t . 6 0 min 1 END SEARCH EXECUTING 0:00:00 CANCEL Touch here to TAPE...
Then, your camcorder is set to PLAY/EDIT. Make sure that the POWER switch is a blank section between recorded sections on the tape. The last scene of the ... to TAPE. b Notes • END SEARCH will not work correctly when there is set to standby. z Tips • You can view about 5 seconds, and the camcorder enters the standby mode at the point where the last recording has finished. Touch t . 6 0 min 1 END SEARCH EXECUTING 0:00:00 CANCEL Touch here to TAPE...

Operation Guide
Page 31
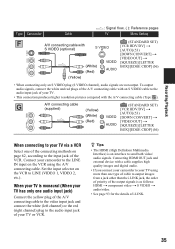
...[VCR HDV/DV] or [i.LINK CONV] setting is connected and connectors used. Jacks on what type of TV is changed after the TV and your camcorder were connected with the device to play back on an x.v.Color-compliant TV (p. 45). Playing the picture on a TV Connection methods and image quality ...differ depending on your camcorder Open the jack cover in the direction of the arrow and connect the cable. Recording/Playback Lift up the bottom of the jack cover, then...
...[VCR HDV/DV] or [i.LINK CONV] setting is connected and connectors used. Jacks on what type of TV is changed after the TV and your camcorder were connected with the device to play back on an x.v.Color-compliant TV (p. 45). Playing the picture on a TV Connection methods and image quality ...differ depending on your camcorder Open the jack cover in the direction of the arrow and connect the cable. Recording/Playback Lift up the bottom of the jack cover, then...

Operation Guide
Page 32
... is also needed to output audio signals. Connect the white and red plugs of your TV. 32 COMPONENT IN AUDIO HDMI i.LINK (for HDV1080i) A B C Type Camcorder Cable A Component video cable (optional) (Green) Y (Blue) PB/CB (Red) PR/CR A/V connecting cable (supplied) (White) (Red) : Signal flow, ( ): Reference pages TV Menu Setting (STANDARD...
... is also needed to output audio signals. Connect the white and red plugs of your TV. 32 COMPONENT IN AUDIO HDMI i.LINK (for HDV1080i) A B C Type Camcorder Cable A Component video cable (optional) (Green) Y (Blue) PB/CB (Red) PR/CR A/V connecting cable (supplied) (White) (Red) : Signal flow, ( ): Reference pages TV Menu Setting (STANDARD...

Operation Guide
Page 33
...LINK CONV] t [OFF] (56) • Your TV needs to have an i.LINK jack compatible with HDV1080i specification. See the instruction manuals supplied with your camcorder and HDMI OUT jack of an external device with the HDMI cable. COMPONENT IN AUDIO i.LINK S VIDEO VIDEO/AUDIO VIDEO/AUDIO D E F G Continued , 33...) and played back. • A DV formatted picture is played back as illustrated in the pictures. • DV format pictures input to the camcorder via i.LINK cable (p. 65) cannot be set so that it is connected. Do not connect the HDMI OUT jack of your TV. •...
...LINK CONV] t [OFF] (56) • Your TV needs to have an i.LINK jack compatible with HDV1080i specification. See the instruction manuals supplied with your camcorder and HDMI OUT jack of an external device with the HDMI cable. COMPONENT IN AUDIO i.LINK S VIDEO VIDEO/AUDIO VIDEO/AUDIO D E F G Continued , 33...) and played back. • A DV formatted picture is played back as illustrated in the pictures. • DV format pictures input to the camcorder via i.LINK cable (p. 65) cannot be set so that it is connected. Do not connect the HDMI OUT jack of your TV. •...

Operation Guide
Page 34
Playing the picture on a TV (Continued) To set so that it recognizes that the camcorder is also needed to output audio signals. See the instruction manuals supplied with the 16:9 signal, set [ WIDE SELECT] to the audio input jack... to match your TV. Connect the white and red plugs of the A/V connecting cable to [4:3] on a 4:3 TV not compatible with your camcorder when recording a picture (p. 54). : Signal flow, ( ): Reference pages Type Camcorder Cable TV Menu Setting D Component video cable (optional) (Green) Y (Blue) PB/CB (Red) PR/CR A/V connecting cable (supplied) (White) ...
Playing the picture on a TV (Continued) To set so that it recognizes that the camcorder is also needed to output audio signals. See the instruction manuals supplied with the 16:9 signal, set [ WIDE SELECT] to the audio input jack... to match your TV. Connect the white and red plugs of the A/V connecting cable to [4:3] on a 4:3 TV not compatible with your camcorder when recording a picture (p. 54). : Signal flow, ( ): Reference pages Type Camcorder Cable TV Menu Setting D Component video cable (optional) (Green) Y (Blue) PB/CB (Red) PR/CR A/V connecting cable (supplied) (White) ...
Operation Guide
Page 35
...White) (Red) (STANDARD SET) [VCR HDV/DV] t [AUTO] (53) [DOWN CONVERT] t [VIDEO OUT] t [SQUEEZE]/[LETTER BOX]/[EDGE CROP] (56) When connecting to your camcorder to the LINE IN input on the VCR using more than one of the connecting methods on the VCR to the audio input jack of... the VCR. Connecting HDMI OUT jack and external device with a cable supplies high quality images and digital audio. • If you connect your camcorder to the input jack of your TV. • This connection produces higher resolution pictures compared with the A/V connecting cable (Type ). z Tips •...
...White) (Red) (STANDARD SET) [VCR HDV/DV] t [AUTO] (53) [DOWN CONVERT] t [VIDEO OUT] t [SQUEEZE]/[LETTER BOX]/[EDGE CROP] (56) When connecting to your camcorder to the LINE IN input on the VCR using more than one of the connecting methods on the VCR to the audio input jack of... the VCR. Connecting HDMI OUT jack and external device with a cable supplies high quality images and digital audio. • If you connect your camcorder to the input jack of your TV. • This connection produces higher resolution pictures compared with the A/V connecting cable (Type ). z Tips •...

Operation Guide
Page 39
...sunset)* () Select to focus on selecting menu items. SCENE SELECT You can record pictures effectively in windows between the camcorder and the subject. This setting also prevents your camcorder to the recording conditions The default settings are lit by strong light. B AUTO Select to record all the splendor ...a soft background. FIREWORKS* ( ) Select to automatically record pictures effectively without the [SCENE SELECT] function. CAMERA SET menu Settings to adjust your camcorder from appearing excessively white when subjects are marked with the [SCENE SELECT] function.
...sunset)* () Select to focus on selecting menu items. SCENE SELECT You can record pictures effectively in windows between the camcorder and the subject. This setting also prevents your camcorder to the recording conditions The default settings are lit by strong light. B AUTO Select to record all the splendor ...a soft background. FIREWORKS* ( ) Select to automatically record pictures effectively without the [SCENE SELECT] function. CAMERA SET menu Settings to adjust your camcorder from appearing excessively white when subjects are marked with the [SCENE SELECT] function.


