Operation Guide
Page 6
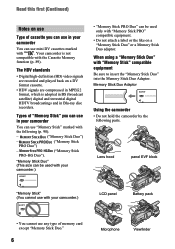
... - ("Memory Stick PRO Duo") - ("Memory Stick PRO-HG Duo"). Lens hood panel EVF block "Memory Stick" (You cannot use with your camcorder.) • "Memory Stick PRO Duo" can use in Blu-ray disc recorders. Read this first (Continued) Notes on use Type of memory card ...except "Memory Stick Duo." 6 Microphone Viewfinder Your camcorder is adopted in BS (broadcast satellite) digital and terrestrial digital HDTV broadcastings and in your camcorder You can use mini DV cassettes marked with the Cassette Memory function (p. 89). ...
... - ("Memory Stick PRO Duo") - ("Memory Stick PRO-HG Duo"). Lens hood panel EVF block "Memory Stick" (You cannot use with your camcorder.) • "Memory Stick PRO Duo" can use in Blu-ray disc recorders. Read this first (Continued) Notes on use Type of memory card ...except "Memory Stick Duo." 6 Microphone Viewfinder Your camcorder is adopted in BS (broadcast satellite) digital and terrestrial digital HDTV broadcastings and in your camcorder You can use mini DV cassettes marked with the Cassette Memory function (p. 89). ...
Operation Guide
Page 9
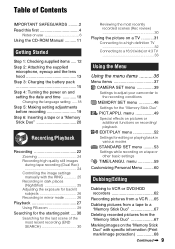
...:9 (wide) or 4:3 TV 33 Using the Menu Using the menu items .......... 36 Menu items 37 CAMERA SET menu 39 Settings to adjust your camcorder to a "Memory Stick Duo 67 Deleting recorded pictures from a tape to the recording conditions MEMORY SET menu 46 Settings for the "Memory Stick Duo...this first 4 Notes on use 6 Using the CD-ROM Manual .......... 11 Getting Started Step 1: Checking supplied items ..... 12 Step 2: Attaching the supplied microphone, eyecup and the lens hood 13 Step 3: Charging the battery pack 15 Step 4: Turning the power on and setting the date and time 18 Changing...
...:9 (wide) or 4:3 TV 33 Using the Menu Using the menu items .......... 36 Menu items 37 CAMERA SET menu 39 Settings to adjust your camcorder to a "Memory Stick Duo 67 Deleting recorded pictures from a tape to the recording conditions MEMORY SET menu 46 Settings for the "Memory Stick Duo...this first 4 Notes on use 6 Using the CD-ROM Manual .......... 11 Getting Started Step 1: Checking supplied items ..... 12 Step 2: Attaching the supplied microphone, eyecup and the lens hood 13 Step 3: Charging the battery pack 15 Step 4: Turning the power on and setting the date and time 18 Changing...

Operation Guide
Page 12
The number in the parentheses indicates the number of that you have following items supplied with your camcorder. Then attach the grip belt to the grip belt Remove the grip belt and attach the lens cap by leading the grip belt ...F570 (1) (p. 15, 92) Lens hood (1) 12 Getting Started Step 1: Checking supplied items Make sure that item supplied. AC Adaptor (1) (p. 15) Lens cap (1) Wind screen (1) (p. 13) Microphone (1) (p. 13) Power cord (mains lead) (1) (p. 15) A/V connecting cable (1) (p. 31, 62) Eye cup (1) CD-ROM "Manuals for Digital HD Video Camera Recorder"(1) Operating Guide (This...
The number in the parentheses indicates the number of that you have following items supplied with your camcorder. Then attach the grip belt to the grip belt Remove the grip belt and attach the lens cap by leading the grip belt ...F570 (1) (p. 15, 92) Lens hood (1) 12 Getting Started Step 1: Checking supplied items Make sure that item supplied. AC Adaptor (1) (p. 15) Lens cap (1) Wind screen (1) (p. 13) Microphone (1) (p. 13) Power cord (mains lead) (1) (p. 15) A/V connecting cable (1) (p. 31, 62) Eye cup (1) CD-ROM "Manuals for Digital HD Video Camera Recorder"(1) Operating Guide (This...

Operation Guide
Page 13
...fits the corresponding part properly. Be sure to the Mic jack 4. Step 2: Attaching the supplied microphone, eyecup and the lens hood Attaching the supplied microphone 1 2 4 5 4 Turn the plug of the microphone counter-clockwise to 180 degrees in the viewfinder. Attaching the eyecup Attach the eyecup aligned with ...the concave part of the holder, then place the microphone into the holder. Close the cover and lock the stopper securely. Continued , 13 You can attach the eyecup facing either the ...
...fits the corresponding part properly. Be sure to the Mic jack 4. Step 2: Attaching the supplied microphone, eyecup and the lens hood Attaching the supplied microphone 1 2 4 5 4 Turn the plug of the microphone counter-clockwise to 180 degrees in the viewfinder. Attaching the eyecup Attach the eyecup aligned with ...the concave part of the holder, then place the microphone into the holder. Close the cover and lock the stopper securely. Continued , 13 You can attach the eyecup facing either the ...

Operation Guide
Page 14
Align the marks on the lens hood to those on the camcorder, and turn the lens hood in the opposite direction of the arrow. To remove the Lens hood 1 2 Turn the lens hood cover in the direction of the arrow as illustrated above while pressing the lever on its sides. Attaching the lens cap Attach the lens cap by pressing both knobs on the lens hood cover. 14 Step 2: Attaching the supplied microphone and the lens hood (Continued) Attaching the lens hood 2 1 z Tips • If you attach, remove or adjust an 37mm (2 1/2in.) PL filter or MC protector, remove the lens hood.
Align the marks on the lens hood to those on the camcorder, and turn the lens hood in the opposite direction of the arrow. To remove the Lens hood 1 2 Turn the lens hood cover in the direction of the arrow as illustrated above while pressing the lever on its sides. Attaching the lens cap Attach the lens cap by pressing both knobs on the lens hood cover. 14 Step 2: Attaching the supplied microphone and the lens hood (Continued) Attaching the lens hood 2 1 z Tips • If you attach, remove or adjust an 37mm (2 1/2in.) PL filter or MC protector, remove the lens hood.

Operation Guide
Page 54
...to the TV connected when recording. x WIDE SELECT You can monitor the sound recorded by other camcorders or VCRs. • When you output the recording picture using audio dubbing or 4ch microphone recording. 54 Refer also to [ON:SQUEEZE]/[ON: EDGE CROP], pictures are interrupted temporarily. &#...8226; When [i.LINK CONV] is . - x REC MODE (Recording mode) B SP (SP) Records in the LP mode on other camcorders using an i.LINK cable, set...
...to the TV connected when recording. x WIDE SELECT You can monitor the sound recorded by other camcorders or VCRs. • When you output the recording picture using audio dubbing or 4ch microphone recording. 54 Refer also to [ON:SQUEEZE]/[ON: EDGE CROP], pictures are interrupted temporarily. &#...8226; When [i.LINK CONV] is . - x REC MODE (Recording mode) B SP (SP) Records in the LP mode on other camcorders using an i.LINK cable, set...

Operation Guide
Page 81
... from the [ST2] (additional sound) side until the sound is dirty (p. 95). • Use the Sony mini DV cassette. The picture or sound breaks off . • This occurs if the tape or video ... actual size. "---" is being played. • The data code on a tape with the 4ch microphone recording standard. No picture appears during [END SEARCH] or Rec Review. • The tape was ...• The tape was recorded in HDV format to the instruction manuals supplied with your camcorder (NTSC). Horizontal lines appear on the picture. Continued , 81 Troubleshooting The displayed pictures ...
... from the [ST2] (additional sound) side until the sound is dirty (p. 95). • Use the Sony mini DV cassette. The picture or sound breaks off . • This occurs if the tape or video ... actual size. "---" is being played. • The data code on a tape with the 4ch microphone recording standard. No picture appears during [END SEARCH] or Rec Review. • The tape was ...• The tape was recorded in HDV format to the instruction manuals supplied with your camcorder (NTSC). Horizontal lines appear on the picture. Continued , 81 Troubleshooting The displayed pictures ...

Operation Guide
Page 99
... camera recording using the viewfinder with normal brightness: HDV recording 4.6 W DV recording 4.4 W During camera recording using the LCD & viewfinder with lens cover , microphone. *2The unique pixel array of Sony's ClearVid CMOS sensor and image processing system (new Enhanced Imaging Processor) allows for still image resolution equivalent to + 140 °F) Dimensions (approx.) 265...
... camera recording using the viewfinder with normal brightness: HDV recording 4.6 W DV recording 4.4 W During camera recording using the LCD & viewfinder with lens cover , microphone. *2The unique pixel array of Sony's ClearVid CMOS sensor and image processing system (new Enhanced Imaging Processor) allows for still image resolution equivalent to + 140 °F) Dimensions (approx.) 265...

Operation Guide
Page 103
E Lens (Carl Zeiss Lens) (8) F Infrared port G Grip belt H RING (25) I Quick Reference A Microphone (13) B Cassette compartment lid (20) C OPEN/EJECT lever (20) D REC lamp (Camera recording lamp) • The REC lamp lights up in .)) to the tripod receptacle using a tripod screw. 103 A D B E C F G H I Tripod receptacle Attach the tripod (optional: the length of the screw must be less than 5.5 mm (7/32 in red during recording (p. 58). • The REC lamp flashes if the remaining tape or battery power is low.
E Lens (Carl Zeiss Lens) (8) F Infrared port G Grip belt H RING (25) I Quick Reference A Microphone (13) B Cassette compartment lid (20) C OPEN/EJECT lever (20) D REC lamp (Camera recording lamp) • The REC lamp lights up in .)) to the tripod receptacle using a tripod screw. 103 A D B E C F G H I Tripod receptacle Attach the tripod (optional: the length of the screw must be less than 5.5 mm (7/32 in red during recording (p. 58). • The REC lamp flashes if the remaining tape or battery power is low.


