
Child Safety: It Makes A Difference Where Your TV Stands
Page 1
...the Home Entertainment Support Safety Committee comprised of television and consumer electronics furniture manufacturers to climb on or play with furniture and television sets. 5 Avoid placing any items on the proper TV stands. Many homes, in fact, have a television in your family and ...friends. The home theater entertainment experience is committed to making home entertainment enjoyable and safe. As a result, TV sets may fall over . 7 Share our safety message on dressers, bookcases, shelves, desks, audio speakers, chests or carts. The industry is a...
...the Home Entertainment Support Safety Committee comprised of television and consumer electronics furniture manufacturers to climb on or play with furniture and television sets. 5 Avoid placing any items on the proper TV stands. Many homes, in fact, have a television in your family and ...friends. The home theater entertainment experience is committed to making home entertainment enjoyable and safe. As a result, TV sets may fall over . 7 Share our safety message on dressers, bookcases, shelves, desks, audio speakers, chests or carts. The industry is a...

Operating Instructions
Page 4
...how to FM/AM radio 23 Storing FM stations automatically ........ 24 - INPUT MODE Customizing sound fields 35 Adjusting the tone 37 Advanced settings 37 Other Operations Naming preset stations and inputs ........ 39 Using the Sleep Timer 40 Selecting the speaker system 40 Recording 41 Operations ... with only analog audio jacks 10 2: Connecting the antennas 12 3: Connecting speakers 13 4: Connecting the AC power cord ........ 17 5: Setting up the speakers 18 6: Setting up the sub woofer 21 7: Adjusting the speaker levels and balance 21 - SURR BACK DECODING Advanced Adjustments and...
...how to FM/AM radio 23 Storing FM stations automatically ........ 24 - INPUT MODE Customizing sound fields 35 Adjusting the tone 37 Advanced settings 37 Other Operations Naming preset stations and inputs ........ 39 Using the Sleep Timer 40 Selecting the speaker system 40 Recording 41 Operations ... with only analog audio jacks 10 2: Connecting the antennas 12 3: Connecting speakers 13 4: Connecting the AC power cord ........ 17 5: Setting up the speakers 18 6: Setting up the sub woofer 21 7: Adjusting the speaker levels and balance 21 - SURR BACK DECODING Advanced Adjustments and...
Operating Instructions
Page 17
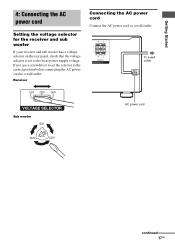
...b To a wall outlet 120V 220V 240V VOLTAGE SELECTOR Sub woofer 120V AC power cord 240V 220V continued 17GB Getting Started 4: Connecting the AC power cord Setting the voltage selector for the receiver and sub woofer If your receiver and sub woofer has a voltage selector on the rear panel, check that the... voltage selector is set the selector to the correct position before connecting the AC power cord to a wall outlet. If not, use a screwdriver to set to a wall outlet.
...b To a wall outlet 120V 220V 240V VOLTAGE SELECTOR Sub woofer 120V AC power cord 240V 220V continued 17GB Getting Started 4: Connecting the AC power cord Setting the voltage selector for the receiver and sub woofer If your receiver and sub woofer has a voltage selector on the rear panel, check that the... voltage selector is set the selector to the correct position before connecting the AC power cord to a wall outlet. If not, use a screwdriver to set to a wall outlet.
Operating Instructions
Page 18
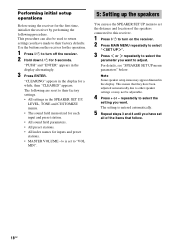
...a while, then "CLEARED" appears. The following procedure. Note Some speaker setup items may not be used to their factory settings. • All settings in the display for inputs and preset stations. • MASTER VOLUME -/+ is entered automatically. 5 Repeat steps 3 and 4 until you ... the following are reset to their factory defaults. This means that follow. 18GB repeatedly to select the setting you have set to adjust. For details, see "SPEAKER SET UP menu parameters" below. Performing initial setup operations Before using the receiver for 5 seconds. Use the...
...a while, then "CLEARED" appears. The following procedure. Note Some speaker setup items may not be used to their factory settings. • All settings in the display for inputs and preset stations. • MASTER VOLUME -/+ is entered automatically. 5 Repeat steps 3 and 4 until you ... the following are reset to their factory defaults. This means that follow. 18GB repeatedly to select the setting you have set to adjust. For details, see "SPEAKER SET UP menu parameters" below. Performing initial setup operations Before using the receiver for 5 seconds. Use the...

Operating Instructions
Page 19
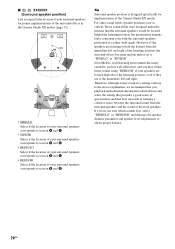
...from a distance equal to the front speaker distance (A) to a distance 1.5 meters (5 feet) closer to your listening position to the surround speakers. If you set the distance to the surround back speaker. B A A 30˚ 30˚ 100˚-120˚ 100˚-120˚ C C D x... C DIST. Surround back speaker distance should be set from a distance equal to the front speaker distance (A) to a distance 4.5 meters (15 feet) closer to your listening position (C). Likewise, the surround speakers ...
...from a distance equal to the front speaker distance (A) to a distance 1.5 meters (5 feet) closer to your listening position to the surround speakers. If you set the distance to the surround back speaker. B A A 30˚ 30˚ 100˚-120˚ 100˚-120˚ C C D x... C DIST. Surround back speaker distance should be set from a distance equal to the front speaker distance (A) to a distance 4.5 meters (15 feet) closer to your listening position (C). Likewise, the surround speakers ...
Operating Instructions
Page 20
... to section B and D. For other sound fields, speaker position is designed specifically for proper implementation of the surround effects in a setting contrary to the above the listening position, even if they are to the immediate left and right of the listening position, the surround...However, if the speakers are located high above explanation, we recommend that you playback multi channel surround encoded software and select the setting that provides a good sense of spaciousness and that the surround speakers would be located behind the listening position, but presentation remains ...
... to section B and D. For other sound fields, speaker position is designed specifically for proper implementation of the surround effects in a setting contrary to the above the listening position, even if they are to the immediate left and right of the listening position, the surround...However, if the speakers are located high above explanation, we recommend that you playback multi channel surround encoded software and select the setting that provides a good sense of spaciousness and that the surround speakers would be located behind the listening position, but presentation remains ...
Operating Instructions
Page 21
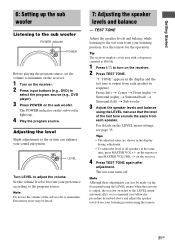
... turn MASTER VOLUME -/+ on the sub woofer lights up the sub woofer Listening to the sub woofer POWER indicator POWER Before playing the program source, set the volume of all speakers at 800 Hz. 1 Press ?/1 to the test tone from each speaker in sequence. Front (left) t Center t Front (right...menu so that the level of the test tone sounds the same from your preference according to best suit your listening position. Getting Started 6: Setting up . 4 Play the program source. Use the remote for the operation. For details on the sub woofer. Extraneous noise may be made...
... turn MASTER VOLUME -/+ on the sub woofer lights up the sub woofer Listening to the sub woofer POWER indicator POWER Before playing the program source, set the volume of all speakers at 800 Hz. 1 Press ?/1 to the test tone from each speaker in sequence. Front (left) t Center t Front (right...menu so that the level of the test tone sounds the same from your preference according to best suit your listening position. Getting Started 6: Setting up . 4 Play the program source. Use the remote for the operation. For details on the sub woofer. Extraneous noise may be made...
Operating Instructions
Page 22
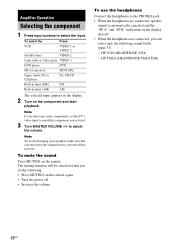
Amplifier Operation Selecting the component 1 Press input buttons to adjust the volume. Note If you select any video components, set the TV's video input to the PHONES jack. • When the headphones are connected, you can select only the following . • Press MUTING on the ...
Amplifier Operation Selecting the component 1 Press input buttons to adjust the volume. Note If you select any video components, set the TV's video input to the PHONES jack. • When the headphones are connected, you can select only the following . • Press MUTING on the ...
Operating Instructions
Page 23
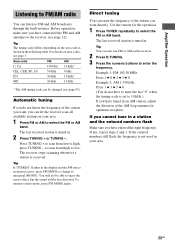
... have connected the FM and AM antennas to enter the frequency. If you do not have to enter the last "0" when the tuning scale is set to monaural (MONO). Automatic tuning If you cannot tune in the following table. The last received station is tuned in . 2 Press TUNING + or TUNING -. The...
... have connected the FM and AM antennas to enter the frequency. If you do not have to enter the last "0" when the tuning scale is set to monaural (MONO). Automatic tuning If you cannot tune in the following table. The last received station is tuned in . 2 Press TUNING + or TUNING -. The...
Operating Instructions
Page 24
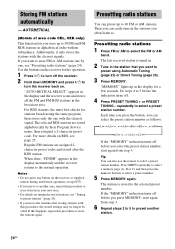
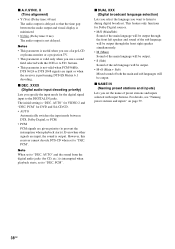
... tuner first checks for a few seconds. The selected RDS stations are assigned 2character preset codes and stored after storing stations with this procedure, the stored settings may no longer be valid. Notes • Do not press any button on RDS, see "Presetting radio stations" (page 24) . Press SHIFT repeatedly to select...
... tuner first checks for a few seconds. The selected RDS stations are assigned 2character preset codes and stored after storing stations with this procedure, the stored settings may no longer be valid. Notes • Do not press any button on RDS, see "Presetting radio stations" (page 24) . Press SHIFT repeatedly to select...
Operating Instructions
Page 28
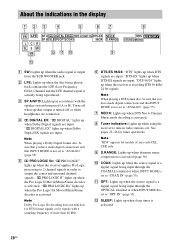
... of more than 48 kHz. Note "RDS" appears for signals with the speaker system being input through the OPTICAL terminal or when INPUT MODE is set to 2 channel signals in radio stations, etc. NEO:6 D.RANGE 9 RDS MEMORY STEREOMONO qd A SW: Lights up when the receiver applies Pro Logic ... activated (page 36). DIGITAL EX: "; Note When playing a DTS format disc, be sure that you have made digital connections and that INPUT MODE is not set to "ANALOG" (page 35). E ; See pages 23-26 for tuner operations. K OPT: Lights up in the display 12 3 4 5 67 8 SW LFE SP A ; ...
... of more than 48 kHz. Note "RDS" appears for signals with the speaker system being input through the OPTICAL terminal or when INPUT MODE is set to 2 channel signals in radio stations, etc. NEO:6 D.RANGE 9 RDS MEMORY STEREOMONO qd A SW: Lights up when the receiver applies Pro Logic ... activated (page 36). DIGITAL EX: "; Note When playing a DTS format disc, be sure that you have made digital connections and that INPUT MODE is not set to "ANALOG" (page 35). E ; See pages 23-26 for tuner operations. K OPT: Lights up in the display 12 3 4 5 67 8 SW LFE SP A ; ...
Operating Instructions
Page 31
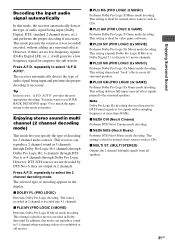
...In most appropriate decoding. AUTO" provides the most cases, "A.F.D. Press A.F.D. x DOLBY PL (PRO LOGIC) Performs Dolby Pro Logic decoding. This setting is ideal for normal stereo sources such as CDs. x PLIIX GM (PRO LOGIC IIx GAME) Performs Dolby Pro Logic IIx Game mode decoding.... x MULTI ST. (MULTI STEREO) Outputs the 2 channel left/right signals from all surround speakers. AUTO". This setting is ideal for video game softwares. This setting expands Dolby Pro Logic II Movie or Dolby Digital 5.1 to select "A.F.D. Enjoying stereo sound in Dolby Surround. x...
...In most appropriate decoding. AUTO" provides the most cases, "A.F.D. Press A.F.D. x DOLBY PL (PRO LOGIC) Performs Dolby Pro Logic decoding. This setting is ideal for normal stereo sources such as CDs. x PLIIX GM (PRO LOGIC IIx GAME) Performs Dolby Pro Logic IIx Game mode decoding.... x MULTI ST. (MULTI STEREO) Outputs the 2 channel left/right signals from all surround speakers. AUTO". This setting is ideal for video game softwares. This setting expands Dolby Pro Logic II Movie or Dolby Digital 5.1 to select "A.F.D. Enjoying stereo sound in Dolby Surround. x...

Operating Instructions
Page 32
... these three elements simultaneously. Selecting a sound field You can reproduce the sound characteristics of Sony Pictures Entertainment's dubbing studio in Hollywood. The CINEMA STUDIO EX modes consist of the following three elements. • Virtual Multi Dimension Creates 5 sets of virtual speakers from inside the screen like in theaters. • Cinema Studio Reverberation...
... these three elements simultaneously. Selecting a sound field You can reproduce the sound characteristics of Sony Pictures Entertainment's dubbing studio in Hollywood. The CINEMA STUDIO EX modes consist of the following three elements. • Virtual Multi Dimension Creates 5 sets of virtual speakers from inside the screen like in theaters. • Cinema Studio Reverberation...
Operating Instructions
Page 35
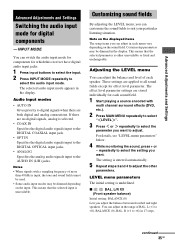
...is either unavailable or fixed and unchangeable. Certain setup parameters may be dimmed in 17 steps. L/R XX (Front speaker balance) Initial setting: BALANCE (0) Lets you can adjust the balance and level of BAL. This means that the selected parameter is input, the tone ...on the sound field. Adjusting the LEVEL menu You can customize the sound fields to +8), BALANCE (0), BAL. Advanced Adjustments and Settings Advanced Adjustments and Settings Switching the audio input mode for which this receiver have digital audio input jacks. 1 Press input buttons to select the input....
...is either unavailable or fixed and unchangeable. Certain setup parameters may be dimmed in 17 steps. L/R XX (Front speaker balance) Initial setting: BALANCE (0) Lets you can adjust the balance and level of BAL. This means that the selected parameter is input, the tone ...on the sound field. Adjusting the LEVEL menu You can customize the sound fields to +8), BALANCE (0), BAL. Advanced Adjustments and Settings Advanced Adjustments and Settings Switching the audio input mode for which this receiver have digital audio input jacks. 1 Press input buttons to select the input....
Operating Instructions
Page 36
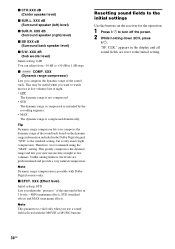
...(right) level) x SB XXX dB (Surround back speaker level) x S.W. Therefore, we recommend using the "MAX" setting. "SF. appears in 1 dB steps. XXX dB (Sub woofer level) Initial setting: 0 dB You can adjust from -10 dB to watch movies at low volumes late at low volumes. This greatly ...adjust the "presence" of the sound track. x D.RANGE COMP. XXX dB (Surround speaker (left) level) x SUR.R. XXX (Effect level) Initial setting: STD Lets you want to +10 dB in the display and all sound fields are predetermined and provide a very natural compression. MIN (minimum effect), STD...
...(right) level) x SB XXX dB (Surround back speaker level) x S.W. Therefore, we recommend using the "MAX" setting. "SF. appears in 1 dB steps. XXX dB (Sub woofer level) Initial setting: 0 dB You can adjust from -10 dB to watch movies at low volumes late at low volumes. This greatly ...adjust the "presence" of the sound track. x D.RANGE COMP. XXX dB (Surround speaker (left) level) x SUR.R. XXX (Effect level) Initial setting: STD Lets you want to +10 dB in the display and all sound fields are predetermined and provide a very natural compression. MIN (minimum effect), STD...
Operating Instructions
Page 37
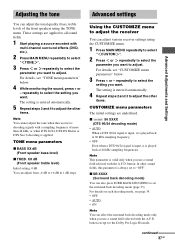
... "CUSTOMIZE menu parameters" below . 4 While monitoring the sound, press + or - repeatedly to adjust. Note This parameter is applied. These settings are underlined. For details, see page 34. • OFF • AUTO • ON Note You can select the surround back decoding mode... repeatedly to select the parameter you want to all sound fields. 1 Start playing a source encoded with the A.F.D. continued 37GB Advanced Adjustments and Settings The setting is played back at 96 kHz sampling frequency. • OFF Even when a DTS 96/24 signal is input, it is entered automatically....
... "CUSTOMIZE menu parameters" below . 4 While monitoring the sound, press + or - repeatedly to adjust. Note This parameter is applied. These settings are underlined. For details, see page 34. • OFF • AUTO • ON Note You can select the surround back decoding mode... repeatedly to select the parameter you want to all sound fields. 1 Start playing a source encoded with the A.F.D. continued 37GB Advanced Adjustments and Settings The setting is played back at 96 kHz sampling frequency. • OFF Even when a DTS 96/24 signal is input, it is entered automatically....
Operating Instructions
Page 38
...the time gap between DTS, Dolby Digital, or PCM. • PCM PCM signals are input or when the receiver is output. PCM". The initial setting is valid only when you want to listen to "DEC. x DUAL XXX (Digital broadcast language selection) Lets you select the language you use a ...Lets you use a large LCD or plasma monitor or a projection TV. • This parameter is "DEC. Notes • This parameter is useful when you set to "DEC. AUTO" for Dolby Digital sources. • M/S (Main/Sub) Sound of the main language will be output through the front left speaker and ...
...the time gap between DTS, Dolby Digital, or PCM. • PCM PCM signals are input or when the receiver is output. PCM". The initial setting is valid only when you want to listen to "DEC. x DUAL XXX (Digital broadcast language selection) Lets you select the language you use a ...Lets you use a large LCD or plasma monitor or a projection TV. • This parameter is "DEC. Notes • This parameter is useful when you set to "DEC. AUTO" for Dolby Digital sources. • M/S (Main/Sub) Sound of the main language will be output through the front left speaker and ...
Operating Instructions
Page 40
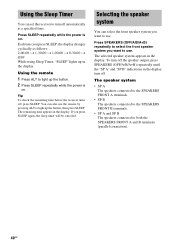
... the SPEAKERS FRONT A terminals. • SP B The speakers connected to the SPEAKERS FRONT B terminals. • SP A and SP B The speakers connected to use . You can set the receiver to turn off . Press SPEAKERS (OFF/A/B/A+B) repeatedly to select the front speaker system you press SLEEP, the display changes cyclically as follows: 2-00...
... the SPEAKERS FRONT A terminals. • SP B The speakers connected to the SPEAKERS FRONT B terminals. • SP A and SP B The speakers connected to use . You can set the receiver to turn off . Press SPEAKERS (OFF/A/B/A+B) repeatedly to select the front speaker system you press SLEEP, the display changes cyclically as follows: 2-00...
Operating Instructions
Page 42
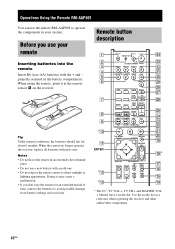
... .> 0/10 >10/11 12 SHIFT D.TUNING DISC ALT mM - wl wk wj wh wg wf wd ws wa w; qa ENTER *qs *qd TV ?/1 AV ?/1 ?/1 RM SET UP P SYSTEM STANDBY SLEEP VIDEO1 VIDEO2 VIDEO3 DVD AV1 AV2 MD/TAPE SA-CD/CD TUNER AUX MULTI CH 2CH A.F.D. ql qk* qj qh qg...
... .> 0/10 >10/11 12 SHIFT D.TUNING DISC ALT mM - wl wk wj wh wg wf wd ws wa w; qa ENTER *qs *qd TV ?/1 AV ?/1 ?/1 RM SET UP P SYSTEM STANDBY SLEEP VIDEO1 VIDEO2 VIDEO3 DVD AV1 AV2 MD/TAPE SA-CD/CD TUNER AUX MULTI CH 2CH A.F.D. ql qk* qj qh qg...
Operating Instructions
Page 43
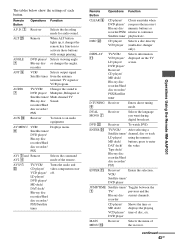
.../ Satellite tuner/ DVD player JUMP/TIME Satellite tuner/ Toggles between the 7 TV/ previous and the Blu-ray disc current channels. The tables below show the settings of the receiver. AV ?/1 ed TV/VCR/ Turns the audio and CD player/ video components on the TV LD player/ screen. LD player/ DVD player...
.../ Satellite tuner/ DVD player JUMP/TIME Satellite tuner/ Toggles between the 7 TV/ previous and the Blu-ray disc current channels. The tables below show the settings of the receiver. AV ?/1 ed TV/VCR/ Turns the audio and CD player/ video components on the TV LD player/ screen. LD player/ DVD player...


