

Limited Warranty (US Only)
Page 1
... customer instruction, installation, set up adjustments or signal reception problems. This warranty does not cover cosmetic damage or damage due to acts of God, accident, misuse, abuse, negligence, commercial use, or modification of, or to any authorized Sony service facility. This warranty is invalid if the factory applied serial number has been altered or removed from your convenience, Sony Electronics Inc. REPAIR OR REPLACEMENT AS...
... customer instruction, installation, set up adjustments or signal reception problems. This warranty does not cover cosmetic damage or damage due to acts of God, accident, misuse, abuse, negligence, commercial use, or modification of, or to any authorized Sony service facility. This warranty is invalid if the factory applied serial number has been altered or removed from your convenience, Sony Electronics Inc. REPAIR OR REPLACEMENT AS...
Operating Instructions (HT-DDW650)
Page 3
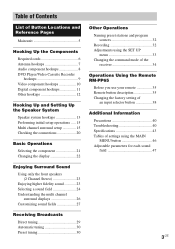
... List of Button Locations and Reference Pages Main unit 5 Hooking Up the Components Required cords 6 Antenna hookups 7 Audio component hookups 8 DVD Player/Video Cassette Recorder hookups 9 Video component hookups 10 Digital component hookups 11 Other hookups 12 Hooking Up and Setting Up the Speaker System Speaker system hookups 13 Performing initial setup operations ..... 15 Multi channel surround setup 15 Checking the connections 20 Basic Operations Selecting the component 21 Changing the display 22 Enjoying Surround Sound Using only the front speakers (2 Channel Stereo 23...
... List of Button Locations and Reference Pages Main unit 5 Hooking Up the Components Required cords 6 Antenna hookups 7 Audio component hookups 8 DVD Player/Video Cassette Recorder hookups 9 Video component hookups 10 Digital component hookups 11 Other hookups 12 Hooking Up and Setting Up the Speaker System Speaker system hookups 13 Performing initial setup operations ..... 15 Multi channel surround setup 15 Checking the connections 20 Basic Operations Selecting the component 21 Changing the display 22 Enjoying Surround Sound Using only the front speakers (2 Channel Stereo 23...
Operating Instructions (HT-DDW650)
Page 14
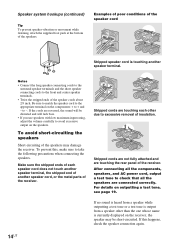
.... After connecting all the components, speakers, and AC power cord, output a test tone to avoid excessive output on the components: + to -. Be sure to match the speaker cord to the appropriate terminal on the speakers. Stripped cords are not fully attached and are reversed, the sound will lack bass. • If you use speakers with low maximum input rating, adjust the volume carefully to check that all the speakers are touching each speaker cord does...
.... After connecting all the components, speakers, and AC power cord, output a test tone to avoid excessive output on the components: + to -. Be sure to match the speaker cord to the appropriate terminal on the speakers. Stripped cords are not fully attached and are reversed, the sound will lack bass. • If you use speakers with low maximum input rating, adjust the volume carefully to check that all the speakers are touching each speaker cord does...
Operating Instructions (HT-DDW650)
Page 15
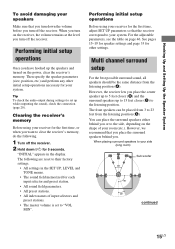
... shape of input selectors and preset stations. • The master volume is set up the speakers and turned on page 46. When placing surround speakers to the listening position. Performing initial setup operations Before using your system. For the adjustable parameters, see the table on the power, clear the receiver's memory. Hooking Up and Setting Up the Speaker System To avoid damaging your side (long room) B A A 45° Sub woofer C C 90...
... shape of input selectors and preset stations. • The master volume is set up the speakers and turned on page 46. When placing surround speakers to the listening position. Performing initial setup operations Before using your system. For the adjustable parameters, see the table on the power, clear the receiver's memory. Hooking Up and Setting Up the Speaker System To avoid damaging your side (long room) B A A 45° Sub woofer C C 90...
Operating Instructions (HT-DDW650)
Page 16
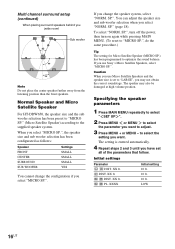
... the power, then turn on again while pressing MAIN MENU. (To reset to "MICRO SP.", do the same procedure.) Tip The setting for Micro Satellite Speaker (MICRO SP.) has been programmed to adjust. 3 Press MENU + or MENU - C DIST. XX ft. SL SR DIST. Multi channel surround setup (continued) When placing surround speakers behind you want to optimize the sound balance. to select the setting you (wide room) B A A 45° Sub woofer...
... the power, then turn on again while pressing MAIN MENU. (To reset to "MICRO SP.", do the same procedure.) Tip The setting for Micro Satellite Speaker (MICRO SP.) has been programmed to adjust. 3 Press MENU + or MENU - C DIST. XX ft. SL SR DIST. Multi channel surround setup (continued) When placing surround speakers behind you want to optimize the sound balance. to select the setting you (wide room) B A A 45° Sub woofer...
Operating Instructions (HT-DDW650)
Page 17
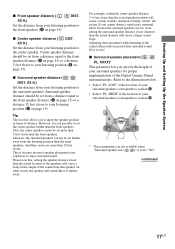
... speaker distance ( L R DIST. XX ft.) Set the distance from your surround speakers corresponds to the front speakers (A on page 15) to a distance 5 feet closer to input the speaker position in much better surround sound. Center speaker distance should be no more than 5 feet closer than the actual location of the speakers will cause a delay in the output of being "inside" the screen. Refer to enjoy surround sound. LOW...
... speaker distance ( L R DIST. XX ft.) Set the distance from your surround speakers corresponds to the front speakers (A on page 15) to a distance 5 feet closer to input the speaker position in much better surround sound. Center speaker distance should be no more than 5 feet closer than the actual location of the speakers will cause a delay in the output of being "inside" the screen. Refer to enjoy surround sound. LOW...
Operating Instructions (HT-DDW650)
Page 19
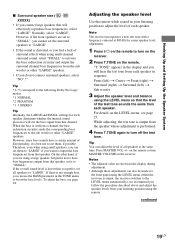
... using multi channel surround sound, select "SMALL" to activate the bass redirection circuitry and output the surround channel bass frequencies from the sub woofer or other "LARGE" speakers. • If you do not connect surround speakers, select "NO".*3 Tip *1-*3 correspond to the following Dolby Pro Logic modes *1 NORMAL *2 PHANTOM *3 3 STEREO Tip Internally, the LARGE and SMALL settings for easier speaker level adjustment. 1 Press ?/1 on the LEVEL menu, see page 28. On the other "LARGE" speakers. For details on the remote...
... using multi channel surround sound, select "SMALL" to activate the bass redirection circuitry and output the surround channel bass frequencies from the sub woofer or other "LARGE" speakers. • If you do not connect surround speakers, select "NO".*3 Tip *1-*3 correspond to the following Dolby Pro Logic modes *1 NORMAL *2 PHANTOM *3 3 STEREO Tip Internally, the LARGE and SMALL settings for easier speaker level adjustment. 1 Press ?/1 on the LEVEL menu, see page 28. On the other "LARGE" speakers. For details on the remote...
Operating Instructions (HT-DDW650)
Page 20
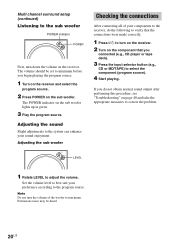
... sub woofer Checking the connections After connecting all of the woofer to minimum before you connected (e.g., CD player or tape deck). 3 Press the input selector button (e.g., CD or MD/TAPE) to adjust the volume. LEVEL 1 Rotate LEVEL to select the component (program source). 4 Start playing. Multi channel surround setup (continued) Listening to correct the problem. If you do the following to verify that you begin playing the program source. 1 Turn on the receiver and select the program source. 2 Press POWER on the sub woofer lights...
... sub woofer Checking the connections After connecting all of the woofer to minimum before you connected (e.g., CD player or tape deck). 3 Press the input selector button (e.g., CD or MD/TAPE) to adjust the volume. LEVEL 1 Rotate LEVEL to select the component (program source). 4 Start playing. Multi channel surround setup (continued) Listening to correct the problem. If you do the following to verify that you begin playing the program source. 1 Turn on the receiver and select the program source. 2 Press POWER on the sub woofer lights...
Operating Instructions (HT-DDW650)
Page 21
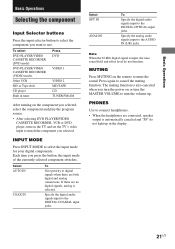
... digital and analog connections. The muting function is input, the tone, sound field and effect level do not light up . Basic Operations Basic Operations Selecting the component Input Selector buttons Press the input selector button to select the component you want to turn the volume up in tuner Press DVD VIDEO 1 VIDEO 2 MD/TAPE CD TUNER FM/AM After turning on the component you selected, select the component and play the program source. • After selecting DVD PLAYER/VIDEO CASSETTE RECORDER, VCR or DVD player, turn on or turn the MASTER VOLUME to use...
... digital and analog connections. The muting function is input, the tone, sound field and effect level do not light up . Basic Operations Basic Operations Selecting the component Input Selector buttons Press the input selector button to select the component you want to turn the volume up in tuner Press DVD VIDEO 1 VIDEO 2 MD/TAPE CD TUNER FM/AM After turning on the component you selected, select the component and play the program source. • After selecting DVD PLAYER/VIDEO CASSETTE RECORDER, VCR or DVD player, turn on or turn the MASTER VOLUME to use...
Operating Instructions (HT-DDW650)
Page 23
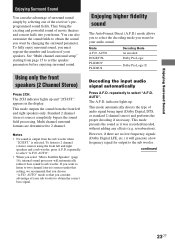
... 23US To fully enjoy surround sound, you can take advantage of the receiver's preprogrammed sound fields. Standard 2 channel (stereo) sources completely bypass the sound field processing. Notes • No sound is selected. repeatedly to select "A.F.D. AUTO". • When you want for output to the sub woofer. To listen to 2 channel (stereo) sources using the front left and right speakers only. The 2CH indicator lights up . Mode A.F.D. Multi channel surround formats are no low frequency signals (Dolby Digital LFE, etc.) it was...
... 23US To fully enjoy surround sound, you can take advantage of the receiver's preprogrammed sound fields. Standard 2 channel (stereo) sources completely bypass the sound field processing. Notes • No sound is selected. repeatedly to select "A.F.D. AUTO". • When you want for output to the sub woofer. To listen to 2 channel (stereo) sources using the front left and right speakers only. The 2CH indicator lights up . Mode A.F.D. Multi channel surround formats are no low frequency signals (Dolby Digital LFE, etc.) it was...
Operating Instructions (HT-DDW650)
Page 25
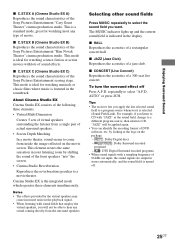
... theater, sound seems to a program source whenever it is featured in the display. Cinema Studio EX is turned off Press A.F.D. To turn the surround effect off . 25US This is a standard mode, great for watching musicals or classic films where music is selected (Sound Field Link). x JAZZ (Jazz Club) Reproduces the acoustics of movie. x HALL Reproduces the acoustics of 96 kHz are input, the sound signals are output in...
... theater, sound seems to a program source whenever it is featured in the display. Cinema Studio EX is turned off Press A.F.D. To turn the surround effect off . 25US This is a standard mode, great for watching musicals or classic films where music is selected (Sound Field Link). x JAZZ (Jazz Club) Reproduces the acoustics of movie. x HALL Reproduces the acoustics of 96 kHz are input, the sound signals are output in...
Operating Instructions (HT-DDW650)
Page 26
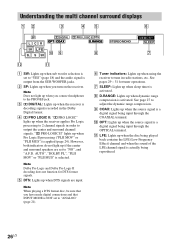
... audio signal is output from the SUB WOOFER jacks. 2 SP: Lights up when you turn on the receiver. Note Does not light up when you have made digital connections and that you connect headphones to adjust the dynamic range compression. 9 COAX: Lights up when the source signal is a digital signal being input through the OPTICAL terminal. Note When playing a DTS format disc, be sure that INPUT MODE is NOT set to "ANALOG" (page 21). 6 Tuner indicators: Lights up when using...
... audio signal is output from the SUB WOOFER jacks. 2 SP: Lights up when you turn on the receiver. Note Does not light up when you have made digital connections and that you connect headphones to adjust the dynamic range compression. 9 COAX: Lights up when the source signal is a digital signal being input through the OPTICAL terminal. Note When playing a DTS format disc, be sure that INPUT MODE is NOT set to "ANALOG" (page 21). 6 Tuner indicators: Lights up when using...
Operating Instructions (HT-DDW650)
Page 30
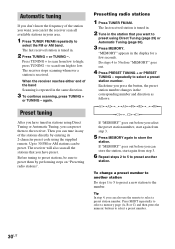
... stations in your area. 1 Press TUNER FM/AM repeatedly to select a preset station number. The last received station is tuned in. 2 Tune in the station that you have tuned in stations using Direct Tuning or Automatic Tuning, you can also use the remote to select the FM or AM band. If "MEMORY" goes out before you can let the receiver scan all the stations that you can preset them by entering its 2-character preset code using Direct Tuning...
... stations in your area. 1 Press TUNER FM/AM repeatedly to select a preset station number. The last received station is tuned in. 2 Tune in the station that you have tuned in stations using Direct Tuning or Automatic Tuning, you can also use the remote to select the FM or AM band. If "MEMORY" goes out before you can let the receiver scan all the stations that you can preset them by entering its 2-character preset code using Direct Tuning...
Operating Instructions (HT-DDW650)
Page 32
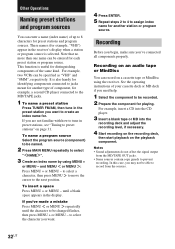
... CD player connected to the MD/TAPE jacks. 1 To name a preset station Press TUNER FM/AM, then tune in the receiver's display when a station or program source is useful for distinguishing components of up to select " NAME ". 3 Create an index name by using the receiver. This function is selected. It is also handy for identifying components connected to be recorded. 2 Prepare the component for playing. Recording Before you begin, make sure you need help. 1 Select the component to jacks...
... CD player connected to the MD/TAPE jacks. 1 To name a preset station Press TUNER FM/AM, then tune in the receiver's display when a station or program source is useful for distinguishing components of up to select " NAME ". 3 Create an index name by using the receiver. This function is selected. It is also handy for identifying components connected to be recorded. 2 Prepare the component for playing. Recording Before you begin, make sure you need help. 1 Select the component to jacks...
Operating Instructions (HT-DDW650)
Page 33
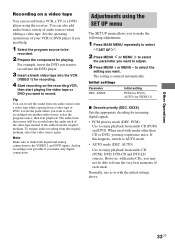
... setting PCM (for DVD), AUTO (for incoming digital signals. • PCM priority mode (DEC. You can also add audio from a variety of your VCR or DVD player if you need help. 1 Select the program source to be recorded. 2 Prepare the component for recording. 4 Start recording on a video tape You can record from a VCR, a TV or a DVD player using the SET UP menu The SET UP menu allows you to make the following adjustments. 1 Press MAIN MENU repeatedly to select " SET...
... setting PCM (for DVD), AUTO (for incoming digital signals. • PCM priority mode (DEC. You can also add audio from a variety of your VCR or DVD player if you need help. 1 Select the program source to be recorded. 2 Prepare the component for recording. 4 Start recording on a video tape You can record from a VCR, a TV or a DVD player using the SET UP menu The SET UP menu allows you to make the following adjustments. 1 Press MAIN MENU repeatedly to select " SET...
Operating Instructions (HT-DDW650)
Page 35
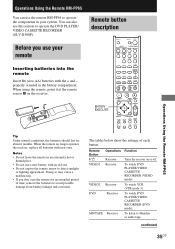
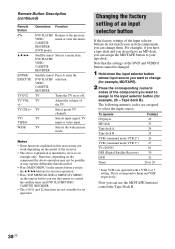
...-D300P). Remote button description ENTER/ EXECUTE TV ?/1 AV ?/1 ?/1 SELECT SYSTEM STANDBY DVD VIDEO1 VIDEO2 MD/TAPE CD TUNER 2CH A.F.D. Notes • Do not leave the remote in an extremely hot or humid place. • Do not use your system. To watch VCR. (VTR mode 3) To watch DVD PLAYER/VIDEO CASSETTE RECORDER (VIDEO mode). To listen to operate the components in the battery compartment. ANT MODE T.TONE 1 2 4 5 AUDIO 3 PRESET/ CH/D.SKIP...
...-D300P). Remote button description ENTER/ EXECUTE TV ?/1 AV ?/1 ?/1 SELECT SYSTEM STANDBY DVD VIDEO1 VIDEO2 MD/TAPE CD TUNER 2CH A.F.D. Notes • Do not leave the remote in an extremely hot or humid place. • Do not use your system. To watch VCR. (VTR mode 3) To watch DVD PLAYER/VIDEO CASSETTE RECORDER (VIDEO mode). To listen to operate the components in the battery compartment. ANT MODE T.TONE 1 2 4 5 AUDIO 3 PRESET/ CH/D.SKIP...
Operating Instructions (HT-DDW650)
Page 36
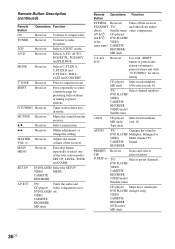
...radio station or tuning to preset stations and with "D.TUNING" for presetting radio stations or tuning to compact disc. TUNER Receiver To listen to output test tone. mode. A.F.D. T.TONE Receiver Press to radio programs. 2CH Receiver Selects 2CH ST. Adjusts the master volume of the four cursor modes: SET UP, LEVEL, TONE and NAME. RECORDER PRESET/ Receiver Scans and selects CH/ preset stations. Remote Button Description (continued) Remote Button Operations Function CD Receiver To listen to preset stations. SET UP DVD PLAYER/ Select the SETUP VIDEO MENU...
...radio station or tuning to preset stations and with "D.TUNING" for presetting radio stations or tuning to compact disc. TUNER Receiver To listen to output test tone. mode. A.F.D. T.TONE Receiver Press to radio programs. 2CH Receiver Selects 2CH ST. Adjusts the master volume of the four cursor modes: SET UP, LEVEL, TONE and NAME. RECORDER PRESET/ Receiver Scans and selects CH/ preset stations. Remote Button Description (continued) Remote Button Operations Function CD Receiver To listen to preset stations. SET UP DVD PLAYER/ Select the SETUP VIDEO MENU...
Operating Instructions (HT-DDW650)
Page 38
... work depending on the model of the TV. The following numeric codes are assigned to the previous VIDEO menu or exits the menu. Adjust the volume of the receiver. • The above operation may not be changed. 1 Hold down the input selector button whose input source you use the V/v/B/b buttons for receiver operation. • Press TOP MENU/GUIDE or MENU/AV MENU on or off. Tape deck B). Remote Button Description (continued) Remote Button Operations Function O DVD PLAYER/ Returns to select the input source: To operate...
... work depending on the model of the TV. The following numeric codes are assigned to the previous VIDEO menu or exits the menu. Adjust the volume of the receiver. • The above operation may not be changed. 1 Hold down the input selector button whose input source you use the V/v/B/b buttons for receiver operation. • Press TOP MENU/GUIDE or MENU/AV MENU on or off. Tape deck B). Remote Button Description (continued) Remote Button Operations Function O DVD PLAYER/ Returns to select the input source: To operate...
Operating Instructions (HT-DDW650)
Page 40
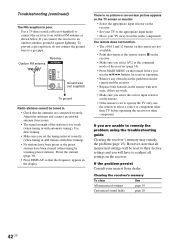
... while using the receiver, use any type of a short circuit ("PROTECT" flashes). There is no sound or only a very low-level sound no matter which component is selected. • Check that the speakers and components are connected securely and correctly. • Check that both the receiver and all the components are not connected. • The protective device on page 20 to 30 minutes. The operating voltage is connected to the wall...
... while using the receiver, use any type of a short circuit ("PROTECT" flashes). There is no sound or only a very low-level sound no matter which component is selected. • Check that the speakers and components are connected securely and correctly. • Check that both the receiver and all the components are not connected. • The protective device on page 20 to 30 minutes. The operating voltage is connected to the wall...
Operating Instructions (HT-DDW650)
Page 42
... wire (not supplied) To ground Radio stations cannot be reset to the appropriate input mode. • Move your nearest Sony dealer. If you will be tuned in the display. If you set to operate the TV only, use the V/v/B/b buttons for receiver operation. • Remove any obstacles in the path between the remote and the receiver. • Replace both batteries in AM stations with direct tuning). • No stations have been preset or the preset stations...
... wire (not supplied) To ground Radio stations cannot be reset to the appropriate input mode. • Move your nearest Sony dealer. If you will be tuned in the display. If you set to operate the TV only, use the V/v/B/b buttons for receiver operation. • Remove any obstacles in the path between the remote and the receiver. • Replace both batteries in AM stations with direct tuning). • No stations have been preset or the preset stations...


