Operating Instructions
Page 5
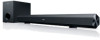
... into the system, unplug the system and have it checked by qualified personnel before operating it on the nameplate at the rear of the Sound Bar that have been specially treated (with adequate ventilation to disconnect the system from the wall outlet (mains). If color irregularity is wider than ...during operation, this system at the qualified service shop. On operation Before connecting other for a long time, be observed on the corners of the Sound Bar or the subwoofer. Place the system further away from the TV, VCR, or tape deck. Use caution when placing the system on ...
... into the system, unplug the system and have it checked by qualified personnel before operating it on the nameplate at the rear of the Sound Bar that have been specially treated (with adequate ventilation to disconnect the system from the wall outlet (mains). If color irregularity is wider than ...during operation, this system at the qualified service shop. On operation Before connecting other for a long time, be observed on the corners of the Sound Bar or the subwoofer. Place the system further away from the TV, VCR, or tape deck. Use caution when placing the system on ...
Operating Instructions
Page 9
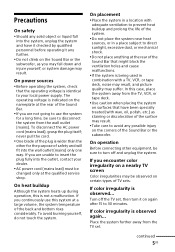
Getting Started Getting Started Unpacking Subwoofer (1) Sound Bar (1) Digital optical cord for a TV (1) AC power cord (mains lead) (1) Remote control (RM-ANU192) (1) Operating Instructions (1) Warranty (1) 9US
Getting Started Getting Started Unpacking Subwoofer (1) Sound Bar (1) Digital optical cord for a TV (1) AC power cord (mains lead) (1) Remote control (RM-ANU192) (1) Operating Instructions (1) Warranty (1) 9US
Operating Instructions
Page 10
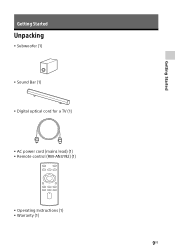
Index to parts and controls For more information, see the pages indicated in parentheses. Sound Bar SURROUND indicator (page 21) Input indicators (page 21) OPTICAL COAXIAL ANALOG BLUETOOTH indicator (page 17) 10US
Index to parts and controls For more information, see the pages indicated in parentheses. Sound Bar SURROUND indicator (page 21) Input indicators (page 21) OPTICAL COAXIAL ANALOG BLUETOOTH indicator (page 17) 10US
Operating Instructions
Page 11
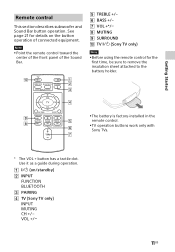
Remote control This section describes subwoofer and Sound Bar button operation. Getting Started The battery is factory-installed in the remote control. TV operation buttons work only with Sony TVs. * The VOL + button has a tactile dot. Use it as a guide during operation. Note ... of the front panel of connected equipment. on the button operation of the Sound Bar. TREBLE +/- BASS +/- VOL +*/ MUTING SURROUND TV (Sony TV only) Note Before using the remote control for the first ...
Remote control This section describes subwoofer and Sound Bar button operation. Getting Started The battery is factory-installed in the remote control. TV operation buttons work only with Sony TVs. * The VOL + button has a tactile dot. Use it as a guide during operation. Note ... of the front panel of connected equipment. on the button operation of the Sound Bar. TREBLE +/- BASS +/- VOL +*/ MUTING SURROUND TV (Sony TV only) Note Before using the remote control for the first ...
Operating Instructions
Page 12
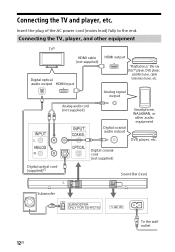
...™ player, DVD player, satellite tuner, cable television tuner, etc. Connecting the TV and player, etc. Digital optical cord (supplied)2) Digital coaxial cord (not supplied) Sound Bar (rear) Subwoofer 12US To the wall outlet Connecting the TV, player, and other audio equipment DVD player, etc. Insert the plug of the AC power...
...™ player, DVD player, satellite tuner, cable television tuner, etc. Connecting the TV and player, etc. Digital optical cord (supplied)2) Digital coaxial cord (not supplied) Sound Bar (rear) Subwoofer 12US To the wall outlet Connecting the TV, player, and other audio equipment DVD player, etc. Insert the plug of the AC power...
Operating Instructions
Page 13
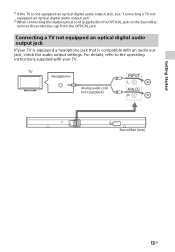
TV Headphone Analog audio cord (not supplied) Sound Bar (rear) 13US For details, refer to the operating instructions supplied with your TV is equipped a headphone jack that is not equipped an optical digital audio ... jack, see "Connecting a TV not equipped an optical digital audio output jack". 2) When connecting the digital optical cord (supplied) to the OPTICAL jack on the Sound Bar, remove the protective cap from the OPTICAL jack. Getting Started 1) If the TV is compatible with an audio out jack, check the audio output settings...
TV Headphone Analog audio cord (not supplied) Sound Bar (rear) 13US For details, refer to the operating instructions supplied with your TV is equipped a headphone jack that is not equipped an optical digital audio ... jack, see "Connecting a TV not equipped an optical digital audio output jack". 2) When connecting the digital optical cord (supplied) to the OPTICAL jack on the Sound Bar, remove the protective cap from the OPTICAL jack. Getting Started 1) If the TV is compatible with an audio out jack, check the audio output settings...

Operating Instructions
Page 14
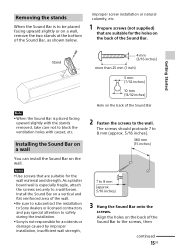
Note • When you select a place for the Sound Bar, do not block the heat ventilation on installing the subwoofer Place the subwoofer so that the rear panel is at least ten centimeters (four inches) away from the wall. 10 cm (4 in) 14US Installing the Sound Bar Installing the Sound Bar on a rack Installing the Sound Bar on a wall (page 15) Note on the rear panel of how to install the Sound Bar. Positioning the system The illustrations below are examples of the Sound Bar.
Note • When you select a place for the Sound Bar, do not block the heat ventilation on installing the subwoofer Place the subwoofer so that the rear panel is at least ten centimeters (four inches) away from the wall. 10 cm (4 in) 14US Installing the Sound Bar Installing the Sound Bar on a rack Installing the Sound Bar on a wall (page 15) Note on the rear panel of how to install the Sound Bar. Positioning the system The illustrations below are examples of the Sound Bar.
Operating Instructions
Page 15
...on the back of the Sound Bar to the wall. Align the holes on the back of the Sound Bar, as shown below. Install the Sound Bar on a vertical and flat reinforced area of the wall. Be sure to subcontract the installation to Sony dealers or licensed contractors ...and pay special attention to safety during the installation. Sony is not responsible for accidents or damage caused by improper installation, insufficient wall strength, Hole on the back of the Sound Bar. improper screw installation or natural calamity, etc. 1 Prepare screws (not ...
...on the back of the Sound Bar to the wall. Align the holes on the back of the Sound Bar, as shown below. Install the Sound Bar on a vertical and flat reinforced area of the wall. Be sure to subcontract the installation to Sony dealers or licensed contractors ...and pay special attention to safety during the installation. Sony is not responsible for accidents or damage caused by improper installation, insufficient wall strength, Hole on the back of the Sound Bar. improper screw installation or natural calamity, etc. 1 Prepare screws (not ...
Operating Instructions
Page 16
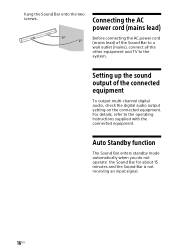
...audio, check the digital audio output setting on the connected equipment. Auto Standby function The Sound Bar enters standby mode automatically when you do not operate the Sound Bar for about 15 minutes and the Sound Bar is not receiving an input signal. 16US For details, refer to the system. Setting ...up the sound output of the Sound Bar to a wall outlet (mains), connect all the other equipment and TV...
...audio, check the digital audio output setting on the connected equipment. Auto Standby function The Sound Bar enters standby mode automatically when you do not operate the Sound Bar for about 15 minutes and the Sound Bar is not receiving an input signal. 16US For details, refer to the system. Setting ...up the sound output of the Sound Bar to a wall outlet (mains), connect all the other equipment and TV...
Operating Instructions
Page 17
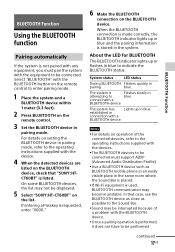
...may be interrupted because of the connected devices, refer to the operating instructions supplied with the equipment to be displayed. 5 Select "SONY:HT-CT60BT" on the remote control. 3 Set the BLUETOOTH device in pairing mode. System status LED status During BLUETOOTH Flashes quickly in ... to be connected must support A2DP (Advanced Audio Distribution Profile). Use a BLUETOOTH device such as possible to the Sound Bar. Sound may not be connected. About the LED for BLUETOOTH The BLUETOOTH indicator lights up in blue. BLUETOOTH Function Using the BLUETOOTH ...
...may be interrupted because of the connected devices, refer to the operating instructions supplied with the equipment to be displayed. 5 Select "SONY:HT-CT60BT" on the remote control. 3 Set the BLUETOOTH device in pairing mode. System status LED status During BLUETOOTH Flashes quickly in ... to be connected must support A2DP (Advanced Audio Distribution Profile). Use a BLUETOOTH device such as possible to the Sound Bar. Sound may not be connected. About the LED for BLUETOOTH The BLUETOOTH indicator lights up in blue. BLUETOOTH Function Using the BLUETOOTH ...
Operating Instructions
Page 19
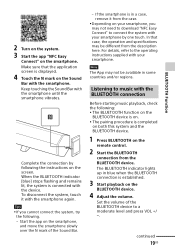
... again. Listening to connect the system with your smartphone by following . - Set the volume of the Sound Bar. - 2 Turn on the system. 3 Start the app "NFC Easy Connect" on the Sound Bar with the smartphone. Keep touching the Sound Bar with the device. Note The App may be available in blue when the BLUETOOTH connection is...
... again. Listening to connect the system with your smartphone by following . - Set the volume of the Sound Bar. - 2 Turn on the system. 3 Start the app "NFC Easy Connect" on the Sound Bar with the smartphone. Keep touching the Sound Bar with the device. Note The App may be available in blue when the BLUETOOTH connection is...
Operating Instructions
Page 21
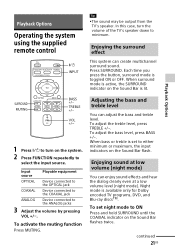
...57800; to turn the volume of the TV's speaker down to either minimum or maximum, the input indicators on the Sound Bar flashes twice. In this case, turn on the Sound Bar is toggled ON or OFF. Each time you press the button, surround mode is lit. To activate the muting ... ANALOG Device connected to ON Press and hold SURROUND until the COAXIAL indicator on the Sound Bar flash. Playback Options Operating the system using the supplied remote control INPUT Tip The sound may be output from the TV's speaker. When bass or treble is available only...
...57800; to turn the volume of the TV's speaker down to either minimum or maximum, the input indicators on the Sound Bar flashes twice. In this case, turn on the Sound Bar is toggled ON or OFF. Each time you press the button, surround mode is lit. To activate the muting ... ANALOG Device connected to ON Press and hold SURROUND until the COAXIAL indicator on the Sound Bar flash. Playback Options Operating the system using the supplied remote control INPUT Tip The sound may be output from the TV's speaker. When bass or treble is available only...
Operating Instructions
Page 22
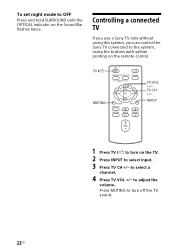
TV MUTING TV VOL +/ TV CH +/- Controlling a connected TV If you use a Sony TV only without using this system, you can control the Sony TV connected to the system, using the buttons with yellow printing on the TV. 2 Press INPUT to select input. 3 Press TV CH +/- Press MUTING to... +/ to turn on the remote control. INPUT 1 Press TV to OFF Press and hold SURROUND until the OPTICAL indicator on the Sound Bar flashes twice. To set night mode to turn off the TV...
TV MUTING TV VOL +/ TV CH +/- Controlling a connected TV If you use a Sony TV only without using this system, you can control the Sony TV connected to the system, using the buttons with yellow printing on the TV. 2 Press INPUT to select input. 3 Press TV CH +/- Press MUTING to... +/ to turn on the remote control. INPUT 1 Press TV to OFF Press and hold SURROUND until the OPTICAL indicator on the Sound Bar flashes twice. To set night mode to turn off the TV...
Operating Instructions
Page 25
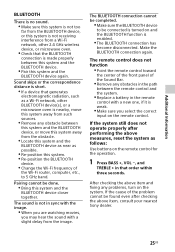
... device to 5 GHz band. The remote control does not function Point the remote control toward the center of the front panel of the Sound Bar. Remove any obstacles in the path between the remote control and the system. Replace a battery in sync with a slight delay... from the image. If the system still does not operate properly after checking the above item, consult your nearest Sony dealer. 25US Additional Information BLUETOOTH There is no sound. Make sure this system is not too far from the BLUETOOTH device, or this system is not receiving...
... device to 5 GHz band. The remote control does not function Point the remote control toward the center of the front panel of the Sound Bar. Remove any obstacles in the path between the remote control and the system. Replace a battery in sync with a slight delay... from the image. If the system still does not operate properly after checking the above item, consult your nearest Sony dealer. 25US Additional Information BLUETOOTH There is no sound. Make sure this system is not too far from the BLUETOOTH device, or this system is not receiving...
Operating Instructions
Page 26
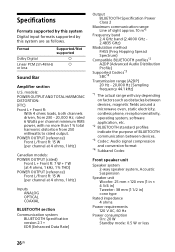
... loads, both channels driven, from 250 milliwatts to rated output. Format Dolby Digital Linear PCM 2ch 48 kHz or less Supported/Not supported Sound Bar Amplifier section U.S.
... loads, both channels driven, from 250 milliwatts to rated output. Format Dolby Digital Linear PCM 2ch 48 kHz or less Supported/Not supported Sound Bar Amplifier section U.S.


