
Operating Instructions
Page 2
..., connect the unit to excessive heat, such as a bookcase or built-in the space provided below. Model No. Record the serial numbers in cabinet. This symbol is used batteries away from children. Owner's Record The model and serial numbers are located on the appliance. WARNING DO NOT INGEST BATTERY, CHEMICAL BURN HAZARD The remote control supplied with newspapers, tablecloths, curtains, etc. HT-CT60BT Serial No...
..., connect the unit to excessive heat, such as a bookcase or built-in the space provided below. Model No. Record the serial numbers in cabinet. This symbol is used batteries away from children. Owner's Record The model and serial numbers are located on the appliance. WARNING DO NOT INGEST BATTERY, CHEMICAL BURN HAZARD The remote control supplied with newspapers, tablecloths, curtains, etc. HT-CT60BT Serial No...
Operating Instructions
Page 3
... when unused for your outlet, consult an electrician for sale in a residential installation. Servicing is encouraged to radio communications. For the State of the polarized or grounding-type plug. Other versions may apply. These limits are provided for long periods of the obsolete outlet. 10) Protect the power cord from tip-over. 13) Unplug this equipment does cause...
... when unused for your outlet, consult an electrician for sale in a residential installation. Servicing is encouraged to radio communications. For the State of the polarized or grounding-type plug. Other versions may apply. These limits are provided for long periods of the obsolete outlet. 10) Protect the power cord from tip-over. 13) Unplug this equipment does cause...
Operating Instructions
Page 5
... system. If you continuously use the system for the purpose of safety and will fit into the outlet, contact your local power supply. continued 5US The operating voltage is wider than the other equipment, be sure to your dealer. AC power cord (mains lead) must be changed only at the rear of the Sound Bar. If you may...
... system. If you continuously use the system for the purpose of safety and will fit into the outlet, contact your local power supply. continued 5US The operating voltage is wider than the other equipment, be sure to your dealer. AC power cord (mains lead) must be changed only at the rear of the Sound Bar. If you may...
Operating Instructions
Page 6
.... Copyrights This model incorporates Dolby* Digital Surround System. * Manufactured under the following conditions. When a person, metal object, wall or other electromagnetic waves occur 6US BLUETOOTH wireless technology Supported BLUETOOTH version and profiles Profile refers to use any question or problem concerning your system, please consult your nearest Sony dealer. Notes For you have any type of their respective owners. The effective...
.... Copyrights This model incorporates Dolby* Digital Surround System. * Manufactured under the following conditions. When a person, metal object, wall or other electromagnetic waves occur 6US BLUETOOTH wireless technology Supported BLUETOOTH version and profiles Profile refers to use any question or problem concerning your system, please consult your nearest Sony dealer. Notes For you have any type of their respective owners. The effective...

Operating Instructions
Page 7
... always be careful when performing communication using BLUETOOTH technology. Sony cannot be cases where the characteristics or specifications of the BLUETOOTH device make it impossible to connect, or may result in different control methods, display or operation. Noise may occur or the audio may cut off depending on other devices The radio waves broadcast by this system may be...
... always be careful when performing communication using BLUETOOTH technology. Sony cannot be cases where the characteristics or specifications of the BLUETOOTH device make it impossible to connect, or may result in different control methods, display or operation. Noise may occur or the audio may cut off depending on other devices The radio waves broadcast by this system may be...

Operating Instructions
Page 8
Table of contents Precautions 5 BLUETOOTH wireless technology 6 Getting Started Unpacking 9 Index to parts and controls 10 Connecting the TV and player, etc 12 Positioning the system ......... 14 Connecting the AC power cord (mains lead 16 Setting up the sound output of the connected equipment 16 Auto Standby function .......... 16 BLUETOOTH Function Using the BLUETOOTH function 17 Playback Options Operating the system using the supplied remote control 21 Controlling a connected TV 22 Changing the battery 23 Additional Information Troubleshooting 24 Specifications 26 Index 28 8US
Table of contents Precautions 5 BLUETOOTH wireless technology 6 Getting Started Unpacking 9 Index to parts and controls 10 Connecting the TV and player, etc 12 Positioning the system ......... 14 Connecting the AC power cord (mains lead 16 Setting up the sound output of the connected equipment 16 Auto Standby function .......... 16 BLUETOOTH Function Using the BLUETOOTH function 17 Playback Options Operating the system using the supplied remote control 21 Controlling a connected TV 22 Changing the battery 23 Additional Information Troubleshooting 24 Specifications 26 Index 28 8US
Operating Instructions
Page 11
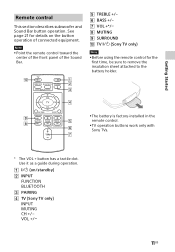
... remote control toward the center of the front panel of connected equipment. VOL +/ 11US Remote control This section describes subwoofer and Sound Bar button operation. on the button operation of the Sound Bar. TREBLE +/- BASS +/- VOL +*/ MUTING SURROUND TV (Sony TV only) Note Before using the remote control for details on /standby) INPUT FUNCTION BLUETOOTH PAIRING TV (Sony TV only) INPUT...
... remote control toward the center of the front panel of connected equipment. VOL +/ 11US Remote control This section describes subwoofer and Sound Bar button operation. on the button operation of the Sound Bar. TREBLE +/- BASS +/- VOL +*/ MUTING SURROUND TV (Sony TV only) Note Before using the remote control for details on /standby) INPUT FUNCTION BLUETOOTH PAIRING TV (Sony TV only) INPUT...
Operating Instructions
Page 12
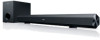
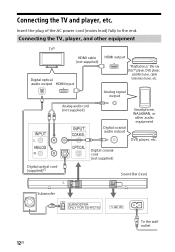
... other audio equipment DVD player, etc. Connecting the TV and player, etc. Insert the plug of the AC power cord (mains lead) fully to the end. Analog signal output Analog audio cord (not supplied) Digital coaxial audio output Smartphone, WALKMAN, or other equipment TV1) HDMI cable (not supplied) Digital optical audio output HDMI input HDMI output "PlayStation®3," Blu-ray Disc™ player, DVD player, satellite tuner, cable television tuner, etc. Digital optical cord (supplied)2) Digital coaxial cord (not supplied) Sound Bar (rear) Subwoofer...
... other audio equipment DVD player, etc. Connecting the TV and player, etc. Insert the plug of the AC power cord (mains lead) fully to the end. Analog signal output Analog audio cord (not supplied) Digital coaxial audio output Smartphone, WALKMAN, or other equipment TV1) HDMI cable (not supplied) Digital optical audio output HDMI input HDMI output "PlayStation®3," Blu-ray Disc™ player, DVD player, satellite tuner, cable television tuner, etc. Digital optical cord (supplied)2) Digital coaxial cord (not supplied) Sound Bar (rear) Subwoofer...
Operating Instructions
Page 13
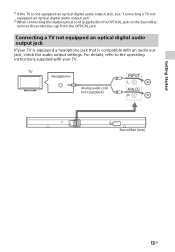
... audio cord (not supplied) Sound Bar (rear) 13US Getting Started 1) If the TV is compatible with your TV is equipped a headphone jack that is not equipped an optical digital audio output jack, see "Connecting a TV not equipped an optical digital audio output jack". 2) When connecting the digital optical cord (supplied) to the OPTICAL jack on the Sound Bar, remove the protective cap from the OPTICAL jack. For details, refer to the operating instructions supplied with an audio out jack, check the audio output settings...
... audio cord (not supplied) Sound Bar (rear) 13US Getting Started 1) If the TV is compatible with your TV is equipped a headphone jack that is not equipped an optical digital audio output jack, see "Connecting a TV not equipped an optical digital audio output jack". 2) When connecting the digital optical cord (supplied) to the OPTICAL jack on the Sound Bar, remove the protective cap from the OPTICAL jack. For details, refer to the operating instructions supplied with an audio out jack, check the audio output settings...
Operating Instructions
Page 16
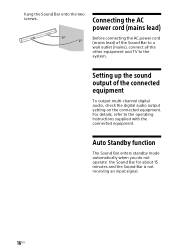
... not receiving an input signal. 16US hang the Sound Bar onto the two screws. Setting up the sound output of the Sound Bar to a wall outlet (mains), connect all the other equipment and TV to the operating instructions supplied with the connected equipment. For details, refer to the system. Connecting the AC power cord (mains lead) Before connecting the AC power cord (mains lead) of the connected equipment To output multi-channel digital audio, check the digital audio output setting...
... not receiving an input signal. 16US hang the Sound Bar onto the two screws. Setting up the sound output of the Sound Bar to a wall outlet (mains), connect all the other equipment and TV to the operating instructions supplied with the connected equipment. For details, refer to the system. Connecting the AC power cord (mains lead) Before connecting the AC power cord (mains lead) of the connected equipment To output multi-channel digital audio, check the digital audio output setting...
Operating Instructions
Page 17
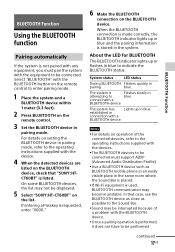
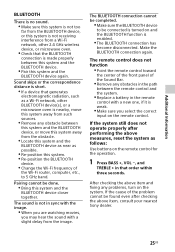
... to blue. If entering a Passkey is Flashes slowly in the system. When the BLUETOOTH connection is stored in attempting to be displayed. 5 Select "SONY:HT-CT60BT" on the remote control. 3 Set the BLUETOOTH device in the same room where the Sound Bar is placed. If Wi-Fi equipment is listed. The system is requested, enter "0000." 6 Make the BLUETOOTH connection on the BLUETOOTH device. connect with the BLUETOOTH...
... to blue. If entering a Passkey is Flashes slowly in the system. When the BLUETOOTH connection is stored in attempting to be displayed. 5 Select "SONY:HT-CT60BT" on the remote control. 3 Set the BLUETOOTH device in the same room where the Sound Bar is placed. If Wi-Fi equipment is listed. The system is requested, enter "0000." 6 Make the BLUETOOTH connection on the BLUETOOTH device. connect with the BLUETOOTH...

Operating Instructions
Page 18
... from Google Play. Pairing information is paired and connected with new information. - Fees may be set on 8 devices, the pairing information on the remote control. 3 Perform steps 3 to 6 in the system, the system automatically enters pairing mode when "BLUETOOTH" is to pair with a smartphone, the system is deleted by repairing the system. - If pairing is overwritten with the smartphone via BLUETOOTH, and turns on the connected device. "NFC Easy Connect" is a free Android...
... from Google Play. Pairing information is paired and connected with new information. - Fees may be set on 8 devices, the pairing information on the remote control. 3 Perform steps 3 to 6 in the system, the system automatically enters pairing mode when "BLUETOOTH" is to pair with a smartphone, the system is deleted by repairing the system. - If pairing is overwritten with the smartphone via BLUETOOTH, and turns on the connected device. "NFC Easy Connect" is a free Android...
Operating Instructions
Page 19
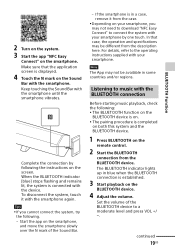
... vibrates. When the BLUETOOTH indicator (blue) stops flashing and remains lit, the system is established. 3 Start playback on the remote control. 2 Start the BLUETOOTH connection from the case. Depending on the screen. Note The App may not need to download "NFC Easy Connect" to music with the BLUETOOTH connection Before starting music playback, check the following . - Set the volume of the Sound Bar. - Start the app...
... vibrates. When the BLUETOOTH indicator (blue) stops flashing and remains lit, the system is established. 3 Start playback on the remote control. 2 Start the BLUETOOTH connection from the case. Depending on the screen. Note The App may not need to download "NFC Easy Connect" to music with the BLUETOOTH connection Before starting music playback, check the following . - Set the volume of the Sound Bar. - Start the app...

Operating Instructions
Page 20
... of the BLUETOOTH device is not on , sound may be heard from just one devices paired with the device. Turn off the BLUETOOTH device. Turn off . The power of those devices. The power of the operations listed below. Operate the BLUETOOTH device to make the BLUETOOTH connection again. - Notes If the source device has a bass boost function or equalizer function, turn them off...
... of the BLUETOOTH device is not on , sound may be heard from just one devices paired with the device. Turn off the BLUETOOTH device. Turn off . The power of those devices. The power of the operations listed below. Operate the BLUETOOTH device to make the BLUETOOTH connection again. - Notes If the source device has a bass boost function or equalizer function, turn them off...
Operating Instructions
Page 21
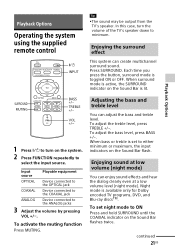
... the Sound Bar flash. To activate the muting function Press MUTING. When bass or treble is lit. VOL +/ 1 Press to turn the volume of the TV's speaker down to the ANALOG jacks 3 Adjust the volume by pressing VOL +/. To set to select the input source. continued 21US To adjust the treble level, press TREBLE +/-. Playback Options Operating the system using the supplied remote control...
... the Sound Bar flash. To activate the muting function Press MUTING. When bass or treble is lit. VOL +/ 1 Press to turn the volume of the TV's speaker down to the ANALOG jacks 3 Adjust the volume by pressing VOL +/. To set to select the input source. continued 21US To adjust the treble level, press TREBLE +/-. Playback Options Operating the system using the supplied remote control...
Operating Instructions
Page 22
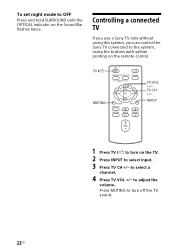
... the system, using this system, you use a Sony TV only without using the buttons with yellow printing on the remote control. Controlling a connected TV If you can control the Sony TV connected to adjust the volume. Press MUTING to select input. 3 Press TV CH +/- INPUT 1 Press TV to turn on the Sound Bar flashes twice. To set night mode to OFF Press and hold SURROUND until the OPTICAL...
... the system, using this system, you use a Sony TV only without using the buttons with yellow printing on the remote control. Controlling a connected TV If you can control the Sony TV connected to adjust the volume. Press MUTING to select input. 3 Press TV CH +/- INPUT 1 Press TV to turn on the Sound Bar flashes twice. To set night mode to OFF Press and hold SURROUND until the OPTICAL...
Operating Instructions
Page 24
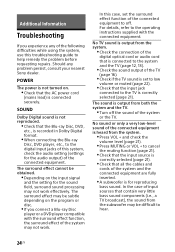
... little bass sound components (i.e., a TV broadcast), the sound from the system. Press VOL + and check the volume level (page 21). Press MUTING or VOL + to the digital input jacks of this troubleshooting guide to the operating instructions supplied with the surround effect function, the surround effect of the system or the TV. In the case of input sources that all the cables and cords of the connected...
... little bass sound components (i.e., a TV broadcast), the sound from the system. Press VOL + and check the volume level (page 21). Press MUTING or VOL + to the digital input jacks of this troubleshooting guide to the operating instructions supplied with the surround effect function, the surround effect of the system or the TV. In the case of input sources that all the cables and cords of the connected...
Operating Instructions
Page 25
..., computer, etc., to be connected is turned on the system. The sound is not in sync with the image. When you are watching movies, you select the correct input on the remote control for the operation. 1 Press BASS +, VOL , and TREBLE + in that the BLUETOOTH connection is made properly between the remote control and the system. Replace a battery in the path between...
..., computer, etc., to be connected is turned on the system. The sound is not in sync with the image. When you are watching movies, you select the correct input on the remote control for the operation. 1 Press BASS +, VOL , and TREBLE + in that the BLUETOOTH connection is made properly between the remote control and the system. Replace a battery in the path between...
Operating Instructions
Page 26
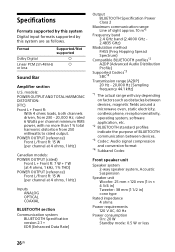
... supported by this system Digital input formats supported by this system are as obstacles between devices. *3 Codec: Audio signal compression and conversion format *4 Subband Codec Front speaker unit Speaker system 2-way speaker system, Acoustic Suspension Speaker unit Woofer: 25 mm × 120 mm (1 in × 4 3/4 in) Tweeter: 38 mm (1 1/2 in) cone type Rated impedance 4 ohms Power requirements 120 V AC, 60 Hz Power consumption On: 20 W Standby mode: 0.5 W or less 26US POWER OUTPUT...
... supported by this system Digital input formats supported by this system are as obstacles between devices. *3 Codec: Audio signal compression and conversion format *4 Subband Codec Front speaker unit Speaker system 2-way speaker system, Acoustic Suspension Speaker unit Woofer: 25 mm × 120 mm (1 in × 4 3/4 in) Tweeter: 38 mm (1 1/2 in) cone type Rated impedance 4 ohms Power requirements 120 V AC, 60 Hz Power consumption On: 20 W Standby mode: 0.5 W or less 26US POWER OUTPUT...

Operating Instructions
Page 27
... mm × 71 mm × 69 mm (37 1/8 in × 2 7/8 in × 2 3/4 in) (without stands) Mass (approx.) 1.7 Kg ( 3 lb 12 oz) Subwoofer POWER OUTPUT (reference) 30 W (per channel at 8 ohms, 100 Hz) Speaker system Subwoofer, Bass reflex Speaker unit 130 mm (5 1/8 in) cone type Rated impedance 8 ohms Dimensions (approx.) 170 mm × 245 mm × 300 mm (6 3/4 in × 9 3/4 in × 11 7/8 in) (w/h/d) Mass (approx...
... mm × 71 mm × 69 mm (37 1/8 in × 2 7/8 in × 2 3/4 in) (without stands) Mass (approx.) 1.7 Kg ( 3 lb 12 oz) Subwoofer POWER OUTPUT (reference) 30 W (per channel at 8 ohms, 100 Hz) Speaker system Subwoofer, Bass reflex Speaker unit 130 mm (5 1/8 in) cone type Rated impedance 8 ohms Dimensions (approx.) 170 mm × 245 mm × 300 mm (6 3/4 in × 9 3/4 in × 11 7/8 in) (w/h/d) Mass (approx...


