Operating Instructions
Page 5
... you encounter color irregularity on a nearby TV screen Color irregularities may result. Take care to avoid any possible injury on the corners of the Sound Bar that the operating voltage is identical to your dealer. AC power cord (mains lead) must be sure to turn it on again after 15... dust, or mechanical shock. Do not place anything at the rear of TV sets. The operating voltage is indicated on certain types of the Sound Bar. If you are not going to insert the plug fully into the wall outlet (mains) only one way. If you are unable to use...
... you encounter color irregularity on a nearby TV screen Color irregularities may result. Take care to avoid any possible injury on the corners of the Sound Bar that the operating voltage is identical to your dealer. AC power cord (mains lead) must be sure to turn it on again after 15... dust, or mechanical shock. Do not place anything at the rear of TV sets. The operating voltage is indicated on certain types of the Sound Bar. If you are not going to insert the plug fully into the wall outlet (mains) only one way. If you are unable to use...
Operating Instructions
Page 9
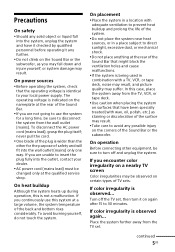
Getting Started Getting Started Unpacking Subwoofer (1) Sound Bar (1) Digital optical cord for a TV (1) AC power cord (mains lead) (1) Remote control (RM-ANU192) (1) Operating Instructions (1) Warranty (1) 9US
Getting Started Getting Started Unpacking Subwoofer (1) Sound Bar (1) Digital optical cord for a TV (1) AC power cord (mains lead) (1) Remote control (RM-ANU192) (1) Operating Instructions (1) Warranty (1) 9US
Operating Instructions
Page 10
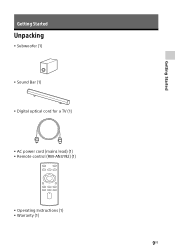
Sound Bar SURROUND indicator (page 21) Input indicators (page 21) OPTICAL COAXIAL ANALOG BLUETOOTH indicator (page 17) 10US Index to parts and controls For more information, see the pages indicated in parentheses.
Sound Bar SURROUND indicator (page 21) Input indicators (page 21) OPTICAL COAXIAL ANALOG BLUETOOTH indicator (page 17) 10US Index to parts and controls For more information, see the pages indicated in parentheses.
Operating Instructions
Page 11
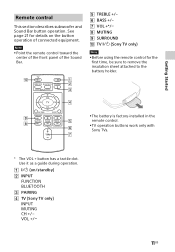
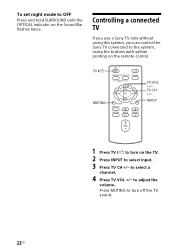
...the remote control. TV operation buttons work only with Sony TVs. * The VOL + button has a tactile dot. Use it as a guide during operation. Note Point the remote control toward the center of the front panel of the Sound Bar. TREBLE +/- BASS +/- ...VOL +*/ MUTING SURROUND TV (Sony TV only) Note Before using the remote control for details on /standby...
...the remote control. TV operation buttons work only with Sony TVs. * The VOL + button has a tactile dot. Use it as a guide during operation. Note Point the remote control toward the center of the front panel of the Sound Bar. TREBLE +/- BASS +/- ...VOL +*/ MUTING SURROUND TV (Sony TV only) Note Before using the remote control for details on /standby...
Operating Instructions
Page 12
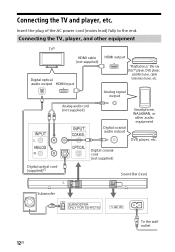
... the TV, player, and other audio equipment DVD player, etc. Connecting the TV and player, etc. Digital optical cord (supplied)2) Digital coaxial cord (not supplied) Sound Bar (rear) Subwoofer 12US To the wall outlet Analog signal output Analog audio cord (not supplied) Digital coaxial audio output Smartphone, WALKMAN, or other equipment TV1...
... the TV, player, and other audio equipment DVD player, etc. Connecting the TV and player, etc. Digital optical cord (supplied)2) Digital coaxial cord (not supplied) Sound Bar (rear) Subwoofer 12US To the wall outlet Analog signal output Analog audio cord (not supplied) Digital coaxial audio output Smartphone, WALKMAN, or other equipment TV1...
Operating Instructions
Page 13
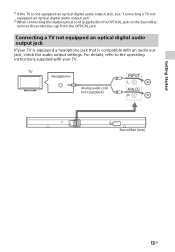
TV Headphone Analog audio cord (not supplied) Sound Bar (rear) 13US Getting Started 1) If the TV is compatible with your TV is equipped a headphone jack that is not equipped an optical digital audio output ... audio output settings. Connecting a TV not equipped an optical digital audio output jack If your TV. For details, refer to the OPTICAL jack on the Sound Bar, remove the protective cap from the OPTICAL jack.
TV Headphone Analog audio cord (not supplied) Sound Bar (rear) 13US Getting Started 1) If the TV is compatible with your TV is equipped a headphone jack that is not equipped an optical digital audio output ... audio output settings. Connecting a TV not equipped an optical digital audio output jack If your TV. For details, refer to the OPTICAL jack on the Sound Bar, remove the protective cap from the OPTICAL jack.

Operating Instructions
Page 14
Positioning the system The illustrations below are examples of the Sound Bar. Note • When you select a place for the Sound Bar, do not block the heat ventilation on installing the subwoofer Place the subwoofer so that the rear panel is at least ten centimeters (four inches) away from the wall. 10 cm (4 in) 14US Installing the Sound Bar Installing the Sound Bar on a rack Installing the Sound Bar on a wall (page 15) Note on the rear panel of how to install the Sound Bar.
Positioning the system The illustrations below are examples of the Sound Bar. Note • When you select a place for the Sound Bar, do not block the heat ventilation on installing the subwoofer Place the subwoofer so that the rear panel is at least ten centimeters (four inches) away from the wall. 10 cm (4 in) 14US Installing the Sound Bar Installing the Sound Bar on a rack Installing the Sound Bar on a wall (page 15) Note on the rear panel of how to install the Sound Bar.
Operating Instructions
Page 15
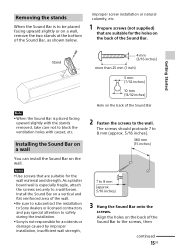
...by improper installation, insufficient wall strength, Hole on the back of the Sound Bar. Install the Sound Bar on a vertical and flat reinforced area of the wall. Be sure to subcontract the installation to Sony dealers or licensed contractors and pay special attention to safety during the ...installation. Sony is not responsible for the holes on the back of the Sound Bar, as shown below. Removing the stands When the Sound Bar is to a wall beam. As a plaster board wall is placed facing ...
...by improper installation, insufficient wall strength, Hole on the back of the Sound Bar. Install the Sound Bar on a vertical and flat reinforced area of the wall. Be sure to subcontract the installation to Sony dealers or licensed contractors and pay special attention to safety during the ...installation. Sony is not responsible for the holes on the back of the Sound Bar, as shown below. Removing the stands When the Sound Bar is to a wall beam. As a plaster board wall is placed facing ...
Operating Instructions
Page 16
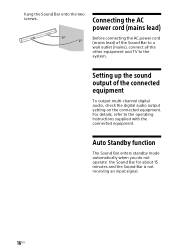
... the operating instructions supplied with the connected equipment. hang the Sound Bar onto the two screws. For details, refer to the system. Auto Standby function The Sound Bar enters standby mode automatically when you do not operate the Sound Bar for about 15 minutes and the Sound Bar is not receiving an input signal. 16US Connecting the AC...
... the operating instructions supplied with the connected equipment. hang the Sound Bar onto the two screws. For details, refer to the system. Auto Standby function The Sound Bar enters standby mode automatically when you do not operate the Sound Bar for about 15 minutes and the Sound Bar is not receiving an input signal. 16US Connecting the AC...
Operating Instructions
Page 17
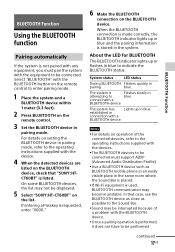
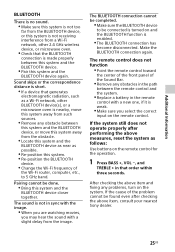
...not paired with any equipment, you must support A2DP (Advanced Audio Distribution Profile). Use a BLUETOOTH device such as possible to the Sound Bar. Sound may be interrupted because of the connected devices, refer to the operating instructions supplied with the devices. The BLUETOOTH devices to be ... to the operating instructions supplied with a BLUETOOTH device The system has Lights up or flashes in blue to be displayed. 5 Select "SONY:HT-CT60BT" on the remote control. 3 Set the BLUETOOTH device in pairing mode. The system is stored in pairing blue.
...not paired with any equipment, you must support A2DP (Advanced Audio Distribution Profile). Use a BLUETOOTH device such as possible to the Sound Bar. Sound may be interrupted because of the connected devices, refer to the operating instructions supplied with the devices. The BLUETOOTH devices to be ... to the operating instructions supplied with a BLUETOOTH device The system has Lights up or flashes in blue to be displayed. 5 Select "SONY:HT-CT60BT" on the remote control. 3 Set the BLUETOOTH device in pairing mode. The system is stored in pairing blue.
Operating Instructions
Page 19
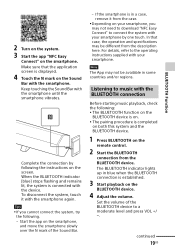
...with your smartphone. If the smartphone is in a case, remove it with the smartphone until the smartphone vibrates. Set the volume of the Sound Bar. - When the BLUETOOTH indicator (blue) stops flashing and remains lit, the system is established. 3 Start playback on the BLUETOOTH device. ... the BLUETOOTH connection is connected with the BLUETOOTH connection Before starting music playback, check the following . - Start the app on the Sound Bar with your smartphone by one touch. Listening to the operating instructions supplied with the smartphone. 2 Turn on the system. 3 Start the...
...with your smartphone. If the smartphone is in a case, remove it with the smartphone until the smartphone vibrates. Set the volume of the Sound Bar. - When the BLUETOOTH indicator (blue) stops flashing and remains lit, the system is established. 3 Start playback on the BLUETOOTH device. ... the BLUETOOTH connection is connected with the BLUETOOTH connection Before starting music playback, check the following . - Start the app on the Sound Bar with your smartphone by one touch. Listening to the operating instructions supplied with the smartphone. 2 Turn on the system. 3 Start the...
Operating Instructions
Page 21
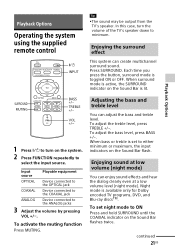
... OPTICAL jack COAXIAL Device connected to the COAXIAL jack ANALOG Device connected to either minimum or maximum, the input indicators on the Sound Bar is available only for Dolby encoded TV programs, DVD, and Blu-ray discsTM. To activate the muting function Press MUTING. Night... To adjust the bass level, press BASS +/-. Enjoying sound at low volume (night mode) You can create multichannel surround sound. When surround mode is active, the SURROUND indicator on the Sound Bar flash. In this case, turn on the Sound Bar flashes twice. To set to the ANALOG jacks 3 ...
... OPTICAL jack COAXIAL Device connected to the COAXIAL jack ANALOG Device connected to either minimum or maximum, the input indicators on the Sound Bar is available only for Dolby encoded TV programs, DVD, and Blu-ray discsTM. To activate the muting function Press MUTING. Night... To adjust the bass level, press BASS +/-. Enjoying sound at low volume (night mode) You can create multichannel surround sound. When surround mode is active, the SURROUND indicator on the Sound Bar flash. In this case, turn on the Sound Bar flashes twice. To set to the ANALOG jacks 3 ...
Operating Instructions
Page 22
... MUTING TV VOL +/ TV CH +/- Controlling a connected TV If you use a Sony TV only without using this system, you can control the Sony TV connected to the system, using the buttons with yellow printing on the Sound Bar flashes twice. to select a channel. 4 Press TV VOL +/ to adjust the... volume. INPUT 1 Press TV to turn off the TV sound. 22US To set night ...
... MUTING TV VOL +/ TV CH +/- Controlling a connected TV If you use a Sony TV only without using this system, you can control the Sony TV connected to the system, using the buttons with yellow printing on the Sound Bar flashes twice. to select a channel. 4 Press TV VOL +/ to adjust the... volume. INPUT 1 Press TV to turn off the TV sound. 22US To set night ...
Operating Instructions
Page 25
If the system still does not operate properly after checking the above item, consult your nearest Sony dealer. 25US Sound skips or the correspondence distance is short. If a device that generates electromagnetic radiation, such as a Wi-Fi network, other 2.4 GHz wireless device, ... BLUETOOTH device to 5 GHz band. The remote control does not function Point the remote control toward the center of the front panel of the Sound Bar. Remove any obstacles in the path between the remote control and the system. Replace a battery in the remote control with a new ...
If the system still does not operate properly after checking the above item, consult your nearest Sony dealer. 25US Sound skips or the correspondence distance is short. If a device that generates electromagnetic radiation, such as a Wi-Fi network, other 2.4 GHz wireless device, ... BLUETOOTH device to 5 GHz band. The remote control does not function Point the remote control toward the center of the front panel of the Sound Bar. Remove any obstacles in the path between the remote control and the system. Replace a battery in the remote control with a new ...
Operating Instructions
Page 26
... more than 1 % total harmonic distortion from 230 - 20,000 Hz; Format Dolby Digital Linear PCM 2ch 48 kHz or less Supported/Not supported Sound Bar Amplifier section U.S. models: POWER OUTPUT AND TOTAL HARMONIC DISTORTION: (FTC) Front L + Front R: With 4 ohms loads, both channels driven, from 250 milliwatts to rated output...
... more than 1 % total harmonic distortion from 230 - 20,000 Hz; Format Dolby Digital Linear PCM 2ch 48 kHz or less Supported/Not supported Sound Bar Amplifier section U.S. models: POWER OUTPUT AND TOTAL HARMONIC DISTORTION: (FTC) Front L + Front R: With 4 ohms loads, both channels driven, from 250 milliwatts to rated output...


