
Operating Guide
Page 4
...and CANADA RECYCLING LITHIUM-ION BATTERIES Lithium-Ion batteries are recyclable. You can help preserve our environment by Sony. Dispose of rechargeable batteries, call : Sony Customer Information Center 1-800222-SONY (7669). This Class B digital apparatus complies with the specified type only. If you have any ...the sun. Do not incinerate or dispose of the FCC Rules. Use the nearby wall outlet (wall socket) when using your camcorder is turned off, AC power source (mains) is for future reference. For customers in fire. Do not handle damaged or ...
...and CANADA RECYCLING LITHIUM-ION BATTERIES Lithium-Ion batteries are recyclable. You can help preserve our environment by Sony. Dispose of rechargeable batteries, call : Sony Customer Information Center 1-800222-SONY (7669). This Class B digital apparatus complies with the specified type only. If you have any ...the sun. Do not incinerate or dispose of the FCC Rules. Use the nearby wall outlet (wall socket) when using your camcorder is turned off, AC power source (mains) is for future reference. For customers in fire. Do not handle damaged or ...
Operating Guide
Page 8
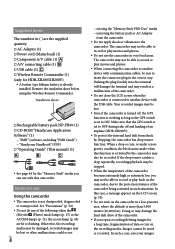
... installed. Insulation sheet Rechargeable battery pack NP-FH60 (1) CD-ROM "Handycam Application Software" (1) "PMB" (software, including "PMB Guide") "Handycam Handbook" (PDF) "Operating Guide" (This manual) (1) See page 44 for a long time, fragmentation of the camcorder being activated in such situations. Otherwise, the recording media may be damaged...
... installed. Insulation sheet Rechargeable battery pack NP-FH60 (1) CD-ROM "Handycam Application Software" (1) "PMB" (software, including "PMB Guide") "Handycam Handbook" (PDF) "Operating Guide" (This manual) (1) See page 44 for a long time, fragmentation of the camcorder being activated in such situations. Otherwise, the recording media may be damaged...
Operating Guide
Page 9
...Unauthorized recording of the pixels are not compatible with the AVCHD format Discs recorded with high definition image quality (HD) This camcorder captures high definition footage in any problems. Compensation for effective use. About language setting The on-screen displays ...Memory Stick PRO-HG Duo" media are referred as "Memory Stick PRO Duo" media. You will find the "Handycam Handbook" (PDF) on the camcorder with the following devices; Other AVCHD format compatible devices which are not compatible with High Profile Devices which...
...Unauthorized recording of the pixels are not compatible with the AVCHD format Discs recorded with high definition image quality (HD) This camcorder captures high definition footage in any problems. Compensation for effective use. About language setting The on-screen displays ...Memory Stick PRO-HG Duo" media are referred as "Memory Stick PRO Duo" media. You will find the "Handycam Handbook" (PDF) on the camcorder with the following devices; Other AVCHD format compatible devices which are not compatible with High Profile Devices which...

Operating Guide
Page 10
... image quality (HD) or standard definition image quality (SD) from the internal hard disk. Playing movies and photos (p. 22) Playing movies and photos on your camcorder (p. 22) Playing movies and photos on other media, from high definition image quality (HD) movies imported to the computer. Saving movies and photos on the...
... image quality (HD) or standard definition image quality (SD) from the internal hard disk. Playing movies and photos (p. 22) Playing movies and photos on your camcorder (p. 22) Playing movies and photos on other media, from high definition image quality (HD) movies imported to the computer. Saving movies and photos on the...
Operating Guide
Page 11
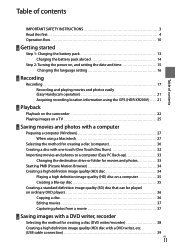
... 15 Changing the language setting 16 Recording Recording 17 Recording and playing movies and photos easily (Easy Handycam operation 21 Acquiring recording location information using the GPS (HDR-XR200V).. . . . . 21 Playback Playback on the camcorder 22 Playing images on a TV 25 Saving movies and photos with a computer Preparing a computer (Windows 27 When...
... 15 Changing the language setting 16 Recording Recording 17 Recording and playing movies and photos easily (Easy Handycam operation 21 Acquiring recording location information using the GPS (HDR-XR200V).. . . . . 21 Playback Playback on the camcorder 22 Playing images on a TV 25 Saving movies and photos with a computer Preparing a computer (Windows 27 When...

Operating Guide
Page 12
... definition image quality (SD) disc with a recorder, etc. (A/V connecting cable connection 40 Making good use of your camcorder Deleting movies and photos 42 Coping with shooting conditions 43 Changing the recording medium 43 To check the recording media settings ...photos from the internal hard disk to a "Memory Stick PRO Duo" media 45 Customizing your camcorder with menus 45 Using the HELP function 46 Getting detailed information from the "Handycam Handbook 51 Additional information Troubleshooting 52 Precautions 54 Specifications 57 Screen indicators 61 Parts and controls ...
... definition image quality (SD) disc with a recorder, etc. (A/V connecting cable connection 40 Making good use of your camcorder Deleting movies and photos 42 Coping with shooting conditions 43 Changing the recording medium 43 To check the recording media settings ...photos from the internal hard disk to a "Memory Stick PRO Duo" media 45 Customizing your camcorder with menus 45 Using the HELP function 46 Getting detailed information from the "Handycam Handbook 51 Additional information Troubleshooting 52 Precautions 54 Specifications 57 Screen indicators 61 Parts and controls ...

Operating Guide
Page 13
... indicator at the upper left on charging, recording and playing time. When your camcorder. See page 58 on the LCD screen. The charge lamp lights up and charging starts. The ...charge lamp turns off your camcorder by closing the LCD screen. 2 Attach the battery pack by sliding it in the direction of ...the arrow until it clicks. 3 Connect the AC Adaptor and the power cord (mains lead) to your camcorder and the wall outlet (wall socket). Be sure that the mark on the DC plug is...
... indicator at the upper left on charging, recording and playing time. When your camcorder. See page 58 on the LCD screen. The charge lamp lights up and charging starts. The ...charge lamp turns off your camcorder by closing the LCD screen. 2 Attach the battery pack by sliding it in the direction of ...the arrow until it clicks. 3 Connect the AC Adaptor and the power cord (mains lead) to your camcorder and the wall outlet (wall socket). Be sure that the mark on the DC plug is...

Operating Guide
Page 14
... screen and make sure that the (Movie) lamp/ (Photo) lamp (p. 15)/ACCESS lamps (p. 13)/access lamp(p. 44) are turned off automatically if you leave your camcorder within the AC 100 V - 240 V, 50 Hz/60 Hz range. Do not use a wall outlet (wall socket) as a power source Make the same ... In the default setting, the power turns off . Do not short-circuit the DC plug of the AC Adaptor or battery terminal with your camcorder without any metallic objects. To remove the battery pack Close the LCD screen. US 14 Charging the battery pack abroad You can charge the battery...
... screen and make sure that the (Movie) lamp/ (Photo) lamp (p. 15)/ACCESS lamps (p. 13)/access lamp(p. 44) are turned off automatically if you leave your camcorder within the AC 100 V - 240 V, 50 Hz/60 Hz range. Do not use a wall outlet (wall socket) as a power source Make the same ... In the default setting, the power turns off . Do not short-circuit the DC plug of the AC Adaptor or battery terminal with your camcorder without any metallic objects. To remove the battery pack Close the LCD screen. US 14 Charging the battery pack abroad You can charge the battery...

Operating Guide
Page 15
... record photos 2 Select the desired geographical area with / , then touch [NEXT]. When an item is not on the recording media, and can turn on your camcorder. Your camcorder is turned on. To turn off the operation beeps by touching (HOME) (SETTINGS) [SOUND/DISP SET] [BEEP] [OFF US... [SUMMERTIME], date and time, then touch . Step 2: Turning the power on, and setting the date and time 1 Open the LCD screen of your camcorder when the LCD screen is open, press POWER.
... record photos 2 Select the desired geographical area with / , then touch [NEXT]. When an item is not on the recording media, and can turn on your camcorder. Your camcorder is turned on. To turn off the operation beeps by touching (HOME) (SETTINGS) [SOUND/DISP SET] [BEEP] [OFF US... [SUMMERTIME], date and time, then touch . Step 2: Turning the power on, and setting the date and time 1 Open the LCD screen of your camcorder when the LCD screen is open, press POWER.

Operating Guide
Page 16
The turned off. (Movie) lamp flashes several seconds, then the camcorder is set to show messages in a specified language. To turn off the power Close the LCD screen. Changing the language setting You can turn off your camcorder also by pressing POWER. When [POWER ON BY LCD] (p. 49) is POWER You can change the on-screen displays to [OFF], turn off your camcorder by pressing POWER. Touch (HOME) (SETTINGS) [CLOCK/ LANG] [ LANGUAGE SET] the desired language US 16
The turned off. (Movie) lamp flashes several seconds, then the camcorder is set to show messages in a specified language. To turn off the power Close the LCD screen. Changing the language setting You can turn off your camcorder also by pressing POWER. When [POWER ON BY LCD] (p. 49) is POWER You can change the on-screen displays to [OFF], turn off your camcorder by pressing POWER. Touch (HOME) (SETTINGS) [CLOCK/ LANG] [ LANGUAGE SET] the desired language US 16
Operating Guide
Page 17
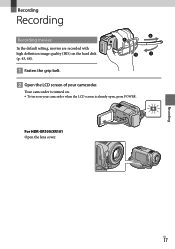
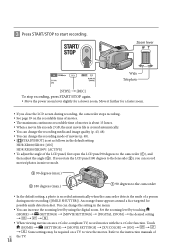
Recording Recording Recording Recording movies In the default setting, movies are recorded with high definition image quality (HD) on the hard disk (p. 43, 48). Fasten the grip belt. Open the LCD screen of your camcorder when the LCD screen is turned on. To turn on your camcorder. For HDR-XR100/XR101 Open the lens cover. Your camcorder is already open, press POWER. US 17
Recording Recording Recording Recording movies In the default setting, movies are recorded with high definition image quality (HD) on the hard disk (p. 43, 48). Fasten the grip belt. Open the LCD screen of your camcorder when the LCD screen is turned on. To turn on your camcorder. For HDR-XR100/XR101 Open the lens cover. Your camcorder is already open, press POWER. US 17
Operating Guide
Page 18
...a TV to start recording. Refer to the instruction manuals of the LCD panel, first open the LCD panel 90 degrees to the camcorder In the default setting, a photo is set as follows in the menu. You can increase the zooming level ...recording media and image quality (p. 43, 48). You can change the recording mode of movies (p. 48). [ STEADYSHOT] is recorded automatically when the camcorder detects the smile of a person during movie recording ([SMILE SHUTTER]). Touch (HOME) (SETTINGS) [MOVIE SETTINGS] [X.V.COLOR] [ON...
...a TV to start recording. Refer to the instruction manuals of the LCD panel, first open the LCD panel 90 degrees to the camcorder In the default setting, a photo is set as follows in the menu. You can increase the zooming level ...recording media and image quality (p. 43, 48). You can change the recording mode of movies (p. 48). [ STEADYSHOT] is recorded automatically when the camcorder detects the smile of a person during movie recording ([SMILE SHUTTER]). Touch (HOME) (SETTINGS) [MOVIE SETTINGS] [X.V.COLOR] [ON...
Operating Guide
Page 19
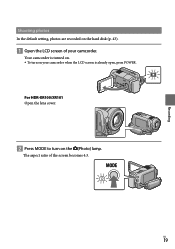
US 19 The aspect ratio of your camcorder when the LCD screen is already open, press POWER. For HDR-XR100/XR101 Open the lens cover. Press MODE to turn on your camcorder. Recording Shooting photos In the default setting, photos are recorded on the hard disk (p. 43). Open the LCD screen of the screen becomes 4:3. Your camcorder is turned on. To turn on the (Photo) lamp.
US 19 The aspect ratio of your camcorder when the LCD screen is already open, press POWER. For HDR-XR100/XR101 Open the lens cover. Press MODE to turn on your camcorder. Recording Shooting photos In the default setting, photos are recorded on the hard disk (p. 43). Open the LCD screen of the screen becomes 4:3. Your camcorder is turned on. To turn on the (Photo) lamp.
Operating Guide
Page 20
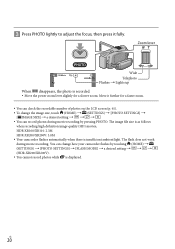
.... You can record photos during movie recording. The image file size is insufficient ambient light. HDR-XR100/XR101: 2.3M HDR-XR200/XR200V: 3.0M Your camcorder flashes automatically when there is as follows when recording high definition image quality (HD) movies; The flash does not work during movie recording by touching... (p. 61). To change the image size, touch (HOME) (SETTINGS) [PHOTO SETTINGS] [ IMAGE SIZE] a desired setting You can change how your camcorder flashes by pressing PHOTO. US 20
.... You can record photos during movie recording. The image file size is insufficient ambient light. HDR-XR100/XR101: 2.3M HDR-XR200/XR200V: 3.0M Your camcorder flashes automatically when there is as follows when recording high definition image quality (HD) movies; The flash does not work during movie recording by touching... (p. 61). To change the image size, touch (HOME) (SETTINGS) [PHOTO SETTINGS] [ IMAGE SIZE] a desired setting You can change how your camcorder flashes by pressing PHOTO. US 20
Operating Guide
Page 21
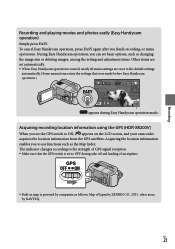
...after you can set automatically. When Easy Handycam operation is powered by NAVTEQ. Map of an airplane. Built-in map is started, nearly all menu settings are reset to ON, appears on the LCD screen, and your camcorder acquires the location information from the GPS satellites. ...Recording Recording and playing movies and photos easily (Easy Handycam operation) Simply press EASY.
...after you can set automatically. When Easy Handycam operation is powered by NAVTEQ. Map of an airplane. Built-in map is started, nearly all menu settings are reset to ON, appears on the LCD screen, and your camcorder acquires the location information from the GPS satellites. ...Recording Recording and playing movies and photos easily (Easy Handycam operation) Simply press EASY.
Operating Guide
Page 22
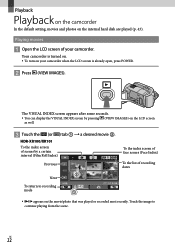
... VISUAL INDEX screen by a certain interval (Film Roll Index) To the index screen of face scenes (Face Index) Previous To the list of your camcorder when the LCD screen is turned on. To turn on the movie/photo that was played or recorded most recently. US 22 Playback Playback... on the camcorder In the default setting, movies and photos on the LCD screen as well. Touch the (or ) tab a desired movie . Touch...
... VISUAL INDEX screen by a certain interval (Film Roll Index) To the index screen of face scenes (Face Index) Previous To the list of your camcorder when the LCD screen is turned on. To turn on the movie/photo that was played or recorded most recently. US 22 Playback Playback... on the camcorder In the default setting, movies and photos on the LCD screen as well. Touch the (or ) tab a desired movie . Touch...

Operating Guide
Page 23
... as fast as about 5 times about 10 times about 30 times about 60 times. You can display it . US 23 Your camcorder starts playing the selected movie. To adjust the sound volume of recording dates / appears on your...
... as fast as about 5 times about 10 times about 30 times about 60 times. You can display it . US 23 Your camcorder starts playing the selected movie. To adjust the sound volume of recording dates / appears on your...
Operating Guide
Page 24
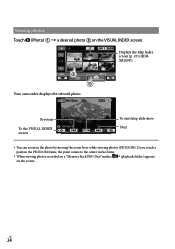
Viewing photos Touch (Photo) a desired photo on the screen. Previous To the VISUAL INDEX screen To start/stop slide show Next You can zoom in the frame. When viewing photos recorded on a "Memory Stick PRO Duo" media, (playback folder) appears on the VISUAL INDEX screen. Displays the Map Index screen (p. 47) (HDRXR200V) Your camcorder displays the selected photo. US 24 If you touch a point in the PB ZOOM frame, the point comes to the center in the photo by moving the zoom lever while viewing photos (PB ZOOM).
Viewing photos Touch (Photo) a desired photo on the screen. Previous To the VISUAL INDEX screen To start/stop slide show Next You can zoom in the frame. When viewing photos recorded on a "Memory Stick PRO Duo" media, (playback folder) appears on the VISUAL INDEX screen. Displays the Map Index screen (p. 47) (HDRXR200V) Your camcorder displays the selected photo. US 24 If you touch a point in the PB ZOOM frame, the point comes to the center in the photo by moving the zoom lever while viewing photos (PB ZOOM).

Operating Guide
Page 25
...; Switch the input on the TV to the connected jack. Refer to the instruction manuals of the TV. Turn on your camcorder, and touch (HOME) CONNECT Guide] on the LCD screen. (OTHERS) [TV When an item is not on your... and photos on the screen, touch / until the item appears. Use the supplied AC Adaptor as the power source (p. 14). Connect your camcorder Input connectors on the TV A/V Remote Connector HDMI OUT (mini) jack When the A/V connecting cable is connected, and the connectors...
...; Switch the input on the TV to the connected jack. Refer to the instruction manuals of the TV. Turn on your camcorder, and touch (HOME) CONNECT Guide] on the LCD screen. (OTHERS) [TV When an item is not on your... and photos on the screen, touch / until the item appears. Use the supplied AC Adaptor as the power source (p. 14). Connect your camcorder Input connectors on the TV A/V Remote Connector HDMI OUT (mini) jack When the A/V connecting cable is connected, and the connectors...
Operating Guide
Page 26
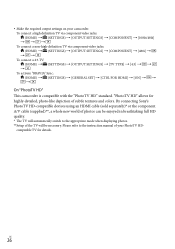
...HD- To connect a high definition TV via component video jacks: (HOME) (SETTINGS) [OUTPUT SETTINGS] [COMPONENT] [1080i/480i To connect a non-high-definition TV via component video jacks: (HOME) (SETTINGS) [OUTPUT SETTINGS] [COMPONENT] ...[GENERAL SET] [CTRL FOR HDMI] [ON On "PhotoTV HD" This camcorder is compatible with the "PhotoTV HD" standard. US 26 "PhotoTV HD" allows for details. By connecting Sony's PhotoTV HD-compatible devices using an HDMI cable (sold separately)* or the component A/V cable (...
...HD- To connect a high definition TV via component video jacks: (HOME) (SETTINGS) [OUTPUT SETTINGS] [COMPONENT] [1080i/480i To connect a non-high-definition TV via component video jacks: (HOME) (SETTINGS) [OUTPUT SETTINGS] [COMPONENT] ...[GENERAL SET] [CTRL FOR HDMI] [ON On "PhotoTV HD" This camcorder is compatible with the "PhotoTV HD" standard. US 26 "PhotoTV HD" allows for details. By connecting Sony's PhotoTV HD-compatible devices using an HDMI cable (sold separately)* or the component A/V cable (...


