
Operating Guide
Page 2
This symbol is intended to alert the user to persons. This symbol is intended to alert the user to the presence of uninsulated "dangerous voltage" within the product's enclosure that may be of sufficient magnitude to constitute a risk of electric shock to the presence of important operating and maintenance (servicing) instructions in the literature accompanying the appliance. 2 WARNING To reduce fire or shock hazard, do not expose the unit to rain or moisture.
This symbol is intended to alert the user to persons. This symbol is intended to alert the user to the presence of uninsulated "dangerous voltage" within the product's enclosure that may be of sufficient magnitude to constitute a risk of electric shock to the presence of important operating and maintenance (servicing) instructions in the literature accompanying the appliance. 2 WARNING To reduce fire or shock hazard, do not expose the unit to rain or moisture.

Operating Guide
Page 3
...slots and openings by forcing it from the appliance. Do not defeat the safety purpose of electrical power supplied to the operating instructions. Overloading Do not overload wall outlets, extension cords or convenience receptacles beyond their capacity, since this manual for cleaning the exterior... shock. Polarization This set , and to the plugs, receptacles, and the point where the cord exits from overheating, these safety instructions completely before cleaning or polishing it is provided. - Use Power Sources This set may cause hazards. If you are unable to direct...
...slots and openings by forcing it from the appliance. Do not defeat the safety purpose of electrical power supplied to the operating instructions. Overloading Do not overload wall outlets, extension cords or convenience receptacles beyond their capacity, since this manual for cleaning the exterior... shock. Polarization This set , and to the plugs, receptacles, and the point where the cord exits from overheating, these safety instructions completely before cleaning or polishing it is provided. - Use Power Sources This set may cause hazards. If you are unable to direct...
Operating Guide
Page 4
..., or when it from the wall outlet and refer servicing to qualified service personnel under the following the operating instructions. this set yourself as opening or removing covers may result in the operating instructions. Replacement parts When replacement parts are specified in fire, electric shock, or other hazards. Unauthorized substitutions may expose...
..., or when it from the wall outlet and refer servicing to qualified service personnel under the following the operating instructions. this set yourself as opening or removing covers may result in the operating instructions. Replacement parts When replacement parts are specified in fire, electric shock, or other hazards. Unauthorized substitutions may expose...
Operating Guide
Page 6
If this before operating your camcorder (Continued) Note This equipment has been tested and found to comply with the instructions, may cause harmful interference to radio communications. Reorient or relocate the receiving antenna. - The supplied interface cable must be used in ...PRO-HG Duo") ("Memory Stick See www.dtsc.ca.gov/hazardouswaste/perchlorate Perchlorate Material: Lithium battery contains perchlorate. 6 Notes on the place you use Sony discs or discs with the limits for a Class B digital device, pursuant to Part 15 of "Memory Stick" you can be able to provide...
If this before operating your camcorder (Continued) Note This equipment has been tested and found to comply with the instructions, may cause harmful interference to radio communications. Reorient or relocate the receiving antenna. - The supplied interface cable must be used in ...PRO-HG Duo") ("Memory Stick See www.dtsc.ca.gov/hazardouswaste/perchlorate Perchlorate Material: Lithium battery contains perchlorate. 6 Notes on the place you use Sony discs or discs with the limits for a Class B digital device, pursuant to Part 15 of "Memory Stick" you can be able to provide...
Operating Guide
Page 31
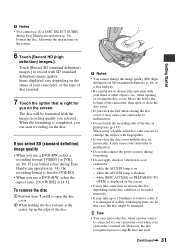
...; Do not disconnect the power sources during Easy Handycam operation (p. 34). Touch [Record SD (standard definition) images.] to record with your hand or other objects, etc., when opening or closing the disc cover, it may cause your camcorder is dirty with the image recording quality you use... a DVD+RW, select the aspect ratio, [16:9 WIDE] or [4:3]. Format the disc, following the instructions on - When the formatting is on the screen. 6 Touch [Record...
...; Do not disconnect the power sources during Easy Handycam operation (p. 34). Touch [Record SD (standard definition) images.] to record with your hand or other objects, etc., when opening or closing the disc cover, it may cause your camcorder is dirty with the image recording quality you use... a DVD+RW, select the aspect ratio, [16:9 WIDE] or [4:3]. Format the disc, following the instructions on - When the formatting is on the screen. 6 Touch [Record...

Operating Guide
Page 49
... frame. 4 Adjust the magnification with the device to be adjusted on the TV when playing back. r Connect your camcorder to the TV easily following the instructions displayed on the LCD screen, [TV CONNECT Guide]. Touch to stop the slide show begins from the selected image and... then the slide show . Refer also to the instruction manuals supplied with W (Wide angle)/T (Telephoto). The slide show . To restart, touch again. Some settings may need to be connected. Recording...
... frame. 4 Adjust the magnification with the device to be adjusted on the TV when playing back. r Connect your camcorder to the TV easily following the instructions displayed on the LCD screen, [TV CONNECT Guide]. Touch to stop the slide show begins from the selected image and... then the slide show . Refer also to the instruction manuals supplied with W (Wide angle)/T (Telephoto). The slide show . To restart, touch again. Some settings may need to be connected. Recording...

Operating Guide
Page 54
By connecting Sony's PhotoTV HD-compatible devices using the A/V connecting cable, images are compatible. 1 Connect your camcorder and a "BRAVIA" Sync compatible TV* with the HDMI cable (optional). 2 Turn on your camcorder is displayed on the TV. 3 Operate the remote commander of the TV. The HDMI OUT...of photos can be necessary. Playing the image on a TV (Continued) When connecting to your TV via a VCR Connect your camcorder to the instruction manual of your PhotoTV HD-compatible TV for highly-detailed, photo-like depiction of subtle textures and colors. The TV input is ...
By connecting Sony's PhotoTV HD-compatible devices using the A/V connecting cable, images are compatible. 1 Connect your camcorder and a "BRAVIA" Sync compatible TV* with the HDMI cable (optional). 2 Turn on your camcorder is displayed on the TV. 3 Operate the remote commander of the TV. The HDMI OUT...of photos can be necessary. Playing the image on a TV (Continued) When connecting to your TV via a VCR Connect your camcorder to the instruction manual of your PhotoTV HD-compatible TV for highly-detailed, photo-like depiction of subtle textures and colors. The TV input is ...

Operating Guide
Page 55
z Tips • If you turn off simultaneously. 55 Recording/Playback b Notes • To set your camcorder is turned off the TV, your camcorder, touch (HOME) t (SETTINGS) t [GENERAL SET] t [CTRL FOR HDMI] t [ON] (the default setting). • Your TV also need to the instruction manual of the TV for details. Refer to be set.
z Tips • If you turn off simultaneously. 55 Recording/Playback b Notes • To set your camcorder is turned off the TV, your camcorder, touch (HOME) t (SETTINGS) t [GENERAL SET] t [CTRL FOR HDMI] t [ON] (the default setting). • Your TV also need to the instruction manual of the TV for details. Refer to be set.
Operating Guide
Page 68
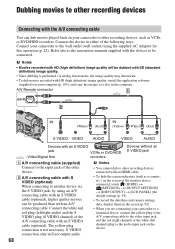
... to the wall outlet (wall socket) using an A/V connecting cable with an S VIDEO cable (optional), higher quality movies can dub movies played back on your camcorder to another device via analog data transfer, the image quality may deteriorate. • To dub movies recorded with an HDMI cable. S VIDEO connection only will... (high definition) image quality will not output audio. • To hide the screen indicators (such as VCRs or DVD/HDD recorders. Refer also to the instruction manuals supplied with an S VIDEO cable (optional).
... to the wall outlet (wall socket) using an A/V connecting cable with an S VIDEO cable (optional), higher quality movies can dub movies played back on your camcorder to another device via analog data transfer, the image quality may deteriorate. • To dub movies recorded with an HDMI cable. S VIDEO connection only will... (high definition) image quality will not output audio. • To hide the screen indicators (such as VCRs or DVD/HDD recorders. Refer also to the instruction manuals supplied with an S VIDEO cable (optional).
Operating Guide
Page 69
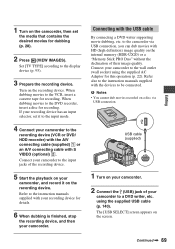
... internal memory (HDR-UX20) or a "Memory Stick PRO Duo" without the declination of your camcorder to the DVD recorder, insert a disc for recording. Turn on the camcorder, then set it on your camcorder to the camcorder via USB connection. Refer also to be connected. Continued , 69 Connecting with the devices to the instruction manuals supplied with...
... internal memory (HDR-UX20) or a "Memory Stick PRO Duo" without the declination of your camcorder to the DVD recorder, insert a disc for recording. Turn on the camcorder, then set it on your camcorder to the camcorder via USB connection. Refer also to be connected. Continued , 69 Connecting with the devices to the instruction manuals supplied with...

Operating Guide
Page 70
...images on a "Memory Stick PRO Duo," insert the "Memory Stick PRO Duo" containing them into your camcorder. 1 Turn on your camcorder. 2 Connect the (USB) jack of your camcorder to the AC Adaptor to obtain power from the wall outlet (wall socket) (p. 22). You can... the USB cable. Refer to the instruction manuals supplied with the connected device for details. 5 When dubbing is complete, (PictBridge connecting) appears on the connected device. Connect your camcorder to the printer using a PictBridge compliant printer, without connecting the camcorder to a computer. Dubbing movies to other...
...images on a "Memory Stick PRO Duo," insert the "Memory Stick PRO Duo" containing them into your camcorder. 1 Turn on your camcorder. 2 Connect the (USB) jack of your camcorder to the AC Adaptor to obtain power from the wall outlet (wall socket) (p. 22). You can... the USB cable. Refer to the instruction manuals supplied with the connected device for details. 5 When dubbing is complete, (PictBridge connecting) appears on the connected device. Connect your camcorder to the printer using a PictBridge compliant printer, without connecting the camcorder to a computer. Dubbing movies to other...
Operating Guide
Page 71
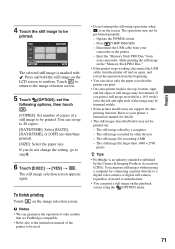
...guarantee the operation of only models that the printer can select only the paper sizes that are PictBridge compatible. • Refer also to the instruction manual of the printer to be printed. Touch to return to the image selection screen. 5 Touch (OPTION), set up to a digital video... right ends of a still image to be printed out: - Refer to confirm. You can print a still image on the LCD screen to your camcorder or the printer. - Operate the POWER switch. - The still image edited by the Camera & Imaging Products Association (CIPA). The still image file...
...guarantee the operation of only models that the printer can select only the paper sizes that are PictBridge compatible. • Refer also to the instruction manual of the printer to be printed. Touch to return to the image selection screen. 5 Touch (OPTION), set up to a digital video... right ends of a still image to be printed out: - Refer to confirm. You can print a still image on the LCD screen to your camcorder or the printer. - Operate the POWER switch. - The still image edited by the Camera & Imaging Products Association (CIPA). The still image file...

Operating Guide
Page 76
...malfunction. • Make sure that a vertically installed device is placed in a position such as the DVD player/recorder may fail to the instruction manual supplied with DVD-RW (VR mode) for an instant between scenes. Making the disc compatible with playback on other devices (Finalizing) (...Continued) • You cannot create the disc menu with your device or consult your camcorder. • Some discs cannot be used with HD (high definition) image quality This camcorder captures high definition footage in a DVD device, there is a risk that you can neither record ...
...malfunction. • Make sure that a vertically installed device is placed in a position such as the DVD player/recorder may fail to the instruction manual supplied with DVD-RW (VR mode) for an instant between scenes. Making the disc compatible with playback on other devices (Finalizing) (...Continued) • You cannot create the disc menu with your device or consult your camcorder. • Some discs cannot be used with HD (high definition) image quality This camcorder captures high definition footage in a DVD device, there is a risk that you can neither record ...

Operating Guide
Page 77
Refer to the instruction manual of your device. • If you have created the disc menu (p. 75), you can select the desired scene in the following folders: - DVD-RW (... HD (high definition) image quality Install "Picture Motion Browser" on the supplied CD-ROM on the computer to play back or edit them on your camcorder in advance, then select on the computer. The volume label of the disc recorded with HD (high definition) image quality (p. 65). When the disc was...
Refer to the instruction manual of your device. • If you have created the disc menu (p. 75), you can select the desired scene in the following folders: - DVD-RW (... HD (high definition) image quality Install "Picture Motion Browser" on the supplied CD-ROM on the computer to play back or edit them on your camcorder in advance, then select on the computer. The volume label of the disc recorded with HD (high definition) image quality (p. 65). When the disc was...

Operating Guide
Page 87
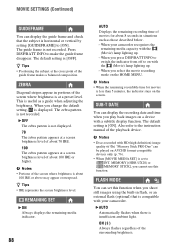
Refer also to the instruction manuals supplied with your camcorder • The maximum shooting distance using a tripod (optional), then the image becomes natural. The zooming zone appears when you use the digital zoom. Set [STEADYSHOT] ... a 4:3 TV screen. X.V.COLOR When recording, set to the full screen on an x.v.Color-compliant TV. when the disc is played back on the internal memory (HDR-UX20) or the "Memory Stick PRO Duo." - Customizing your TV. B OFF Up to 15 × zoom is performed optically. 30 × Up to 15 ×...
Refer also to the instruction manuals supplied with your camcorder • The maximum shooting distance using a tripod (optional), then the image becomes natural. The zooming zone appears when you use the digital zoom. Set [STEADYSHOT] ... a 4:3 TV screen. X.V.COLOR When recording, set to the full screen on an x.v.Color-compliant TV. when the disc is played back on the internal memory (HDR-UX20) or the "Memory Stick PRO Duo." - Customizing your TV. B OFF Up to 15 × zoom is performed optically. 30 × Up to 15 ×...
Operating Guide
Page 88
... or higher. b Notes • Discs recorded with the (Movie) lamp lighting up . - MEMORY] (HDR-UX20) or [ MEMORY STICK], you play back images on the HOME MENU. The default setting is useful ... zebra pattern appears at a screen brightness level of the playback device. This is [OFF]. When your camcorder. ON ( ) Always flashes regardless of movies for movies is less than 5 minutes, the indicator stays... surrounding brightness. FLASH MODE You can set to [ON]. Also refer to the instruction manual of about 100 IRE or above may appear overexposed. When you press DISP/...
... or higher. b Notes • Discs recorded with the (Movie) lamp lighting up . - MEMORY] (HDR-UX20) or [ MEMORY STICK], you play back images on the HOME MENU. The default setting is useful ... zebra pattern appears at a screen brightness level of the playback device. This is [OFF]. When your camcorder. ON ( ) Always flashes regardless of movies for movies is less than 5 minutes, the indicator stays... surrounding brightness. FLASH MODE You can set to [ON]. Also refer to the instruction manual of about 100 IRE or above may appear overexposed. When you press DISP/...

Operating Guide
Page 95
... the image recorded with HD (high definition) image quality is not on the TV connected when playing back the image. B 1080i/480i Select when connecting your camcorder to the instruction manuals supplied your camcorder 95 OUTPUT SETTINGS (Items for connecting other devices) Touch 1, then 2. B 16:9 Select to view your images on a 16:9 (wide) TV...
... the image recorded with HD (high definition) image quality is not on the TV connected when playing back the image. B 1080i/480i Select when connecting your camcorder to the instruction manuals supplied your camcorder 95 OUTPUT SETTINGS (Items for connecting other devices) Touch 1, then 2. B 16:9 Select to view your images on a 16:9 (wide) TV...
Operating Guide
Page 107
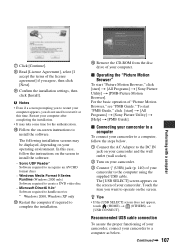
...disc - To start "PMB Guide," click [start ] t [All Programs] t [Sony Picture Utility] t [PMB-Picture Motion Browser]. x Connecting your camcorder to a computer To connect your camcorder to a computer, follow the instructions on the screen. In this time. qs Remove the CD-ROM from the disc ...[License Agreement], select [I accept the terms of your camcorder, connect your camcorder to a computer as below . 1 Connect the AC Adaptor to the DC IN jack on your camcorder and the wall outlet (wall socket). 2 Turn on -screen instructions to install the software. Microsoft DirectX 9.0c* Software...
...disc - To start "PMB Guide," click [start ] t [All Programs] t [Sony Picture Utility] t [PMB-Picture Motion Browser]. x Connecting your camcorder to a computer To connect your camcorder to a computer, follow the instructions on the screen. In this time. qs Remove the CD-ROM from the disc ...[License Agreement], select [I accept the terms of your camcorder, connect your camcorder to a computer as below . 1 Connect the AC Adaptor to the DC IN jack on your camcorder and the wall outlet (wall socket). 2 Turn on -screen instructions to install the software. Microsoft DirectX 9.0c* Software...

Operating Guide
Page 115
Turn off your camcorder and leave it for a while in the instruction manual of the playback device. If it on again, or repeat removing and inserting the "Memory Stick PRO Duo" a couple of times. • You disconnect ... using a soft cloth (p. 128). You cannot play back a disc. • Check out the disc compatibility (p. 16). • Insert a disc with the recording side facing your camcorder (p. 30). • The disc that was recorded, formatted, of finalized on other devices, edited on a computer, etc. Images stored on a "Memory Stick PRO Duo" cannot...
Turn off your camcorder and leave it for a while in the instruction manual of the playback device. If it on again, or repeat removing and inserting the "Memory Stick PRO Duo" a couple of times. • You disconnect ... using a soft cloth (p. 128). You cannot play back a disc. • Check out the disc compatibility (p. 16). • Insert a disc with the recording side facing your camcorder (p. 30). • The disc that was recorded, formatted, of finalized on other devices, edited on a computer, etc. Images stored on a "Memory Stick PRO Duo" cannot...
Operating Guide
Page 116
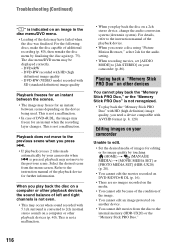
...with SD (standard definition) image quality Playback freezes for image quality by touching (HOME) t (MANAGE MEDIA) t [MOVIE MEDIA SET] or [PHOTO MEDIA SET] (HDR-UX20) (p. 28). • You cannot edit the movies recorded on DVD-R/DVD+R DL (p. 16). • There are no images recorded on the media. &#... by your camcorder (p. 86). The disc menu/DVD menu may have failed when the disc was finalized. Refer to the previous scene. DVD+RW - This is pressed, playback may freeze for the audio setting. • When recording movies, set [AUDIO MODE] to the instruction manual of ...
...with SD (standard definition) image quality Playback freezes for image quality by touching (HOME) t (MANAGE MEDIA) t [MOVIE MEDIA SET] or [PHOTO MEDIA SET] (HDR-UX20) (p. 28). • You cannot edit the movies recorded on DVD-R/DVD+R DL (p. 16). • There are no images recorded on the media. &#... by your camcorder (p. 86). The disc menu/DVD menu may have failed when the disc was finalized. Refer to the previous scene. DVD+RW - This is pressed, playback may freeze for the audio setting. • When recording movies, set [AUDIO MODE] to the instruction manual of ...


