
Operating Guide (Large File - 11.29 MB)
Page 13
Editing Operating the MODE menu 56 Protecting recorded images (Protect 57 Using the Playlist of movies 58 Creating the Playlist 58 Playing the Playlist 58 Capturing ... 63 Repairing the image database file 64 Using the Menu Operating the menu 65 Menu items 67 (CAMERA SET) menu 69 Settings to adjust your camcorder to the recording conditions (GAIN SET/ BACK LIGHT/STEADYSHOT, etc.) (REC/OUT SET) menu 73 Recording settings, input and output settings (REC FORMAT/VIDEO OUT...
Editing Operating the MODE menu 56 Protecting recorded images (Protect 57 Using the Playlist of movies 58 Creating the Playlist 58 Playing the Playlist 58 Capturing ... 63 Repairing the image database file 64 Using the Menu Operating the menu 65 Menu items 67 (CAMERA SET) menu 69 Settings to adjust your camcorder to the recording conditions (GAIN SET/ BACK LIGHT/STEADYSHOT, etc.) (REC/OUT SET) menu 73 Recording settings, input and output settings (REC FORMAT/VIDEO OUT...
Operating Guide (Large File - 11.29 MB)
Page 56
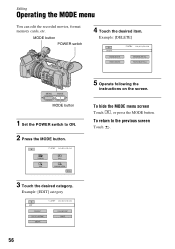
MODE button POWER switch 4 Touch the desired item. Example: [DELETE] MODE button 1 Set the POWER switch to the previous screen Touch . 3 Touch the desired category. Example: [EDIT] category 56 To return to ON. 2 Press the MODE button. 5 Operate following the instructions on the screen. To hide the MODE menu screen Touch , or press the MODE button. Editing Operating the MODE menu You can edit the recorded movies, format memory cards, etc.
MODE button POWER switch 4 Touch the desired item. Example: [DELETE] MODE button 1 Set the POWER switch to the previous screen Touch . 3 Touch the desired category. Example: [EDIT] category 56 To return to ON. 2 Press the MODE button. 5 Operate following the instructions on the screen. To hide the MODE menu screen Touch , or press the MODE button. Editing Operating the MODE menu You can edit the recorded movies, format memory cards, etc.
Operating Guide (Large File - 11.29 MB)
Page 57
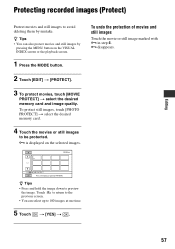
is displayed on the VISUAL INDEX screen or the playback screen. 1 Press the MODE button. 2 Touch [EDIT] t [PROTECT]. 3 To protect movies, touch [MOVIE PROTECT] t select the desired memory card and image quality. disappears. Touch to return to the previous screen. • You ... also protect movies and still images by mistake. To undo the protection of movies and still images Touch the movie or still image marked with - Editing z Tips • Press and hold the image down to 100 images at one time. 5 Touch t [YES] t . 57 z Tips • You can select up to preview...
is displayed on the VISUAL INDEX screen or the playback screen. 1 Press the MODE button. 2 Touch [EDIT] t [PROTECT]. 3 To protect movies, touch [MOVIE PROTECT] t select the desired memory card and image quality. disappears. Touch to return to the previous screen. • You ... also protect movies and still images by mistake. To undo the protection of movies and still images Touch the movie or still image marked with - Editing z Tips • Press and hold the image down to 100 images at one time. 5 Touch t [YES] t . 57 z Tips • You can select up to preview...
Operating Guide (Large File - 11.29 MB)
Page 58
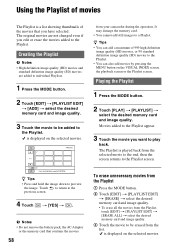
.... Movies added to the Playlist appear. 3 Touch the movie you edit or erase the movies added to the Playlist. Using the Playlist of...Playlists. 1 Press the MODE button. 2 Touch [EDIT] t [PLAYLIST EDIT] t [ADD] t select the desired memory card and image quality. 3 Touch... the movie to be erased from the Playlist, touch [EDIT] t [PLAYLIST EDIT] t [ERASE ALL] t select the desired memory card and image... To erase unnecessary movies from the Playlist 1 Press the MODE button. 2 Touch [EDIT] t [PLAYLIST EDIT] t [ERASE] t select the desired memory card and image quality. • ...
.... Movies added to the Playlist appear. 3 Touch the movie you edit or erase the movies added to the Playlist. Using the Playlist of...Playlists. 1 Press the MODE button. 2 Touch [EDIT] t [PLAYLIST EDIT] t [ADD] t select the desired memory card and image quality. 3 Touch... the movie to be erased from the Playlist, touch [EDIT] t [PLAYLIST EDIT] t [ERASE ALL] t select the desired memory card and image... To erase unnecessary movies from the Playlist 1 Press the MODE button. 2 Touch [EDIT] t [PLAYLIST EDIT] t [ERASE] t select the desired memory card and image quality. • ...
Operating Guide (Large File - 11.29 MB)
Page 59
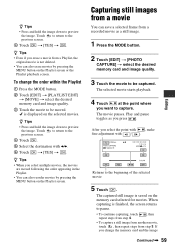
...Press and hold the image down to the previous screen. 4 Touch t [YES] t . To change the memory card and the image Continued , 59 Editing Touch to return to be captured. z Tips • Press and hold the image down to preview the image. z Tips • Even if you press... . After you change the order within the Playlist 1 Press the MODE button. 2 Touch [EDIT] t [PLAYLIST EDIT] t [MOVE] t select the desired memory card and image quality. 3 Touch the movie to the previous screen. 4 Touch . 5 Select the destination ...
...Press and hold the image down to the previous screen. 4 Touch t [YES] t . To change the memory card and the image Continued , 59 Editing Touch to return to be captured. z Tips • Press and hold the image down to preview the image. z Tips • Even if you press... . After you change the order within the Playlist 1 Press the MODE button. 2 Touch [EDIT] t [PLAYLIST EDIT] t [MOVE] t select the desired memory card and image quality. 3 Touch the movie to the previous screen. 4 Touch . 5 Select the destination ...
Operating Guide (Large File - 11.29 MB)
Page 60
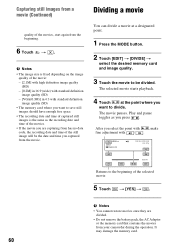
... (Continued) quality of the still image will be divided. The selected movie starts playback. 4 Touch at a designated point. 1 Press the MODE button. 2 Touch [EDIT] t [DIVIDE] t select the desired memory card and image quality. 3 Touch the movie to save still images should have enough free space. • The recording... you are divided. • Do not remove the battery pack, the AC Adaptor or the memory card that contains the movies from your camcorder during the operation. Dividing a movie You can divide a movie at the point where you want to be the date and time you want...
... (Continued) quality of the still image will be divided. The selected movie starts playback. 4 Touch at a designated point. 1 Press the MODE button. 2 Touch [EDIT] t [DIVIDE] t select the desired memory card and image quality. 3 Touch the movie to save still images should have enough free space. • The recording... you are divided. • Do not remove the battery pack, the AC Adaptor or the memory card that contains the movies from your camcorder during the operation. Dividing a movie You can divide a movie at the point where you want to be the date and time you want...
Operating Guide (Large File - 11.29 MB)
Page 61
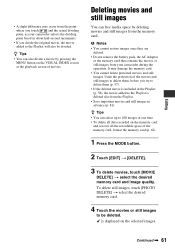
... card. 4 Touch the movies or still images to the Playlist is deleted also from your camcorder selects the dividing point based in about half-second increments. • If you try to ...playback screen of the memory card, format the memory card (p. 62). 1 Press the MODE button. 2 Touch [EDIT] t [DELETE]. 3 To delete movies, touch [MOVIE DELETE] t select the desired memory card and image ...quality. is included in advance (p. 81). z Tips • You can free media space by pressing the MENU button on the selected images. Deleting movies and still images You can...
... card. 4 Touch the movies or still images to the Playlist is deleted also from your camcorder selects the dividing point based in about half-second increments. • If you try to ...playback screen of the memory card, format the memory card (p. 62). 1 Press the MODE button. 2 Touch [EDIT] t [DELETE]. 3 To delete movies, touch [MOVIE DELETE] t select the desired memory card and image ...quality. is included in advance (p. 81). z Tips • You can free media space by pressing the MENU button on the selected images. Deleting movies and still images You can...
Operating Guide (Large File - 11.29 MB)
Page 63
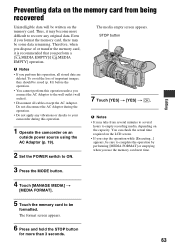
... images, they should be saved (p. 81) before the operation. • You cannot perform this operation unless you perform this operation. 1 Operate the camcorder on the LCD screen. • If you stop the operation while [Executing...] appears, be some data remaining. To avoid the loss of or transfer... the memory card, it may be sure to ON. Editing 3 Press the MODE button. 4 Touch [MANAGE MEDIA] t [MEDIA FORMAT]. 5 Touch the memory card to empty recording media, depending on the memory card.
... images, they should be saved (p. 81) before the operation. • You cannot perform this operation unless you perform this operation. 1 Operate the camcorder on the LCD screen. • If you stop the operation while [Executing...] appears, be some data remaining. To avoid the loss of or transfer... the memory card, it may be sure to ON. Editing 3 Press the MODE button. 4 Touch [MANAGE MEDIA] t [MEDIA FORMAT]. 5 Touch the memory card to empty recording media, depending on the memory card.
Operating Guide (Large File - 11.29 MB)
Page 68
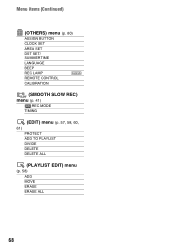
Menu items (Continued) (OTHERS) menu (p. 80) ASSIGN BUTTON CLOCK SET AREA SET DST SET/ SUMMERTIME LANGUAGE BEEP REC LAMP REMOTE CONTROL CALIBRATION (SMOOTH SLOW REC) menu (p. 41) REC MODE TIMING (EDIT) menu (p. 57, 58, 60, 61) PROTECT ADD TO PLAYLIST DIVIDE DELETE DELETE ALL (PLAYLIST EDIT) menu (p. 58) ADD MOVE ERASE ERASE ALL 68
Menu items (Continued) (OTHERS) menu (p. 80) ASSIGN BUTTON CLOCK SET AREA SET DST SET/ SUMMERTIME LANGUAGE BEEP REC LAMP REMOTE CONTROL CALIBRATION (SMOOTH SLOW REC) menu (p. 41) REC MODE TIMING (EDIT) menu (p. 57, 58, 60, 61) PROTECT ADD TO PLAYLIST DIVIDE DELETE DELETE ALL (PLAYLIST EDIT) menu (p. 58) ADD MOVE ERASE ERASE ALL 68
Operating Guide (Large File - 11.29 MB)
Page 81
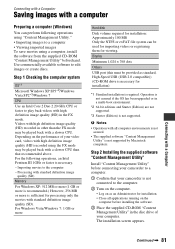
.... *3 Starter (Edition) is necessary. - For the following operations using "Content Management Utility." • Importing images to a computer • Viewing imported images To save movies using the FX mode may be played back with a slower CPU than that your camcorder is not connected to... above. The installation screen appears. Step 2 Installing the supplied software "Content Management Utility" Install "Content Management Utility" before connecting your camcorder to play back videos with standard definition image quality (SD) Memory For Windows XP: 512 MB or more (1 GB or more is...
.... *3 Starter (Edition) is necessary. - For the following operations using "Content Management Utility." • Importing images to a computer • Viewing imported images To save movies using the FX mode may be played back with a slower CPU than that your camcorder is not connected to... above. The installation screen appears. Step 2 Installing the supplied software "Content Management Utility" Install "Content Management Utility" before connecting your camcorder to play back videos with standard definition image quality (SD) Memory For Windows XP: 512 MB or more (1 GB or more is...
Operating Guide (Large File - 11.29 MB)
Page 83
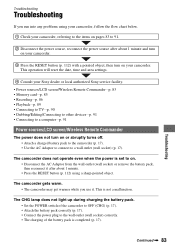
This operation will reset the date, time and area settings. 4 Consult your Sony dealer or local authorized Sony service facility. • Power sources/LCD screen/Wireless Remote Commander···p. 83 • Memory card···p. 85 • ...• Connecting to TV···p. 90 • Dubbing/Editing/Connecting to other devices···p. 91 • Connecting to a computer···p. 91 Power sources/LCD screen/Wireless Remote Commander The power does not turn on your camcorder. 3 Press the RESET button (p. 112) with a pointed object,...
This operation will reset the date, time and area settings. 4 Consult your Sony dealer or local authorized Sony service facility. • Power sources/LCD screen/Wireless Remote Commander···p. 83 • Memory card···p. 85 • ...• Connecting to TV···p. 90 • Dubbing/Editing/Connecting to other devices···p. 91 • Connecting to a computer···p. 91 Power sources/LCD screen/Wireless Remote Commander The power does not turn on your camcorder. 3 Press the RESET button (p. 112) with a pointed object,...
Operating Guide (Large File - 11.29 MB)
Page 85
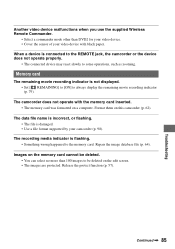
... the edit screen. • The images are protected. When a device is damaged. • Use a file format supported by your video device with the memory card inserted. • The memory card was formatted on this camcorder (p. 62). The data file name is incorrect, or flashing. •... a computer. The recording media indicator is not displayed. • Set [ REMAINING] to [ON] to the memory card. The camcorder does not operate with black paper. Repair the image database file (p. 64). Memory card The remaining movie recording indicator is flashing. • Something wrong happened...
... the edit screen. • The images are protected. When a device is damaged. • Use a file format supported by your video device with the memory card inserted. • The memory card was formatted on this camcorder (p. 62). The data file name is incorrect, or flashing. •... a computer. The recording media indicator is not displayed. • Set [ REMAINING] to [ON] to the memory card. The camcorder does not operate with black paper. Repair the image database file (p. 64). Memory card The remaining movie recording indicator is flashing. • Something wrong happened...
Operating Guide (Large File - 11.29 MB)
Page 89
...standard. This is heard. • Turn up the volume (p. 47). • Movies recorded using [SMOOTH SLOW REC] do not have edited the data on your camcorder (p. 98). • Only the file name is displayed, if the folder structure does not conform to 2ch stereo and played back on... a computer (When viewing still images, the file name flashes). The data file name is displayed incorrectly, or flashing. • The file is damaged. • The file format is not supported on your camcorder. Troubleshooting Playback Refer also to [ON]. • Bars will be displayed...
...standard. This is heard. • Turn up the volume (p. 47). • Movies recorded using [SMOOTH SLOW REC] do not have edited the data on your camcorder (p. 98). • Only the file name is displayed, if the folder structure does not conform to 2ch stereo and played back on... a computer (When viewing still images, the file name flashes). The data file name is displayed incorrectly, or flashing. • The file is damaged. • The file format is not supported on your camcorder. Troubleshooting Playback Refer also to [ON]. • Bars will be displayed...
Operating Guide (Large File - 11.29 MB)
Page 91
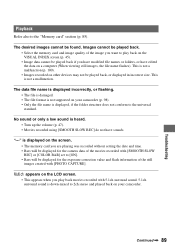
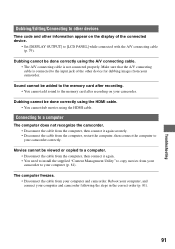
Troubleshooting Dubbing/Editing/Connecting to other devices Time code and other device for dubbing images from your computer and camcorder. Movies cannot be done correctly using the HDMI cable. Connecting to a computer The computer does not recognize the camcorder. • Disconnect the cable from the... to a computer. • Disconnect the cable from the computer, then connect it again securely. • Disconnect the cable from your camcorder to your computer (p. 81). Sound cannot be done correctly using the HDMI cable. • You cannot dub movies using the A/V connecting...
Troubleshooting Dubbing/Editing/Connecting to other devices Time code and other device for dubbing images from your computer and camcorder. Movies cannot be done correctly using the HDMI cable. Connecting to a computer The computer does not recognize the camcorder. • Disconnect the cable from the... to a computer. • Disconnect the cable from the computer, then connect it again securely. • Disconnect the cable from your camcorder to your computer (p. 81). Sound cannot be done correctly using the HDMI cable. • You cannot dub movies using the A/V connecting...
Operating Guide (Large File - 11.29 MB)
Page 94
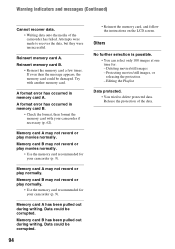
... card B may not record or play movies normally. • Use the memory card recommended for your camcorder (p. 9). Memory card B may not record or play normally. • Use the memory card recommended for...the memory card, and follow the instructions on the LCD screen. Deleting movies/still images - Editing the Playlist Data protected. • You tried to recover the data, but they were unsuccessful..... Warning indicators and messages (Continued) Cannot recover data. • Writing data onto the media of the data. A format error has occurred in memory card B. • Check the...
... card B may not record or play movies normally. • Use the memory card recommended for your camcorder (p. 9). Memory card B may not record or play normally. • Use the memory card recommended for...the memory card, and follow the instructions on the LCD screen. Deleting movies/still images - Editing the Playlist Data protected. • You tried to recover the data, but they were unsuccessful..... Warning indicators and messages (Continued) Cannot recover data. • Writing data onto the media of the data. A format error has occurred in memory card B. • Check the...
Operating Guide (Large File - 11.29 MB)
Page 116
...screen 20 Lens 103 Lens cover lever 16 M MANAGE MEDIA 62 MARKER 77, 87 MEDIA FORMAT 62 Memory card 9 Insert/Eject 23 Memory card slot 23 "Memory Stick Duo" media slot cover 23 "Memory Stick" media 9, 99 "Memory Stick PRO Duo" media 99 Menu 65 AUDIO SET menu ........75 CAMERA SET ... power source........... 19 P PAL 97 PEAKING 77, 87 PHOTO CAPTURE 59 Picture profile 35 PICTURE PROFILE button 35 Playback 45 PLAYLIST 58 PLAYLIST EDIT 58 Power cord (mains lead) ...... 17 POWER switch 19 Pre-installed rechargeable battery 103 PROTECT 57 PUSH AUTO button 30 Push auto focus ...
...screen 20 Lens 103 Lens cover lever 16 M MANAGE MEDIA 62 MARKER 77, 87 MEDIA FORMAT 62 Memory card 9 Insert/Eject 23 Memory card slot 23 "Memory Stick Duo" media slot cover 23 "Memory Stick" media 9, 99 "Memory Stick PRO Duo" media 99 Menu 65 AUDIO SET menu ........75 CAMERA SET ... power source........... 19 P PAL 97 PEAKING 77, 87 PHOTO CAPTURE 59 Picture profile 35 PICTURE PROFILE button 35 Playback 45 PLAYLIST 58 PLAYLIST EDIT 58 Power cord (mains lead) ...... 17 POWER switch 19 Pre-installed rechargeable battery 103 PROTECT 57 PUSH AUTO button 30 Push auto focus ...
Marketing Specifications
Page 1
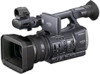
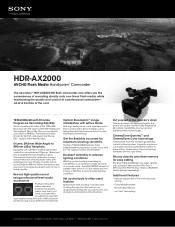
... highest possible bit-rate for maximum shooting versatility. HDR-AX2000 AVCHD Flash Media Handycam® Camcorder The new Sony® HDR-AX2000 HD flash camcorder now offers you 're shooting a wedding by ...sony.com the HDR-AX2000 will record superb video down to assist in Sony® image stabilization technology. than a shaky video. The Sony® HDR-AX2000 features three independent manual rings-zoom, focus and iris-for easy editing The Sony® HDR-AX2000 records video directly onto compact Memory Stick PRO Duo™/ Memory Stick PRO-HG Duo media or SD/SDHC media...
... highest possible bit-rate for maximum shooting versatility. HDR-AX2000 AVCHD Flash Media Handycam® Camcorder The new Sony® HDR-AX2000 HD flash camcorder now offers you 're shooting a wedding by ...sony.com the HDR-AX2000 will record superb video down to assist in Sony® image stabilization technology. than a shaky video. The Sony® HDR-AX2000 features three independent manual rings-zoom, focus and iris-for easy editing The Sony® HDR-AX2000 records video directly onto compact Memory Stick PRO Duo™/ Memory Stick PRO-HG Duo media or SD/SDHC media...


