Operating Instructions
Page 5
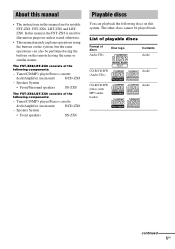
... the remote having the same or similar names. The FST-ZX8/LBT-ZX8 consists of discs Audio CDs Disc logo Contents Audio CD-R/CD-RW (Audio CDs) CD-R/CD-RW (Discs with MP3 audio tracks) Audio Audio continued 5GB List of playable discs Format of the following components: - In this system. Tuner/CD/MP3 player/Stereo cassette deck/Amplifier (main unit) HCD-ZX6...
... the remote having the same or similar names. The FST-ZX8/LBT-ZX8 consists of discs Audio CDs Disc logo Contents Audio CD-R/CD-RW (Audio CDs) CD-R/CD-RW (Discs with MP3 audio tracks) Audio Audio continued 5GB List of playable discs Format of the following components: - In this system. Tuner/CD/MP3 player/Stereo cassette deck/Amplifier (main unit) HCD-ZX6...
Operating Instructions
Page 9
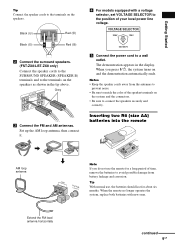
...terminals on and the demonstration automatically ends. Tip With normal use the remote for about six months. Extend the FM lead antenna horizontally continued 9GB When the remote no longer operates the system, replace both batteries with a voltage selector, set VOLTAGE SELECTOR to...Grey L R (SPFERAOKNERT A) 3 Connect the FM and AM antennas. Inserting two R6 (size AA) batteries into the remote e E E e AM loop antenna AM FCOMA7X5IAL Note If you press ?/1, the system turns on the speakers. Black (#) Black (#) Red (3) Red (3) 2 Connect the surround speakers. (FST-ZX8/LBT...
...terminals on and the demonstration automatically ends. Tip With normal use the remote for about six months. Extend the FM lead antenna horizontally continued 9GB When the remote no longer operates the system, replace both batteries with a voltage selector, set VOLTAGE SELECTOR to...Grey L R (SPFERAOKNERT A) 3 Connect the FM and AM antennas. Inserting two R6 (size AA) batteries into the remote e E E e AM loop antenna AM FCOMA7X5IAL Note If you press ?/1, the system turns on the speakers. Black (#) Black (#) Red (3) Red (3) 2 Connect the surround speakers. (FST-ZX8/LBT...
Operating Instructions
Page 11
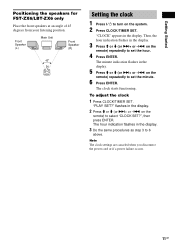
... step 3 to set the hour. 4 Press ENTER. on the remote) to turn on the remote) repeatedly to 6 above. The hour indication flashes in the display. "PLAY SET?" Getting Started Positioning the speakers for FST-ZX6/LBT-ZX6 only Place the front speakers at an angle of 45 degrees from... your listening position. flashes in the display. 2 Press M or m (or >+ or -. Front Speaker (L) Main Unit Front Speaker (R) 45 Setting the clock 1 Press ?/1 to select "CLOCK SET?", then press ENTER. on the system. 2...
... step 3 to set the hour. 4 Press ENTER. on the remote) to turn on the remote) repeatedly to 6 above. The hour indication flashes in the display. "PLAY SET?" Getting Started Positioning the speakers for FST-ZX6/LBT-ZX6 only Place the front speakers at an angle of 45 degrees from... your listening position. flashes in the display. 2 Press M or m (or >+ or -. Front Speaker (L) Main Unit Front Speaker (R) 45 Setting the clock 1 Press ?/1 to select "CLOCK SET?", then press ENTER. on the system. 2...
Operating Instructions
Page 12
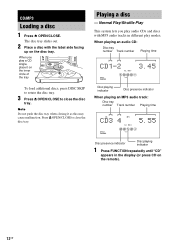
...To load additional discs, press DISC SKIP to rotate the disc tray. 3 Press Z OPEN/CLOSE to close the disc tray. When playing an audio CD: Disc tray number Track number Playing time EFFECT X-GROOVE ALL DISC S 1 2 34 5 j Disc playing indicator Disc presence indicator When playing an ... 1 Press Z OPEN/CLOSE. Playing a disc - When you play a CD single, place it as this may cause malfunction. Normal Play/Shuffle Play This system lets you play audio CDs and discs with the label side facing up on the remote). 12GB The disc tray slides out. 2 Place a disc with MP3 audio...
...To load additional discs, press DISC SKIP to rotate the disc tray. 3 Press Z OPEN/CLOSE to close the disc tray. When playing an audio CD: Disc tray number Track number Playing time EFFECT X-GROOVE ALL DISC S 1 2 34 5 j Disc playing indicator Disc presence indicator When playing an ... 1 Press Z OPEN/CLOSE. Playing a disc - When you play a CD single, place it as this may cause malfunction. Normal Play/Shuffle Play This system lets you play audio CDs and discs with the label side facing up on the remote). 12GB The disc tray slides out. 2 Place a disc with MP3 audio...
Operating Instructions
Page 13
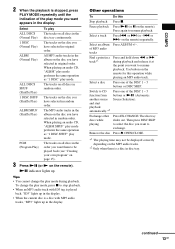
... audio track with ID3 tag is played back, "ID3" lights up in original order. Pause playback Press NX (or X on the remote) repeatedly. Select a track Press . or >+ on the remote). or > (or -. Select an album Press ALBUM +/-. Use button on the disc you have selected in the display. • ... is a disc in original order. PGM (Program Play) The tracks on the disc you have selected in the order you want to exchange. CD/MP3 2 When the playback is stopped, press PLAY MODE repeatedly until the indication of the play mode you want to resume playback. ALL DISCS ...
... audio track with ID3 tag is played back, "ID3" lights up in original order. Pause playback Press NX (or X on the remote) repeatedly. Select a track Press . or >+ on the remote). or > (or -. Select an album Press ALBUM +/-. Use button on the disc you have selected in the display. • ... is a disc in original order. PGM (Program Play) The tracks on the disc you have selected in the order you want to exchange. CD/MP3 2 When the playback is stopped, press PLAY MODE repeatedly until the indication of the play mode you want to resume playback. ALL DISCS ...

Operating Instructions
Page 14
..., can also be played back. • When naming the MP3 audio tracks, be recognize by CD power manage function (page 17). • If you press CD on the remote while the system is turned off , the system turns on automatically and "CD" is skipped. • The maximum number of albums on the encoding/writing software, recording...
..., can also be played back. • When naming the MP3 audio tracks, be recognize by CD power manage function (page 17). • If you press CD on the remote while the system is turned off , the system turns on automatically and "CD" is skipped. • The maximum number of albums on the encoding/writing software, recording...
Operating Instructions
Page 15
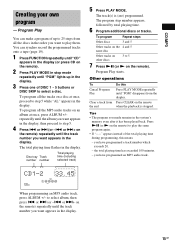
...5 Other tracks on the 4 and 5 same disc Other tracks on other discs 3 to 5 7 Press NX (or N on the remote) repeatedly until the album you made remains in the system's memory even after it has been played back. Other operations To Cancel Program Play Clear a track from the end Do this... means: - or >+ on the remote). 2 Press PLAY MODE in the display. 15GB CD/MP3 Creating your own program - You can make...
...5 Other tracks on the 4 and 5 same disc Other tracks on other discs 3 to 5 7 Press NX (or N on the remote) repeatedly until the album you made remains in the system's memory even after it has been played back. Other operations To Cancel Program Play Clear a track from the end Do this... means: - or >+ on the remote). 2 Press PLAY MODE in the display. 15GB CD/MP3 Creating your own program - You can make...
Operating Instructions
Page 16
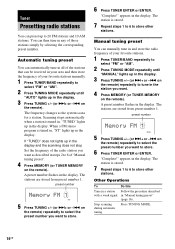
... on the remote) repeatedly to...the stations that can be received in your area and then... preset number 1. on the remote) repeatedly to tune in steps...+/- (or >+ or -. on the remote) repeatedly to store. 6 Press TUNER ...or TUNER MEMORY on the remote). When a FM stereo program is stored. 7... Repeat steps 1 to 6 to select "FM" or "AM". 2 Press TUNING MODE repeatedly until "MANUAL" lights up in and store the radio frequency of "Manual tuning preset". 4 Press MEMORY (or TUNER MEMORY on the remote...the display. on the remote). Tuner Presetting radio stations ...
... on the remote) repeatedly to...the stations that can be received in your area and then... preset number 1. on the remote) repeatedly to tune in steps...+/- (or >+ or -. on the remote) repeatedly to store. 6 Press TUNER ...or TUNER MEMORY on the remote). When a FM stereo program is stored. 7... Repeat steps 1 to 6 to select "FM" or "AM". 2 Press TUNING MODE repeatedly until "MANUAL" lights up in and store the radio frequency of "Manual tuning preset". 4 Press MEMORY (or TUNER MEMORY on the remote...the display. on the remote). Tuner Presetting radio stations ...

Operating Instructions
Page 17
...Listening to the radio You can also press FUNCTION repeatedly to tune in the display. 2 Press ?/1 to turn off the system. 3 Press ?/1 while holding down x (CD). on the remote) repeatedly to select "TUNER". "AM 10k STEP" or "AM 9k STEP" appears in the display. To reset the interval...When you want . Tips • To improve broadcast reception, adjust the supplied antennas, or connect an external antenna. • When an FM stereo program has static noise, press FM MODE repeatedly until "MANUAL" lights up in the display. Manual Tuning 1 Press TUNER/BAND repeatedly to non-...
...Listening to the radio You can also press FUNCTION repeatedly to tune in the display. 2 Press ?/1 to turn off the system. 3 Press ?/1 while holding down x (CD). on the remote) repeatedly to select "TUNER". "AM 10k STEP" or "AM 9k STEP" appears in the display. To reset the interval...When you want . Tips • To improve broadcast reception, adjust the supplied antennas, or connect an external antenna. • When an FM stereo program has static noise, press FM MODE repeatedly until "MANUAL" lights up in the display. Manual Tuning 1 Press TUNER/BAND repeatedly to non-...
Operating Instructions
Page 18
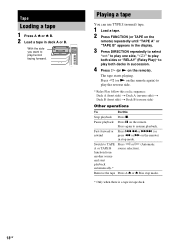
... side) t Deck B (reverse side) Other operations To Do this Stop playback Press x. Press h (or N on the remote again) to play both decks in deck A or B. Pause playback Press X on the remote. Switch to resume playback. Playing a tape You can use TYPE I (normal) tape. 1 Load a tape. 2 Press ...to play both sides or "RELAY" (Relay Play)* to play /record facing forward. Fast-forward or rewind Press .m or M> (or press m or M on the remote) in stop mode. * Only when there is a tape in stop mode. Remove the tape Press A Z or Z B in tape deck. 18GB Tape Loading a ...
... side) t Deck B (reverse side) Other operations To Do this Stop playback Press x. Press h (or N on the remote again) to play both decks in deck A or B. Pause playback Press X on the remote. Switch to resume playback. Playing a tape You can use TYPE I (normal) tape. 1 Load a tape. 2 Press ...to play both sides or "RELAY" (Relay Play)* to play /record facing forward. Fast-forward or rewind Press .m or M> (or press m or M on the remote) in stop mode. * Only when there is a tape in stop mode. Remove the tape Press A Z or Z B in tape deck. 18GB Tape Loading a ...
Operating Instructions
Page 19
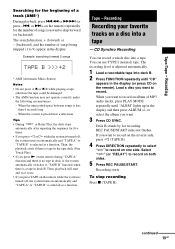
... turned off , the system turns on the remote). Tape/Tape - Example: searching forward 2 songs * AMS (Automatic Music Sensor) Notes • Do not press A Z or Z B while playing a tape, otherwise the tape could be damaged. • The AMS function may not operate correctly under the following circumstances: - CD Synchro Recording You can use TYPE I (normal...
... turned off , the system turns on the remote). Tape/Tape - Example: searching forward 2 songs * AMS (Automatic Music Sensor) Notes • Do not press A Z or Z B while playing a tape, otherwise the tape could be damaged. • The AMS function may not operate correctly under the following circumstances: - CD Synchro Recording You can use TYPE I (normal...
Operating Instructions
Page 20
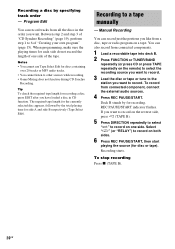
...for recording a disc, press EDIT after you have loaded a disc in the order you like from connected components. 1 Load a recordable tape into deck B. 2 Press FUNCTION or TUNER/BAND repeatedly (or press CD or press TAPE repeatedly on a tape. Manual Recording You can record just the portions you want. Recording ...You cannot listen to record. REC PAUSE/START indicator flashes. Program Edit You can also record from a disc, tape or radio program on the remote) to select the recording source you want to record. 3 Load the disc or tape or tune to the station you want to other sources ...
...for recording a disc, press EDIT after you have loaded a disc in the order you like from connected components. 1 Load a recordable tape into deck B. 2 Press FUNCTION or TUNER/BAND repeatedly (or press CD or press TAPE repeatedly on a tape. Manual Recording You can record just the portions you want. Recording ...You cannot listen to record. REC PAUSE/START indicator flashes. Program Edit You can also record from a disc, tape or radio program on the remote) to select the recording source you want to record. 3 Load the disc or tape or tune to the station you want to other sources ...
Operating Instructions
Page 21
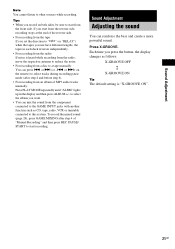
... tape: If you set the direction to "j" (or "RELAY") when the tapes you record on the remote) to start from the front side. Each time you want. • You can mix the sound from...select tracks during recording pause mode (after step 4 and before step 6). • For recording from the component connected to the GAME INPUT jacks with another function such as follows: X-GROOVE OFF Y X-GROOVE ON Tip...X-GROOVE. to select the album you press the button, the display changes as CD, tape, radio, VCR or turntable connected to other sources while recording. or > (or -. Sound Adjustment Note...
... tape: If you set the direction to "j" (or "RELAY") when the tapes you record on the remote) to start from the front side. Each time you want. • You can mix the sound from...select tracks during recording pause mode (after step 4 and before step 6). • For recording from the component connected to the GAME INPUT jacks with another function such as follows: X-GROOVE OFF Y X-GROOVE ON Tip...X-GROOVE. to select the album you press the button, the display changes as CD, tape, radio, VCR or turntable connected to other sources while recording. or > (or -. Sound Adjustment Note...
Operating Instructions
Page 22
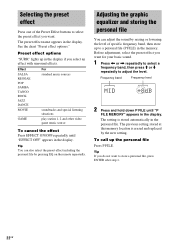
The preset effect name appears in the display. Tip You can adjust the sound by pressing EQ on the remote repeatedly. To call up the personal file Press P FILE. See the chart "Preset effect options." The previous setting stored at this memory location is stored ...
The preset effect name appears in the display. Tip You can adjust the sound by pressing EQ on the remote repeatedly. To call up the personal file Press P FILE. See the chart "Preset effect options." The previous setting stored at this memory location is stored ...
Operating Instructions
Page 27
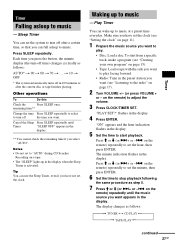
t 10 t OFF * The system automatically turns off time) changes cyclically as follows: AUTO* t 90 t 80 t 70 t ... Other operations To Do this Check the Press SLEEP once. Waking up to adjust the volume. 3 Press CLOCK/TIMER SET. on the remote) repeatedly to set the hour, then press ENTER... or m (or >+ or -. Make sure you want to "AUTO" during CD Synchro Recording on the remote) repeatedly until Timer "SLEEP OFF" appears in the display. Press SLEEP repeatedly. Notes • Do not set the system to turn -off in 100 minutes or after a certain time, so that you ...
t 10 t OFF * The system automatically turns off time) changes cyclically as follows: AUTO* t 90 t 80 t 70 t ... Other operations To Do this Check the Press SLEEP once. Waking up to adjust the volume. 3 Press CLOCK/TIMER SET. on the remote) repeatedly to set the hour, then press ENTER... or m (or >+ or -. Make sure you want to "AUTO" during CD Synchro Recording on the remote) repeatedly until Timer "SLEEP OFF" appears in the display. Press SLEEP repeatedly. Notes • Do not set the system to turn -off in 100 minutes or after a certain time, so that you ...
Operating Instructions
Page 28
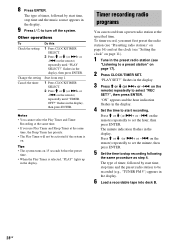
...Play Timer will not be recorded (e.g., "TUNER FM 5") appears in the preset radio station (see "Listening to turn off the system. flashes in the display, then press ENTER. on the remote) repeatedly to set the hour, then press ENTER. on page 17). 2 Press CLOCK/TIMER SET. "PLAY SET?" Press ... step 1. 1 Press CLOCK/TIMER SELECT. 2 Press M or m (or >+ or -. 8 Press ENTER. Tips • The system turns on 15 seconds before the preset time. • When the Play Timer is on the remote) repeatedly until "TIMER OFF?" "ON" appears and the hour indication flashes in the display.
...Play Timer will not be recorded (e.g., "TUNER FM 5") appears in the preset radio station (see "Listening to turn off the system. flashes in the display, then press ENTER. on the remote) repeatedly to set the hour, then press ENTER. on page 17). 2 Press CLOCK/TIMER SET. "PLAY SET?" Press ... step 1. 1 Press CLOCK/TIMER SELECT. 2 Press M or m (or >+ or -. 8 Press ENTER. Tips • The system turns on 15 seconds before the preset time. • When the Play Timer is on the remote) repeatedly until "TIMER OFF?" "ON" appears and the hour indication flashes in the display.
Operating Instructions
Page 29
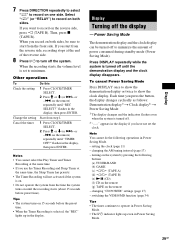
... display if you start from the time the system turns on both sides, be turned off to show the demonstration display or twice to minimize the amount of the reverse side. 8 Press ?/1 to record on one side. on the remote - Cancel the timer 1 Press CLOCK/TIMER... TUNER/BAND (b) GAME (c) h/H (TAPE A) (d) h/H (TAPE B) (e) NX (CD) (f) CD on the remote (g) TAPE on the remote) repeatedly until "TIMER OFF?" flashes in the display, then press ENTER. Press DISPLAY repeatedly while the system is turned off until the recording starts (about 15 seconds before the preset time. &#...
... display if you start from the time the system turns on both sides, be turned off to show the demonstration display or twice to minimize the amount of the reverse side. 8 Press ?/1 to record on one side. on the remote - Cancel the timer 1 Press CLOCK/TIMER... TUNER/BAND (b) GAME (c) h/H (TAPE A) (d) h/H (TAPE B) (e) NX (CD) (f) CD on the remote (g) TAPE on the remote) repeatedly until "TIMER OFF?" flashes in the display, then press ENTER. Press DISPLAY repeatedly while the system is turned off until the recording starts (about 15 seconds before the preset time. &#...
Operating Instructions
Page 31
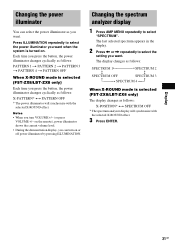
Press ILLUMINATION repeatedly to select the power illuminator you want when the system is selected (FST-ZX8/LBT-ZX8 only) The display changes as follows: X-PATTERN* y PATTERN OFF * The power illuminator will synchronize with the selected X-ROUND effect.... spectrum analyzer display will synchronize with the selected X-ROUND effect. 3 Press ENTER. Changing the power illuminator You can turn VOLUME +/- (or press VOLUME +/- on the remote), power illuminator shows the current volume level. • During the demonstration display, you can select the power illuminator as you turn on .
Press ILLUMINATION repeatedly to select the power illuminator you want when the system is selected (FST-ZX8/LBT-ZX8 only) The display changes as follows: X-PATTERN* y PATTERN OFF * The power illuminator will synchronize with the selected X-ROUND effect.... spectrum analyzer display will synchronize with the selected X-ROUND effect. 3 Press ENTER. Changing the power illuminator You can turn VOLUME +/- (or press VOLUME +/- on the remote), power illuminator shows the current volume level. • During the demonstration display, you can select the power illuminator as you turn on .
Operating Instructions
Page 36
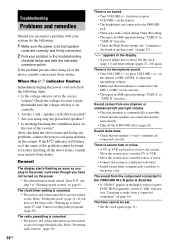
... off the X-ROUND effect (page 24). Move the system away from the TV or VCR. • Move the system away from a connected component" on page 34). speaker cords short-circuited? • Are you encounter a problem with your nearest Sony dealer. The radio presetting is canceled. • The... power cord is disconnected or a power failure occurs. on the remote) or MIC LEVEL ...
... off the X-ROUND effect (page 24). Move the system away from the TV or VCR. • Move the system away from a connected component" on page 34). speaker cords short-circuited? • Are you encounter a problem with your nearest Sony dealer. The radio presetting is canceled. • The... power cord is disconnected or a power failure occurs. on the remote) or MIC LEVEL ...
Operating Instructions
Page 37
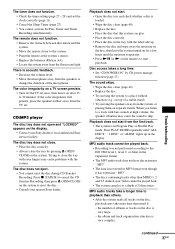
... cannot eject the disc during CD Synchro Recording. Press PLAY MODE repeatedly until the moisture evaporates. • Press NX (or N on separate stands. the number of a stable stand). • Try moving the speakers away from the system, or placing them on the remote) to start playback. The ...size AA). • Locate the system away from the speakers or change the direction of 8 directories. Trying to 30 minutes. Disc access takes a long time. • Set "CD POWER ON" by pressing Z OPEN/ CLOSE on the display. • Contact your nearest Sony dealer. Playback does not start . ...
... cannot eject the disc during CD Synchro Recording. Press PLAY MODE repeatedly until the moisture evaporates. • Press NX (or N on separate stands. the number of a stable stand). • Try moving the speakers away from the system, or placing them on the remote) to start playback. The ...size AA). • Locate the system away from the speakers or change the direction of 8 directories. Trying to 30 minutes. Disc access takes a long time. • Set "CD POWER ON" by pressing Z OPEN/ CLOSE on the display. • Contact your nearest Sony dealer. Playback does not start . ...


