Operating Instructions
Page 5
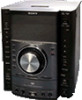
MHC-GZR33Di Main unit: HCD-GZR33D Speaker system: SS-GZR77D (Front speakers) LBT-LCD7Di Main unit: HCD-LCD7Di Speaker system: SS-LCD7Di (Front speakers) In this manual are stored in this manual, the MHC-GZR33Di is used for models MHC-GZR33Di and LBTLCD7Di. Each model consists of the displayed items may be different from the actual display. DivX video files can only be played back on LBT-LCD7Di, when files are for...
MHC-GZR33Di Main unit: HCD-GZR33D Speaker system: SS-GZR77D (Front speakers) LBT-LCD7Di Main unit: HCD-LCD7Di Speaker system: SS-LCD7Di (Front speakers) In this manual are stored in this manual, the MHC-GZR33Di is used for models MHC-GZR33Di and LBTLCD7Di. Each model consists of the displayed items may be different from the actual display. DivX video files can only be played back on LBT-LCD7Di, when files are for...

Operating Instructions
Page 6
... Using the Radio Data System (RDS) (European model only 66 iPod Playing the iPod 67 USB Device Before using the USB device with this system 74 Transferring music from a disc to a USB device 75 Recording analog audio to a USB device 80 Playing a file of the USB device.....81 Sound Adjustment Adjusting the sound 89 Singing along: Karaoke 92 Other Operations Using the timers 97 Changing the display 99 Hooking up optional components...
... Using the Radio Data System (RDS) (European model only 66 iPod Playing the iPod 67 USB Device Before using the USB device with this system 74 Transferring music from a disc to a USB device 75 Recording analog audio to a USB device 80 Playing a file of the USB device.....81 Sound Adjustment Adjusting the sound 89 Singing along: Karaoke 92 Other Operations Using the timers 97 Changing the display 99 Hooking up optional components...

Operating Instructions
Page 15
... switch the operating mode to select the frequency band when adjusting the equalizer. USB* button (page 78, 81, 92) Press to select the sound effect. PRESET EQ button (page 89) Press to select the "USB" function. VIDEO/SAT* button (page 106) Press to select the "VIDEO" or "SAT" function. Remote sensor (page 108) DISPLAY button (page 28, 32, 99, 100) Press to display the disc information or clock in the front panel display. MASTER VOLUME Turn...
... switch the operating mode to select the frequency band when adjusting the equalizer. USB* button (page 78, 81, 92) Press to select the sound effect. PRESET EQ button (page 89) Press to select the "USB" function. VIDEO/SAT* button (page 106) Press to select the "VIDEO" or "SAT" function. Remote sensor (page 108) DISPLAY button (page 28, 32, 99, 100) Press to display the disc information or clock in the front panel display. MASTER VOLUME Turn...

Operating Instructions
Page 17
D. TUNING button (page 64) Press to switch to the direct tuning mode. MEMORY SELECT button (page 87, 88) Press to select the playback source or transferring destination on the TV screen. The Control Menu is displayed only when the "DVD" function or "USB" function is selected. PRESET + button (page 65) Press to select the preset station. (go forward) button (page 35, 37, 42, 51, 68, 71, 84, 100) Press to adjust the volume. TV...
D. TUNING button (page 64) Press to switch to the direct tuning mode. MEMORY SELECT button (page 87, 88) Press to select the playback source or transferring destination on the TV screen. The Control Menu is displayed only when the "DVD" function or "USB" function is selected. PRESET + button (page 65) Press to select the preset station. (go forward) button (page 35, 37, 42, 51, 68, 71, 84, 100) Press to adjust the volume. TV...

Operating Instructions
Page 27
... iPod through the COMPONENT VIDEO OUT jacks of this unit. You cannot output the video signal from this system. Notes You cannot output the video signal from the VIDEO/SAT VIDEO IN jack through the COMPONENT VIDEO OUT jacks of this unit. Continued 27GB Getting Started Hooking up the TV Connect the video input jack of your TV to the VIDEO OUT jack with progressive format signals, use the optional component video cords to connect the COMPONENT VIDEO input jacks...
... iPod through the COMPONENT VIDEO OUT jacks of this unit. You cannot output the video signal from this system. Notes You cannot output the video signal from the VIDEO/SAT VIDEO IN jack through the COMPONENT VIDEO OUT jacks of this unit. Continued 27GB Getting Started Hooking up the TV Connect the video input jack of your TV to the VIDEO OUT jack with progressive format signals, use the optional component video cords to connect the COMPONENT VIDEO input jacks...

Operating Instructions
Page 32
... flashes in a 4:3-format. Setting the LCD The default setting is displayed. CINEMA: For viewing film-based content. VIVID: Enhances picture contrast and sharpness. PHOTO: For viewing photographs. WIDE MODE FULL: Select this when you disconnect the power cord or if a power failure occurs. The clock is displayed for home entertainment. PICTURE MODE Allows you view pictures in a 16:9-format. Setting the clock Use buttons on the remote to set...
... flashes in a 4:3-format. Setting the LCD The default setting is displayed. CINEMA: For viewing film-based content. VIVID: Enhances picture contrast and sharpness. PHOTO: For viewing photographs. WIDE MODE FULL: Select this when you disconnect the power cord or if a power failure occurs. The clock is displayed for home entertainment. PICTURE MODE Allows you view pictures in a 16:9-format. Setting the clock Use buttons on the remote to set...

Operating Instructions
Page 39
... settings in the Setup Menu. you changed the "PARENTAL CONTROL" level. You cannot search for the first disc will be deleted. Disc Notes You cannot perform resume playback during Shuffle Play or Program Play. Resume playback may not work properly with some discs. Resume playback is canceled when you press when playback is set "MULTI-DISC RESUME" in Repeat Play mode...
... settings in the Setup Menu. you changed the "PARENTAL CONTROL" level. You cannot search for the first disc will be deleted. Disc Notes You cannot perform resume playback during Shuffle Play or Program Play. Resume playback may not work properly with some discs. Resume playback is canceled when you press when playback is set "MULTI-DISC RESUME" in Repeat Play mode...

Operating Instructions
Page 40
... mode: The number of language and audio format varies. When the same language is displayed two or more times, the DVD VIDEO is underlined. Some DVD VIDEOs allow you can select the sound from both the right and left channel, you to select the desired audio format or mode. When playing a DVD-R/-RW in multiple audio formats. When playing a DivX video file (MHC‑GZR33Di only): The options for the sound using DVD/TUNER MENU. When playing a VIDEO...
... mode: The number of language and audio format varies. When the same language is displayed two or more times, the DVD VIDEO is underlined. Some DVD VIDEOs allow you can select the sound from both the right and left channel, you to select the desired audio format or mode. When playing a DVD-R/-RW in multiple audio formats. When playing a DivX video file (MHC‑GZR33Di only): The options for the sound using DVD/TUNER MENU. When playing a VIDEO...
Operating Instructions
Page 48
.../FM MODE repeatedly. "REP" lights up in the display when Repeat Play is set to "ALL DISCS," "ONE DISC," "FOLDER" or "ON." "REP1" lights up in step 3. When Program Play or Shuffle Play is selected). you perform CD Synchro Recording and USB TRANSFER. you change the disc (except when "ALL DISCS" is selected). you turn off the system. you transfer music from a disc...
.../FM MODE repeatedly. "REP" lights up in the display when Repeat Play is set to "ALL DISCS," "ONE DISC," "FOLDER" or "ON." "REP1" lights up in step 3. When Program Play or Shuffle Play is selected). you perform CD Synchro Recording and USB TRANSFER. you change the disc (except when "ALL DISCS" is selected). you turn off the system. you transfer music from a disc...

Operating Instructions
Page 57
.... "PARENTAL CONTROL" setting is selected. To turn off the "PARENTAL CONTROL" function Set "LEVEL" to select "LEVEL," then press ENTER. Disc 6 Enter or re-enter your password, re-enter it using the numeric buttons, then press ENTER. Continued 57GB The display for "STANDARD" appear on the TV screen. 7 Press or repeatedly to select a geographic area as the playback limitation level, then press ENTER. To change the password...
.... "PARENTAL CONTROL" setting is selected. To turn off the "PARENTAL CONTROL" function Set "LEVEL" to select "LEVEL," then press ENTER. Disc 6 Enter or re-enter your password, re-enter it using the numeric buttons, then press ENTER. Continued 57GB The display for "STANDARD" appear on the TV screen. 7 Press or repeatedly to select a geographic area as the playback limitation level, then press ENTER. To change the password...
Operating Instructions
Page 62
... dynamic range fully. Setting the system "SYSTEM SETUP" SCREEN SAVER The screen saver will help prevent your display device from PCM, DTS, Dolby Digital, to MPEG. 3) When you play back a DVD VIDEO on the disc (DVD VIDEO, CD-Extra, etc.). The background color or picture is displayed when playback is underlined. ON: The screen saver image appears if you do not operate the system for watching movies at low volume late...
... dynamic range fully. Setting the system "SYSTEM SETUP" SCREEN SAVER The screen saver will help prevent your display device from PCM, DTS, Dolby Digital, to MPEG. 3) When you play back a DVD VIDEO on the disc (DVD VIDEO, CD-Extra, etc.). The background color or picture is displayed when playback is underlined. ON: The screen saver image appears if you do not operate the system for watching movies at low volume late...

Operating Instructions
Page 63
... "SPEAKER SETUP" when you have connected the subwoofer. OFF: Does not store the resume playback point in "CONNECTION" cannot be selected. 63GB RESET* Returns "SETUP" settings to http://www. divx.com on the settings of "CONNECTION" to default setting. Disc DivX (MHC-GZR33Di only) Displays the registration code for this if the subwoofer is not connected. However, note that are set to the unit. 2) Depending on the Internet. MULTI-DISC RESUME (DVD VIDEO and VIDEO...
... "SPEAKER SETUP" when you have connected the subwoofer. OFF: Does not store the resume playback point in "CONNECTION" cannot be selected. 63GB RESET* Returns "SETUP" settings to http://www. divx.com on the settings of "CONNECTION" to default setting. Disc DivX (MHC-GZR33Di only) Displays the registration code for this if the subwoofer is not connected. However, note that are set to the unit. 2) Depending on the Internet. MULTI-DISC RESUME (DVD VIDEO and VIDEO...
Operating Instructions
Page 91
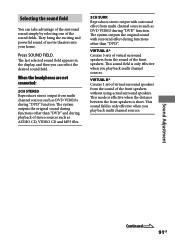
... speakers. Sound Adjustment Continued 91GB When the headphones are not connected: 2CH STEREO Reproduces stereo output from multi channel sources such as DVD VIDEOs during "DVD" function. They bring the exciting and powerful sound of the sound fields. The last selected sound field appears in the display, and then you can take advantage of the surround sound simply by selecting one of movie theaters into your home. This sound field is only effective when you play...
... speakers. Sound Adjustment Continued 91GB When the headphones are not connected: 2CH STEREO Reproduces stereo output from multi channel sources such as DVD VIDEOs during "DVD" function. They bring the exciting and powerful sound of the sound fields. The last selected sound field appears in the display, and then you can take advantage of the surround sound simply by selecting one of movie theaters into your home. This sound field is only effective when you play...

Operating Instructions
Page 103
... a DVD VIDEO. Notes Only alphabet letters, numbers and some symbols can be recorded on a DATA CD/DVD: Elapsed playing time of the current file and folder/file name* * If an MP3 file has the ID3 tag, the system will display an album name or title name from monaural to 5.1 channel signals can be displayed. Example: For Dolby Digital 5.1 channel: 2 Surround components 2 Front components + 1 Center component 1 LFE (Low Frequency Effect) component Other Operations...
... a DVD VIDEO. Notes Only alphabet letters, numbers and some symbols can be recorded on a DATA CD/DVD: Elapsed playing time of the current file and folder/file name* * If an MP3 file has the ID3 tag, the system will display an album name or title name from monaural to 5.1 channel signals can be displayed. Example: For Dolby Digital 5.1 channel: 2 Surround components 2 Front components + 1 Center component 1 LFE (Low Frequency Effect) component Other Operations...

Operating Instructions
Page 105
... can enjoy 5.1 channel sound, if the connected amplifier equipped with Dolby Digital or DTS decoder. Notes Sound is output only when the system function is set "PROGRESSIVE (COMPONENT OUT)" to Karaoke mode, or if you must use this unit. VIDEO OUT jack Connect the video input jack of the TV or projector. DVD DIGITAL OUT jack Connect the digital optical input jack of an optional digital component (such as VCR or satellite tuner). COMPONENT VIDEO OUT jacks Connect the component video input jacks of the...
... can enjoy 5.1 channel sound, if the connected amplifier equipped with Dolby Digital or DTS decoder. Notes Sound is output only when the system function is set "PROGRESSIVE (COMPONENT OUT)" to Karaoke mode, or if you must use this unit. VIDEO OUT jack Connect the video input jack of the TV or projector. DVD DIGITAL OUT jack Connect the digital optical input jack of an optional digital component (such as VCR or satellite tuner). COMPONENT VIDEO OUT jacks Connect the component video input jacks of the...

Operating Instructions
Page 106
... the multi channel sound with the connected amplifier. 3 Start playing a multi channel source, such as a DVD VIDEO. 4 Select the desired audio format. For the speakers placement, refer to the operating instructions supplied with the optional amplifier 1 Connect the digital optical cord. To switch between the "VIDEO" and "SAT" function Hold down VIDEO/SAT on the unit and press on the unit while the system is selected, change the function to "SAT." See "Hooking up optional components" (page 104). 2 Connect the speakers...
... the multi channel sound with the connected amplifier. 3 Start playing a multi channel source, such as a DVD VIDEO. 4 Select the desired audio format. For the speakers placement, refer to the operating instructions supplied with the optional amplifier 1 Connect the digital optical cord. To switch between the "VIDEO" and "SAT" function Hold down VIDEO/SAT on the unit and press on the unit while the system is selected, change the function to "SAT." See "Hooking up optional components" (page 104). 2 Connect the speakers...
Operating Instructions
Page 112
...; Upper cases (A to Z) Numbers (0 to start playback depending on the DVD VIDEO, the output signal may be the entire 5.1 channel. iPod There is no sound. Make sure the iPod is connected securely. Make sure the iPod is distorted. Turn down the volume. Set the "EQ" setting of the iPod to MPEG4 Simple Profile. If not, update the iPod before using with the latest software.
...; Upper cases (A to Z) Numbers (0 to start playback depending on the DVD VIDEO, the output signal may be the entire 5.1 channel. iPod There is no sound. Make sure the iPod is connected securely. Make sure the iPod is distorted. Turn down the volume. Set the "EQ" setting of the iPod to MPEG4 Simple Profile. If not, update the iPod before using with the latest software.
Operating Instructions
Page 118
... set to the COMPONENT VIDEO OUT jacks and play back video-based software in progressive signal format, some sections of the TV screen cannot be changed . Multilingual subtitles are not recorded on the DVD VIDEO being played back. The DVD VIDEO prohibits changing the subtitles. The subtitles cannot be distorted (Australian model only) (page 64). When you connect your TV to interlace format (the default setting...
... set to the COMPONENT VIDEO OUT jacks and play back video-based software in progressive signal format, some sections of the TV screen cannot be changed . Multilingual subtitles are not recorded on the DVD VIDEO being played back. The DVD VIDEO prohibits changing the subtitles. The subtitles cannot be distorted (Australian model only) (page 64). When you connect your TV to interlace format (the default setting...

Operating Instructions
Page 120
... STEP" or "AM 10K STEP" appears in the display. The Control Menu appears on the TV screen. 2 Press or repeatedly to select (SETUP), then press ENTER. 3 Press or repeatedly to the default settings*, perform reset as follows: Use buttons on the unit to reset the system to its factory default settings. 1 Unplug the power cord. 2 Plug the power cord back in. 3 Press to...
... STEP" or "AM 10K STEP" appears in the display. The Control Menu appears on the TV screen. 2 Press or repeatedly to select (SETUP), then press ENTER. 3 Press or repeatedly to the default settings*, perform reset as follows: Use buttons on the unit to reset the system to its factory default settings. 1 Unplug the power cord. 2 Plug the power cord back in. 3 Press to...

Operating Instructions
Page 144
... 5.1 Channel Surround 103, 105 A A/V SYNC 55, 135 AUDIO 60 AUDIO DRC 62 AUDIO SETUP 62 Auto Pause 140 B BACKGROUND 62 Batteries 25 BLACK LEVEL 61 BLACK LEVEL (COMPONENT OUT) 61 C CHAPTER 47, 134 Chapter 37, 140 COLD RESET 120 COLOR SYSTEM (VIDEO CD) 61 COMPONENT VIDEO OUT 29, 105 Controlling the TV 31 Control Menu Display 133 CUSTOM 29, 56, 58 D DATE 104, 135 Demonstration 99 DivX 63, 140 Dolby Digital...
... 5.1 Channel Surround 103, 105 A A/V SYNC 55, 135 AUDIO 60 AUDIO DRC 62 AUDIO SETUP 62 Auto Pause 140 B BACKGROUND 62 Batteries 25 BLACK LEVEL 61 BLACK LEVEL (COMPONENT OUT) 61 C CHAPTER 47, 134 Chapter 37, 140 COLD RESET 120 COLOR SYSTEM (VIDEO CD) 61 COMPONENT VIDEO OUT 29, 105 Controlling the TV 31 Control Menu Display 133 CUSTOM 29, 56, 58 D DATE 104, 135 Demonstration 99 DivX 63, 140 Dolby Digital...

