
Operating Instructions
Page 2
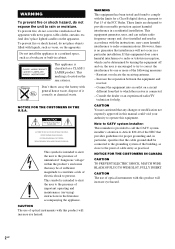
... interference by turning the equipment off and on the apparatus. Reorient or relocate the receiving antenna. - Consult the dealer or an experienced radio/TV technician for a Class B digital device, pursuant to rain or moisture. WARNING This equipment has been tested and found to comply with the limits for help. And don't place lighted candles on , the user is intended...
... interference by turning the equipment off and on the apparatus. Reorient or relocate the receiving antenna. - Consult the dealer or an experienced radio/TV technician for a Class B digital device, pursuant to rain or moisture. WARNING This equipment has been tested and found to comply with the limits for help. And don't place lighted candles on , the user is intended...

Operating Instructions
Page 3
... call; AND CANADA Replace the AC power adaptor with Part 15 of Directive 1999/5/EC. United Kingdom, Germany, France, Italy, Netherlands, Austria, Belgium, Portugal, Switzerland, Norway, Sweden, Denmark, Finland NOTICE FOR THE CUSTOMERS IN THE U.S.A. If you have any questions about this equipment is subject to the following countries. sony customer Information Service Center 1-800-222-7669...
... call; AND CANADA Replace the AC power adaptor with Part 15 of Directive 1999/5/EC. United Kingdom, Germany, France, Italy, Netherlands, Austria, Belgium, Portugal, Switzerland, Norway, Sweden, Denmark, Finland NOTICE FOR THE CUSTOMERS IN THE U.S.A. If you have any questions about this equipment is subject to the following countries. sony customer Information Service Center 1-800-222-7669...

Operating Instructions
Page 4
... Components Hooking up optional components......... 23 Transmitter 24 (CMT-HPX10W only) Troubleshooting Problems and remedies 26 Messages 29 Additional Information Precautions 30 Specifications 31 List of Contents How to the radio 15 - Sleep Timer Waking up the system 7 Setting the clock 9 CD/MP3 - Normal Play/Shuffle Play Playing repeatedly 12 - Manual Tuning Using the Radio Data System (RDS).... 16 (European model only) Tape - Preset Tuning - Program Play Tuner Presetting radio stations 14 Listening to use this manual 5 Playable discs...
... Components Hooking up optional components......... 23 Transmitter 24 (CMT-HPX10W only) Troubleshooting Problems and remedies 26 Messages 29 Additional Information Precautions 30 Specifications 31 List of Contents How to the radio 15 - Sleep Timer Waking up the system 7 Setting the clock 9 CD/MP3 - Normal Play/Shuffle Play Playing repeatedly 12 - Manual Tuning Using the Radio Data System (RDS).... 16 (European model only) Tape - Preset Tuning - Program Play Tuner Presetting radio stations 14 Listening to use this manual 5 Playable discs...
Operating Instructions
Page 8
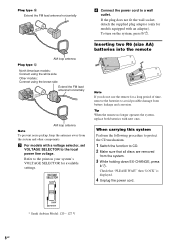
... protect the CD mechanism. 1 Switch the function to avoid possible damage from the system. 3 While holding down EX-CHANGE, press ?/1. If the plug does not fit the wall socket, detach the supplied plug adaptor (only for available settings. 4 Connect the power cord to the local power line voltage. Tip When the remote no longer operates the system, replace both batteries with an adaptor). To turn...
... protect the CD mechanism. 1 Switch the function to avoid possible damage from the system. 3 While holding down EX-CHANGE, press ?/1. If the plug does not fit the wall socket, detach the supplied plug adaptor (only for available settings. 4 Connect the power cord to the local power line voltage. Tip When the remote no longer operates the system, replace both batteries with an adaptor). To turn...
Operating Instructions
Page 14
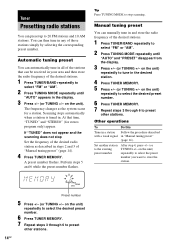
... "AUTO" and "PRESET" disappear from the display. 3 Press +/- (or TUNING +/- Automatic tuning preset You can automatically tune in all of the desired radio station as the system scans for stereo program only) appear. Tip Press TUNING MODE to the existing preset number Do this Follow the procedure described in "Manual tuning preset" (page 14). Other operations To Tune in a station with a weak signal Set another station to stop Set the frequency of the stations that time, "TUNED" and "STEREO" (for a station...
... "AUTO" and "PRESET" disappear from the display. 3 Press +/- (or TUNING +/- Automatic tuning preset You can automatically tune in all of the desired radio station as the system scans for stereo program only) appear. Tip Press TUNING MODE to the existing preset number Do this Follow the procedure described in "Manual tuning preset" (page 14). Other operations To Tune in a station with a weak signal Set another station to stop Set the frequency of the stations that time, "TUNED" and "STEREO" (for a station...
Operating Instructions
Page 15
... "AUTO" and "PRESET" disappear from the display. 3 Press +/- (or TUNING +/- continued 15GB Preset Tuning Preset radio stations in the tuner's memory first (see "Presetting radio stations" on the unit) repeatedly to turn off the power by pressing ?/1 on the unit. To set to on. 1 Press FUNCTION repeatedly to switch the function to CD. 2 Press ?/1 to tune in the desired station. Tuner To improve tuner reception When tuner reception is poor, set CD player power off by manually tuning in...
... "AUTO" and "PRESET" disappear from the display. 3 Press +/- (or TUNING +/- continued 15GB Preset Tuning Preset radio stations in the tuner's memory first (see "Presetting radio stations" on the unit) repeatedly to turn off the power by pressing ?/1 on the unit. To set to on. 1 Press FUNCTION repeatedly to switch the function to CD. 2 Press ?/1 to tune in the desired station. Tuner To improve tuner reception When tuner reception is poor, set CD player power off by manually tuning in...

Operating Instructions
Page 16
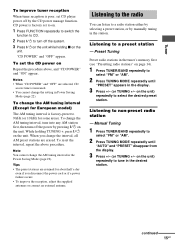
... broadcast reception, adjust the supplied antennas, or connect a commercially available external antenna. • When an FM stereo program has static noise, press FM MODE until "AUTO" appears in a station (Automatic Tuning). • To record the radio programs, use manual recording (page 18). on RDS services in your local radio stations for details on the unit). Receiving RDS broadcasts Simply select a station from the FM band. The frequency indication changes and scanning stops...
... broadcast reception, adjust the supplied antennas, or connect a commercially available external antenna. • When an FM stereo program has static noise, press FM MODE until "AUTO" appears in a station (Automatic Tuning). • To record the radio programs, use manual recording (page 18). on RDS services in your local radio stations for details on the unit). Receiving RDS broadcasts Simply select a station from the FM band. The frequency indication changes and scanning stops...
Operating Instructions
Page 19
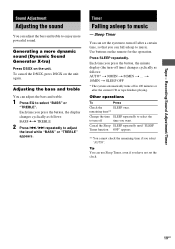
... "SLEEP Timer function OFF" appears. ** You cannot check the remaining time if you press the button, the minute display (the turn off time) changes cyclically as follows: BASS y TREBLE 2 Press ./> repeatedly to select "BASS" or "TREBLE". Recording/Sound Adjustment/Timer Sound Adjustment Adjusting the sound You can adjust the bass and treble. 1 Press EQ to adjust the level while "BASS" or "TREBLE" appears. Use buttons on the remote for the operation. Adjusting the bass and treble You can adjust the bass and treble to music - Press...
... "SLEEP Timer function OFF" appears. ** You cannot check the remaining time if you press the button, the minute display (the turn off time) changes cyclically as follows: BASS y TREBLE 2 Press ./> repeatedly to select "BASS" or "TREBLE". Recording/Sound Adjustment/Timer Sound Adjustment Adjusting the sound You can adjust the bass and treble. 1 Press EQ to adjust the level while "BASS" or "TREBLE" appears. Use buttons on the remote for the operation. Adjusting the bass and treble You can adjust the bass and treble to music - Press...

Operating Instructions
Page 20
To start from a specific track, make a program (see "Creating your own program" on page 13). • TAPE: Load a tape (see "Playing a tape" on page 17). • TUNER: Tune in turn, then the original display returns. 9 Press ?/1 to music - Each time you use the optional component connected to stop time, and the sound source appear in a radio station (see "Listening to the radio" on page 15). 2 Adjust the volume. 3 Press CLOCK/TIMER SET. 4 Press ./> repeatedly until "TIMER...
To start from a specific track, make a program (see "Creating your own program" on page 13). • TAPE: Load a tape (see "Playing a tape" on page 17). • TUNER: Tune in turn, then the original display returns. 9 Press ?/1 to music - Each time you use the optional component connected to stop time, and the sound source appear in a radio station (see "Listening to the radio" on page 15). 2 Adjust the volume. 3 Press CLOCK/TIMER SET. 4 Press ./> repeatedly until "TIMER...
Operating Instructions
Page 21
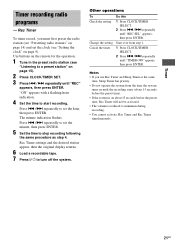
... display returns. 6 Load a recordable tape. 7 Press ?/1 to start recording. Timer Timer recording radio programs - Press ./> repeatedly to set the minute, then press ENTER. 5 Set the time to minimum during recording. • You cannot activate Play Timer and Rec Timer simultaneously. 21GB "ON" appears with a flashing hour indication. 4 Set the time to turn off the system. Notes • If you must first preset the radio station...
... display returns. 6 Load a recordable tape. 7 Press ?/1 to start recording. Timer Timer recording radio programs - Press ./> repeatedly to set the minute, then press ENTER. 5 Set the time to minimum during recording. • You cannot activate Play Timer and Rec Timer simultaneously. 21GB "ON" appears with a flashing hour indication. 4 Set the time to turn off the system. Notes • If you must first preset the radio station...

Operating Instructions
Page 22
... number of the current album** t Disc name** t Clock display t Bass level t Treble level * TOC = Table of the disc. Tips • The ?/1 indicator lights up even in Power Saving Mode. Note You cannot perform the following operations in stop mode. Checking the total playing time and titles (CD/MP3) Press DISPLAY repeatedly in Power Saving Mode. - The ID3 tag displays only the track title information. Each time you press the button, the display changes...
... number of the current album** t Disc name** t Clock display t Bass level t Treble level * TOC = Table of the disc. Tips • The ?/1 indicator lights up even in Power Saving Mode. Note You cannot perform the following operations in stop mode. Checking the total playing time and titles (CD/MP3) Press DISPLAY repeatedly in Power Saving Mode. - The ID3 tag displays only the track title information. Each time you press the button, the display changes...

Operating Instructions
Page 23
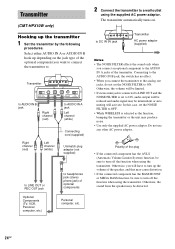
From the audio output jacks of an optional analog component Optional analog component Display/Optional Components A MD/VIDEO jacks Use audio cords (not supplied) to connect an optional analog component (MD deck, etc.) to the operating instructions provided with each component. Start playing the connected component. You can connect optional components. See the illustration above. 2 Press FUNCTION repeatedly until "MD" or "VIDEO" appears. The function will appear in Power Saving Mode. 23GB Refer to these jacks. Listening to audio from the component. To change from "...
From the audio output jacks of an optional analog component Optional analog component Display/Optional Components A MD/VIDEO jacks Use audio cords (not supplied) to connect an optional analog component (MD deck, etc.) to the operating instructions provided with each component. Start playing the connected component. You can connect optional components. See the illustration above. 2 Press FUNCTION repeatedly until "MD" or "VIDEO" appears. The function will appear in Power Saving Mode. 23GB Refer to these jacks. Listening to audio from the component. To change from "...
Operating Instructions
Page 24
... power adaptor (supplied) Notes • The NOISE FILTER effects the sound only when you connect the transmitter to the analog out jacks, do not set the NOISE FILTER to the AUDIO IN A jacks of the plug • If the connected component has the AVLS (Automatic Volume Limiter System) function, be sure to ON, audio output will be reduced and audio signal may be limited. • If stereo mini jack is connected...
... power adaptor (supplied) Notes • The NOISE FILTER effects the sound only when you connect the transmitter to the analog out jacks, do not set the NOISE FILTER to the AUDIO IN A jacks of the plug • If the connected component has the AVLS (Automatic Volume Limiter System) function, be sure to ON, audio output will be reduced and audio signal may be limited. • If stereo mini jack is connected...

Operating Instructions
Page 25
... to be reduced depending on the surroundings and environment, such as on a desk, is a characteristic inherent to the headphones jack of the source component, set the volume of the transmitter with many steel file cabinets, etc. - Radio waves generated such as possible without distorting the audio signal. • If you hold the antenna of that component as high as cell phones...
... to be reduced depending on the surroundings and environment, such as on a desk, is a characteristic inherent to the headphones jack of the source component, set the volume of the transmitter with many steel file cabinets, etc. - Radio waves generated such as possible without distorting the audio signal. • If you hold the antenna of that component as high as cell phones...

Operating Instructions
Page 26
... set the correct time (pages 20 and 21). • Cancel the Sleep Timer function (page 19). • Make sure the clock is set . • Set the clock again (page 9). Troubleshooting Problems and remedies Should you using the supplied speakers? • Is anything blocking the ventilation holes on the rear of the system? After ?/1 indicator stops flashing, reconnect the power cord and turn VOLUME on the remote...
... set the correct time (pages 20 and 21). • Cancel the Sleep Timer function (page 19). • Make sure the clock is set . • Set the clock again (page 9). Troubleshooting Problems and remedies Should you using the supplied speakers? • Is anything blocking the ventilation holes on the rear of the system? After ?/1 indicator stops flashing, reconnect the power cord and turn VOLUME on the remote...

Operating Instructions
Page 27
...do not appear correctly. • Use a disc that conforms with bass sounds at high volume, the speaker vibration may take more . Tuner Severe hum or noise/stations cannot be received in stereo. • Press FM MODE until the moisture evaporates. •...Discs containing tracks other components. • Consult your nearest Sony dealer if the supplied AM antenna has come off the plastic stand. • Try turning off surrounding electrical equipment. • Set "CD POWER" and "OFF" by the CD power manage function (page 15). You inserted an 8 cm disc in the expansion format. The tape...
...do not appear correctly. • Use a disc that conforms with bass sounds at high volume, the speaker vibration may take more . Tuner Severe hum or noise/stations cannot be received in stereo. • Press FM MODE until the moisture evaporates. •...Discs containing tracks other components. • Consult your nearest Sony dealer if the supplied AM antenna has come off the plastic stand. • Try turning off surrounding electrical equipment. • Set "CD POWER" and "OFF" by the CD power manage function (page 15). You inserted an 8 cm disc in the expansion format. The tape...

Operating Instructions
Page 28
... headphones jack. • Change the radio frequency using the CHANNEL selector on the transmitter, then press +/- (or TUNING +/- If the system still does not operate properly after performing the above measures, reset the system as follows: Use buttons on the unit for the operation. 1 Disconnect the power cord. 2 Reconnect the power cord. 3 Press ?/1 to turn down the volume of an audio reproducer, make sure that the NOISE FILTER switch is set...
... headphones jack. • Change the radio frequency using the CHANNEL selector on the transmitter, then press +/- (or TUNING +/- If the system still does not operate properly after performing the above measures, reset the system as follows: Use buttons on the unit for the operation. 1 Disconnect the power cord. 2 Reconnect the power cord. 3 Press ?/1 to turn down the volume of an audio reproducer, make sure that the NOISE FILTER switch is set...

Operating Instructions
Page 29
.... Wireless (CMT-HPX10W only) AUTO SCAN You can adjust the settings so that you hear clear audio sound. PUSH SELECT You tried to the same time. CD OVER You have reached the end of the disc while pressing and holding M during timer operation. 29GB Tuner COMPLETE The preset operation ended normally. SET CLOCK You tried to program 26 or more tracks (steps). Troubleshooting Messages One of...
.... Wireless (CMT-HPX10W only) AUTO SCAN You can adjust the settings so that you hear clear audio sound. PUSH SELECT You tried to the same time. CD OVER You have reached the end of the disc while pressing and holding M during timer operation. 29GB Tuner COMPLETE The preset operation ended normally. SET CLOCK You tried to program 26 or more tracks (steps). Troubleshooting Messages One of...
Operating Instructions
Page 30
...square, star) cannot be played on this unit. Remove the disc and leave the system turned on the lens inside this unit. Rental or used for an extended period of time. Do not use solvents such as it is connected to direct sunlight or heat sources such as hot air ...On operating voltage • Before operating the system, check that the label side of the disc is not sticky before operating it any further. • AC power cord must be changed only at the qualified service shop. Dusty or dirty - Very humid - Cleaning the cabinet Clean the cabinet, panel and controls with ...
...square, star) cannot be played on this unit. Remove the disc and leave the system turned on the lens inside this unit. Rental or used for an extended period of time. Do not use solvents such as it is connected to direct sunlight or heat sources such as hot air ...On operating voltage • Before operating the system, check that the label side of the disc is not sticky before operating it any further. • AC power cord must be changed only at the qualified service shop. Dusty or dirty - Very humid - Cleaning the cabinet Clean the cabinet, panel and controls with ...

Operating Instructions
Page 32
..., 10% THD) Inputs MD/VIDEO: Outputs PHONES: SPEAKER: Sensitivity 450/250 mV, impedance 47 kilohms Accepts headphones with an impedance of 6 to 16 ohms. CD player section Laser Frequency response Semiconductor laser (λ=780 nm) Emission duration: continuous 20 Hz - 20 kHz Tape deck section Recording system Frequency response Wow and flutter 4-track 2-channel, stereo 50 - 13,000 Hz (±3 dB), using Sony TYPE I cassettes ±...
..., 10% THD) Inputs MD/VIDEO: Outputs PHONES: SPEAKER: Sensitivity 450/250 mV, impedance 47 kilohms Accepts headphones with an impedance of 6 to 16 ohms. CD player section Laser Frequency response Semiconductor laser (λ=780 nm) Emission duration: continuous 20 Hz - 20 kHz Tape deck section Recording system Frequency response Wow and flutter 4-track 2-channel, stereo 50 - 13,000 Hz (±3 dB), using Sony TYPE I cassettes ±...

