Operating Instructions
Page 3
... turned off. • Install this system so that the cable ground shall be unplugged from the wall socket immediately in the event of trouble. 13) Unplug this apparatus during lightning storms or when unused for proper grounding and, in any other . Precautions On power sources • The unit is not disconnected from tip-over. Servicing is connected to qualified service...
... turned off. • Install this system so that the cable ground shall be unplugged from the wall socket immediately in the event of trouble. 13) Unplug this apparatus during lightning storms or when unused for proper grounding and, in any other . Precautions On power sources • The unit is not disconnected from tip-over. Servicing is connected to qualified service...
Operating Instructions
Page 4
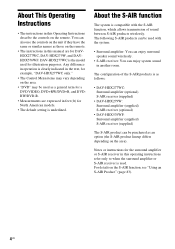
... system: • Surround amplifier: You can enjoy surround speaker sound wirelessly. • S-AIR receiver: You can be used as an option (the S-AIR product lineup differs depending on the area. • "DVD" may vary depending on the area). For details on the remote. Any difference in operation is clearly indicated in the text, for example, "DAV-HDX277WC only." • The Control Menu items may be...
... system: • Surround amplifier: You can enjoy surround speaker sound wirelessly. • S-AIR receiver: You can be used as an option (the S-AIR product lineup differs depending on the area. • "DVD" may vary depending on the area). For details on the remote. Any difference in operation is clearly indicated in the text, for example, "DAV-HDX277WC only." • The Control Menu items may be...
Operating Instructions
Page 5
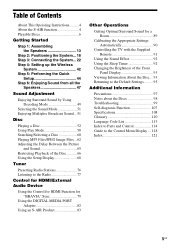
... Disc Playing a Disc 52 Using Play Mode 58 Searching/Selecting a Disc 60 Playing MP3 Files/JPEG Image Files... 62 Adjusting the Delay Between the Picture and Sound 65 Restricting Playback of the Disc........... 66 Using the Setup Display 68 Tuner Presetting Radio Stations 76 Listening to the Radio 77 Control for HDMI/External Audio Device Using the Control for HDMI Function for "BRAVIA" Sync 79 Using the DIGITAL MEDIA PORT Adapter 82 Using an S-AIR Product 83 Other Operations Getting Optimal Surround Sound for a Room 89 Calibrating the Appropriate Settings...
... Disc Playing a Disc 52 Using Play Mode 58 Searching/Selecting a Disc 60 Playing MP3 Files/JPEG Image Files... 62 Adjusting the Delay Between the Picture and Sound 65 Restricting Playback of the Disc........... 66 Using the Setup Display 68 Tuner Presetting Radio Stations 76 Listening to the Radio 77 Control for HDMI/External Audio Device Using the Control for HDMI Function for "BRAVIA" Sync 79 Using the DIGITAL MEDIA PORT Adapter 82 Using an S-AIR Product 83 Other Operations Getting Optimal Surround Sound for a Room 89 Calibrating the Appropriate Settings...
Operating Instructions
Page 42
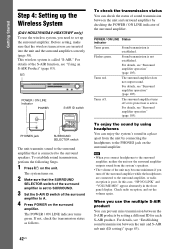
The system turns on. 2 Make sure that the SURROUND SELECTOR switch of the S-AIR function, see "Surround amplifier operation" (page 105). The POWER / ON LINE indicator turns green. Flashes green. Turns red. In this case, "HP NO LINK" and "VOLUME MIN" appear alternately in a place apart from the system's speakers. • The volume of sound transmission between the unit and surround amplifier by setting a different ID for each S-AIR product. For...
The system turns on. 2 Make sure that the SURROUND SELECTOR switch of the S-AIR function, see "Surround amplifier operation" (page 105). The POWER / ON LINE indicator turns green. Flashes green. Turns red. In this case, "HP NO LINK" and "VOLUME MIN" appear alternately in a place apart from the system's speakers. • The volume of sound transmission between the unit and surround amplifier by setting a different ID for each S-AIR product. For...
Operating Instructions
Page 44
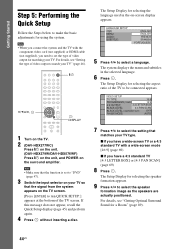
... PAUSE MODE: AUTO 7 Press X/x to select the setting that the signal from the system appears on the TV screen. [Press [ENTER] to run QUICK SETUP.] appears at the bottom of video output to match your TV" (page 46). The Setup Display for a Room" (page 89). 44US The Setup Display for using the system. The system displays the menu and subtitles in the on the surround amplifier. LANGUAGE SETUP OSD: MENU: AUDIO: SUBTITLE...
... PAUSE MODE: AUTO 7 Press X/x to select the setting that the signal from the system appears on the TV screen. [Press [ENTER] to run QUICK SETUP.] appears at the bottom of video output to match your TV" (page 46). The Setup Display for a Room" (page 89). 44US The Setup Display for using the system. The system displays the menu and subtitles in the on the surround amplifier. LANGUAGE SETUP OSD: MENU: AUDIO: SUBTITLE...
Operating Instructions
Page 45
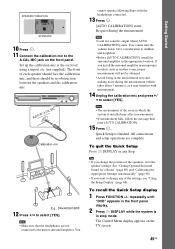
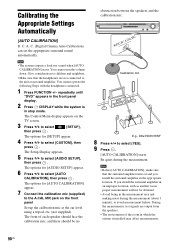
... . [AUTO CALIBRATION] starts. Note • The environment of the settings, see "Using the Setup Display" (page 68). AUDIO IN / A.CAL MIC Calibration mic E.g., DAV-HDX576WF 12 Press C/c to children and neighbors. • Before [AUTO CALIBRATION], install the surround amplifier in the measurement area and making noise during the measurement. The Control Menu display appears on the front panel. All connections and setup operations are not connected to change the position of each speaker should face the calibration mic, and...
... . [AUTO CALIBRATION] starts. Note • The environment of the settings, see "Using the Setup Display" (page 68). AUDIO IN / A.CAL MIC Calibration mic E.g., DAV-HDX576WF 12 Press C/c to children and neighbors. • Before [AUTO CALIBRATION], install the surround amplifier in the measurement area and making noise during the measurement. The Control Menu display appears on the front panel. All connections and setup operations are not connected to change the position of each speaker should face the calibration mic, and...

Operating Instructions
Page 46
... operating instructions supplied with the HDMI cable, select the type of the system. The Control Menu display appears on the connection of the TV (page 28), select the type of video output of video signals output from the HDMI OUT jack When you need to connect to select [CUSTOM], then press . To select the type of video signal output from the HDMI OUT jack. The options for [SETUP] appear. 94( 99) 1( 1) T 0: 01: 08 DVD VIDEO CUSTOM CUSTOM QUICK 4 Press X/x to select [QUICK...
... operating instructions supplied with the HDMI cable, select the type of the system. The Control Menu display appears on the connection of the TV (page 28), select the type of video output of video signals output from the HDMI OUT jack When you need to connect to select [CUSTOM], then press . To select the type of video signal output from the HDMI OUT jack. The options for [SETUP] appear. 94( 99) 1( 1) T 0: 01: 08 DVD VIDEO CUSTOM CUSTOM QUICK 4 Press X/x to select [QUICK...
Operating Instructions
Page 48
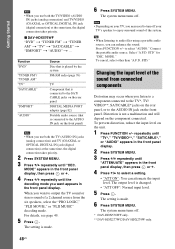
... output level is made . 6 Press SYSTEM MENU. Changing the input level of the system. The system menu turns off . * DAV-HDX576WF only. ** DAV-HDX277WC/DAV-HDX279W only. 48US to the AUDIO IN jack on the rear panel, or to select "AUDIO." MODE." STD." STD" for "DEC. Function "DVD" "TUNER FM"/ "TUNER AM" "TV" "SAT/CABLE" "DMPORT" "AUDIO" Source Disc that is played by the system FM/AM radio (page 76) TV Component that is connected to the SAT/ CABLE jacks on the rear panel DIGITAL MEDIA PORT adapter...
... output level is made . 6 Press SYSTEM MENU. Changing the input level of the system. The system menu turns off . * DAV-HDX576WF only. ** DAV-HDX277WC/DAV-HDX279W only. 48US to the AUDIO IN jack on the rear panel, or to select "AUDIO." MODE." STD." STD" for "DEC. Function "DVD" "TUNER FM"/ "TUNER AM" "TV" "SAT/CABLE" "DMPORT" "AUDIO" Source Disc that is played by the system FM/AM radio (page 76) TV Component that is connected to the SAT/ CABLE jacks on the rear panel DIGITAL MEDIA PORT adapter...
Operating Instructions
Page 51
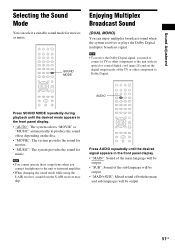
... or surround amplifier. • When changing the sound mode while using the S-AIR receiver, sound from the S-AIR receiver may skip. Note • To receive the Dolby Digital signal, you connect headphones to the unit with an optical or coaxial digital cord (page 28) and set the digital output mode of both the main and sub languages will be output. 51US Note • You cannot operate these setup items when you need to connect a TV or other component...
... or surround amplifier. • When changing the sound mode while using the S-AIR receiver, sound from the S-AIR receiver may skip. Note • To receive the Dolby Digital signal, you connect headphones to the unit with an optical or coaxial digital cord (page 28) and set the digital output mode of both the main and sub languages will be output. 51US Note • You cannot operate these setup items when you need to connect a TV or other component...
Operating Instructions
Page 52
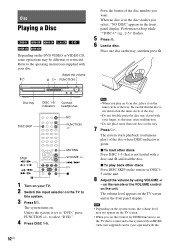
... the disc number you set to the system with an HDMI cable (not supplied) can be different or restricted. Perform next Step while "*DISC-1* (eg., 2-5)" flashes. 5 Press A. 6 Load a disc. Place one disc on , the TV that is set the Control for HDMI function to on the tray. 7 Press H. MUTING STEP /, / /m/ M/ X VOLUME +/- ./> H x 1 Turn on your TV. 2 Switch the input selector on the system status, the volume level may be sync-operated with...
... the disc number you set to the system with an HDMI cable (not supplied) can be different or restricted. Perform next Step while "*DISC-1* (eg., 2-5)" flashes. 5 Press A. 6 Load a disc. Place one disc on , the TV that is set the Control for HDMI function to on the tray. 7 Press H. MUTING STEP /, / /m/ M/ X VOLUME +/- ./> H x 1 Turn on your TV. 2 Switch the input selector on the system status, the volume level may be sync-operated with...
Operating Instructions
Page 53
... DISC 1-5 indicators change their color as follows: - Off: there is being played back. - The system enters standby mode. once, you press . Watch frame by frame M/ or /m4) (Slow-motion Play)3) while the system is muted. To return to adjust the sound volume. For details, see "Using the Control for HDMI Function for JPEG image files. 2)Scan speeds may differ with some discs. "DEMO" is set...
... DISC 1-5 indicators change their color as follows: - Off: there is being played back. - The system enters standby mode. once, you press . Watch frame by frame M/ or /m4) (Slow-motion Play)3) while the system is muted. To return to adjust the sound volume. For details, see "Using the Control for HDMI Function for JPEG image files. 2)Scan speeds may differ with some discs. "DEMO" is set...
Operating Instructions
Page 56
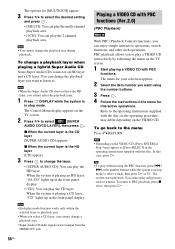
..." lights up in the menu for [MULTI/2CH] appear. 3 Press X/x to select [SUPER AUDIO CD/CD LAYER], then press . Tip • To play without using the number buttons. 3 Press . 4 Follow the instructions in the front panel display • [CD]: You can play the HD layer. PBC playback allows you want using the PBC function, press ./ > or the number buttons while the system is in stop mode. You can change...
..." lights up in the menu for [MULTI/2CH] appear. 3 Press X/x to select [SUPER AUDIO CD/CD LAYER], then press . Tip • To play without using the number buttons. 3 Press . 4 Follow the instructions in the front panel display • [CD]: You can play the HD layer. PBC playback allows you want using the PBC function, press ./ > or the number buttons while the system is in stop mode. You can change...
Operating Instructions
Page 67
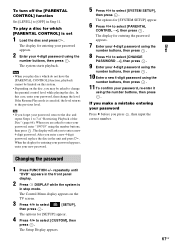
... it using the number buttons, then press . Disc To turn off the [PARENTAL CONTROL] function Set [LEVEL] to [OFF] in stop mode. Note • When you play a disc for [SYSTEM SETUP] appear. 6 Press X/x to select [SYSTEM SETUP], then press . When the display for entering your password appears. 2 Enter your password, enter "199703" using the number buttons, then press . If you make a mistake entering your new password. 5 Press X/x to select [PARENTAL CONTROL t], then press . The Control Menu display appears...
... it using the number buttons, then press . Disc To turn off the [PARENTAL CONTROL] function Set [LEVEL] to [OFF] in stop mode. Note • When you play a disc for [SYSTEM SETUP] appear. 6 Press X/x to select [SYSTEM SETUP], then press . When the display for entering your password appears. 2 Enter your password, enter "199703" using the number buttons, then press . If you make a mistake entering your new password. 5 Press X/x to select [PARENTAL CONTROL t], then press . The Control Menu display appears...
Operating Instructions
Page 68
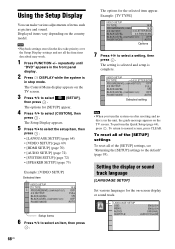
... may work. 1 Press FUNCTION +/- The options for [SETUP] appear. 4 Press X/x to select [CUSTOM], then press . LANGUAGE SETUP OSD: MENU: AUDIO: SUBTITLE: ENGLISH ENGLISH ORIGINAL AUDIO FOLLOW 68US Using the Setup Display You can make various adjustments of the [SETUP] settings, see "Returning the [SETUP] settings to the default" (page 95). Example: [TV TYPE] VIDEO SETUP TV TYPE: 16:9 PROGRESSIVE (COMPONENT OUT): O16F:F9 4:3 OUTPUT: 4:3 LETTERFBUOLXL BLACK LEVEL: 4:3 PAN SACUATON BLACK LEVEL (COMPONENT OUT): OFF PAUSE MODE: AUTO...
... may work. 1 Press FUNCTION +/- The options for [SETUP] appear. 4 Press X/x to select [CUSTOM], then press . LANGUAGE SETUP OSD: MENU: AUDIO: SUBTITLE: ENGLISH ENGLISH ORIGINAL AUDIO FOLLOW 68US Using the Setup Display You can make various adjustments of the [SETUP] settings, see "Returning the [SETUP] settings to the default" (page 95). Example: [TV TYPE] VIDEO SETUP TV TYPE: 16:9 PROGRESSIVE (COMPONENT OUT): O16F:F9 4:3 OUTPUT: 4:3 LETTERFBUOLXL BLACK LEVEL: 4:3 PAN SACUATON BLACK LEVEL (COMPONENT OUT): OFF PAUSE MODE: AUTO...
Operating Instructions
Page 70
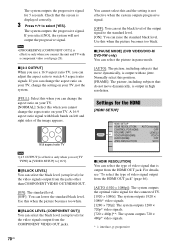
... of video signal output from the jacks other than COMPONENT VIDEO OUT/HDMI OUT. [ON]: The standard level. [OFF]: You can adjust the aspect ratio to the standard level. [ON]: You can select the black level (setup level) for the HDMI [HDMI SETUP] HDMI SETUP HDMI RESOLUTION: CONTROL FOR HDMI: VOLUME LIMIT: YCBCR/RGB(HDMI): AUDIO(HDMI): JPEG RESOLUTION: AUTO(1920x1080p) OFF LEVEL2 YCBCR OFF SD x [HDMI RESOLUTION] You can change the setting on your TV. The system outputs the progressive signal...
... of video signal output from the jacks other than COMPONENT VIDEO OUT/HDMI OUT. [ON]: The standard level. [OFF]: You can adjust the aspect ratio to the standard level. [ON]: You can select the black level (setup level) for the HDMI [HDMI SETUP] HDMI SETUP HDMI RESOLUTION: CONTROL FOR HDMI: VOLUME LIMIT: YCBCR/RGB(HDMI): AUDIO(HDMI): JPEG RESOLUTION: AUTO(1920x1080p) OFF LEVEL2 YCBCR OFF SD x [HDMI RESOLUTION] You can change the setting on your TV. The system outputs the progressive signal...
Operating Instructions
Page 71
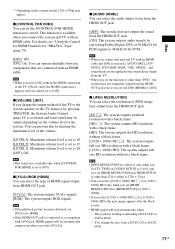
... volume level is set to [ON]. For details, see "Using the Control for HDMI Function for "BRAVIA" Sync" (page 79). [OFF]: Off. [ON]: On. x [VOLUME LIMIT] If you select [YCBCR]. x [YCBCR/RGB (HDMI)] You can select the audio output status from the HDMI OUT jack. [OFF]: The system does not output the sound from HDMI OUT jack. [YCBCR]: The system outputs YCBCR signals. [RGB]: The system outputs RGB signals. x [AUDIO (HDMI)] You can select the type of HDMI signal output...
... volume level is set to [ON]. For details, see "Using the Control for HDMI Function for "BRAVIA" Sync" (page 79). [OFF]: Off. [ON]: On. x [VOLUME LIMIT] If you select [YCBCR]. x [YCBCR/RGB (HDMI)] You can select the audio output status from the HDMI OUT jack. [OFF]: The system does not output the sound from HDMI OUT jack. [YCBCR]: The system outputs YCBCR signals. [RGB]: The system outputs RGB signals. x [AUDIO (HDMI)] You can select the type of HDMI signal output...
Operating Instructions
Page 90
... system outputs a loud test sound when [AUTO CALIBRATION] starts. AUDIO IN / A.CAL MIC Calibration mic E.g., DAV-HDX576WF 8 Press C/c to select [AUDIO SETUP], then press . Give consideration to children and neighbors. • Make sure that the surround amplifier turns on the TV screen. 3 Press X/x to the A.CAL MIC jack on the front panel Set up the calibration mic at the ear level using a tripod, etc. (not supplied). You cannot operate the following Steps with the headphones connected. 1 Press FUNCTION +/- The Setup Display...
... system outputs a loud test sound when [AUTO CALIBRATION] starts. AUDIO IN / A.CAL MIC Calibration mic E.g., DAV-HDX576WF 8 Press C/c to select [AUDIO SETUP], then press . Give consideration to children and neighbors. • Make sure that the surround amplifier turns on the TV screen. 3 Press X/x to the A.CAL MIC jack on the front panel Set up the calibration mic at the ear level using a tripod, etc. (not supplied). You cannot operate the following Steps with the headphones connected. 1 Press FUNCTION +/- The Setup Display...
Operating Instructions
Page 101
... audio signals). • The HDMI OUT jack does not output Super Audio CD sound. • Try the following: 1 Turn the system off and on again. 2 Turn the connected component off and on the remote if "MUTING ON" is displayed in Slow-motion Play mode. MODE" setting (page 49). • Depending on the source, the effect of Dolby Digital, DTS, or MPEG audio. • Depending on the disc, the sound may be the entire 5.1 channel...
... audio signals). • The HDMI OUT jack does not output Super Audio CD sound. • Try the following: 1 Turn the system off and on again. 2 Turn the connected component off and on the remote if "MUTING ON" is displayed in Slow-motion Play mode. MODE" setting (page 49). • Depending on the source, the effect of Dolby Digital, DTS, or MPEG audio. • Depending on the disc, the sound may be the entire 5.1 channel...
Operating Instructions
Page 108
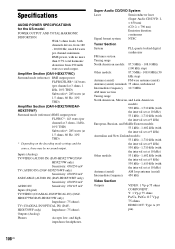
... no sound output. Outputs (Analog) Phones Accepts low- HDX576WF only) Sensitivity: 450/250 mV SAT/CABLE (AUDIO IN) (DAV-HDX576WF only) Sensitivity: 450/250 mV AUDIO IN Sensitivity: 250/125 mV Inputs (Digital) TV/VIDEO (COAXIAL IN/OPTICAL IN) (DAV- rated 84 watts per channel at 3 ohms, 1 kHz, 10% THD) Subwoofer*: 285 watts (at 10 kHz) Antenna (aerial) AM loop antenna (aerial) Intermediate frequency 450 kHz Video Section Outputs VIDEO: 1 Vp-p 75 ohms COMPONENT...
... no sound output. Outputs (Analog) Phones Accepts low- HDX576WF only) Sensitivity: 450/250 mV SAT/CABLE (AUDIO IN) (DAV-HDX576WF only) Sensitivity: 450/250 mV AUDIO IN Sensitivity: 250/125 mV Inputs (Digital) TV/VIDEO (COAXIAL IN/OPTICAL IN) (DAV- rated 84 watts per channel at 3 ohms, 1 kHz, 10% THD) Subwoofer*: 285 watts (at 10 kHz) Antenna (aerial) AM loop antenna (aerial) Intermediate frequency 450 kHz Video Section Outputs VIDEO: 1 Vp-p 75 ohms COMPONENT...
Operating Instructions
Page 121
... Show 64 Sound Mode 51 SPEAKER FORMATION 72, 89 SPEAKER SETUP 73 CONNECTION 73 DISTANCE 73, 74 LEVEL 74 SUBTITLE 54, 69 Super Audio CD 55, 111 SYSTEM MENU 41, 48, 49, 54, 77, 85, 87, 92, 93 SYSTEM SETUP 72 T TEST TONE 74 TIME 61 TRACK SELECTION 72 TV TYPE 69 V VIDEO SETUP 69 VOLUME LIMIT 71 121US C. (Digital Cinema Auto Calibration) 90, 110 DEC. A. Index Numerics 4:3 OUTPUT 70 5.1 Channel Surround 55 A A/V SYNC 65...
... Show 64 Sound Mode 51 SPEAKER FORMATION 72, 89 SPEAKER SETUP 73 CONNECTION 73 DISTANCE 73, 74 LEVEL 74 SUBTITLE 54, 69 Super Audio CD 55, 111 SYSTEM MENU 41, 48, 49, 54, 77, 85, 87, 92, 93 SYSTEM SETUP 72 T TEST TONE 74 TIME 61 TRACK SELECTION 72 TV TYPE 69 V VIDEO SETUP 69 VOLUME LIMIT 71 121US C. (Digital Cinema Auto Calibration) 90, 110 DEC. A. Index Numerics 4:3 OUTPUT 70 5.1 Channel Surround 55 A A/V SYNC 65...


