

Operating Instructions
Page 2
.... Model No. DAV-FR10W Serial No WARNING This equipment has been tested and found to comply with the instructions, may be connected to the grounding system of the building, as practical. These limits are designed to Part 15 of the FCC Rules. Reorient or relocate the receiving antenna. - Consult the dealer or an experienced radio/TV technician for a Class B digital...
.... Model No. DAV-FR10W Serial No WARNING This equipment has been tested and found to comply with the instructions, may be connected to the grounding system of the building, as practical. These limits are designed to Part 15 of the FCC Rules. Reorient or relocate the receiving antenna. - Consult the dealer or an experienced radio/TV technician for a Class B digital...
Operating Instructions
Page 3
... inside the DVD Home Theatre System and cause damage to standby mode by pressing the "/1 button (the STANDBY indicator lights up in the system. • At high volume, over long periods of time. As an ENERGY STAR® partner, Sony Corporation has determined...operating it any disc. In this manual thoroughly and retain it out by the plug, never by the cord. If you move the system, take out any further. • The unit is equipped with very low level inputs or no audio signals. Before operating this system, please read this case, remove the disc and leave the system turned...
... inside the DVD Home Theatre System and cause damage to standby mode by pressing the "/1 button (the STANDBY indicator lights up in the system. • At high volume, over long periods of time. As an ENERGY STAR® partner, Sony Corporation has determined...operating it any disc. In this manual thoroughly and retain it out by the plug, never by the cord. If you move the system, take out any further. • The unit is equipped with very low level inputs or no audio signals. Before operating this system, please read this case, remove the disc and leave the system turned...

Operating Instructions
Page 5
... Viewing Disc Information 52 Sound Adjustments Changing the Sound 57 Enjoying Surround Sound 59 Selecting the Surround Back Decoding Mode 63 Using the Sound Effect 65 Using Various Additional Functions Changing the Angles 66 Displaying Subtitles 67 Locking Discs 68 (CUSTOM PARENTAL CONTROL, PARENTAL CONTROL) Other Operations Controlling TV with the Supplied Remote 73 Using the SONY TV DIRECT Function 75 Using the Video or Other Units 76 Enjoying Multiplex Broadcast Sound (DUAL MONO 77 Enjoying the Radio 78 Using the...
... Viewing Disc Information 52 Sound Adjustments Changing the Sound 57 Enjoying Surround Sound 59 Selecting the Surround Back Decoding Mode 63 Using the Sound Effect 65 Using Various Additional Functions Changing the Angles 66 Displaying Subtitles 67 Locking Discs 68 (CUSTOM PARENTAL CONTROL, PARENTAL CONTROL) Other Operations Controlling TV with the Supplied Remote 73 Using the SONY TV DIRECT Function 75 Using the Video or Other Units 76 Enjoying Multiplex Broadcast Sound (DUAL MONO 77 Enjoying the Radio 78 Using the...
Operating Instructions
Page 6
Settings and Adjustments Using the Setup Display 83 Setting the Display or Sound Track Language 84 (LANGUAGE SETUP) Settings for the Display 84 (SCREEN SETUP) Custom Settings 86 (CUSTOM SETUP) Settings for the Speakers 87 (SPEAKER SETUP) Quick Setup and Resetting the System 93 (SETUP) Additional Information Troubleshooting 94 Specifications 97 Glossary 99 Index to Parts and Controls 103 Language Code List 108 DVD Setup Menu List 109 AMP Menu List 111 Index 112 Quick Reference for Remote Commander 114 6US
Settings and Adjustments Using the Setup Display 83 Setting the Display or Sound Track Language 84 (LANGUAGE SETUP) Settings for the Display 84 (SCREEN SETUP) Custom Settings 86 (CUSTOM SETUP) Settings for the Speakers 87 (SPEAKER SETUP) Quick Setup and Resetting the System 93 (SETUP) Additional Information Troubleshooting 94 Specifications 97 Glossary 99 Index to Parts and Controls 103 Language Code List 108 DVD Setup Menu List 109 AMP Menu List 111 Index 112 Quick Reference for Remote Commander 114 6US
Operating Instructions
Page 14
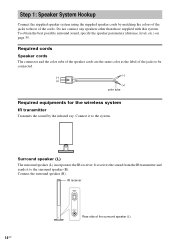
... to the surround speaker (R). Step 1: Speaker System Hookup Connect the supplied speaker system using the supplied speaker cords by the infrared ray. To obtain the best possible surround sound, specify the speaker parameters (distance, level, etc.) on page 35. Required cords Speaker cords The connector and the color tube of the speaker cords are the same color as the label of the cords. Connect it to the system. Connect the surround speaker (R). IR receiver POWER ON...
... to the surround speaker (R). Step 1: Speaker System Hookup Connect the supplied speaker system using the supplied speaker cords by the infrared ray. To obtain the best possible surround sound, specify the speaker parameters (distance, level, etc.) on page 35. Required cords Speaker cords The connector and the color tube of the speaker cords are the same color as the label of the cords. Connect it to the system. Connect the surround speaker (R). IR receiver POWER ON...
Operating Instructions
Page 18
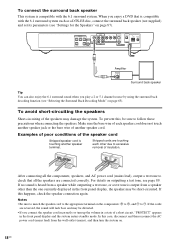
... S VIDEO (DVD ONLY) OPTICAL DIGITAL IN COMPOMEMT VIDEO OUT L S AT VIDEO MONITOR OUT AM FM 75 COAXIAL Amplifier AUDIO IN Surround back speaker Tip You can also enjoy the 6.1 surround sound when you play a 2 or 5.1 channel source by using the surround back decoding function (see page 89. Make sure the bare wire of another speaker terminal. For details on outputting a test tone, see "Selecting the Surround Back Decoding Mode" on page 87). Stripped cords are reversed, the sound will lack bass...
... S VIDEO (DVD ONLY) OPTICAL DIGITAL IN COMPOMEMT VIDEO OUT L S AT VIDEO MONITOR OUT AM FM 75 COAXIAL Amplifier AUDIO IN Surround back speaker Tip You can also enjoy the 6.1 surround sound when you play a 2 or 5.1 channel source by using the surround back decoding function (see page 89. Make sure the bare wire of another speaker terminal. For details on outputting a test tone, see "Selecting the Surround Back Decoding Mode" on page 87). Stripped cords are reversed, the sound will lack bass...

Operating Instructions
Page 26
... select "VIDEO." Tip When you cannot output the TV sound from the speakers of this system. 2 Change the mode of a 2 channel source from the speakers 1 Connect audio cords. If using the VIDEO jack distorts the sound, reconnect the TV or VCR to the VIDEO jacks (AUDIO IN L/R) of TV or VCR to SAT. Output the TV or VCR sound from the 6 speakers, select any sound field other than "AUTO FORMAT DIRECT AUTO" or "2 CHANNEL STEREO" (page 59). 26US Connect the AUDIO OUT (L/R) jacks...
... select "VIDEO." Tip When you cannot output the TV sound from the speakers of this system. 2 Change the mode of a 2 channel source from the speakers 1 Connect audio cords. If using the VIDEO jack distorts the sound, reconnect the TV or VCR to the VIDEO jacks (AUDIO IN L/R) of TV or VCR to SAT. Output the TV or VCR sound from the 6 speakers, select any sound field other than "AUTO FORMAT DIRECT AUTO" or "2 CHANNEL STEREO" (page 59). 26US Connect the AUDIO OUT (L/R) jacks...

Operating Instructions
Page 35
.... Use the test tone to adjust the speaker level and balance to the listening position. The front speakers can be the same distance from the TV set . If color irregularity occurs again, place the subwoofer farther away from the listening position. Select [SPEAKER SETUP] in the [SIZE] setting (page 87) to 23 ft)c) (A) from the TV set . Specifying the speaker parameters To obtain the best possible surround sound, first...
.... Use the test tone to adjust the speaker level and balance to the listening position. The front speakers can be the same distance from the TV set . If color irregularity occurs again, place the subwoofer farther away from the listening position. Select [SPEAKER SETUP] in the [SIZE] setting (page 87) to 23 ft)c) (A) from the TV set . Specifying the speaker parameters To obtain the best possible surround sound, first...
Operating Instructions
Page 63
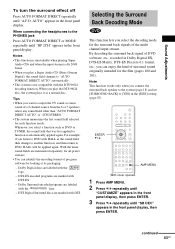
... preset stations. • You can enjoy the kind of surround sound originally intended for the surround back signals of a 2 channel source from the 6 or 7 speakers, select any sound field other than "AUTO FORMAT DIRECT AUTO" or "2CH STEREO." • The system memorizes the last sound field selected for each function mode. Dolby Digital discs are marked with the logo. - ENTER X/x AMP MENU With cover opened. 1 Press AMP MENU. 2 Press X/x repeatedly until "CUSTOMIZE" appears in the front panel display...
... preset stations. • You can enjoy the kind of surround sound originally intended for the surround back signals of a 2 channel source from the 6 or 7 speakers, select any sound field other than "AUTO FORMAT DIRECT AUTO" or "2CH STEREO." • The system memorizes the last sound field selected for each function mode. Dolby Digital discs are marked with the logo. - ENTER X/x AMP MENU With cover opened. 1 Press AMP MENU. 2 Press X/x repeatedly until "CUSTOMIZE" appears in the front panel display...

Operating Instructions
Page 64
... conforms to Dolby Digital EX DTS-ES Matrix 6.1 6.1c) DTS Matrix decoder DTS-ES 6.1 Discrete 6.1d) DTS Discrete decoder When selecting "SB AUTO" When you want according to the input stream, then press ENTER or AMP MENU. 4 Press X/x to select the surround back mode you input stream contains the 6.1 channel decoding flaga), the appropriate decoder is selected (page 59). The default setting is "SB MATRIX." Input stream Output Applied surround back channel decoder Dolby Digital 5.1 - 5.1 DTS 5.1 5.1 -
... conforms to Dolby Digital EX DTS-ES Matrix 6.1 6.1c) DTS Matrix decoder DTS-ES 6.1 Discrete 6.1d) DTS Discrete decoder When selecting "SB AUTO" When you want according to the input stream, then press ENTER or AMP MENU. 4 Press X/x to select the surround back mode you input stream contains the 6.1 channel decoding flaga), the appropriate decoder is selected (page 59). The default setting is "SB MATRIX." Input stream Output Applied surround back channel decoder Dolby Digital 5.1 - 5.1 DTS 5.1 5.1 -
Operating Instructions
Page 71
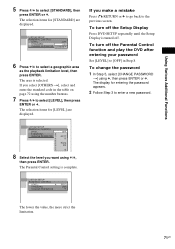
... to the previous screen. To turn off . The Parental Control setting is turned off the Parental Control function and play the DVD after entering your password Set [LEVEL] to [OFF] in the table on page 72 using the number buttons. 7 Press X/x to enter a new password. The area is selected. The selection items for [STANDARD] are displayed. To change the password 1 In Step 5, select [CHANGE PASSWORD t] using X/x, then press ENTER. CUSTOM SETUP PARENTAL CONTROL LEVEL: STANDARD: CHANGE PASSWORD OFF USA OTHERS...
... to the previous screen. To turn off . The Parental Control setting is turned off the Parental Control function and play the DVD after entering your password Set [LEVEL] to [OFF] in the table on page 72 using the number buttons. 7 Press X/x to enter a new password. The area is selected. The selection items for [STANDARD] are displayed. To change the password 1 In Step 5, select [CHANGE PASSWORD t] using X/x, then press ENTER. CUSTOM SETUP PARENTAL CONTROL LEVEL: STANDARD: CHANGE PASSWORD OFF USA OTHERS...

Operating Instructions
Page 75
... INPUT COMPONENT2 INPUT * Except for the TV's input source to connect this system, then press SONY TV DIRECT once. If the setting is selected. Other Operations Using the SONY TV DIRECT Function SONY TV DIRECT allows you to turn on the TV. By pressing Number TV CH+ 1 2 3 4 5 6 7 8 Transmit time 0.5 (Default) 1 1.5 2 2.5 3 3.5 4 continued 75US While transmitting the code from the remote is unsuccessful, the TV button flashes five times quickly. To change the transmit time Press and hold TV/VIDEO...
... INPUT COMPONENT2 INPUT * Except for the TV's input source to connect this system, then press SONY TV DIRECT once. If the setting is selected. Other Operations Using the SONY TV DIRECT Function SONY TV DIRECT allows you to turn on the TV. By pressing Number TV CH+ 1 2 3 4 5 6 7 8 Transmit time 0.5 (Default) 1 1.5 2 2.5 3 3.5 4 continued 75US While transmitting the code from the remote is unsuccessful, the TV button flashes five times quickly. To change the transmit time Press and hold TV/VIDEO...
Operating Instructions
Page 79
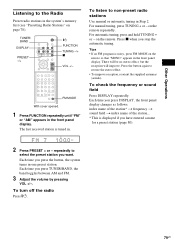
... manual tuning, press TUNING + or - Press the button again to non-preset radio stations Use manual or automatic tuning in Step 2. FM MODE With cover opened. 1 Press FUNCTION repeatedly until "FM" or "AM" appears in . Each time you press DISPLAY, the front panel display changes as follows: index name of the station* t frequency t sound field t index name of the station... * This is noisy, press FM MODE on the remote. Other Operations Listening to the Radio Preset radio stations...
... manual tuning, press TUNING + or - Press the button again to non-preset radio stations Use manual or automatic tuning in Step 2. FM MODE With cover opened. 1 Press FUNCTION repeatedly until "FM" or "AM" appears in . Each time you press DISPLAY, the front panel display changes as follows: index name of the station* t frequency t sound field t index name of the station... * This is noisy, press FM MODE on the remote. Other Operations Listening to the Radio Preset radio stations...

Operating Instructions
Page 86
... multiple audio formats (PCM, MPEG audio, DTS, or Dolby Digital format) are underlined. The default settings are recorded. For details, see "Using the Setup Display" (page 83). In this case, you set [COMPONENT OUT] in the Setup Display. For details on the DVD, the audio channel with playback limitation for confirming does not appears when you set progressive format. • When [PROGRESSIVE] is selected in [SCREEN SETUP], no signal is output from the MONITOR OUT jacks...
... multiple audio formats (PCM, MPEG audio, DTS, or Dolby Digital format) are underlined. The default settings are recorded. For details, see "Using the Setup Display" (page 83). In this case, you set [COMPONENT OUT] in the Setup Display. For details on the DVD, the audio channel with playback limitation for confirming does not appears when you set progressive format. • When [PROGRESSIVE] is selected in [SCREEN SETUP], no signal is output from the MONITOR OUT jacks...

Operating Instructions
Page 87
.... Select [SPEAKER SETUP] in the Control Menu. Position diagram A B 90 A 45 B 20 continued 87US If only MP3 files exist on the disc, the system recognises the disc as an "MP3 Disc." Then use the test tone to the same level. Note AUDIO DRC only applies to the default setting when changing a setting Select the item, then press CLEAR. x SIZE If you play , when you do not connect center or surround speakers, or move the surround speakers, set [SURROUND...
.... Select [SPEAKER SETUP] in the Control Menu. Position diagram A B 90 A 45 B 20 continued 87US If only MP3 files exist on the disc, the system recognises the disc as an "MP3 Disc." Then use the test tone to the same level. Note AUDIO DRC only applies to the default setting when changing a setting Select the item, then press CLEAR. x SIZE If you play , when you do not connect center or surround speakers, or move the surround speakers, set [SURROUND...
Operating Instructions
Page 94
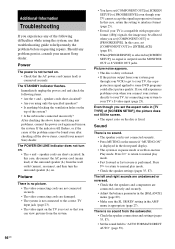
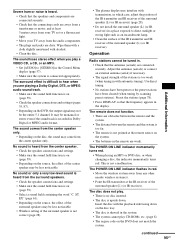
... then turn on the disc is not connected to help remedy the problem before requesting repairs. In this case, disconnect the AC power cord (mains lead) of the surround speaker (L) from the system. 94US • You have set [COMPONENT OUT] in [SCREEN SETUP] to your TV's S video input (page 23). The left and right sounds are unbalanced or reversed. • Check that you using the system, use this case...
... then turn on the disc is not connected to help remedy the problem before requesting repairs. In this case, disconnect the AC power cord (mains lead) of the surround speaker (L) from the system. 94US • You have set [COMPONENT OUT] in [SCREEN SETUP] to your TV's S video input (page 23). The left and right sounds are unbalanced or reversed. • Check that you using the system, use this case...
Operating Instructions
Page 95
... set or a fluorescent light. • Move your TV away from the surround speakers. • Check the speaker connections and settings. • Make sure the sound field function is connected appropriately. ST. Operation Radio stations cannot be tuned in the Control Menu display (page 57). • Make sure the system is on the source, the effect of the surround speakers may be the entire 5.1 channel. The POWER/ON LINE indicator momentarily turns red. • When playing...
... set or a fluorescent light. • Move your TV away from the surround speakers. • Check the speaker connections and settings. • Make sure the sound field function is connected appropriately. ST. Operation Radio stations cannot be tuned in the Control Menu display (page 57). • Make sure the system is on the source, the effect of the surround speakers may be the entire 5.1 channel. The POWER/ON LINE indicator momentarily turns red. • When playing...
Operating Instructions
Page 96
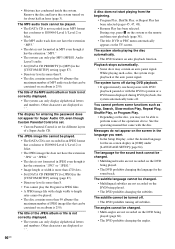
... display for entering the password does not appear for Super Audio CD, even though Custom Parental Control is set. • Custom Parental Control is set for the on-screen display in the language you may contain an auto pause signal. Remove the disc and leave the system turned on the DVD being played (page 66). • The DVD prohibits changing the angles. The MP3 audio track cannot be played...
... display for entering the password does not appear for Super Audio CD, even though Custom Parental Control is set. • Custom Parental Control is set for the on-screen display in the language you may contain an auto pause signal. Remove the disc and leave the system turned on the DVD being played (page 66). • The DVD prohibits changing the angles. The MP3 audio track cannot be played...
Operating Instructions
Page 112
... SCREEN SAVER 85 SCREEN SETUP 84 Setup Display 83 SHUFFLE 47 Shuffle Play 47 SIZE 87 SLEEP 81 Slide show 43 Slow-motion 49 Sound Field 59 SPEAKER SETUP 87 Speaker System Hookup 14 SUBTITLE 67, 84 Super Audio CD 102 Surround Back Decoding Mode 63 T TEST TONE 89 TIME SEARCH 50 TITLE 50 Title 7, 102 TRACK 50 Track 7, 41, 102 TRACK SELECTION 86 Troubleshooting 94 TV and Video Component Hookups 23...
... SCREEN SAVER 85 SCREEN SETUP 84 Setup Display 83 SHUFFLE 47 Shuffle Play 47 SIZE 87 SLEEP 81 Slide show 43 Slow-motion 49 Sound Field 59 SPEAKER SETUP 87 Speaker System Hookup 14 SUBTITLE 67, 84 Super Audio CD 102 Surround Back Decoding Mode 63 T TEST TONE 89 TIME SEARCH 50 TITLE 50 Title 7, 102 TRACK 50 Track 7, 41, 102 TRACK SELECTION 86 Troubleshooting 94 TV and Video Component Hookups 23...
Operating Instructions
Page 114
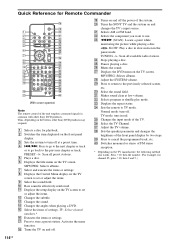
... Sony DVD products may respond. el Press to store a preset station. K Displays the setup display on and off at low volume. N Changes the angles when playing a DVD. ef Sets the remote to the previous chapter or track. Switches monaural or stereo of the system. TV: Select channel numbers.* P Executes the items or settings. W m/M (SCAN): Locate a point while monitoring the picture while playing a disc. / SLOW: Play a disc in slow motion in red. ej Adjust the TV volume. Z Mutes the sound. Select...
... Sony DVD products may respond. el Press to store a preset station. K Displays the setup display on and off at low volume. N Changes the angles when playing a DVD. ef Sets the remote to the previous chapter or track. Switches monaural or stereo of the system. TV: Select channel numbers.* P Executes the items or settings. W m/M (SCAN): Locate a point while monitoring the picture while playing a disc. / SLOW: Play a disc in slow motion in red. ej Adjust the TV volume. Z Mutes the sound. Select...

