
Operating Instructions
Page 2
... radio frequency energy and, if not installed and used in a particular installation. Reorient or relocate the receiving antenna. - Connect the equipment into an outlet on , the user is provided to call upon your authority to Part 15 of the following measures: - Consult the dealer or an experienced radio/TV technician for a Class B digital device, pursuant to operate this equipment. Owner's Record The model and serial number...
... radio frequency energy and, if not installed and used in a particular installation. Reorient or relocate the receiving antenna. - Connect the equipment into an outlet on , the user is provided to call upon your authority to Part 15 of the following measures: - Consult the dealer or an experienced radio/TV technician for a Class B digital device, pursuant to operate this equipment. Owner's Record The model and serial number...

Operating Instructions
Page 3
...Sony dealer. On moisture condensation If the unit is brought directly from the CD section. 2 Press o to disappear in the display. 3 Turn the power off. 4 Insert the key into the unit, unplug it in place. Should this case, remove the disc and leave the unit turned on A II HCD-551...On cleaning the cabinet Clean the cabinet, panel and controls with a soft cloth lightly moistened with mild detergent solution. Note on the Transit Key The transit key on the label, and store it and have any type of a control amplifier, tuner, stereo cassette deck and 5-compact disc player.
...Sony dealer. On moisture condensation If the unit is brought directly from the CD section. 2 Press o to disappear in the display. 3 Turn the power off. 4 Insert the key into the unit, unplug it in place. Should this case, remove the disc and leave the unit turned on A II HCD-551...On cleaning the cabinet Clean the cabinet, panel and controls with a soft cloth lightly moistened with mild detergent solution. Note on the Transit Key The transit key on the label, and store it and have any type of a control amplifier, tuner, stereo cassette deck and 5-compact disc player.

Operating Instructions
Page 4
...5 Using Your Stereo Setting the super woofer 7 Operating SA-W551/SA-W552 7 Selecting the level meter 7 Adjusting the phase 7 Adjusting the audio 8 Adjusting the super woofer level 8 Volume adjustment 8 Adjusting balance 8 Adjusting the bass and the treble sound 8 Getting ready for dolby surround sound 9 Placement of speakers and selecting the PRO LOGIC MODE 9 Adjusting the speaker volume 10 Adjusting the delay time of normal operation can be used for a long time, r;...fiuvc u e batteries to avoid damage caused by battery leakage and corrosion. Select shuffle play...
...5 Using Your Stereo Setting the super woofer 7 Operating SA-W551/SA-W552 7 Selecting the level meter 7 Adjusting the phase 7 Adjusting the audio 8 Adjusting the super woofer level 8 Volume adjustment 8 Adjusting balance 8 Adjusting the bass and the treble sound 8 Getting ready for dolby surround sound 9 Placement of speakers and selecting the PRO LOGIC MODE 9 Adjusting the speaker volume 10 Adjusting the delay time of normal operation can be used for a long time, r;...fiuvc u e batteries to avoid damage caused by battery leakage and corrosion. Select shuffle play...
Operating Instructions
Page 5
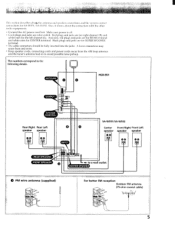
... speaker cords, connecting cords and power cords away from the AM loop antenna and the tuner's antenna lead-in to a wall outlet CENTER SPEAKER 0 FM wire antenna (supplied) 3 FM 760 For better FM reception Outdoor FM antenna (75-ohm coaxial cable) 3000 FM 160 5 The numbers correspond to the following details. 14 / ANTENNA 0 0 HCD-551 • 0® 08 00 00 • • Rear Right Rear Left speaker speaker 00 OO 0 0 INPUT 1 SA-W551/5A-W552 Center speaker OO...
... speaker cords, connecting cords and power cords away from the AM loop antenna and the tuner's antenna lead-in to a wall outlet CENTER SPEAKER 0 FM wire antenna (supplied) 3 FM 760 For better FM reception Outdoor FM antenna (75-ohm coaxial cable) 3000 FM 160 5 The numbers correspond to the following details. 14 / ANTENNA 0 0 HCD-551 • 0® 08 00 00 • • Rear Right Rear Left speaker speaker 00 OO 0 0 INPUT 1 SA-W551/5A-W552 Center speaker OO...
Operating Instructions
Page 6
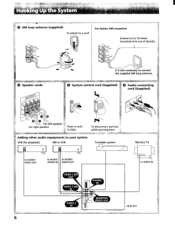
... reception 300° FM 75 ° Extend a 6 to VIDEO IN VIDEO 1/MD OUT VIDEO 1/MD IN • PHONO IN ee ro VIDEO 2 IN MONITOR VIDEO OUT HCD-551 6 It is also necessary to connect the supplied AM loop antenna. • Speaker cords AP srt,rA.sEg13, 43 System control cord (Supplied) Q Audio connecting cord (Supplied) O 0 0 0 For left speaker For right speaker Push in until it clicks To disconnect, pull out...
... reception 300° FM 75 ° Extend a 6 to VIDEO IN VIDEO 1/MD OUT VIDEO 1/MD IN • PHONO IN ee ro VIDEO 2 IN MONITOR VIDEO OUT HCD-551 6 It is also necessary to connect the supplied AM loop antenna. • Speaker cords AP srt,rA.sEg13, 43 System control cord (Supplied) Q Audio connecting cord (Supplied) O 0 0 0 For left speaker For right speaker Push in until it clicks To disconnect, pull out...
Operating Instructions
Page 7
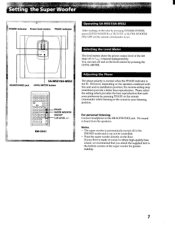
... SYSTEM POWER, press SUPER WOOFER on HCD-551 or SUPER WOOFER ON/OFF on the remote commander to on the remote commander while listening to the sound in the PHONO mode and it can turn off in your listening position. Adjusting the Phase The phase polarity is normal when the PHASE indicator is heard from the speakers. Please select the setting which provides the bass reproduction...
... SYSTEM POWER, press SUPER WOOFER on HCD-551 or SUPER WOOFER ON/OFF on the remote commander to on the remote commander while listening to the sound in the PHONO mode and it can turn off in your listening position. Adjusting the Phase The phase polarity is normal when the PHASE indicator is heard from the speakers. Please select the setting which provides the bass reproduction...

Operating Instructions
Page 8
... Bass and the Treble Sound Before adjusting the tone level, press TONE/LEVEL so that the indicator lights and press LEVEL - Press BASS/REAR - to attenuate the BASS sound. Adjusting Balance 0 To change relative volume of the right and left speakers, adjust the BALANCE control. to attenuate the TREBLE sound. BASS/REAR MEM SUPER WOOFER LEVEL O Press BASS/REAR + to reproduced sound. TREBLE/CENTER Press SUPER WOOFER so that the TONE indicator lights. The super woofer level is indicated on the display. The following operations apply only to enhance the BASS sound...
... Bass and the Treble Sound Before adjusting the tone level, press TONE/LEVEL so that the indicator lights and press LEVEL - Press BASS/REAR - to attenuate the BASS sound. Adjusting Balance 0 To change relative volume of the right and left speakers, adjust the BALANCE control. to attenuate the TREBLE sound. BASS/REAR MEM SUPER WOOFER LEVEL O Press BASS/REAR + to reproduced sound. TREBLE/CENTER Press SUPER WOOFER so that the TONE indicator lights. The super woofer level is indicated on the display. The following operations apply only to enhance the BASS sound...
Operating Instructions
Page 9
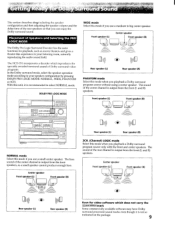
... DOLBY PRO LOGIC MODE: NORMAL, WIDE, PHANTOM or 3CH. This section describes abw t selecting the speaker configuration and then adjusting the speaker volume and the delay time of the rear speakers so that you use a medium to big center speaker. The sound of the center channel is not so indicated on the package. Front speaker (L) Center speaker Front speaker (R) 1 ))))\)\ Rear speaker (L) 4i> OE Rear speaker (R) PHANTOM mode Select this mode if you can enjoy the Dolby surround sound. The bass sound of the rear channel is output...
... DOLBY PRO LOGIC MODE: NORMAL, WIDE, PHANTOM or 3CH. This section describes abw t selecting the speaker configuration and then adjusting the speaker volume and the delay time of the rear speakers so that you use a medium to big center speaker. The sound of the center channel is not so indicated on the package. Front speaker (L) Center speaker Front speaker (R) 1 ))))\)\ Rear speaker (L) 4i> OE Rear speaker (R) PHANTOM mode Select this mode if you can enjoy the Dolby surround sound. The bass sound of the rear channel is output...
Operating Instructions
Page 10
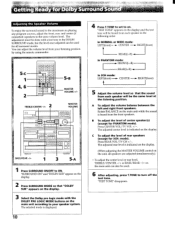
... using the remote commander. 5-c 1 4, 6 2 00 00 O 00 00 0 00 00 0 co 0 0 co 0 0 00 000 5-B MASTER VOLUME +/- 2 TREBLE/CENTER -/+ MASTER VOLUME = 00 1 gE ===== =0 MI I I I_JCIOn O 1 O .EDC=EIDOO. 0J 0 --1-- -- -- ,O=O= -OO IN E BASS/REAR -1+ 1 3 Press SURROUND ON/OFF to the same volume level. "TEST TONE" appears on . A To adjust the volume balance between the left and right front speakers. "SURROUND ON" and "DOLBY SUR" appear on the display. 2 Press SURROUND MODE so that the sound from the front speakers...
... using the remote commander. 5-c 1 4, 6 2 00 00 O 00 00 0 00 00 0 co 0 0 co 0 0 00 000 5-B MASTER VOLUME +/- 2 TREBLE/CENTER -/+ MASTER VOLUME = 00 1 gE ===== =0 MI I I I_JCIOn O 1 O .EDC=EIDOO. 0J 0 --1-- -- -- ,O=O= -OO IN E BASS/REAR -1+ 1 3 Press SURROUND ON/OFF to the same volume level. "TEST TONE" appears on . A To adjust the volume balance between the left and right front speakers. "SURROUND ON" and "DOLBY SUR" appear on the display. 2 Press SURROUND MODE so that the sound from the front speakers...
Operating Instructions
Page 11
... 0 00 0 a 00 CI 0=1 0 1 Press SURROUND ON/OFF to OFF. To turn off the surround effect Press SURROUND ON/OFF to ON. Adjusting the Delay Time of the Rear Speakers The delay time is a time between the surround sound from the front and that from rear speakers. The delay time can be selected among 15 ms, 20 ms and 30 ms. The delay time can be set in each surround mode (DOLBY, HALL, SIMULATED). (see page...
... 0 00 0 a 00 CI 0=1 0 1 Press SURROUND ON/OFF to OFF. To turn off the surround effect Press SURROUND ON/OFF to ON. Adjusting the Delay Time of the Rear Speakers The delay time is a time between the surround sound from the front and that from rear speakers. The delay time can be selected among 15 ms, 20 ms and 30 ms. The delay time can be set in each surround mode (DOLBY, HALL, SIMULATED). (see page...

Operating Instructions
Page 12
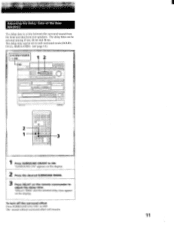
... a simulated stereo effect to be heard from Dolby Laboratories Licensing Corporation. HALL (Hall surround): Provides reverberation effect that is selected. 2 Start the selected program. 12 SYSTEM POWER --• ON 00 3 4 1 01==== 0=000 I]ri I I i jr i I ,=+BBBEZ7E:=1 - = ,======== E MI E 1 1 1 41 Select the program source. Note No sound will be pressed Phono record PHONO Radio Broadcast TUNER Compact disc CD Taped program TAPE Video program /Mini Disc VIDEO 1/MD or VIDEO 2 The MONITOR number on the display. * You can select the appropriate surround mode among...
... a simulated stereo effect to be heard from Dolby Laboratories Licensing Corporation. HALL (Hall surround): Provides reverberation effect that is selected. 2 Start the selected program. 12 SYSTEM POWER --• ON 00 3 4 1 01==== 0=000 I]ri I I i jr i I ,=+BBBEZ7E:=1 - = ,======== E MI E 1 1 1 41 Select the program source. Note No sound will be pressed Phono record PHONO Radio Broadcast TUNER Compact disc CD Taped program TAPE Video program /Mini Disc VIDEO 1/MD or VIDEO 2 The MONITOR number on the display. * You can select the appropriate surround mode among...

Operating Instructions
Page 13
VIDEO 1/MD VIDEO 2 TAPE CD TUNER PHONO 3 Press DUAL MODE TUNING - or +. For a lower frequency For a higher frequency • Tuning in manually Press DUAL MODE TUNING - The CD section is received, the automatic tuning stops. To stop automatic tuning Press DUAL MODE TUNING - After changing the interval, be sure to connect the supplied AM and FM antema. or + to match the frequency allocation system of SUPER WOOFER ON/OFF, SURROUND ON/OFF and BASS/TREBLE will...
VIDEO 1/MD VIDEO 2 TAPE CD TUNER PHONO 3 Press DUAL MODE TUNING - or +. For a lower frequency For a higher frequency • Tuning in manually Press DUAL MODE TUNING - The CD section is received, the automatic tuning stops. To stop automatic tuning Press DUAL MODE TUNING - After changing the interval, be sure to connect the supplied AM and FM antema. or + to match the frequency allocation system of SUPER WOOFER ON/OFF, SURROUND ON/OFF and BASS/TREBLE will...
Operating Instructions
Page 16
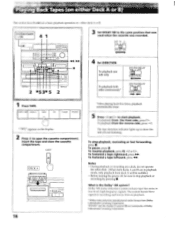
... both sides continuously* =-1c=I ( _)))9)\1 16 *After playing back five times, playback automatically stops. 5 Press a or f> to start playback. VIDEO 1/MD VIDEO 2 TAPE n CD TUNER PHONO "TREE" appears on either deck A or B. s on This section describeTabout a basic playback operation on the display. 2 Press a to the same position that was used when the cassette was recorded. SYSTEM POWER ON 4 1 GlI=O.71=1 =10=100 0 OD...
... both sides continuously* =-1c=I ( _)))9)\1 16 *After playing back five times, playback automatically stops. 5 Press a or f> to start playback. VIDEO 1/MD VIDEO 2 TAPE n CD TUNER PHONO "TREE" appears on either deck A or B. s on This section describeTabout a basic playback operation on the display. 2 Press a to the same position that was used when the cassette was recorded. SYSTEM POWER ON 4 1 GlI=O.71=1 =10=100 0 OD...

Operating Instructions
Page 19
3 Select the side(s) to prevent recording, the indicator will flash for that side also. See "To prevent accidental erasure". When If, however, the tab for three seconds to indicate that recording is possible on both sides .--7-' c::::, RELAY Clan ' DIRECTION ow.- 441 4 Press • to enter the recording pause mode. To record on one will not...
3 Select the side(s) to prevent recording, the indicator will flash for that side also. See "To prevent accidental erasure". When If, however, the tab for three seconds to indicate that recording is possible on both sides .--7-' c::::, RELAY Clan ' DIRECTION ow.- 441 4 Press • to enter the recording pause mode. To record on one will not...
Operating Instructions
Page 20
SYSTEM POWER ON 2 0a _ 0=000 00=1= DO I OE= E:O 0= O oOOO OOD 0 0 = == = = = III 3 Press HIGH SPEED DUBBING. The unit enters recording pause mode for high speed dubbing, the II and REC indicators light. (Dubbing can not be carried out without pressing HIGH SPEED DUBBING.) L _j HIGH SPEED DUBBING 4 Select the side on which to B. To dub from the front side, press To dub from deck A to start dubbing. This section describes.about the operation of the recording from the reverse side, press
SYSTEM POWER ON 2 0a _ 0=000 00=1= DO I OE= E:O 0= O oOOO OOD 0 0 = == = = = III 3 Press HIGH SPEED DUBBING. The unit enters recording pause mode for high speed dubbing, the II and REC indicators light. (Dubbing can not be carried out without pressing HIGH SPEED DUBBING.) L _j HIGH SPEED DUBBING 4 Select the side on which to B. To dub from the front side, press To dub from deck A to start dubbing. This section describes.about the operation of the recording from the reverse side, press

Operating Instructions
Page 21
... selection number goes out. Selection number Elapsed time in any mode. Caution on the SYSTEM POWER and set to play . Once it will be damaged when a peak level portion is pressed, "1 DISC" or "ALL DISCS" appears alternately. To stop play and open the disc table. Press > or II to 5 discs. Before playing a disc, turn on adjusting volume Do not turn the disc tray and place up . to the CD mode. This is useful when...
... selection number goes out. Selection number Elapsed time in any mode. Caution on the SYSTEM POWER and set to play . Once it will be damaged when a peak level portion is pressed, "1 DISC" or "ALL DISCS" appears alternately. To stop play and open the disc table. Press > or II to 5 discs. Before playing a disc, turn on adjusting volume Do not turn the disc tray and place up . to the CD mode. This is useful when...

Operating Instructions
Page 23
... times, but there will be no sound. t , - Locating a Particular Point in a Selection Locating a point in sequence (Manual Search) You can locate the beginning of the disc, "1 appears in the display. To go ahead at high speed Keep -44 pressed. pressed. Press 41 or 1.1>0 until the desired selection is located. 23 Eol `"T 41/040DISC SELECT 1-5 DISC SKIP Selecting a Desired Disc By using DISC SELECT 1- 5 or DISC...
... times, but there will be no sound. t , - Locating a Particular Point in a Selection Locating a point in sequence (Manual Search) You can locate the beginning of the disc, "1 appears in the display. To go ahead at high speed Keep -44 pressed. pressed. Press 41 or 1.1>0 until the desired selection is located. 23 Eol `"T 41/040DISC SELECT 1-5 DISC SKIP Selecting a Desired Disc By using DISC SELECT 1- 5 or DISC...
Operating Instructions
Page 30
... (1) Sony batteries SUM-3(NS) (2) System control cord (1) Audio connecting cord (3) Feet (4) Design and specifications are subject to change without notice. 30 Sy; Specifications 4 illEV.11. is Y Amplifier Frequency response PHONO: RIAA curve VIDEO 1 /MD, VIDEO 2: 40 Hz - 50 kHz ±3 dB Audio section Input Sensitivity Impedance PHONO 2.5 mV 50 kilohms VIDEO 1/MD VIDEO 2 Output 250 mV 50 kilohms VIDEO 1 /MD: Voltage 250 mV Impedance 1 kilohm Tone buttons BASS: Boost/Cut range: ±7 dB (100 Hz) TREBLE: Boost/Cut range...
... (1) Sony batteries SUM-3(NS) (2) System control cord (1) Audio connecting cord (3) Feet (4) Design and specifications are subject to change without notice. 30 Sy; Specifications 4 illEV.11. is Y Amplifier Frequency response PHONO: RIAA curve VIDEO 1 /MD, VIDEO 2: 40 Hz - 50 kHz ±3 dB Audio section Input Sensitivity Impedance PHONO 2.5 mV 50 kilohms VIDEO 1/MD VIDEO 2 Output 250 mV 50 kilohms VIDEO 1 /MD: Voltage 250 mV Impedance 1 kilohm Tone buttons BASS: Boost/Cut range: ±7 dB (100 Hz) TREBLE: Boost/Cut range...

Operating Instructions
Page 31
.... Adjust the antenna or connect an external FM antenna. • The signal strength is received. Function buttons do not activate. Excessive wow, flutter or dropout. Unbalanced tone in high frequencies. • No tape in sound level. Severe hum or noise. • A very weak FM station or a noisy FM program is too weak. ---. Compact Disc Operation Remote commander does not operate the unit. Aajust the antenna, connect an external antenna or connect the ground wire. Cover...
.... Adjust the antenna or connect an external FM antenna. • The signal strength is received. Function buttons do not activate. Excessive wow, flutter or dropout. Unbalanced tone in high frequencies. • No tape in sound level. Severe hum or noise. • A very weak FM station or a noisy FM program is too weak. ---. Compact Disc Operation Remote commander does not operate the unit. Aajust the antenna, connect an external antenna or connect the ground wire. Cover...

Operating Instructions
Page 32
... the connection between the super woofer and speakers. • Adjust the PHASE. • Keep the audio components further away from the TV. • Keep the connecting cords away from transformer, motors, fluorescent lights, or computers. • Fully insert connecting cord plugs. • Clean any button on the front panel has been pressed before turning on SYSTEM POWER. • Check the system control cord connection and the power cord connection of bass sound or obscure...
... the connection between the super woofer and speakers. • Adjust the PHASE. • Keep the audio components further away from the TV. • Keep the connecting cords away from transformer, motors, fluorescent lights, or computers. • Fully insert connecting cord plugs. • Clean any button on the front panel has been pressed before turning on SYSTEM POWER. • Check the system control cord connection and the power cord connection of bass sound or obscure...


