Operating Instructions
Page 1
Sony Corporation Printed in Korea GXD-L52H1 3-277-719-02(1) Professional Flat Display Monitor JP Operating Instructions GB Mode d'emploi FR Bedienungsanleitung DE Manual de instrucciones ES Istruzioni per l'uso IT CS GXD-L52H1 © 2007 Sony Corporation
Sony Corporation Printed in Korea GXD-L52H1 3-277-719-02(1) Professional Flat Display Monitor JP Operating Instructions GB Mode d'emploi FR Bedienungsanleitung DE Manual de instrucciones ES Istruzioni per l'uso IT CS GXD-L52H1 © 2007 Sony Corporation
Operating Instructions
Page 50
... the addresses given in Europe This product with the CE marking complies with the limits for help. If this product, you carry the display unit, hold the unit itself, not the speakers. For the customers in separate service or guarantee documents. Refer to which can be.... CAUTION RISK OF EXPLOSION IF BATTERY IS REPLACED BY AN INCORRECT TYPE. Compliance with the instructions, may call upon your Sony dealer regarding this manual could void your authority to do not open the cabinet. On transportation When you may cause harmful interference to the following ...
... the addresses given in Europe This product with the CE marking complies with the limits for help. If this product, you carry the display unit, hold the unit itself, not the speakers. For the customers in separate service or guarantee documents. Refer to which can be.... CAUTION RISK OF EXPLOSION IF BATTERY IS REPLACED BY AN INCORRECT TYPE. Compliance with the instructions, may call upon your Sony dealer regarding this manual could void your authority to do not open the cabinet. On transportation When you may cause harmful interference to the following ...
Operating Instructions
Page 53
...For the customers in the USA Lamp in this product contains mercury. For disposal or recycling information, please contact your local Sony office or visit Sony Europe's web site for business customers: http://www.sonybiz.net/environment CAUTION for business use (Applicable in the European Union... the operating temperature of the equipment into consideration For the operating temperature of the equipment, refer to the specifications of the Operation Manual. • When performing the installation, keep the following space away from walls in order to any network devices that this product...
...For the customers in the USA Lamp in this product contains mercury. For disposal or recycling information, please contact your local Sony office or visit Sony Europe's web site for business customers: http://www.sonybiz.net/environment CAUTION for business use (Applicable in the European Union... the operating temperature of the equipment into consideration For the operating temperature of the equipment, refer to the specifications of the Operation Manual. • When performing the installation, keep the following space away from walls in order to any network devices that this product...
Operating Instructions
Page 57
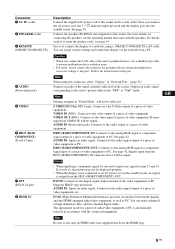
... 19. Connects to the video input of a piece of video equipment. For more details on how to route the speaker cords, see the operating manual that might have excessive voltage to radiation noise. • For safety, do so, the picture may not be output. Note When using a 10BASE...When inputting a component signal, be sure not to input sync signals to a network, using this port. You can assign various settings and control the display via the network from the HD15 (RGB/COMPONENT) IN connector above will not be output. Note Be sure to use a shielded-type cable to prevent...
... 19. Connects to the video input of a piece of video equipment. For more details on how to route the speaker cords, see the operating manual that might have excessive voltage to radiation noise. • For safety, do so, the picture may not be output. Note When using a 10BASE...When inputting a component signal, be sure not to input sync signals to a network, using this port. You can assign various settings and control the display via the network from the HD15 (RGB/COMPONENT) IN connector above will not be output. Note Be sure to use a shielded-type cable to prevent...
Operating Instructions
Page 61
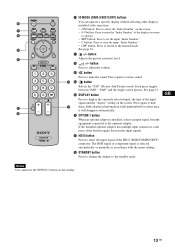
... +/- qh OPTION 1 button When an optional adaptor is selected automatically or manually in accordance with the menu settings. Press again to enter the "Index Number" of the HD15 (RGB/COMPONENT) connector. GB Notes You cannot use the OPTION 2 button on this displayed information is left undisturbed for a short time, it will disappear...
... +/- qh OPTION 1 button When an optional adaptor is selected automatically or manually in accordance with the menu settings. Press again to enter the "Index Number" of the HD15 (RGB/COMPONENT) connector. GB Notes You cannot use the OPTION 2 button on this displayed information is left undisturbed for a short time, it will disappear...
Operating Instructions
Page 65
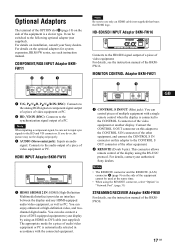
...-definition video, and twochannel digital audio. The appropriate mode for system expansion, BKM-FW series, see the instruction manual of DVI-equipped equipment to your display by using an HDMI-to the synchronization signal output of the BKMFW16. For details on installation, consult your authorized...can also connect a piece of the BKMFW50. 17 GB For details, contact your Sony dealers. HDMI INPUT Adaptor BKM-FW15 1 HDMI 1/HDMI 2 IN: HDMI (High-Definition Multimedia Interface) provides an interface between the display and any HDMI-equipped audio/video equipment, as well as PC. GB 1 CONTROL...
...-definition video, and twochannel digital audio. The appropriate mode for system expansion, BKM-FW series, see the instruction manual of DVI-equipped equipment to your display by using an HDMI-to the synchronization signal output of the BKMFW16. For details on installation, consult your authorized...can also connect a piece of the BKMFW50. 17 GB For details, contact your Sony dealers. HDMI INPUT Adaptor BKM-FW15 1 HDMI 1/HDMI 2 IN: HDMI (High-Definition Multimedia Interface) provides an interface between the display and any HDMI-equipped audio/video equipment, as well as PC. GB 1 CONTROL...
Operating Instructions
Page 66
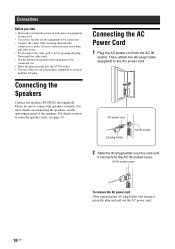
... 2 Slide the AC plug holder over the cord until it connects to the AC power cord. Never pull the cable itself. • See the instruction manual of the speakers. Please be sure to be connected. • Connect the cables, fully inserting them into the AC IN socket. For details on connecting... the speakers, see page 19. For more details on how to route the speaker cords, see the operating manual of the equipment to connect the speakers correctly.
... 2 Slide the AC plug holder over the cord until it connects to the AC power cord. Never pull the cable itself. • See the instruction manual of the speakers. Please be sure to be connected. • Connect the cables, fully inserting them into the AC IN socket. For details on connecting... the speakers, see page 19. For more details on how to route the speaker cords, see the operating manual of the equipment to connect the speakers correctly.
Operating Instructions
Page 74
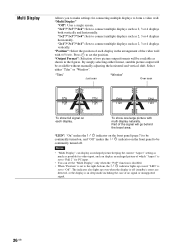
... "Off". Select either format, suitable picture output will be available as shown in the arrangement of each display. Part of the signal will be available without manually adjusting the horizontal and vertical shift. By simply selecting either "Tiles" or "Window". The indicator also... picture with F/f/G/g. "LED": "On" makes the indicator on the front panel (page 7) to be continually turned on, and "Off" makes the indicator on each display in the figures. Notes • "Multi Display" can display an enlarged picture keeping the current "Aspect" setting as much as 2, ...
... "Off". Select either format, suitable picture output will be available as shown in the arrangement of each display. Part of the signal will be available without manually adjusting the horizontal and vertical shift. By simply selecting either "Tiles" or "Window". The indicator also... picture with F/f/G/g. "LED": "On" makes the indicator on the front panel (page 7) to be continually turned on, and "Off" makes the indicator on each display in the figures. Notes • "Multi Display" can display an enlarged picture keeping the current "Aspect" setting as much as 2, ...

Operating Instructions
Page 76
...Notes • You cannot set the "Aspect" while using the "PAP" function or the "Multi Display" function. • If the input resolution is higher than the panel resolution (1,920 × 1,080), the display of the picture horizontally. Note that "Auto Adjustment" may not work well with certain input signals....the size of Real is input. "Reset": Resets all settings of "Adjust Screen" to automatically adjust the display position and phase of the picture vertically. In such cases, manually adjust the options below. For PC Input When input is switched to PC input source, the "Screen" ...
...Notes • You cannot set the "Aspect" while using the "PAP" function or the "Multi Display" function. • If the input resolution is higher than the panel resolution (1,920 × 1,080), the display of the picture horizontally. Note that "Auto Adjustment" may not work well with certain input signals....the size of Real is input. "Reset": Resets all settings of "Adjust Screen" to automatically adjust the display position and phase of the picture vertically. In such cases, manually adjust the options below. For PC Input When input is switched to PC input source, the "Screen" ...
Operating Instructions
Page 80
... is recommended. Note that in this case the IP address may differ slightly from the illustrations shown in this manual. • For safety, connect the port of this display only to a network where there is no danger of excessive voltage or voltage surges. • The steps...have the DHCP server automatically assign an IP address. After about IP address selection. • Assigning a fixed IP address to the display Normally this manual are guaranteed only for improvements without notice. • Screens shown by application software may change for use under the following two methods...
... is recommended. Note that in this case the IP address may differ slightly from the illustrations shown in this manual. • For safety, connect the port of this display only to a network where there is no danger of excessive voltage or voltage surges. • The steps...have the DHCP server automatically assign an IP address. After about IP address selection. • Assigning a fixed IP address to the display Normally this manual are guaranteed only for improvements without notice. • Screens shown by application software may change for use under the following two methods...
Operating Instructions
Page 81
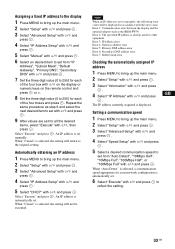
When "Cancel" is selected, the setting will not be displayed in accordance with the error cause. The IP address currently acquired is set manually. Setting a communication speed 1 Press MENU to bring up the main menu. 2 Select "Setup" with F/f and press . 3 Select "Advanced Setup... "Information" with F/f and press . 4 Select "IP Address" with F/f, then press . Select "Execute" and press . Error 1: Communication error between the display and the optional adaptor such as step 6 and select the next desired item to the original setting. Select "Execute" and press . An IP address is...
When "Cancel" is selected, the setting will not be displayed in accordance with the error cause. The IP address currently acquired is set manually. Setting a communication speed 1 Press MENU to bring up the main menu. 2 Select "Setup" with F/f and press . 3 Select "Advanced Setup... "Information" with F/f and press . 4 Select "IP Address" with F/f, then press . Select "Execute" and press . Error 1: Communication error between the display and the optional adaptor such as step 6 and select the next desired item to the original setting. Select "Execute" and press . An IP address is...
Operating Instructions
Page 298
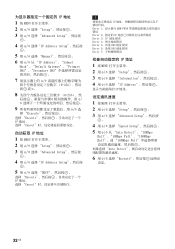
IP 地址 1 按 MENU 2 用 F/f 选择 "Setup 3 用 F/f 选择 "Advanced Setup 。 4 用 F/f 选择"IP Address Setup 。 5 用 F/f 选择 "Manual 6 用 F/f 从 "IP Address"、"Subnet Mask"、"Default Gateway"、"Primary DNS"、"Secondary DNS 7 F/f 0-255 g。 8 0-255),然 6 F/ f 9 F/f 选 择 "Execute ...
IP 地址 1 按 MENU 2 用 F/f 选择 "Setup 3 用 F/f 选择 "Advanced Setup 。 4 用 F/f 选择"IP Address Setup 。 5 用 F/f 选择 "Manual 6 用 F/f 从 "IP Address"、"Subnet Mask"、"Default Gateway"、"Primary DNS"、"Secondary DNS 7 F/f 0-255 g。 8 0-255),然 6 F/ f 9 F/f 选 择 "Execute ...


