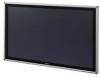

Operating Instructions
Page 51
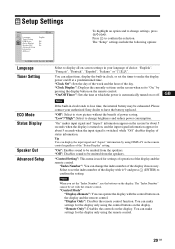
Table of Contents Introduction Precautions ...4 Recommendations on Installation 6 Location and Function of Parts and Controls Front ...7 Side ...8 Right Side...8 Left Side ...8 Rear ...11 Remote Control ...12 Button Description...12 GB Special Buttons on the Remote Control 14 Using the Wide Mode...14 Using the PAP Setting 15 Using the ID MODE button 16 Optional Adaptors ...17...
Table of Contents Introduction Precautions ...4 Recommendations on Installation 6 Location and Function of Parts and Controls Front ...7 Side ...8 Right Side...8 Left Side ...8 Rear ...11 Remote Control ...12 Button Description...12 GB Special Buttons on the Remote Control 14 Using the Wide Mode...14 Using the PAP Setting 15 Using the ID MODE button 16 Optional Adaptors ...17...
Operating Instructions
Page 52
...• There is manufactured with the unit, the following problems, such as malfunction of the remote control, noisy picture, noisy sound, may occur depending on the position of the surface or remove ... the unit. Doing so may disrupt the display or damage the LCD screen. • You may warm up during use . The screen will damage the panel. If you install multiple equipment with an...power cord before use .This does not a problem. To avoid this unit, contact your authorized Sony dealers. If light ghosting (image burn-in a place subject to direct sunlight, excessive dust, ...
...• There is manufactured with the unit, the following problems, such as malfunction of the remote control, noisy picture, noisy sound, may occur depending on the position of the surface or remove ... the unit. Doing so may disrupt the display or damage the LCD screen. • You may warm up during use . The screen will damage the panel. If you install multiple equipment with an...power cord before use .This does not a problem. To avoid this unit, contact your authorized Sony dealers. If light ghosting (image burn-in a place subject to direct sunlight, excessive dust, ...
Operating Instructions
Page 55
..., the indicator does not light up . Note When the "LED" option in green even when the display is turned on or off (standby). 8 Sony logo The Sony logo lights up in the "Multi Display" settings is set to "Off" and the "Position" option is switched on the menu according to ... set your choice. 6 (RETURN) button This returns to the preceding menu screen. 7 1 (POWER) switch Switches the display on , except for the case of no signal or an unsupported signal. 0 Remote control sensor 7 GB The signal to be input from a PC. When the indicator blinks in the OPTION slot, OPTION will...
..., the indicator does not light up . Note When the "LED" option in green even when the display is turned on or off (standby). 8 Sony logo The Sony logo lights up in the "Multi Display" settings is set to "Off" and the "Position" option is switched on the menu according to ... set your choice. 6 (RETURN) button This returns to the preceding menu screen. 7 1 (POWER) switch Switches the display on , except for the case of no signal or an unsupported signal. 0 Remote control sensor 7 GB The signal to be input from a PC. When the indicator blinks in the OPTION slot, OPTION will...
Operating Instructions
Page 57
...IN: Inputs an audio signal. You can assign various settings and control the display via the network from VIDEO IN will not be displayed properly. • When the display is not connected to a network, using this connector, select "Display" in accordance with the speakers. Connect the speakers SS-SPG01 ... equipment, as well as PC. Connects to the S Video output of a piece of video equipment or PC. Connector 1 AC IN socket 2 SPEAKER socket 3 REMOTE (10BASE-T/100BASE-TX) 4 AUDIO (Stereo mini jack) 5 VIDEO 6 HD15 (RGB/ COMPONENT) (D-sub 15-pin) 7 DVI (DVI-D 24-pin) 8 HDMI...
...IN: Inputs an audio signal. You can assign various settings and control the display via the network from VIDEO IN will not be displayed properly. • When the display is not connected to a network, using this connector, select "Display" in accordance with the speakers. Connect the speakers SS-SPG01 ... equipment, as well as PC. Connects to the S Video output of a piece of video equipment or PC. Connector 1 AC IN socket 2 SPEAKER socket 3 REMOTE (10BASE-T/100BASE-TX) 4 AUDIO (Stereo mini jack) 5 VIDEO 6 HD15 (RGB/ COMPONENT) (D-sub 15-pin) 7 DVI (DVI-D 24-pin) 8 HDMI...

Operating Instructions
Page 60
... to open , 12 GB Each press toggles between "Vivid", "Standard", "Custom", "Conference", and "TC Control". 7 F/f/G/g/ buttons The F/f/G/g buttons move the menu cursor and set values, etc. Use the tactile dot as a reference when operating the display. • Insert two size AA (R6) batteries (supplied) by matching the 3 and # on . ...See page 20. Pressing sets the selected menu or setting items. In the "PAP" mode, you can switch the Picture and Picture setting. Remote Control Button Description 1 POWER ON switch Press to turn the display on the batteries to the diagram inside the...
... to open , 12 GB Each press toggles between "Vivid", "Standard", "Custom", "Conference", and "TC Control". 7 F/f/G/g/ buttons The F/f/G/g buttons move the menu cursor and set values, etc. Use the tactile dot as a reference when operating the display. • Insert two size AA (R6) batteries (supplied) by matching the 3 and # on . ...See page 20. Pressing sets the selected menu or setting items. In the "PAP" mode, you can switch the Picture and Picture setting. Remote Control Button Description 1 POWER ON switch Press to turn the display on the batteries to the diagram inside the...

Operating Instructions
Page 62
Special Buttons on the Remote Control Using the Wide Mode You can also access the "Aspect" settings in the "Screen" settings. See page 27, 28. 16:9 Original source m Wide Zoom Zoom ... Illustrations below indicate the input resolution of 800×600 Real Full 4:3 14 GB Full 1 Full 2 Note If the input resolution is higher than the panel resolution (1,920 × 1,080), the display of the screen. Tip You can change the aspect ratio of Real is the same as Full 1.
Special Buttons on the Remote Control Using the Wide Mode You can also access the "Aspect" settings in the "Screen" settings. See page 27, 28. 16:9 Original source m Wide Zoom Zoom ... Illustrations below indicate the input resolution of 800×600 Real Full 4:3 14 GB Full 1 Full 2 Note If the input resolution is higher than the panel resolution (1,920 × 1,080), the display of the screen. Tip You can change the aspect ratio of Real is the same as Full 1.
Operating Instructions
Page 64
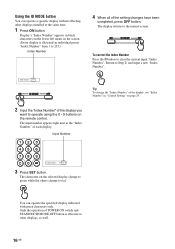
... "Index Number" in black characters on the lower left menu on the screen. (Every display is effective to red. The display returns to Step 2, and input a new "Index Number". Input Number Index Number : 117 117 3 Press SET button. To correct the Index Number ... 29. 2 Input the "Index Number" of the setting changes have been completed, press OFF button. Display's "Index Number" appears in "Control Setting" on the remote control. Index Number : 117 Tip To change to other displays installed at the same time. 1 Press ON button. The input number appears right next to the ...
... "Index Number" in black characters on the lower left menu on the screen. (Every display is effective to red. The display returns to Step 2, and input a new "Index Number". Input Number Index Number : 117 117 3 Press SET button. To correct the Index Number ... 29. 2 Input the "Index Number" of the setting changes have been completed, press OFF button. Display's "Index Number" appears in "Control Setting" on the remote control. Index Number : 117 Tip To change to other displays installed at the same time. 1 Press ON button. The input number appears right next to the ...
Operating Instructions
Page 65
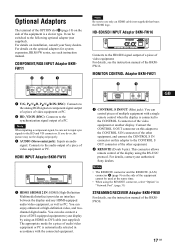
... equipment, as well as PC. For details on this adaptor to the CONTROL S OUT connector of the other equipment, and connect the CONTROL S IN connector on installation, consult your Sony dealers. For details, contact your display by using an HDMI-to use only an HDMI cable (not supplied) ... (page 10) on the side of the equipment is automatically selected in accordance with a single remote control when the display is connected to the CONTROL S connector of the video equipment or another display. It can control pieces of the BKMFW50. 17 GB If you do so, the picture may not be used...
... equipment, as well as PC. For details on this adaptor to the CONTROL S OUT connector of the other equipment, and connect the CONTROL S IN connector on installation, consult your Sony dealers. For details, contact your display by using an HDMI-to use only an HDMI cable (not supplied) ... (page 10) on the side of the equipment is automatically selected in accordance with a single remote control when the display is connected to the CONTROL S connector of the video equipment or another display. It can control pieces of the BKMFW50. 17 GB If you do so, the picture may not be used...
Operating Instructions
Page 69
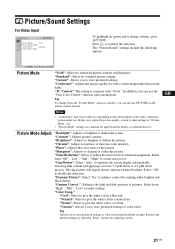
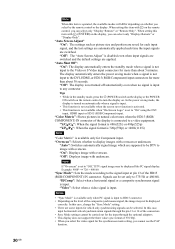
... Picture Mode Adjust. Select from the default settings. "Dynamic Picture": Select "On" to enhance contrast by selecting "Reset" on the remote control instead. GB 21 GB "Custom": Allows you to store preferred settings of "Picture Mode", etc. • "Picture Mode" settings are... may not be effective depending on the environment or the video conference system under fluorescent lights. "Backlight": Adjusts to optimize the screen display automatically detecting film content and applying a reverse 3-2 pull down or 2-2 pull down process. "Phase": Adjusts the color tones of pictures...
... Picture Mode Adjust. Select from the default settings. "Dynamic Picture": Select "On" to enhance contrast by selecting "Reset" on the remote control instead. GB 21 GB "Custom": Allows you to store preferred settings of "Picture Mode", etc. • "Picture Mode" settings are... may not be effective depending on the environment or the video conference system under fluorescent lights. "Backlight": Adjusts to optimize the screen display automatically detecting film content and applying a reverse 3-2 pull down or 2-2 pull down process. "Phase": Adjusts the color tones of pictures...
Operating Instructions
Page 71
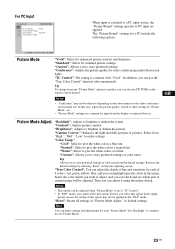
...on the tone adjusting screen. "Backlight": Adjusts to brighten or darken the picture. Restores the default settings by selecting "Reset" on the remote control instead. Even if you can make settings. Notes • "Conference" may not be adjusted. "Contrast": Adjusts picture contrast. Select ...source, the "Picture/Sound" settings specific to PC input are common for input from the display or optional devices. "Brightness": Adjusts to brighten or darken the screen. "True Color Control": You can adjust the details of current image will be applied in the single- "Color...
...on the tone adjusting screen. "Backlight": Adjusts to brighten or darken the picture. Restores the default settings by selecting "Reset" on the remote control instead. Even if you can make settings. Notes • "Conference" may not be adjusted. "Contrast": Adjusts picture contrast. Select ...source, the "Picture/Sound" settings specific to PC input are common for input from the display or optional devices. "Brightness": Adjusts to brighten or darken the screen. "True Color Control": You can adjust the details of current image will be applied in the single- "Color...
Operating Instructions
Page 75
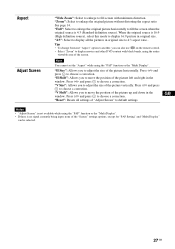
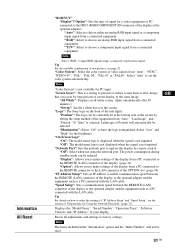
... enlarge to fill screen with black bands, using the entire viewable area of the "Screen" settings options, except for "PAP Setting" and "Multi Display" can also use on the remote control. • Select "Zoom" to default settings. "Full": Select to enlarge the original picture horizontally to fill the screen when the original source...
... enlarge to fill screen with black bands, using the entire viewable area of the "Screen" settings options, except for "PAP Setting" and "Multi Display" can also use on the remote control. • Select "Zoom" to default settings. "Full": Select to enlarge the original picture horizontally to fill the screen when the original source...
Operating Instructions
Page 77
...the power is used for the display only using the control buttons on the display. "Control Setting": This menu is automatically turned on the remote control regardless of power saving. Note When you set the timer to make the display power on the display and the remote control. You can adjust time, display the built-in clock, or ... to change brightness and reduce power consumption. Please contact your language of status information. GB Note If the built-in your authorized Sony dealer to have the battery replaced. "Display Only": Disables the remote control function.
...the power is used for the display only using the control buttons on the display. "Control Setting": This menu is automatically turned on the remote control regardless of power saving. Note When you set the timer to make the display power on the display and the remote control. You can adjust time, display the built-in clock, or ... to change brightness and reduce power consumption. Please contact your language of status information. GB Note If the built-in your authorized Sony dealer to have the battery replaced. "Display Only": Disables the remote control function.
Operating Instructions
Page 78
... Matrix": Shows pictures in the standby mode, press the 1 (POWER) switch on the display or the POWER ON switch on the remote control to image with on the remote control, you can select only "Display+Remote" or "Remote Only". "On": Displays image with underscan. Example: 480P t 720 × 480/60 "Sync Mode": Sets... input to the DVI, HDMI, or HD15 (RGB/Component) input connectors for the synchronous mode setting, you select by the remote control or the display. When setting this item with overscan or underscan. Tips • While in natural color tones when the HD15 (RGB/ COMPONENT...
... Matrix": Shows pictures in the standby mode, press the 1 (POWER) switch on the display or the POWER ON switch on the remote control to image with on the remote control, you can select only "Display+Remote" or "Remote Only". "On": Displays image with underscan. Example: 480P t 720 × 480/60 "Sync Mode": Sets... input to the DVI, HDMI, or HD15 (RGB/Component) input connectors for the synchronous mode setting, you select by the remote control or the display. When setting this item with overscan or underscan. Tips • While in natural color tones when the HD15 (RGB/ COMPONENT...
Operating Instructions
Page 79
... of the same image. Note "Color System" is not inputted. "Logo": The Sony logo on how to make settings of the screen by remote control. If "Auto" is not inputted. "Off": The model name logo is not displayed when the signal is selected, Landscape or Portrait will not be constantly lit at... the bottom side of the display from "Auto," "Landscape," and "Portrait." Note The ...
... of the same image. Note "Color System" is not inputted. "Logo": The Sony logo on how to make settings of the screen by remote control. If "Auto" is not inputted. "Off": The model name logo is not displayed when the signal is selected, Landscape or Portrait will not be constantly lit at... the bottom side of the display from "Auto," "Landscape," and "Portrait." Note The ...
Operating Instructions
Page 81
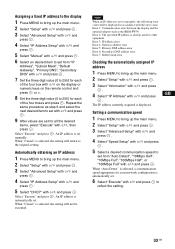
..." with F/f and press to reflect the setting. 33 GB When "Auto Detect" is selected, a communication speed appropriate for your network configuration is displayed. The IP address currently acquired is automatically set. 6 Select "Execute" with F/f and press GB . An IP address is not set properly, the...an desired item to set from "Auto Detect", "10Mbps Half", "10Mbps Full", "100Mbps Half", or "100Mbps Full" with F/f on the display or numeric keys on the remote control and press or g. 8 Set the three digit value (0 to 255) for each of the four boxes and press . Select "Execute" ...
..." with F/f and press to reflect the setting. 33 GB When "Auto Detect" is selected, a communication speed appropriate for your network configuration is displayed. The IP address currently acquired is automatically set. 6 Select "Execute" with F/f and press GB . An IP address is not set properly, the...an desired item to set from "Auto Detect", "10Mbps Half", "10Mbps Full", "100Mbps Half", or "100Mbps Full" with F/f on the display or numeric keys on the remote control and press or g. 8 Set the three digit value (0 to 255) for each of the four boxes and press . Select "Execute" ...
Operating Instructions
Page 85
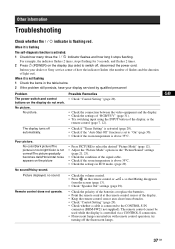
... settings in the table below. 2 If the problem still persists, have your dealer or Sony service center of how the indicator flashes (the number of flashes and the duration of the display, or the remote control (page 7, 12). The display turns off the fluorescent lamps. GB 37 GB When it stops flashing. No picture. Other...
... settings in the table below. 2 If the problem still persists, have your dealer or Sony service center of how the indicator flashes (the number of flashes and the duration of the display, or the remote control (page 7, 12). The display turns off the fluorescent lamps. GB 37 GB When it stops flashing. No picture. Other...
Operating Instructions
Page 86
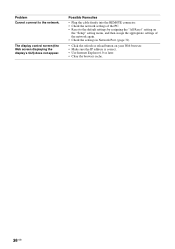
The display control screen (the Web screen displaying the display's GUI) does not appear. Possible Remedies • Plug the cable firmly into the REMOTE connector. • Check the network settings of the PC. • Reset to the network. Problem Cannot connect to the default settings by assigning the "All ...
The display control screen (the Web screen displaying the display's GUI) does not appear. Possible Remedies • Plug the cable firmly into the REMOTE connector. • Check the network settings of the PC. • Reset to the network. Problem Cannot connect to the default settings by assigning the "All ...
Operating Instructions
Page 89
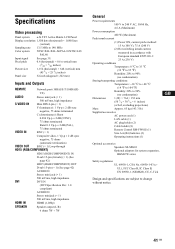
...Panel size 0.6 (horizontal) × 0.6 (vertical) mm (1/40 × 1/40 inches) 1,152 (horizontal) × 648 (vertical) mm (45 1/2 × 25 5/8 inches) 52-inch (diagonal 1,322 mm) Inputs and Outputs REMOTE ...lb.) Supplied accessories AC power cord (1) LAN cable (1) AC plug holder (2) Cable holder (8) Remote Control RM-FW002 (1) Size AA (R6) batteries (2) Operating instructions (1) GB Optional accessories Speakers SS-...See page 39. Specifications Video processing Panel system a-Si TFT Active Matrix LCD Panel Display resolution 1,920 dots (horizontal) × 1,080 lines ...
...Panel size 0.6 (horizontal) × 0.6 (vertical) mm (1/40 × 1/40 inches) 1,152 (horizontal) × 648 (vertical) mm (45 1/2 × 25 5/8 inches) 52-inch (diagonal 1,322 mm) Inputs and Outputs REMOTE ...lb.) Supplied accessories AC power cord (1) LAN cable (1) AC plug holder (2) Cable holder (8) Remote Control RM-FW002 (1) Size AA (R6) batteries (2) Operating instructions (1) GB Optional accessories Speakers SS-...See page 39. Specifications Video processing Panel system a-Si TFT Active Matrix LCD Panel Display resolution 1,920 dots (horizontal) × 1,080 lines ...
Operating Instructions
Page 91
... Clock Set 29 Color Matrix 30 CCCooonlloofrrerSTeyensmcteepm.2213,11,2323 CCoonnftrigasutre21sc,re2e3n 34 Contrast button 13 Control Mode 29 Control screen 34 Control Custom S2e1t,tin2g3 29 D DISPLAY button 13 DVI button 12 DVI connector 9 DDVynIaImNicco2n2n,ec2t4or 9 Dynamic Picture 21 E ECO Mode 20, 29... Settings 20, 21 Pitch 28 Position 26 POWER ON switch 12 POWER switch 7 Power/Stand by Indicator 7 R Real 14, 28 REMOTE connector 9 RReemseot t2e2c,on2t3r,ol2s7e,ns2o8r 7 RETURN button 7 RGB/YUV 31 S S VIDEO button 12 SScVreIeDnESOetItNingcson2n0e,ct2o5r 9 Setup Setup ...
... Clock Set 29 Color Matrix 30 CCCooonlloofrrerSTeyensmcteepm.2213,11,2323 CCoonnftrigasutre21sc,re2e3n 34 Contrast button 13 Control Mode 29 Control screen 34 Control Custom S2e1t,tin2g3 29 D DISPLAY button 13 DVI button 12 DVI connector 9 DDVynIaImNicco2n2n,ec2t4or 9 Dynamic Picture 21 E ECO Mode 20, 29... Settings 20, 21 Pitch 28 Position 26 POWER ON switch 12 POWER switch 7 Power/Stand by Indicator 7 R Real 14, 28 REMOTE connector 9 RReemseot t2e2c,on2t3r,ol2s7e,ns2o8r 7 RETURN button 7 RGB/YUV 31 S S VIDEO button 12 SScVreIeDnESOetItNingcson2n0e,ct2o5r 9 Setup Setup ...
Operating Instructions
Page 282
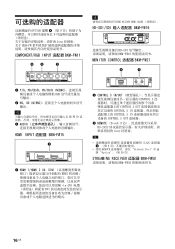
... 适配器 BKM-FW15 1 HDMI 1/HDMI 2 IN:HDMI HDMI HDMI-to-DVI DVI 1 CONTROL S IN/OUT CONTROL S CONTROL S OUT CONTROL S IN CONTROL S IN CONTROL S OUT 2 REMOTE (D-sub 9 RS-232C Sony 注 REMOTE REMOTE (LAN) 连接器 3 (第 9 • 使用 REMOTE Network Port Option"。(第 30 页) STREAMING RECEIVER 适配器 BKM...
... 适配器 BKM-FW15 1 HDMI 1/HDMI 2 IN:HDMI HDMI HDMI-to-DVI DVI 1 CONTROL S IN/OUT CONTROL S CONTROL S OUT CONTROL S IN CONTROL S IN CONTROL S OUT 2 REMOTE (D-sub 9 RS-232C Sony 注 REMOTE REMOTE (LAN) 连接器 3 (第 9 • 使用 REMOTE Network Port Option"。(第 30 页) STREAMING RECEIVER 适配器 BKM...


