Operating Instructions
Page 1
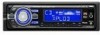
Model No. Pour annuler l'affichage de démonstration (DEMO), reportez-vous à la page 10. 3-217-494-11 (1) FM/AM Compact Disc Player Operating Instructions US Mode d'emploi FR Owner's Record The model and serial numbers are located on the bottom of the unit. Serial No. To cancel the demonstration (DEMO) display, see page 10. Refer to these numbers in the spaces provided below. CDX-GT520 CDX-GT52W © 2007 Sony Corporation Record these numbers whenever you call upon your Sony dealer regarding this product.
Model No. Pour annuler l'affichage de démonstration (DEMO), reportez-vous à la page 10. 3-217-494-11 (1) FM/AM Compact Disc Player Operating Instructions US Mode d'emploi FR Owner's Record The model and serial numbers are located on the bottom of the unit. Serial No. To cancel the demonstration (DEMO) display, see page 10. Refer to these numbers in the spaces provided below. CDX-GT520 CDX-GT52W © 2007 Sony Corporation Record these numbers whenever you call upon your Sony dealer regarding this product.
Operating Instructions
Page 2
... in this manual could void your authority to operate this product will not occur in accordance with this product will control a satellite radio tuner module (sold separately). The unit will shut off completely and automatically in the set the Auto Off function, press and hold (OFF) until the display disappears each time you turn the ignition off and on the satellite radio tuner module. Connect the equipment...
... in this manual could void your authority to operate this product will not occur in accordance with this product will control a satellite radio tuner module (sold separately). The unit will shut off completely and automatically in the set the Auto Off function, press and hold (OFF) until the display disappears each time you turn the ignition off and on the satellite radio tuner module. Connect the equipment...
Operating Instructions
Page 3
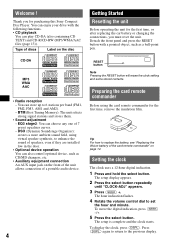
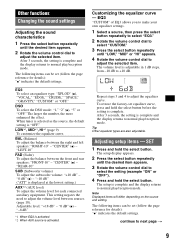
... remote commander 4 Setting the clock 4 Detaching the front panel 5 Attaching the front panel 5 Inserting the disc in the unit 5 Ejecting the disc 5 Location of MP3/WMA/AAC files 13 About MP3 files 13 About WMA files 13 About AAC files 14 Maintenance 14 Removing the unit 14 Specifications 15 Troubleshooting 16 Error displays/Messages 17 3 BTM 8 Storing manually 8 Receiving the stored stations 8 Tuning automatically 8 Other functions Changing the sound settings 9 Adjusting the sound characteristics 9 Customizing the equalizer...
... remote commander 4 Setting the clock 4 Detaching the front panel 5 Attaching the front panel 5 Inserting the disc in the unit 5 Ejecting the disc 5 Location of MP3/WMA/AAC files 13 About MP3 files 13 About WMA files 13 About AAC files 14 Maintenance 14 Removing the unit 14 Specifications 15 Troubleshooting 16 Error displays/Messages 17 3 BTM 8 Storing manually 8 Receiving the stored stations 8 Tuning automatically 8 Other functions Changing the sound settings 9 Adjusting the sound characteristics 9 Customizing the equalizer...
Operating Instructions
Page 4
... the select button. BTM (Best Tuning Memory): The unit selects strong signal stations and stores them. • Sound adjustment - You can enjoy your drive with a pointed object, such as CD/MD changers, etc. • Auxiliary equipment connection An AUX input jack on page 14. DSO (Dynamic Soundstage Organizer): creates a more ambient sound field, using the card remote commander for purchasing this Sony Compact Disc Player. Welcome ! The hour indication flashes. 4 Rotate the volume control dial to 6 stations...
... the select button. BTM (Best Tuning Memory): The unit selects strong signal stations and stores them. • Sound adjustment - You can enjoy your drive with a pointed object, such as CD/MD changers, etc. • Auxiliary equipment connection An AUX input jack on page 14. DSO (Dynamic Soundstage Organizer): creates a more ambient sound field, using the card remote commander for purchasing this Sony Compact Disc Player. Welcome ! The hour indication flashes. 4 Rotate the volume control dial to 6 stations...

Operating Instructions
Page 5
... front panel. A B c 5 The alarm will sound for a few seconds. The disc is used. 1 Press (OFF). The front panel is turned off. 2 Press (OPEN). Playback starts automatically. 1 2 Ejecting the disc 1 Press (OPEN). 2 Press Z. The unit is flipped down. 3 Slide the front panel to the right, then gently pull out the left side in amplifier is ejected. 3 Close the front panel. Attaching the front panel Place...
... front panel. A B c 5 The alarm will sound for a few seconds. The disc is used. 1 Press (OFF). The front panel is turned off. 2 Press (OPEN). Playback starts automatically. 1 2 Ejecting the disc 1 Press (OPEN). 2 Press Z. The unit is flipped down. 3 Slide the front panel to the right, then gently pull out the left side in amplifier is ejected. 3 Close the front panel. Attaching the front panel Place...
Operating Instructions
Page 6
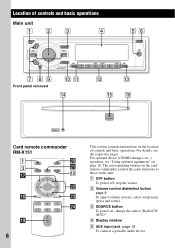
... MODE + - B Volume control dial/select button page 9 To adjust volume (rotate); change the source (Radio/CD/ AUX)*. DSPL SCRL w; ws wd 1 2 3 4 5 6 wf ql + VOL - 6 This section contains instructions on the unit. C SOURCE button To power on page 10. stop the source. wa q; For details, see "Using optional equipment" on ; select setup items (press and rotate). For optional device (CD/MD changer, etc.,) operation, see the respective pages. A OFF button To power off; D Display window E AUX input jack page 10 To connect...
... MODE + - B Volume control dial/select button page 9 To adjust volume (rotate); change the source (Radio/CD/ AUX)*. DSPL SCRL w; ws wd 1 2 3 4 5 6 wf ql + VOL - 6 This section contains instructions on the unit. C SOURCE button To power on page 10. stop the source. wa q; For details, see "Using optional equipment" on ; select setup items (press and rotate). For optional device (CD/MD changer, etc.,) operation, see the respective pages. A OFF button To power off; D Display window E AUX input jack page 10 To connect...
Operating Instructions
Page 7
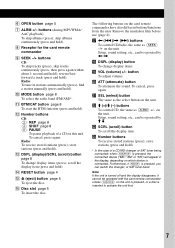
... disc. Radio: To tune in the display, depending on this unit. The following buttons on the unit. button To adjust volume. when (SOURCE) is pressed, you can be operated by < ,. w; store stations (press and hold ). K BTM/CAT button page 8 To start the BTM function (press and hold ). reverse/fastforward a track (press and hold ). find a station manually (press and hold ). Remove the insulation film before use (page 4). wf Number buttons To receive stored stations...
... disc. Radio: To tune in the display, depending on this unit. The following buttons on the unit. button To adjust volume. when (SOURCE) is pressed, you can be operated by < ,. w; store stations (press and hold ). K BTM/CAT button page 8 To start the BTM function (press and hold ). reverse/fastforward a track (press and hold ). find a station manually (press and hold ). Remove the insulation film before use (page 4). wf Number buttons To receive stored stations...
Operating Instructions
Page 8
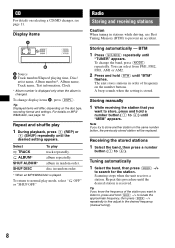
... fine adjust to store another station on the same number button, the previously stored station will differ, depending on the disc type, recording format and settings. Radio Storing and receiving stations Caution When tuning in random order. Scanning stops when the unit receives a station. Tuning automatically 1 Select the band, then press (SEEK) -/+ to normal play mode, select " OFF" or "SHUF OFF." Tip If you know the frequency of frequency on the number buttons. CD...
... fine adjust to store another station on the same number button, the previously stored station will differ, depending on the disc type, recording format and settings. Radio Storing and receiving stations Caution When tuning in random order. Scanning stops when the unit receives a station. Tuning automatically 1 Select the band, then press (SEEK) -/+ to normal play mode, select " OFF" or "SHUF OFF." Tip If you know the frequency of frequency on the number buttons. CD...
Operating Instructions
Page 9
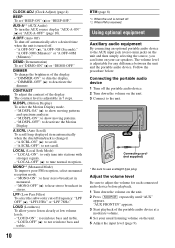
When tuner is selected as the source, the default setting is displayed at the lowest setting.) AUX*2 (AUX level) To adjust the volume level for each connected auxiliary equipment. "-10 dB" ("ATT" is "OFF." "0 dB" (z) - Adjusting setup items - The following items can be set (follow the page reference for details): "z" indicates the default settings. "REAR-10" SUB (Subwoofer volume) To adjust the subwoofer volume: "+10 dB" - To restore the factory-set (follow the page reference for details): "z" indicates the...
When tuner is selected as the source, the default setting is displayed at the lowest setting.) AUX*2 (AUX level) To adjust the volume level for each connected auxiliary equipment. "-10 dB" ("ATT" is "OFF." "0 dB" (z) - Adjusting setup items - The following items can be set (follow the page reference for details): "z" indicates the default settings. "REAR-10" SUB (Subwoofer volume) To adjust the subwoofer volume: "+10 dB" - To restore the factory-set (follow the page reference for details): "z" indicates the...
Operating Instructions
Page 10
... (stereo mini jack) on the unit and then simply selecting the source, you to deactivate the Motion Display. "MONO-OFF" (z): to deactivate the dimmer. DIMMER To change the brightness of the display. CLOCK-ADJ (Clock Adjust) (page 4) BEEP To set "DEMO-ON" (z) or "DEMO-OFF." "LOCAL-OFF" (z): to use a straight type plug. AUX AUX Connecting cord* (not supplied) * Be sure to tune normal reception. "M.DSPL-OFF": to listen clearly at a moderate volume. 4 Set your car speakers.
... (stereo mini jack) on the unit and then simply selecting the source, you to deactivate the Motion Display. "MONO-OFF" (z): to deactivate the dimmer. DIMMER To change the brightness of the display. CLOCK-ADJ (Clock Adjust) (page 4) BEEP To set "DEMO-ON" (z) or "DEMO-OFF." "LOCAL-OFF" (z): to use a straight type plug. AUX AUX Connecting cord* (not supplied) * Be sure to tune normal reception. "M.DSPL-OFF": to listen clearly at a moderate volume. 4 Set your car speakers.

Operating Instructions
Page 11
... random order. ATT SEL PRESET/ DISC MODE SOURCE OFF DSPL VOL SEEK/AMS OFF The following controls on this unit. Rotary commander RM-X4S Attaching the label Attach the indication label depending on how you can reverse the operative direction. 11 continue to next page t To increase To decrease If you need to normal play mode, select " OFF" or "SHUF OFF." Unit number Disc number Playback starts...
... random order. ATT SEL PRESET/ DISC MODE SOURCE OFF DSPL VOL SEEK/AMS OFF The following controls on this unit. Rotary commander RM-X4S Attaching the label Attach the indication label depending on how you can reverse the operative direction. 11 continue to next page t To increase To decrease If you need to normal play mode, select " OFF" or "SHUF OFF." Unit number Disc number Playback starts...
Operating Instructions
Page 12
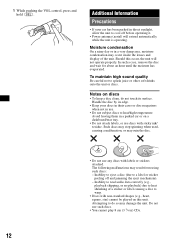
...operating it. • Power antenna (aerial) will not operate properly. Inability to eject a disc (due to splash juice or other soft drinks onto the unit or discs. Should this unit. Notes on discs • To keep a disc clean, do so may result from using such discs: - Handle the disc by its surface. 1 While pushing the VOL control... be played on a dashboard/rear tray. • Do not attach labels, or use . • Do not subject discs to do not touch its edge. • Keep your car has been parked in direct sunlight, allow the unit to heat shrinking of the unit. Attempting...
...operating it. • Power antenna (aerial) will not operate properly. Inability to eject a disc (due to splash juice or other soft drinks onto the unit or discs. Should this unit. Notes on discs • To keep a disc clean, do so may result from using such discs: - Handle the disc by its surface. 1 While pushing the VOL control... be played on a dashboard/rear tray. • Do not attach labels, or use . • Do not subject discs to do not touch its edge. • Keep your car has been parked in direct sunlight, allow the unit to heat shrinking of the unit. Attempting...
Operating Instructions
Page 13
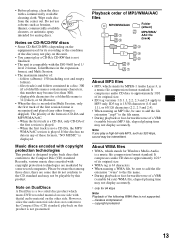
.... Note If you play back discs that conform to the Compact Disc (CD) standard. Notes on CD-R/CD-RW discs • Some CD-Rs/CD-RWs (depending on the equipment used for its recording or the condition of the disc) may not play on this unit. • You cannot play a CD-R/a CD-RW that is not finalized. • The unit is compatible with the ISO 9660 level 1/ level 2 format, Joliet/Romeo...
.... Note If you play back discs that conform to the Compact Disc (CD) standard. Notes on CD-R/CD-RW discs • Some CD-Rs/CD-RWs (depending on the equipment used for its recording or the condition of the disc) may not play on this unit. • You cannot play a CD-R/a CD-RW that is not finalized. • The unit is compatible with the ISO 9660 level 1/ level 2 format, Joliet/Romeo...
Operating Instructions
Page 14
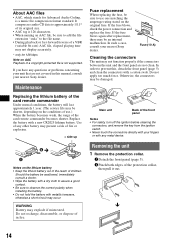
... rate) AAC file, elapsed playing time may not function properly if the connectors between the unit and the front panel are not covered in fire. Fuse (10 A) Cleaning the connectors The unit may not display accurately. * only for Advanced Audio Coding, is a music file compression format standard. In order to use .) When the battery becomes weak, the range of the card remote commander becomes shorter. If...
... rate) AAC file, elapsed playing time may not function properly if the connectors between the unit and the front panel are not covered in fire. Fuse (10 A) Cleaning the connectors The unit may not display accurately. * only for Advanced Audio Coding, is a music file compression format standard. In order to use .) When the battery becomes weak, the range of the card remote commander becomes shorter. If...
Operating Instructions
Page 15
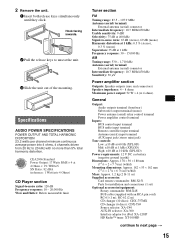
...) connector Intermediate frequency: 10.7 MHz/450 kHz Sensitivity: 30 µV Power amplifier section Outputs: Speaker outputs (sure seal connectors) Speaker impedance: 4 - 8 ohms Maximum power output: 52 W × 4 (at 4 ohms) General Output: Audio outputs terminal (front/rear) Subwoofer output terminal (mono) Power antenna (aerial) relay control terminal Power amplifier control terminal Inputs: BUS control input terminal BUS audio input terminal Remote controller input terminal Antenna (aerial) input terminal AUX input jack (stereo mini jack) Tone controls: Low: ±10 dB at 60 Hz (XPLOD...
...) connector Intermediate frequency: 10.7 MHz/450 kHz Sensitivity: 30 µV Power amplifier section Outputs: Speaker outputs (sure seal connectors) Speaker impedance: 4 - 8 ohms Maximum power output: 52 W × 4 (at 4 ohms) General Output: Audio outputs terminal (front/rear) Subwoofer output terminal (mono) Power antenna (aerial) relay control terminal Power amplifier control terminal Inputs: BUS control input terminal BUS audio input terminal Remote controller input terminal Antenna (aerial) input terminal AUX input jack (stereo mini jack) Tone controls: Low: ±10 dB at 60 Hz (XPLOD...
Operating Instructions
Page 16
... power supply lead or battery has been disconnected. • The power supply lead is not connected properly. 16 Stored stations and correct time are not using the built-in order, check the fuse. • If the unit is set to play back than 45° in Multi Session. - The fuse has blown. The Auto Off function does not operate. The Auto Off function activates after turning off and the display...
... power supply lead or battery has been disconnected. • The power supply lead is not connected properly. 16 Stored stations and correct time are not using the built-in order, check the fuse. • If the unit is set to play back than 45° in Multi Session. - The fuse has blown. The Auto Off function does not operate. The Auto Off function activates after turning off and the display...
Operating Instructions
Page 17
... the SAT tuner is too weak. NO MUSIC The disc does not contain a music file. t Insert a music CD in the rear/side glass). • Check the connection of the disc and you want to next page t 17 Error displays/Messages BLANK Tracks have reached the beginning or the end of the car antenna (aerial). • The auto antenna (aerial) will not eject. t See the installation/connections manual of speakers/amplifiers is...
... the SAT tuner is too weak. NO MUSIC The disc does not contain a music file. t Insert a music CD in the rear/side glass). • Check the connection of the disc and you want to next page t 17 Error displays/Messages BLANK Tracks have reached the beginning or the end of the car antenna (aerial). • The auto antenna (aerial) will not eject. t See the installation/connections manual of speakers/amplifiers is...
Operating Instructions
Page 18
If these solutions do not help improve the situation, consult your nearest Sony dealer. If you take the unit to be displayed with the unit. *1 The disc number of the disc causing the error appears in the display. *2 If an error occurs during playback of a CD or MD, the disc number of CD playback trouble, bring the disc that was used at the time the problem began. 18 "" The character cannot be repaired because of the CD or MD does not appear in the display.
If these solutions do not help improve the situation, consult your nearest Sony dealer. If you take the unit to be displayed with the unit. *1 The disc number of the disc causing the error appears in the display. *2 If an error occurs during playback of a CD or MD, the disc number of CD playback trouble, bring the disc that was used at the time the problem began. 18 "" The character cannot be repaired because of the CD or MD does not appear in the display.
Operating Instructions
Page 40
Call 1-800-222-7669 URL http://www.SONY.com http://www.sony.net/ Sony Corporation Printed in these Operating Instructions. 2 Reset the unit. only); If you have any questions/problems regarding this product, try the following: 1 Read Troubleshooting in Thailand Note: Stored data may be erased. 3 Please contact (U.S.A.
Call 1-800-222-7669 URL http://www.SONY.com http://www.sony.net/ Sony Corporation Printed in these Operating Instructions. 2 Reset the unit. only); If you have any questions/problems regarding this product, try the following: 1 Read Troubleshooting in Thailand Note: Stored data may be erased. 3 Please contact (U.S.A.


