Operating Instructions
Page 1
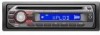
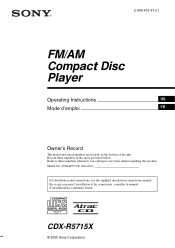
Model No. CDX-R5715X © 2005 Sony Corporation CDX-R5715X Serial No. Record these numbers whenever you call upon your Sony dealer regarding this product. Refer to these numbers in the space provided below. For installation and connections, see the supplied installation/connections manual. 2-348-415-11 (1) FM/AM Compact Disc Player Operating Instructions US Mode d'emploi FR Owner's Record The model and serial numbers are located on the bottom of the unit. En ce qui concerne l'installation et les connexions, consulter le manuel d'installation/raccordement fourni.
Model No. CDX-R5715X © 2005 Sony Corporation CDX-R5715X Serial No. Record these numbers whenever you call upon your Sony dealer regarding this product. Refer to these numbers in the space provided below. For installation and connections, see the supplied installation/connections manual. 2-348-415-11 (1) FM/AM Compact Disc Player Operating Instructions US Mode d'emploi FR Owner's Record The model and serial numbers are located on the bottom of the unit. En ce qui concerne l'installation et les connexions, consulter le manuel d'installation/raccordement fourni.
Operating Instructions
Page 2
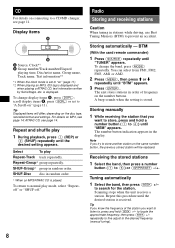
.... CAUTION The use of discs Label on the unit until the display disappears. Thank you for help. You can select an equalizer curve for a Class B digital device, pursuant to radio communications. Welcome ! BTM (Best Tuning Memory): the unit selects strong signal stations and stores them. - EQ7: You can assign a name to each radio station, store it in accordance with this Sony Compact Disc Player. However, there is a CD-DA that to...
.... CAUTION The use of discs Label on the unit until the display disappears. Thank you for help. You can select an equalizer curve for a Class B digital device, pursuant to radio communications. Welcome ! BTM (Best Tuning Memory): the unit selects strong signal stations and stores them. - EQ7: You can assign a name to each radio station, store it in accordance with this Sony Compact Disc Player. However, there is a CD-DA that to...
Operating Instructions
Page 3
... Auxiliary audio equipment 13 Additional Information Precautions 13 Notes on the XM tuner module. BBE MP works by restoring and enhancing the higher harmonics lost through a list - ATRAC, ATRAC3, ATRAC3plus and their logos are trademarks of controls and basic operations Main unit 6 Card remote commander RM-X153 6 CD Display items 8 Repeat and shuffle play 8 Radio Storing and receiving stations 8 Storing automatically - EQ7 Tune 9 Labeling a station/disc 10 Adjusting menu...
... Auxiliary audio equipment 13 Additional Information Precautions 13 Notes on the XM tuner module. BBE MP works by restoring and enhancing the higher harmonics lost through a list - ATRAC, ATRAC3, ATRAC3plus and their logos are trademarks of controls and basic operations Main unit 6 Card remote commander RM-X153 6 CD Display items 8 Repeat and shuffle play 8 Radio Storing and receiving stations 8 Storing automatically - EQ7 Tune 9 Labeling a station/disc 10 Adjusting menu...
Operating Instructions
Page 4
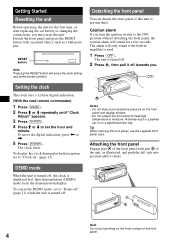
RESET button Note Pressing the RESET button will sound for the first time, or after replacing the car battery or changing the connections, you must reset the unit. The alarm will only sound if the built-in a parked car or on " (page 11). To move the digital indication, press < or ,. 5 Press (ENTER). Notes • Do not drop or put anything on the front panel and display window. •...
RESET button Note Pressing the RESET button will sound for the first time, or after replacing the car battery or changing the connections, you must reset the unit. The alarm will only sound if the built-in a parked car or on " (page 11). To move the digital indication, press < or ,. 5 Press (ENTER). Notes • Do not drop or put anything on the front panel and display window. •...
Operating Instructions
Page 5
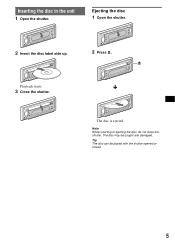
Note While inserting or ejecting the disc, do not close the shutter. The disc may be played with the shutter opened or closed. 5 Inserting the disc in the unit 1 Open the shutter. Ejecting the disc 1 Open the shutter. 2 Insert the disc label side up. 2 Press Z. Playback starts. 3 Close the shutter. Tip The disc can be caught and damaged. x The disc is ejected.
Note While inserting or ejecting the disc, do not close the shutter. The disc may be played with the shutter opened or closed. 5 Inserting the disc in the unit 1 Open the shutter. Ejecting the disc 1 Open the shutter. 2 Insert the disc label side up. 2 Press Z. Playback starts. 3 Close the shutter. Tip The disc can be caught and damaged. x The disc is ejected.
Operating Instructions
Page 6
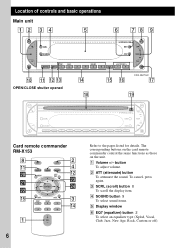
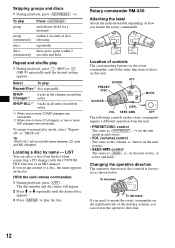
... listed for details. A Volume +/- button To adjust volume. The corresponding buttons on the card remote commander control the same functions as those on the unit. To cancel, press again. wa ws qg OFF ATT SOURCE MENU SOUND + MODE LIST/ CAT ENTER - Location of controls and basic operations Main unit 12 3 4 5 6 78 9 ATT SCRL SOUND OPEN/CLOSE OFF DSO EQ7 SEEK REP SHUF SOURCE MODE 1 2 3 BBE MP 4 5 6 DSPL GP/PRESET 0 qa qs qd OPEN...
... listed for details. A Volume +/- button To adjust volume. The corresponding buttons on the card remote commander control the same functions as those on the unit. To cancel, press again. wa ws qg OFF ATT SOURCE MENU SOUND + MODE LIST/ CAT ENTER - Location of controls and basic operations Main unit 12 3 4 5 6 78 9 ATT SCRL SOUND OPEN/CLOSE OFF DSO EQ7 SEEK REP SHUF SOURCE MODE 1 2 3 BBE MP 4 5 6 DSPL GP/PRESET 0 qa qs qd OPEN...
Operating Instructions
Page 7
..., it cannot be operated with the card remote commander unless (SOURCE) on the unit. H OFF button To power off ). button Radio: To tune in stations automatically (press); L MODE button 8, 11 To select the radio band (FM/AM)/select the unit*3. CD/MD*1: (1): REP 8 (2): SHUF 8 (5): BBE MP*4 2 To activate the BBE MP function, to activate the unit first. O DSPL (display) button 8, 10 To change the source (Radio/CD/ MD*1/AUX*2). S Z (eject) button 5 To eject the disc. wa ENTER button To complete a setting. Tip For details...
..., it cannot be operated with the card remote commander unless (SOURCE) on the unit. H OFF button To power off ). button Radio: To tune in stations automatically (press); L MODE button 8, 11 To select the radio band (FM/AM)/select the unit*3. CD/MD*1: (1): REP 8 (2): SHUF 8 (5): BBE MP*4 2 To activate the BBE MP function, to activate the unit first. O DSPL (display) button 8, 10 To change the source (Radio/CD/ MD*1/AUX*2). S Z (eject) button 5 To eject the disc. wa ENTER button To complete a setting. Tip For details...
Operating Instructions
Page 8
.../PRESET) -/+. Receiving the stored stations 1 Select the band, then press a number button ((1) to normal play mode, select "Repeatoff" or "SHUF-off." repeatedly to fine adjust to a CD/MD changer, see page 14. SHUF-Disc disc in stations while driving, use Best Tuning Memory (BTM) to store another station on MP3, see page 14; The unit stores stations in order of the station you know the frequency of frequency on connecting to the desired frequency (manual tuning). 8 Repeat and shuffle play...
.../PRESET) -/+. Receiving the stored stations 1 Select the band, then press a number button ((1) to normal play mode, select "Repeatoff" or "SHUF-off." repeatedly to fine adjust to a CD/MD changer, see page 14. SHUF-Disc disc in stations while driving, use Best Tuning Memory (BTM) to store another station on MP3, see page 14; The unit stores stations in order of the station you know the frequency of frequency on connecting to the desired frequency (manual tuning). 8 Repeat and shuffle play...
Operating Instructions
Page 9
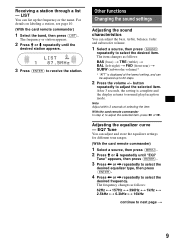
...-rear) t SUBW (subwoofer volume)* * "ATT" is complete and the display returns to adjust the selected item, press < or ,. Other functions Changing the sound settings Adjusting the sound characteristics You can list up to select the desired frequency. Note Adjust within 3 seconds of selecting the item. button repeatedly to select the desired item. The item changes as follows: 62Hz y 157Hz y 396Hz y 1kHz y 2.5kHz y 6.3kHz y 16kHz continue to receive the station. Receiving a station through a list - EQ7 Tune...
...-rear) t SUBW (subwoofer volume)* * "ATT" is complete and the display returns to adjust the selected item, press < or ,. Other functions Changing the sound settings Adjusting the sound characteristics You can list up to select the desired frequency. Note Adjust within 3 seconds of selecting the item. button repeatedly to select the desired item. The item changes as follows: 62Hz y 157Hz y 396Hz y 1kHz y 2.5kHz y 6.3kHz y 16kHz continue to receive the station. Receiving a station through a list - EQ7 Tune...
Operating Instructions
Page 10
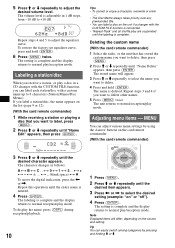
... (ENTER). The unit returns to +10 dB. Adjusting menu items - The setting is adjustable in a CD changer with the CUSTOM FILE function, you want to adjust the desired volume level. The volume level is complete and the display returns to normal play a disc in 1 dB steps, from -10 dB to normal reception/play mode. To restore the factory-set equalizer curve, press and hold (ENTER). If you label a station/disc, the name appears...
... (ENTER). The unit returns to +10 dB. Adjusting menu items - The setting is adjustable in a CD changer with the CUSTOM FILE function, you want to adjust the desired volume level. The volume level is complete and the display returns to normal play a disc in 1 dB steps, from -10 dB to normal reception/play mode. To restore the factory-set equalizer curve, press and hold (ENTER). If you label a station/disc, the name appears...
Operating Instructions
Page 11
... mode. M.Dspl*2 (Motion Display) To select the Motion Display mode. - "off": to adjust the volume level between sources. AUX Level To adjust the volume level for details): "z" indicates the default settings. This setting negates the need to deactivate the Motion Display. EDIT Name Edit (page 10) Name Delete (page 10) BTM (page 8) *1 When the unit is turned off. *2 When the unit is changed. - Unit number Disc number Playback starts. 11 continue to tune normal reception. Dimmer To change the operative direction...
... mode. M.Dspl*2 (Motion Display) To select the Motion Display mode. - "off": to adjust the volume level between sources. AUX Level To adjust the volume level for details): "z" indicates the default settings. This setting negates the need to deactivate the Motion Display. EDIT Name Edit (page 10) Name Delete (page 10) BTM (page 8) *1 When the unit is turned off. *2 When the unit is changed. - Unit number Disc number Playback starts. 11 continue to tune normal reception. Dimmer To change the operative direction...
Operating Instructions
Page 12
... on the unit (push in and rotate). • VOL (volume) control The same as (SEEK) +/- Locating a disc by name - ATT SOUND PRESET/ DISC MODE SOURCE OFF DSPL VOL SEEK/AMS OFF The following controls on the rotary commander require a different operation from the list when connecting a CD changer with the CUSTOM FILE function or an MD changer. LIST You can reverse the operative direction. 12 To return to mount the rotary...
... on the unit (push in and rotate). • VOL (volume) control The same as (SEEK) +/- Locating a disc by name - ATT SOUND PRESET/ DISC MODE SOURCE OFF DSPL VOL SEEK/AMS OFF The following controls on the rotary commander require a different operation from the list when connecting a CD changer with the CUSTOM FILE function or an MD changer. LIST You can reverse the operative direction. 12 To return to mount the rotary...
Operating Instructions
Page 13
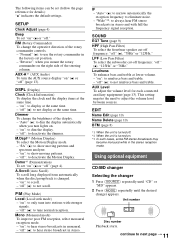
.... Auxiliary audio equipment You can also change the operative direction of auxiliary equipment, see "AUX Level" on the unit. Operate by its surface. Such discs may stop spinning when used, causing a malfunction, or may damage the unit. Tip You can connect optional Sony portable devices to a label or sticker peeling off before operating it. • Power antenna will not operate properly. Tip When connecting both a portable device and a changer, use such discs. • You cannot play...
.... Auxiliary audio equipment You can also change the operative direction of auxiliary equipment, see "AUX Level" on the unit. Operate by its surface. Such discs may stop spinning when used, causing a malfunction, or may damage the unit. Tip You can connect optional Sony portable devices to a label or sticker peeling off before operating it. • Power antenna will not operate properly. Tip When connecting both a portable device and a changer, use such discs. • You cannot play...
Operating Instructions
Page 14
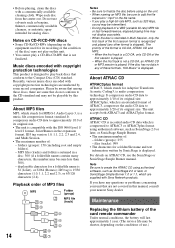
... format is compatible with Sony Network products. It compresses audio CD data to the CD standard and may not display accurately. • When the disc is recorded in Multi Session, only the first track of the first session format is recognized and played (any of the card remote commander Under normal conditions, the battery will last approximately 1 year. (The service life...
... format is compatible with Sony Network products. It compresses audio CD data to the CD standard and may not display accurately. • When the disc is recorded in Multi Session, only the first track of the first session format is recognized and played (any of the card remote commander Under normal conditions, the battery will last approximately 1 year. (The service life...

Operating Instructions
Page 15
... Battery may not function properly if the connectors between the unit and the front panel are not clean. If the fuse blows again after replacement, there may present a risk of any metal device. Should the battery be sure to remove the protection collar. Replace the battery with the protection collar. Use of fire or explosion. + side up 2c 1 Notes on the original fuse. Removing the unit 1 Remove the protection collar...
... Battery may not function properly if the connectors between the unit and the front panel are not clean. If the fuse blows again after replacement, there may present a risk of any metal device. Should the battery be sure to remove the protection collar. Replace the battery with the protection collar. Use of fire or explosion. + side up 2c 1 Notes on the original fuse. Removing the unit 1 Remove the protection collar...
Operating Instructions
Page 16
Design and specifications are not used for soldering certain parts. (more than 5% total harmonic distortion. Troubleshooting The following checklist will help you remedy problems you may encounter with your unit. If everything is in order, check the fuse. • If the unit is Sony BUS system compatible. t Turn on the unit. Before going through the checklist below, check the connection and operating procedures. The power antenna does not extend...
Design and specifications are not used for soldering certain parts. (more than 5% total harmonic distortion. Troubleshooting The following checklist will help you remedy problems you may encounter with your unit. If everything is in order, check the fuse. • If the unit is Sony BUS system compatible. t Turn on the unit. Before going through the checklist below, check the connection and operating procedures. The power antenna does not extend...
Operating Instructions
Page 17
... power connector. a disc recorded with a Sony MP3 compatible CD changer, or this unit. Radio reception The stations cannot be played back. No sound. • The volume is too low. • The ATT function is activated, or the Telephone ATT function (when the interface cable of a car telephone is connected to the ATT lead) is activated. • The position of the fader control (FAD) is not set for audio use (page 14). t Store again into the memory. • The power connecting...
... power connector. a disc recorded with a Sony MP3 compatible CD changer, or this unit. Radio reception The stations cannot be played back. No sound. • The volume is too low. • The ATT function is activated, or the Telephone ATT function (when the interface cable of a car telephone is connected to the ATT lead) is activated. • The position of the fader control (FAD) is not set for audio use (page 14). t Store again into the memory. • The power connecting...
Operating Instructions
Page 18
... pressed.) The connection of the disc and you want to receive the channel that was used at the time the problem began. 18 NO Music The disc is complete and playback starts automatically. t Loading the disc, then select it may be displayed with recorded tracks. Reset The CD unit and CD/MD changer cannot be repaired because of CD playback trouble, bring the disc that you cannot go any button is not...
... pressed.) The connection of the disc and you want to receive the channel that was used at the time the problem began. 18 NO Music The disc is complete and playback starts automatically. t Loading the disc, then select it may be displayed with recorded tracks. Reset The CD unit and CD/MD changer cannot be repaired because of CD playback trouble, bring the disc that you cannot go any button is not...

Operating Instructions
Page 40
Sony Corporation Printed in China
Sony Corporation Printed in China


