Operating Instructions (primary manual)
Page 1
SONY. 3-861-575-13 (1) Trinitron® Color Graphic Display Operating Instructions Mode d'emploi F Manual de instrucciones Wflikl113 GDM-400P5 GDM-500PS O 1997 by Sony Corporation
SONY. 3-861-575-13 (1) Trinitron® Color Graphic Display Operating Instructions Mode d'emploi F Manual de instrucciones Wflikl113 GDM-400P5 GDM-500PS O 1997 by Sony Corporation
Operating Instructions (primary manual)
Page 2
... ENERGY STAR Partner, Sony Corporation has determined that to Part 15 of the unit. Consult the dealer or an experienced radio/TV technician for a Class B digital device, pursuant to which can radiate radio frequency energy and, if not installed and used with a computer equipped with VESA Display Power Management Signaling (DPMS). (GDM-400PS only) This monitor complies with the limits for help. Zur Korrektur...
... ENERGY STAR Partner, Sony Corporation has determined that to Part 15 of the unit. Consult the dealer or an experienced radio/TV technician for a Class B digital device, pursuant to which can radiate radio frequency energy and, if not installed and used with a computer equipped with VESA Display Power Management Signaling (DPMS). (GDM-400PS only) This monitor complies with the limits for help. Zur Korrektur...

Operating Instructions (primary manual)
Page 3
... Display Language 7 Selecting the Input Signal 8 Customizing Your Monitor Adjusting the Picture Brightness and Contrast 9 Introducing the On-screen Display System 9 Using the CENTER On-screen Display 10 Using the SIZE On-screen Display 10 Using the GEOM (Geometry) On-screen Display 11 Using the ZOOM On-screen Display 12 Using the COLOR On-screen Display 12 Using the SCREEN On-screen Display 13 Using the OPTION On-screen Display 15 Using the LANG (Language) On-screen Display 17 Resetting the Adjustments 17 Technical Features Preset and User Modes 18 Power Saving...
... Display Language 7 Selecting the Input Signal 8 Customizing Your Monitor Adjusting the Picture Brightness and Contrast 9 Introducing the On-screen Display System 9 Using the CENTER On-screen Display 10 Using the SIZE On-screen Display 10 Using the GEOM (Geometry) On-screen Display 11 Using the ZOOM On-screen Display 12 Using the COLOR On-screen Display 12 Using the SCREEN On-screen Display 13 Using the OPTION On-screen Display 15 Using the LANG (Language) On-screen Display 17 Resetting the Adjustments 17 Technical Features Preset and User Modes 18 Power Saving...

Operating Instructions (primary manual)
Page 4
...; vertically. onnectionrc gt.-f.,54,. ...,,,._,4 • Use an appropriate power cord for repair or shipment, use any type of plug types for 100 to 120 V AC 114 for about 3 seconds. To turn the monitor vertically and horizontally, hold it at least 30 seconds after turning off the power to allow the static electricity on the CKT display surface to discharge. • After the power has been turned...
...; vertically. onnectionrc gt.-f.,54,. ...,,,._,4 • Use an appropriate power cord for repair or shipment, use any type of plug types for 100 to 120 V AC 114 for about 3 seconds. To turn the monitor vertically and horizontally, hold it at least 30 seconds after turning off the power to allow the static electricity on the CKT display surface to discharge. • After the power has been turned...
Operating Instructions (primary manual)
Page 5
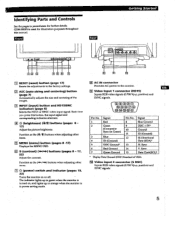
... RESET (reset) button (page 17) Resets the adjustments to the monitor. INPUT (input) button and HO15/BNC indicators (page 8) Selects the HD15 or 5BNC video input signal. Li Video input 1 connector (HD'S) Inputs RGB video signals (0.700 Vp-p, positive) and SYNC signals. Each time you press this manual. The indicator lights up in green when the monitor is turned on, and lights up in orange when the monitor is used for further details. El AC IN connector Provides AC power to the factory settings...
... RESET (reset) button (page 17) Resets the adjustments to the monitor. INPUT (input) button and HO15/BNC indicators (page 8) Selects the HD15 or 5BNC video input signal. Li Video input 1 connector (HD'S) Inputs RGB video signals (0.700 Vp-p, positive) and SYNC signals. Each time you press this manual. The indicator lights up in green when the monitor is turned on, and lights up in orange when the monitor is used for further details. El AC IN connector Provides AC power to the factory settings...
Operating Instructions (primary manual)
Page 6
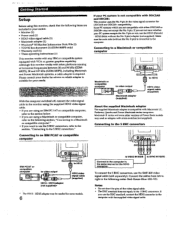
... at horizontal frequencies between 30 and 94 kHz (GDM400PS), 30 and 107 kHz (GDM-500PS), including Macintosh and Power Macintosh systems, a cable adapter is suitable for your needs. $te ant iJ With the computer switched off, connect the video signal cable to the monitor using the supplied HD15 video signal cable. • If you are using a Macintosh or compatible computer, refer to the following order: Red-Green-Blue-HD-VD. Getting Started Setup Before using this monitor works...
... at horizontal frequencies between 30 and 94 kHz (GDM400PS), 30 and 107 kHz (GDM-500PS), including Macintosh and Power Macintosh systems, a cable adapter is suitable for your needs. $te ant iJ With the computer switched off, connect the video signal cable to the monitor using the supplied HD15 video signal cable. • If you are using a Macintosh or compatible computer, refer to the following order: Red-Green-Blue-HD-VD. Getting Started Setup Before using this monitor works...
Operating Instructions (primary manual)
Page 7
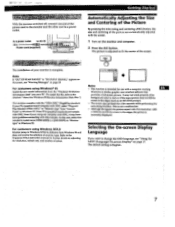
... monitor. Selecting the On-screen Display Language If you need to change the OSD language, see "Warning Messages" on page 17. The default setting is dark or if the input picture does not fill the screen to fit the center of the screen. Refer to the Windows NT4.0 instruction manual for use with a computer running Windows or similar graphic user interface software that provides a full-screen picture. For customers using Windows• 95 Install the new model...
... monitor. Selecting the On-screen Display Language If you need to change the OSD language, see "Warning Messages" on page 17. The default setting is dark or if the input picture does not fill the screen to fit the center of the screen. Refer to the Windows NT4.0 instruction manual for use with a computer running Windows or similar graphic user interface software that provides a full-screen picture. For customers using Windows• 95 Install the new model...

Operating Instructions (primary manual)
Page 8
... in power saving mode, the monitor may automatically select the other connector's signal. The OPTION OSD appears. To close the OSD, press the MENU button again. Getting Started Selecting the Input Signal This monitor has two signal input connectors (HD15 and 5BNC) and can be connected to select "AUTO" or "MANUAL" st) The OPTION OSD automatically disappears after about 30 seconds. Each time you want to view as follows. 1 Turn on : 1 MIN UNLOCK INPUT 4 Press...
... in power saving mode, the monitor may automatically select the other connector's signal. The OPTION OSD appears. To close the OSD, press the MENU button again. Getting Started Selecting the Input Signal This monitor has two signal input connectors (HD15 and 5BNC) and can be connected to select "AUTO" or "MANUAL" st) The OPTION OSD automatically disappears after about 30 seconds. Each time you want to view as follows. 1 Turn on : 1 MIN UNLOCK INPUT 4 Press...

Operating Instructions (primary manual)
Page 9
..., etc. E SCREEN Displays the SCREEN OSD for less brightness For contrast adjustment Press the O.4='/4. MENU OSD Press the MENU button to the factory settings. • The horizontal and vertical frequencies for the received input signal appear in memory for adjusting the centering of the picture. buttons. ▪ for adjusting the color temperature. • Q CENTER . for adjusting the picture rotation and pincushion, etc. [D] EXIT Closes the MENU OSD. 9 The brightness and contrast arc both reset to display the MENU OSD. Adjusting the Picture and Contrast Brightness Once...
..., etc. E SCREEN Displays the SCREEN OSD for less brightness For contrast adjustment Press the O.4='/4. MENU OSD Press the MENU button to the factory settings. • The horizontal and vertical frequencies for the received input signal appear in memory for adjusting the centering of the picture. buttons. ▪ for adjusting the color temperature. • Q CENTER . for adjusting the picture rotation and pincushion, etc. [D] EXIT Closes the MENU OSD. 9 The brightness and contrast arc both reset to display the MENU OSD. Adjusting the Picture and Contrast Brightness Once...

Operating Instructions (primary manual)
Page 10
... MENU button again. to increase picture size F . . . Using the SIZE On-screen Display The SIZE settings allow you to adjust the size of the picture. The SIZE OSD appears. 0 iu 3 For horizontal adjustment Press the buttons. 0 I . the I O ...* . . . Press the MENU button. To reset, press the RESET button while the OSD is on . To close the OSD, press the MENU button again. to move the picture left For vertical adjustment Press. to increase picture size ♦ ... Customizing Your Monitor Using the CENTER On-screen Display The CENTER settings...
... MENU button again. to increase picture size F . . . Using the SIZE On-screen Display The SIZE settings allow you to adjust the size of the picture. The SIZE OSD appears. 0 iu 3 For horizontal adjustment Press the buttons. 0 I . the I O ...* . . . Press the MENU button. To reset, press the RESET button while the OSD is on . To close the OSD, press the MENU button again. to move the picture left For vertical adjustment Press. to increase picture size ♦ ... Customizing Your Monitor Using the CENTER On-screen Display The CENTER settings...
Operating Instructions (primary manual)
Page 12
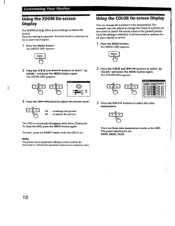
MENU Using the COLOR On-screen Display You can adjust or change the monitor's color temperature. MENU 2 Press the *-4,/t and 04.4.40 buttons to adjust the picture zoom. . The COLOR OSD appears. To reset, press the RESET button while the OSD is adjusted, it will stop as soon as either the horizontal or vertical size reaches its maximum or minimum value. Note The picture zoom adjustment will be stored in memory for the current input signal 1 Press the...
MENU Using the COLOR On-screen Display You can adjust or change the monitor's color temperature. MENU 2 Press the *-4,/t and 04.4.40 buttons to adjust the picture zoom. . The COLOR OSD appears. To reset, press the RESET button while the OSD is adjusted, it will stop as soon as either the horizontal or vertical size reaches its maximum or minimum value. Note The picture zoom adjustment will be stored in memory for the current input signal 1 Press the...

Operating Instructions (primary manual)
Page 13
..." disappears and the new color settings are memorized for each color's signal. To close the OSD, press the MENU button again. • To reset, press the RESET button while the OSD is on the screen. Customizing Your Monitor Using the SCREEN On-screen Display You can adjust convergence settings to correct color imbalances at the four corners of each color's signal. Adjust the LANDING function to eliminate red or blue shadows that may appear around...
..." disappears and the new color settings are memorized for each color's signal. To close the OSD, press the MENU button again. • To reset, press the RESET button while the OSD is on the screen. Customizing Your Monitor Using the SCREEN On-screen Display You can adjust convergence settings to correct color imbalances at the four corners of each color's signal. Adjust the LANDING function to eliminate red or blue shadows that may appear around...

Operating Instructions (primary manual)
Page 15
... OSD, press the MENU button again. Using the OPTION On screen Display The OPTION OSD allows you to the desired position. MENU 2 Press the -04/* and Cli41.-14.. O 4E0a : AUTO t t al UNLOCK OSD V POSMON 4 Press the C040 ./..► buttons to move the OSD to manually degauss the screen and adjust settings such as the OSD position and power saving delay time. The screen is automatically degaussed (demagnetized) when.the poweris turned on . Customizing Your Monitor...
... OSD, press the MENU button again. Using the OPTION On screen Display The OPTION OSD allows you to the desired position. MENU 2 Press the -04/* and Cli41.-14.. O 4E0a : AUTO t t al UNLOCK OSD V POSMON 4 Press the C040 ./..► buttons to move the OSD to manually degauss the screen and adjust settings such as the OSD position and power saving delay time. The screen is automatically degaussed (demagnetized) when.the poweris turned on . Customizing Your Monitor...

Operating Instructions (primary manual)
Page 16
... information on the front panel except the (.5 (power) switch, MENU and INPUT buttons. 1 Press the MENU button. MENU • Lotkitit The control lock function disables all of the buttons on this monitor's power saving capabilities. 1 Press the MENU button. tt AUTO o.ovs +UNLOCK• LOCKI CONTROL LOCK 4 Press the C111/--► buttons to select "UNLOCK." 16 To close the OSD, press the MENU button again. If you cannot select any button other than the O (power) switch, MENU and INPUT buttons, the O-ri mark...
... information on the front panel except the (.5 (power) switch, MENU and INPUT buttons. 1 Press the MENU button. MENU • Lotkitit The control lock function disables all of the buttons on this monitor's power saving capabilities. 1 Press the MENU button. tt AUTO o.ovs +UNLOCK• LOCKI CONTROL LOCK 4 Press the C111/--► buttons to select "UNLOCK." 16 To close the OSD, press the MENU button again. If you cannot select any button other than the O (power) switch, MENU and INPUT buttons, the O-ri mark...
Operating Instructions (primary manual)
Page 18
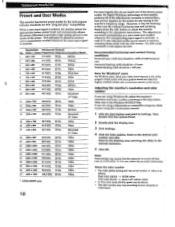
... horizontal and vertical timing conditions Horizontal sync width duty should be necessary to Settings. Adjusting the monitor's resolution and color number If you are using a Macintosh or compatible computer, Refer to your computer or video board. Refer also to the desired resolution. 5 Click OK. If you are using Windows 95, adjust the monitor's resolution and color number according to th'c adjustment instructions. Then double-click the Control Panel. 2 Double-click the Display icon. 3 Click Settings. 4 Click the Color palette...
... horizontal and vertical timing conditions Horizontal sync width duty should be necessary to Settings. Adjusting the monitor's resolution and color number If you are using a Macintosh or compatible computer, Refer to your computer or video board. Refer also to the desired resolution. 5 Click OK. If you are using Windows 95, adjust the monitor's resolution and color number according to th'c adjustment instructions. Then double-click the Control Panel. 2 Double-click the Display icon. 3 Click Settings. 4 Click the Color palette...
Operating Instructions (primary manual)
Page 19
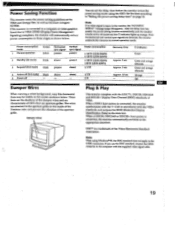
... (2nd mode) Screen active blank blank Horizontal sync signal present absent present Vertical sync signal present present absent Power consumption 160W (GDM-S00PS) 5 130 W (GDM-400PS) 100 W (GOM-500PS) 5 85 W (GDM-400PS) 515 W 4 Active-off (3rd mode) blank 5 Power-off mode and the Ch indicator lights up orange. Approx. 3 sec. Damper wires Plug & Play This monitor complies with the VESA standards and outputs the EDID (Extended Display Identification Data) to the 5 BNC connectors...
... (2nd mode) Screen active blank blank Horizontal sync signal present absent present Vertical sync signal present present absent Power consumption 160W (GDM-S00PS) 5 130 W (GDM-400PS) 100 W (GOM-500PS) 5 85 W (GDM-400PS) 515 W 4 Active-off (3rd mode) blank 5 Power-off mode and the Ch indicator lights up orange. Approx. 3 sec. Damper wires Plug & Play This monitor complies with the VESA standards and outputs the EDID (Extended Display Identification Data) to the 5 BNC connectors...
Operating Instructions (primary manual)
Page 20
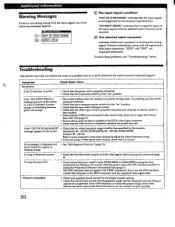
... HD15 connector with the supplied video signal cable. To solve these items If the (.I ) indicator is either orange or alternating between green and orange . • Check that the power cord is properly connected. • Check that specified for the proper monitor setting. • Check this manual and confirm that no signal is input, or the input signal from the selected input connector is not received. Symptom No picture Check these problems, see "Troubleshooting" below. Blue-HD...
... HD15 connector with the supplied video signal cable. To solve these items If the (.I ) indicator is either orange or alternating between green and orange . • Check that the power cord is properly connected. • Check that specified for the proper monitor setting. • Check this manual and confirm that no signal is input, or the input signal from the selected input connector is not received. Symptom No picture Check these problems, see "Troubleshooting" below. Blue-HD...
Operating Instructions (primary manual)
Page 21
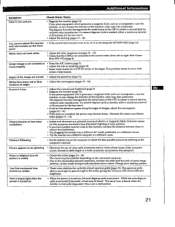
... the monitor, or you change the direction of the monitor, color may lose uniformity. This problem tends to the screen giving the Trinitrun CRT more light to pass through to occur with the buttons on the front panel White does not look white • If the control lock function is set it to off using the OPTION OSD (page 16). • Adjust the color temperature (pages 12 -13). • Check...
... the monitor, or you change the direction of the monitor, color may lose uniformity. This problem tends to the screen giving the Trinitrun CRT more light to pass through to occur with the buttons on the front panel White does not look white • If the control lock function is set it to off using the OPTION OSD (page 16). • Adjust the color temperature (pages 12 -13). • Check...
Operating Instructions (primary manual)
Page 22
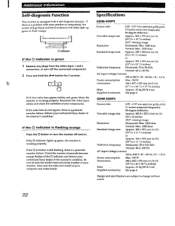
... the indicator will either light up , green, the monitor is working properly. Inform your computer and video board. lL 0.) Indicator If the (I indicator lights up green or flash orange. Specifications GDM-400PS Picture tube 0.25 - 0.27 mm aperture grille pitch 19 inches measured diagonally 90-degree deflection Viewable image size Resolution Standard image area Approx. 365 x 273 mm (w/h) (14 3/ 8 x 10 3 / 4 inches) 18.0" viewing image Horizontal: Max. 1600 dots Vertical: Max. 1200 lines Approx...
... the indicator will either light up , green, the monitor is working properly. Inform your computer and video board. lL 0.) Indicator If the (I indicator lights up green or flash orange. Specifications GDM-400PS Picture tube 0.25 - 0.27 mm aperture grille pitch 19 inches measured diagonally 90-degree deflection Viewable image size Resolution Standard image area Approx. 365 x 273 mm (w/h) (14 3/ 8 x 10 3 / 4 inches) 18.0" viewing image Horizontal: Max. 1600 dots Vertical: Max. 1200 lines Approx...
Marketing Specifications
Page 2
...) Reset Brightness Contrast On Screen Display (OSD) Horizontal Size and Centering Vertical Size and Centering Zoom Raster Rotation Pincushion Distortion Correction Pin Balance Keystone Front Panel Digital Controls (continued) Key Balance Color Temperature Horizontal and Vertical Static Convergence Top and Bottom Vertical Convergence Landing Correction (4 Corners) Moiré Cancellation Manual Degauss H/V OSD Position Control Lock Multi Language Select Input Switching button on the Front Supplies Accessories Video Signal Cable (15-pin mini D-sub) AC Power cord Macintosh adapter Windows®...
...) Reset Brightness Contrast On Screen Display (OSD) Horizontal Size and Centering Vertical Size and Centering Zoom Raster Rotation Pincushion Distortion Correction Pin Balance Keystone Front Panel Digital Controls (continued) Key Balance Color Temperature Horizontal and Vertical Static Convergence Top and Bottom Vertical Convergence Landing Correction (4 Corners) Moiré Cancellation Manual Degauss H/V OSD Position Control Lock Multi Language Select Input Switching button on the Front Supplies Accessories Video Signal Cable (15-pin mini D-sub) AC Power cord Macintosh adapter Windows®...


