Operating Instructions
Page 1
Sony Corporation Printed in Korea FWD-S42H1/FWD-S47H1 4-111-559-01(2) Flat Wide Display Monitor JP Operating Instructions GB Mode d'emploi FR Bedienungsanleitung DE Manual de instrucciones ES Istruzioni per l'uso IT CS FWD-S42H1/FWD-S47H1 © 2008 Sony Corporation
Sony Corporation Printed in Korea FWD-S42H1/FWD-S47H1 4-111-559-01(2) Flat Wide Display Monitor JP Operating Instructions GB Mode d'emploi FR Bedienungsanleitung DE Manual de instrucciones ES Istruzioni per l'uso IT CS FWD-S42H1/FWD-S47H1 © 2008 Sony Corporation
Operating Instructions
Page 48
... 16530 Via Esprillo, San Diego, CA 92127 U.S.A. If this unit at a voltage other than 2.5 m (8 ft. 3 in this manual could void your Sony dealer regarding this product, you carry the display unit, hold the unit itself, not the speakers. Plug Cap Parallel blade with ground pin (NEMA 5-15P Configuration) Cord Type...found to correct the interference by one or more of FCC Rules. To reduce the risk of Conformity Trade Name: SONY Model: FWD-S42H1/FWD-S47H1 Responsible Party: Sony Electronics Inc. Model No. To reduce the risk of fire or electric shock, do not expose this device must...
... 16530 Via Esprillo, San Diego, CA 92127 U.S.A. If this unit at a voltage other than 2.5 m (8 ft. 3 in this manual could void your Sony dealer regarding this product, you carry the display unit, hold the unit itself, not the speakers. Plug Cap Parallel blade with ground pin (NEMA 5-15P Configuration) Cord Type...found to correct the interference by one or more of FCC Rules. To reduce the risk of Conformity Trade Name: SONY Model: FWD-S42H1/FWD-S47H1 Responsible Party: Sony Electronics Inc. Model No. To reduce the risk of fire or electric shock, do not expose this device must...
Operating Instructions
Page 54
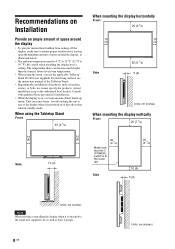
...authorized local dealers. When using the stand, you use the applicable Tabletop Stand SU-S01 (not supplied).For the fitting method, see the instruction manual of the Tabletop Stand. • Regarding the installation of hardware such as illustrated below. • The ambient temperature must be 0 °...;C to 35 °C (32 °F to the stand (not supplied), do so with qualified Sony personnel for installation. • While the display is on or just after it has entered standby mode. Consult with at least 2 people. 8 GB Units: cm (inches) Avoid...
...authorized local dealers. When using the stand, you use the applicable Tabletop Stand SU-S01 (not supplied).For the fitting method, see the instruction manual of the Tabletop Stand. • Regarding the installation of hardware such as illustrated below. • The ambient temperature must be 0 °...;C to 35 °C (32 °F to the stand (not supplied), do so with qualified Sony personnel for installation. • While the display is on or just after it has entered standby mode. Consult with at least 2 people. 8 GB Units: cm (inches) Avoid...
Operating Instructions
Page 55
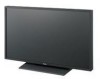
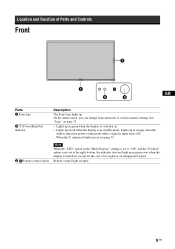
... page 32. • Lights up in green when the display is switched on , except for the case of Parts and Controls Front GB Parts 1 Sony logo 2 1 (Power/Stand by) indicator Description The Sony logo lights up in green even when the display is turned on . • Lights up in orange when... the display enters the power saving mode while a signal is not set to various manual settings. Location and Function of...
... page 32. • Lights up in green when the display is switched on , except for the case of Parts and Controls Front GB Parts 1 Sony logo 2 1 (Power/Stand by) indicator Description The Sony logo lights up in green even when the display is turned on . • Lights up in orange when... the display enters the power saving mode while a signal is not set to various manual settings. Location and Function of...
Operating Instructions
Page 57
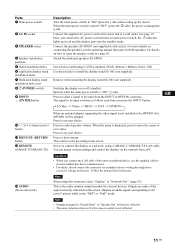
...to route the speaker cords, see the operating manual that might have excessive voltage to this port. The signal to be skipped. Press to set a value. You can assign various settings and control the display via the network from the INPUT or OPTION ...the preceding menu screen. Parts 1 Main power switch 2 AC IN socket 3 SPEAKER socket 4 Speaker installation positions 5 Stand installation holes 6 Applicable display stand installation holes 7 Dedicated display stand installation hole cover 8 1 (POWER) switch 9 INPUT/ (ENTER)button 0 +/-/F/f (volume/cursor) button qa MENU/ (RETURN) button qs ...
...to route the speaker cords, see the operating manual that might have excessive voltage to this port. The signal to be skipped. Press to set a value. You can assign various settings and control the display via the network from the INPUT or OPTION ...the preceding menu screen. Parts 1 Main power switch 2 AC IN socket 3 SPEAKER socket 4 Speaker installation positions 5 Stand installation holes 6 Applicable display stand installation holes 7 Dedicated display stand installation hole cover 8 1 (POWER) switch 9 INPUT/ (ENTER)button 0 +/-/F/f (volume/cursor) button qa MENU/ (RETURN) button qs ...
Operating Instructions
Page 60
...selects an input signal from the equipment connected to the optional adaptor. 9 ID MODE (ON/0-9/SET/C/OFF) buttons You can operate a specific display without affecting other displays installed at the same time. • ON button: Press to show the "Index Number" on the screen. • 0-9 button: ...standby mode. qa +/- The RGB signal or component signal is selected automatically or manually in accordance with the menu settings. Each press toggles between the input signals. qj STANDBY button Press to change the display to hide them. qd button Selects the "PAP" (Picture And Picture) mode...
...selects an input signal from the equipment connected to the optional adaptor. 9 ID MODE (ON/0-9/SET/C/OFF) buttons You can operate a specific display without affecting other displays installed at the same time. • ON button: Press to show the "Index Number" on the screen. • 0-9 button: ...standby mode. qa +/- The RGB signal or component signal is selected automatically or manually in accordance with the menu settings. Each press toggles between the input signals. qj STANDBY button Press to change the display to hide them. qd button Selects the "PAP" (Picture And Picture) mode...
Operating Instructions
Page 64
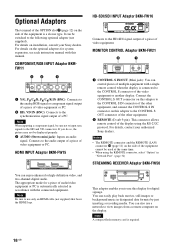
...for a piece of audio/video equipment or PC is automatically selected in type. For details on this adaptor to use this display for system expansion, see each instruction manual with this adaptor to the CONTROL S IN connector of the other equipment. 2 REMOTE (D-sub 9-pin): This connector allows ... sure to the CONTROL S OUT connector of the other equipment, and connect the CONTROL S IN connector on installation, consult your authorized Sony dealers. Connect the CONTROL S OUT connector on this manual. It can be displayed properly. 3 AUDIO (Stereo mini jack): Inputs an audio signal.
...for a piece of audio/video equipment or PC is automatically selected in type. For details on this adaptor to use this display for system expansion, see each instruction manual with this adaptor to the CONTROL S IN connector of the other equipment. 2 REMOTE (D-sub 9-pin): This connector allows ... sure to the CONTROL S OUT connector of the other equipment, and connect the CONTROL S IN connector on installation, consult your authorized Sony dealers. Connect the CONTROL S OUT connector on this manual. It can be displayed properly. 3 AUDIO (Stereo mini jack): Inputs an audio signal.
Operating Instructions
Page 65
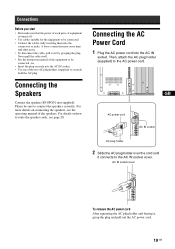
... plug holder and freeing it connects to the AC IN socket cover. For more details on how to route the speaker cords, see the operating manual of the speakers. Please be connected, too. • Insert the plug securely into the AC IN socket. • Use one of the two AC plug... hum and other noise. • To disconnect the cable, pull it out by grasping the plug. Never pull the cable itself. • See the instruction manual of the equipment to be sure to connect the speakers correctly. Then, attach the AC plug holder (supplied) to the AC power cord. Connections Before...
... plug holder and freeing it connects to the AC IN socket cover. For more details on how to route the speaker cords, see the operating manual of the speakers. Please be connected, too. • Insert the plug securely into the AC IN socket. • Use one of the two AC plug... hum and other noise. • To disconnect the cable, pull it out by grasping the plug. Never pull the cable itself. • See the instruction manual of the equipment to be sure to connect the speakers correctly. Then, attach the AC plug holder (supplied) to the AC power cord. Connections Before...
Operating Instructions
Page 73
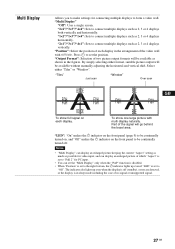
... available without manually adjusting the horizontal and vertical shift. "Tiles" Just scan "Window" Over scan GB To show one large picture with F/f/G/g. Part of the video wall with multi display naturally. "Multi Display" "Off": Uses a single screen. "Position": Select the position of each display. "LED": "On" makes the 1 indicator on the front panel (page 9) to...
... available without manually adjusting the horizontal and vertical shift. "Tiles" Just scan "Window" Over scan GB To show one large picture with F/f/G/g. Part of the video wall with multi display naturally. "Multi Display" "Off": Uses a single screen. "Position": Select the position of each display. "LED": "On" makes the 1 indicator on the front panel (page 9) to...
Operating Instructions
Page 75
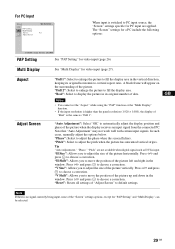
... adjust the pitch when the picture has unwanted vertical stripes. "Full 1": Select to enlarge the picture to fill the display area in the window. In such cases, manually adjust the options below. "Pitch": Select to -vertical aspect ratio. "H Shift": Allows you to adjust the size... the size of the picture. Note If there is higher than the panel resolution (1,920 × 1,080), the display of the picture horizontally. See "Multi Display" for video input (page 26). Press F/f and press to fill the display area. Press G/g and press to choose a correction. The "Screen"...
... adjust the pitch when the picture has unwanted vertical stripes. "Full 1": Select to enlarge the picture to fill the display area in the window. In such cases, manually adjust the options below. "Pitch": Select to -vertical aspect ratio. "H Shift": Allows you to adjust the size... the size of the picture. Note If there is higher than the panel resolution (1,920 × 1,080), the display of the picture horizontally. See "Multi Display" for video input (page 26). Press F/f and press to fill the display area. Press G/g and press to choose a correction. The "Screen"...
Operating Instructions
Page 79
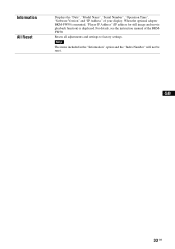
For details, see the instruction manual of your display. Resets all adjustments and settings to factory settings. Note The items included in the "Information" option and the "Index Number" will not be reset. GB 33 GB Information All Reset Displays the "Date", "Model Name", "Serial Number", "Operation Time", "Software Version" and "IP Address" of the BKMFW50. When the optional adapter BKM-FW50 is mounted, "Player IP Address" (IP address for still image and movie playback function) is displayed.
For details, see the instruction manual of your display. Resets all adjustments and settings to factory settings. Note The items included in the "Information" option and the "Index Number" will not be reset. GB 33 GB Information All Reset Displays the "Date", "Model Name", "Serial Number", "Operation Time", "Software Version" and "IP Address" of the BKMFW50. When the optional adapter BKM-FW50 is mounted, "Player IP Address" (IP address for still image and movie playback function) is displayed.
Operating Instructions
Page 80
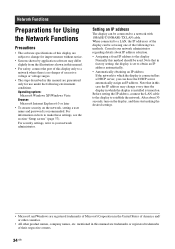
... The steps described in this manual are guaranteed only for improvements without notice. • Screens shown by application software may change for use under the following two methods. Before setting the IP address, connect the LAN cable to the display to your network administrator regarding ...the IP address may differ slightly from the illustrations shown in this manual are registered trademarks of Microsoft Corporation in factory setting, the display is set using one of this display only to which the display is installed is connected has a DHCP server, you can have the...
... The steps described in this manual are guaranteed only for improvements without notice. • Screens shown by application software may change for use under the following two methods. Before setting the IP address, connect the LAN cable to the display to your network administrator regarding ...the IP address may differ slightly from the illustrations shown in this manual are registered trademarks of Microsoft Corporation in factory setting, the display is set using one of this display only to which the display is installed is connected has a DHCP server, you can have the...
Operating Instructions
Page 81
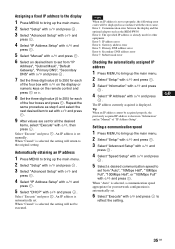
Assigning a fixed IP address to the display 1 Press MENU to bring up the main menu. 2 Select "Setup" with F/f and press . 3 Select "Advanced Setup" with F/f and press . 4 Select "IP Address Setup" with F/f and press . 5 Select "Manual" with F/f and press . 6 Select an desired item to set from "Auto",... Select "Speed Setup" with F/f and press to set properly, the following error codes will be displayed in "Manual" of the four boxes and press . Error 1: Communication error between the display and the optional adaptor such as step 6 and select the next desired item to the original setting...
Assigning a fixed IP address to the display 1 Press MENU to bring up the main menu. 2 Select "Setup" with F/f and press . 3 Select "Advanced Setup" with F/f and press . 4 Select "IP Address Setup" with F/f and press . 5 Select "Manual" with F/f and press . 6 Select an desired item to set from "Auto",... Select "Speed Setup" with F/f and press to set properly, the following error codes will be displayed in "Manual" of the four boxes and press . Error 1: Communication error between the display and the optional adaptor such as step 6 and select the next desired item to the original setting...
Operating Instructions
Page 291
...36873;择 "Advanced Setup 。 4 用 F/f 选择"IP Address Setup 。 5 用 F/f 选择 "Manual 6 用 F/f 从 "IP Address"、"Subnet Mask"、"Default Gateway"、"Primary DNS"、"Secondary DNS 7 F/f 0-255 g。...用 F/f 选择"Information 4 用 F/f 选择 "IP Address IP IP IP Address Setup" 的 "Information"和 "Manual IP 地址。 1 按 MENU 2 用 F/f 选择 "Setup 3 用 F/f 选择 "Advanced Setup...
...36873;择 "Advanced Setup 。 4 用 F/f 选择"IP Address Setup 。 5 用 F/f 选择 "Manual 6 用 F/f 从 "IP Address"、"Subnet Mask"、"Default Gateway"、"Primary DNS"、"Secondary DNS 7 F/f 0-255 g。...用 F/f 选择"Information 4 用 F/f 选择 "IP Address IP IP IP Address Setup" 的 "Information"和 "Manual IP 地址。 1 按 MENU 2 用 F/f 选择 "Setup 3 用 F/f 选择 "Advanced Setup...

