
Operating Instructions (Large File - 12.86 MB)
Page 52
... equipment generates, uses, and can radiate radio frequency energy and, if not installed and used in this manual could void your Sony dealer regarding this equipment. CAUTION RISK OF EXPLOSION IF BATTERY IS REPLACED BY AN INCORRECT TYPE. If you carry the display unit, hold the unit itself, not the speakers. Record the model and serial numbers in a particular installation. To reduce the...
... equipment generates, uses, and can radiate radio frequency energy and, if not installed and used in this manual could void your Sony dealer regarding this equipment. CAUTION RISK OF EXPLOSION IF BATTERY IS REPLACED BY AN INCORRECT TYPE. If you carry the display unit, hold the unit itself, not the speakers. Record the model and serial numbers in a particular installation. To reduce the...
Operating Instructions (Large File - 12.86 MB)
Page 53
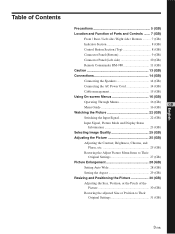
...) Connecting the Speakers 14 (GB) Connecting the AC Power Cord 14 (GB) Cable management 15 (GB) Using On-screen Menus 16 (GB) Operating Through Menus 16 (GB) GB Menu Guide 16 (GB) Watching the Picture 22 (GB) Switching the Input Signal 22 (GB) Input Signal, Picture Mode and Display Status Information 23 (GB) Selecting Image Quality 25 (GB) Adjusting the Picture 25 (GB) Adjusting the Contrast, Brightness, Chroma, and Phase, etc 25 (GB) Restoring the Adjust Picture Menu...
...) Connecting the Speakers 14 (GB) Connecting the AC Power Cord 14 (GB) Cable management 15 (GB) Using On-screen Menus 16 (GB) Operating Through Menus 16 (GB) GB Menu Guide 16 (GB) Watching the Picture 22 (GB) Switching the Input Signal 22 (GB) Input Signal, Picture Mode and Display Status Information 23 (GB) Selecting Image Quality 25 (GB) Adjusting the Picture 25 (GB) Adjusting the Contrast, Brightness, Chroma, and Phase, etc 25 (GB) Restoring the Adjust Picture Menu...
Operating Instructions (Large File - 12.86 MB)
Page 55
... can remove the markings on the screen for several days or more. • To disconnect the AC power cord, pull it as at high altitudes, a buzzing or humming noise may see some kind of video or imaging software to equalize use the screen saver function provided to bright. On the PDP (Plasma Display Panel) • You may emanate from the wall outlet if...
... can remove the markings on the screen for several days or more. • To disconnect the AC power cord, pull it as at high altitudes, a buzzing or humming noise may see some kind of video or imaging software to equalize use the screen saver function provided to bright. On the PDP (Plasma Display Panel) • You may emanate from the wall outlet if...
Operating Instructions (Large File - 12.86 MB)
Page 62
Each press toggles between Vivid, Standard, and User 1 to 3. 8 ASPECT button Press to change the aspect ratio. 9 M/m/ Location and Function of Parts and Controls 7 PICTURE button Selects Picture mode.
Each press toggles between Vivid, Standard, and User 1 to 3. 8 ASPECT button Press to change the aspect ratio. 9 M/m/ Location and Function of Parts and Controls 7 PICTURE button Selects Picture mode.
Operating Instructions (Large File - 12.86 MB)
Page 64
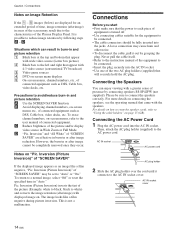
... plug. Connecting the AC Power Cord 1 Plug the AC power cord into the jacks. AC IN socket cover 14 (GB) Situations which can enjoy viewing with 4:3 video source (conventional TV broadcast) 3 Video game sources 4 DVD on-screen menu displays 5 On-screen menus, channel numbers, etc., of connected equipment such as an image like a film negative during picture inversion. To erase channel numbers, on-screen menus, refer to the user manual of the two AC plug holders (supplied...
... plug. Connecting the AC Power Cord 1 Plug the AC power cord into the jacks. AC IN socket cover 14 (GB) Situations which can enjoy viewing with 4:3 video source (conventional TV broadcast) 3 Video game sources 4 DVD on-screen menu displays 5 On-screen menus, channel numbers, etc., of connected equipment such as an image like a film negative during picture inversion. To erase channel numbers, on-screen menus, refer to the user manual of the two AC plug holders (supplied...

Operating Instructions (Large File - 12.86 MB)
Page 66
Using On-screen Menus Using On-screen Menus Operating Through Menus Menu operating buttons Use the buttons on the display. Note Operation may differ in these operating instructions for menu operations. Remote Commander MENU Control button section ENTER Operation of the unit is explained in some cases since there is no The M/m and ENTER buttons on the Remote Commander have the same functions as the M/m and ENTER buttons on the display unit or the Remote Commander for the case of operation using the Remote Commander.
Using On-screen Menus Using On-screen Menus Operating Through Menus Menu operating buttons Use the buttons on the display. Note Operation may differ in these operating instructions for menu operations. Remote Commander MENU Control button section ENTER Operation of the unit is explained in some cases since there is no The M/m and ENTER buttons on the Remote Commander have the same functions as the M/m and ENTER buttons on the display unit or the Remote Commander for the case of operation using the Remote Commander.

Operating Instructions (Large File - 12.86 MB)
Page 67
... adjust the position of the sound. Wide Setup Sets the Auto Wide function. Using On-screen Menus Adjust Screen This menu is set it to "Off" for underscan image display. Adjust Sound You can make settings for overscan image display, and set to "User3" first. For details, see "Adjusting the Sound Quality" on page 32 (GB). You can also adjust the number of "User1" to "Vivid" or "Standard." Set this option to "On" for connecting multiple display units and forming a video wall...
... adjust the position of the sound. Wide Setup Sets the Auto Wide function. Using On-screen Menus Adjust Screen This menu is set it to "Off" for underscan image display. Adjust Sound You can make settings for overscan image display, and set to "User3" first. For details, see "Adjusting the Sound Quality" on page 32 (GB). You can also adjust the number of "User1" to "Vivid" or "Standard." Set this option to "On" for connecting multiple display units and forming a video wall...
Operating Instructions (Large File - 12.86 MB)
Page 68
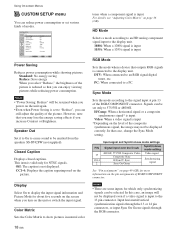
..., an image will be resumed when you can be emitted from the speakers SS-SP42FW (not supplied). Input horizontal/vertical synchronization signals through the 13 or 14 pin connectors, or input Sync On Green signals through the RGB connector. 18 (GB) CUSTOM SETUP Power Saving: Speaker Out: Closed Caption: Display: Color Matrix: HD Mode: RGB Mode: Sync Mode: Remote Input Setting Select Standard Off Off Off Y/PB/PR 1080i DTV H/Comp Selectable Set ENTER Exit MENU Power Saving Reduces power consumption while showing pictures...
..., an image will be resumed when you can be emitted from the speakers SS-SP42FW (not supplied). Input horizontal/vertical synchronization signals through the 13 or 14 pin connectors, or input Sync On Green signals through the RGB connector. 18 (GB) CUSTOM SETUP Power Saving: Speaker Out: Closed Caption: Display: Color Matrix: HD Mode: RGB Mode: Sync Mode: Remote Input Setting Select Standard Off Off Off Y/PB/PR 1080i DTV H/Comp Selectable Set ENTER Exit MENU Power Saving Reduces power consumption while showing pictures...
Operating Instructions (Large File - 12.86 MB)
Page 69
... the display unit for setting, you select the video signal for the display using the Remote Commander. • With Sync On Green, if the unit is not set to accept synchronizing signals, the image will be fixed to RGB.) This setting also applies to the operation when the CONTROL S connector is used for the display using the control buttons on the display unit. You can only make settings for remote control settings. Selectable: Each input selector button on the remote control (INPUT2...
... the display unit for setting, you select the video signal for the display using the Remote Commander. • With Sync On Green, if the unit is not set to accept synchronizing signals, the image will be fixed to RGB.) This setting also applies to the operation when the CONTROL S connector is used for the display using the control buttons on the display unit. You can only make settings for remote control settings. Selectable: Each input selector button on the remote control (INPUT2...

Operating Instructions (Large File - 12.86 MB)
Page 70
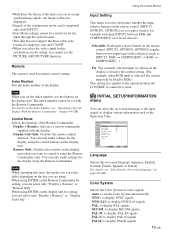
... display unit automatically enters the standby mode when a signal is not input to the factory default condition. For details, see "Setting an IP address and communication speed" on when a signal is input. Note These setting items appear on page 42 (GB). Auto Screen Adjust When "Auto Screen Adjust" is set to the DVI or RGB input connectors for each time input signals are switched, the original factory settings operate. INITIAL SETUP/INFORMATION Information Model Name: Serial Number: Operation Time: Software Version: Software...
... display unit automatically enters the standby mode when a signal is not input to the factory default condition. For details, see "Setting an IP address and communication speed" on when a signal is input. Note These setting items appear on page 42 (GB). Auto Screen Adjust When "Auto Screen Adjust" is set to the DVI or RGB input connectors for each time input signals are switched, the original factory settings operate. INITIAL SETUP/INFORMATION Information Model Name: Serial Number: Operation Time: Software Version: Software...

Operating Instructions (Large File - 12.86 MB)
Page 72
... (time base corrector). Color system or resolution/vertical frequency Signal type Input1 DVI 640x480/60 Vivid 15 : 07 Picture mode You can switch the input signal using the INPUT button on page 19 (GB). 22 (GB) Watching the Picture Watching the Picture Before you start • Power on the display. • Power on the connected equipment and play a video source. • To display the input signal information and Picture Mode on the screen when turning on the power or switching the input signal, set value (Only...
... (time base corrector). Color system or resolution/vertical frequency Signal type Input1 DVI 640x480/60 Vivid 15 : 07 Picture mode You can switch the input signal using the INPUT button on page 19 (GB). 22 (GB) Watching the Picture Watching the Picture Before you start • Power on the display. • Power on the connected equipment and play a video source. • To display the input signal information and Picture Mode on the screen when turning on the power or switching the input signal, set value (Only...

Operating Instructions (Large File - 12.86 MB)
Page 74
... Sync There is component video. Actual on the INPUT2 connector or the BKM-FW12. • If colors appear too light after inputting a DVD signal to the display unit, adjust the "Chroma" setting in the "SCREEN CONTROL" menu, one of Apple Computer, Inc. Select the appropriate setting. INPUT2 RGB The signal mode of INPUT2 is a registered trademark of INPUT1 is set to digital RGB. c) VESA is set to analog RGB. INPUT1 DVI The signal mode of the Video Electronics...
... Sync There is component video. Actual on the INPUT2 connector or the BKM-FW12. • If colors appear too light after inputting a DVD signal to the display unit, adjust the "Chroma" setting in the "SCREEN CONTROL" menu, one of Apple Computer, Inc. Select the appropriate setting. INPUT2 RGB The signal mode of INPUT2 is a registered trademark of INPUT1 is set to digital RGB. c) VESA is set to analog RGB. INPUT1 DVI The signal mode of the Video Electronics...

Operating Instructions (Large File - 12.86 MB)
Page 92
... the screen. INITIAL SETUP/INFORMATION Language: Color System: Auto Shut Off: Auto Screen Adjust: Information IP Address Setup Speed Setup All Reset English Auto Off On Select Set ENTER Exit MENU 3 Select "IP Address Setup" with M/m and press ENTER. Setting an IP address manually (Manual) 1 Select "Manual" in the OPTION1 slot of this capability, set the IP address and communication speed as BKM-FW32, BKM-FW50) is not completed properly, an error code...
... the screen. INITIAL SETUP/INFORMATION Language: Color System: Auto Shut Off: Auto Screen Adjust: Information IP Address Setup Speed Setup All Reset English Auto Off On Select Set ENTER Exit MENU 3 Select "IP Address Setup" with M/m and press ENTER. Setting an IP address manually (Manual) 1 Select "Manual" in the OPTION1 slot of this capability, set the IP address and communication speed as BKM-FW32, BKM-FW50) is not completed properly, an error code...
Operating Instructions (Large File - 12.86 MB)
Page 95
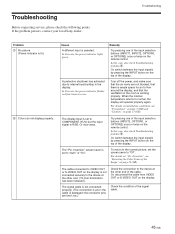
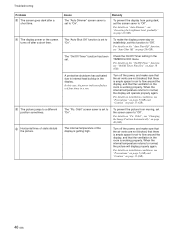
..., also check Troubleshooting problem 9. Inversion" screen saver is lit.) 2 Colors do not display properly. Try pressing one of the input selection buttons (INPUT1, INPUT2, OPTION1, or OPTION2) once or twice on the remote control. The cable connected to VIDEO OUT or S-VIDEO OUT on page 13 (GB). etc.) Check the connection to "Auto" or "On". If the problem persists, contact your local Sony dealer. Troubleshooting Problem 1 No picture (Power indicator is set to the...
..., also check Troubleshooting problem 9. Inversion" screen saver is lit.) 2 Colors do not display properly. Try pressing one of the input selection buttons (INPUT1, INPUT2, OPTION1, or OPTION2) once or twice on the remote control. The cable connected to VIDEO OUT or S-VIDEO OUT on page 13 (GB). etc.) Check the connection to "Auto" or "On". If the problem persists, contact your local Sony dealer. Troubleshooting Problem 1 No picture (Power indicator is set to the...
Operating Instructions (Large File - 12.86 MB)
Page 96
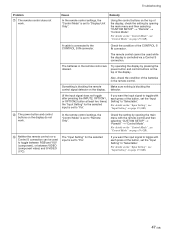
.../CLOCK menu. The "Auto Shut Off" function is set to "On". Orbit" screen saver is set to "On". For details on installation conditions, see "On/Off Timer Function" on page 41 (GB). Remedy To prevent the display from moving, set . Troubleshooting Problem 3 The screen goes dark after a short time. 4 The display power or the screen turns off after a short time. 5 The picture jumps to a different position sometimes. 6 Horizontal lines...
.../CLOCK menu. The "Auto Shut Off" function is set to "On". Orbit" screen saver is set to "On". For details on installation conditions, see "On/Off Timer Function" on page 41 (GB). Remedy To prevent the display from moving, set . Troubleshooting Problem 3 The screen goes dark after a short time. 4 The display power or the screen turns off after a short time. 5 The picture jumps to a different position sometimes. 6 Horizontal lines...
Operating Instructions (Large File - 12.86 MB)
Page 97
... control buttons on the top of the CONTROL S IN connector. For details on the "Control Mode", see "Input Setting" on page 19 (GB). 8 The power button and control buttons on page 19 (GB). 9 Neither the remote control nor a Control S connection can be used to "Fix". Check the condition of the display, check the setting by opening the main menu with each press of the display. power button and control buttons on page 19 (GB). 47 (GB) detector. (If the input signal...
... control buttons on the top of the CONTROL S IN connector. For details on the "Control Mode", see "Input Setting" on page 19 (GB). 8 The power button and control buttons on page 19 (GB). 9 Neither the remote control nor a Control S connection can be used to "Fix". Check the condition of the display, check the setting by opening the main menu with each press of the display. power button and control buttons on page 19 (GB). 47 (GB) detector. (If the input signal...
Pro Displays Brochure
Page 6
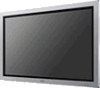
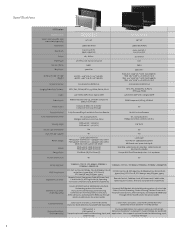
Specifications LCD Displays Model Number Screen Size (viewable area measured diagonally) Resolution Pixel Pitch Colors Panel Type Contrast Ratio Brightness FWD-32LX2F/B & /S FWD-40LX2F/B & /S 32" / 40" 1366 x 768 WXGA 0.51 x 0.51 mm/ 0.648 x 0.648 mm 16.7 Million a-Si-TFT active matrix LCD panel 1300:1 500 cd/m2 Dimensions (W x H x D)/ Weight Screen Protector Anaglog Video Color Systems Audio Video Inputs Video Output Remote Control Color Temperature Control Viewing Angle Closed Caption Decoder High Altitude Capable Mount Design Power Design Color Picture and Picture 32LX2F = 31...
Specifications LCD Displays Model Number Screen Size (viewable area measured diagonally) Resolution Pixel Pitch Colors Panel Type Contrast Ratio Brightness FWD-32LX2F/B & /S FWD-40LX2F/B & /S 32" / 40" 1366 x 768 WXGA 0.51 x 0.51 mm/ 0.648 x 0.648 mm 16.7 Million a-Si-TFT active matrix LCD panel 1300:1 500 cd/m2 Dimensions (W x H x D)/ Weight Screen Protector Anaglog Video Color Systems Audio Video Inputs Video Output Remote Control Color Temperature Control Viewing Angle Closed Caption Decoder High Altitude Capable Mount Design Power Design Color Picture and Picture 32LX2F = 31...
Pro Displays Brochure
Page 7
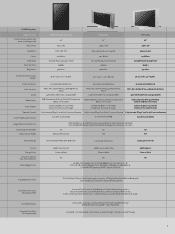
... Instructions, AC Plug Holder (2), AA/R6 size Battery (2), Cable Holder (4), Component Cable, Remote Control Universal Table Stands & Wall Brackets, Multiple Networking options which include Status Control/Streaming Content, Storing Content Tuners, Tuners with Hospitality Connections, Alternate Inputs, and Component/RGB Loop Through 2-year parts and labor, 1-year panel onsite service Limited Warranty² (Extended Service available - PLASMA Displays Model Number Screen Size (viewable area measured diagonally) Resolution Pixel Pitch Colors Panel Type Contrast Ratio Brightness FWD-42PV1...
... Instructions, AC Plug Holder (2), AA/R6 size Battery (2), Cable Holder (4), Component Cable, Remote Control Universal Table Stands & Wall Brackets, Multiple Networking options which include Status Control/Streaming Content, Storing Content Tuners, Tuners with Hospitality Connections, Alternate Inputs, and Component/RGB Loop Through 2-year parts and labor, 1-year panel onsite service Limited Warranty² (Extended Service available - PLASMA Displays Model Number Screen Size (viewable area measured diagonally) Resolution Pixel Pitch Colors Panel Type Contrast Ratio Brightness FWD-42PV1...

Pro Displays Brochure
Page 9
... digital signage • Internal design for clean installation • Flash 6 support • Support for up to 255 Sony displays or projectors • Remote PC Desktop View - Utilize Display Commander to create playlists as well as distribute playlists and content • 5.1 digital audio capability for full surround sound • USB ports can be used for touch screen kiosk applications BKM-FW50 Network Media Card • Streaming or local playback with Compact Flash card (card...
... digital signage • Internal design for clean installation • Flash 6 support • Support for up to 255 Sony displays or projectors • Remote PC Desktop View - Utilize Display Commander to create playlists as well as distribute playlists and content • 5.1 digital audio capability for full surround sound • USB ports can be used for touch screen kiosk applications BKM-FW50 Network Media Card • Streaming or local playback with Compact Flash card (card...

Marketing Specifications
Page 2
...: Yes Contrast Ratio: 10000:1 Display Resolution: 1024 x 768 Image Retention Protection: Auto Wide Mode, Background, Multi-Mode Picture Orbit, Picture Inversion, Power Save, Smart Fan Technology, Timers, White Screen Viewing Angle: Horizontal: 178°, Vertical: 178° Audio Audio Power Output: 14W Total (7Wx2 Digital AMP) Convenience Cable Management System: Yes On Screen Controls: Yes Wall/Arm Mount: Yes (capable) Inputs and Outputs Analog Audio Input(s): 1 (Side) Analog Audio Output(s): Speakers (L/R) Optional Analog Video Input(s): 1 (Side) DVI Connection Input(s): 1 DVI-D (HDCP...
...: Yes Contrast Ratio: 10000:1 Display Resolution: 1024 x 768 Image Retention Protection: Auto Wide Mode, Background, Multi-Mode Picture Orbit, Picture Inversion, Power Save, Smart Fan Technology, Timers, White Screen Viewing Angle: Horizontal: 178°, Vertical: 178° Audio Audio Power Output: 14W Total (7Wx2 Digital AMP) Convenience Cable Management System: Yes On Screen Controls: Yes Wall/Arm Mount: Yes (capable) Inputs and Outputs Analog Audio Input(s): 1 (Side) Analog Audio Output(s): Speakers (L/R) Optional Analog Video Input(s): 1 (Side) DVI Connection Input(s): 1 DVI-D (HDCP...


