
Operating Instructions
Page 47
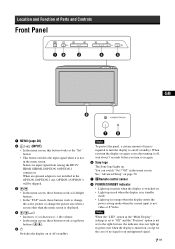
... to the right-bottom, the indicator does not light up in green even when the display is turned on again. 6 Sony logo The Sony logo lights up. Note To protect the panel, a certain amount of Parts and Controls Front Panel GB 1 MENU (page 20) 2 / (INPUT) • In the menu screen, this button ...as the "Set" button. • This button switches the input signal when it is not in orange when the display enters the power saving mode when the current input is not video or S Video. See "Advanced Setup" on page 30. 7 Remote control sensor 8 POWER/STANDBY indicator • Lights up in green...
... to the right-bottom, the indicator does not light up in green even when the display is turned on again. 6 Sony logo The Sony logo lights up. Note To protect the panel, a certain amount of Parts and Controls Front Panel GB 1 MENU (page 20) 2 / (INPUT) • In the menu screen, this button ...as the "Set" button. • This button switches the input signal when it is not in orange when the display enters the power saving mode when the current input is not video or S Video. See "Advanced Setup" on page 30. 7 Remote control sensor 8 POWER/STANDBY indicator • Lights up in green...
Operating Instructions
Page 48
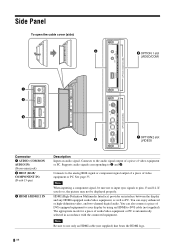
... can also connect a piece of video equipment or PC. The appropriate mode for a piece of video equipment or PC. Note When inputting a component signal, be displayed properly. HDMI (High-Definition Multimedia Interface) provides an interface between the display and any HDMI-equipped audio/video equipment, as well as PC....picture may not be sure not to input sync signals to -DVI cable (not supplied). Side Panel To open the cable cover (side) 4 IN 5 OPTION 1 slot (VIDEO/COM) OPTION 1(VIDEO/COM) MONITOR CONTROL ADAPTOR CONTROL S OUT REMOTE RGB/COMPONENT IN AUDIO IN COM MON AUDIO HD...
... can also connect a piece of video equipment or PC. The appropriate mode for a piece of video equipment or PC. Note When inputting a component signal, be displayed properly. HDMI (High-Definition Multimedia Interface) provides an interface between the display and any HDMI-equipped audio/video equipment, as well as PC....picture may not be sure not to input sync signals to -DVI cable (not supplied). Side Panel To open the cable cover (side) 4 IN 5 OPTION 1 slot (VIDEO/COM) OPTION 1(VIDEO/COM) MONITOR CONTROL ADAPTOR CONTROL S OUT REMOTE RGB/COMPONENT IN AUDIO IN COM MON AUDIO HD...
Operating Instructions
Page 49
... authorized Sony dealers. 5 OPTION 1 slot (VIDEO/COM port) 6 VIDEO INPUT ADAPTOR (The BKM-FW10 is automatically selected. S VIDEO OUT (Mini DIN 4-pin): Connects to the S Video input of a piece of video equipment. Connect the cable (not supplied) to the audio output of a piece of video equipment.... an optional adaptor with a single remote control when the display is connected to the S Video output of a piece of the display using the RS-232C protocol. VIDEO IN (BNC): Connects to the CONTROL S OUT connector of video equipment. GB 9 GB Connector 4 MONITOR CONTROL ADAPTOR (...
... authorized Sony dealers. 5 OPTION 1 slot (VIDEO/COM port) 6 VIDEO INPUT ADAPTOR (The BKM-FW10 is automatically selected. S VIDEO OUT (Mini DIN 4-pin): Connects to the S Video input of a piece of video equipment. Connect the cable (not supplied) to the audio output of a piece of video equipment.... an optional adaptor with a single remote control when the display is connected to the S Video output of a piece of the display using the RS-232C protocol. VIDEO IN (BNC): Connects to the CONTROL S OUT connector of video equipment. GB 9 GB Connector 4 MONITOR CONTROL ADAPTOR (...
Operating Instructions
Page 50
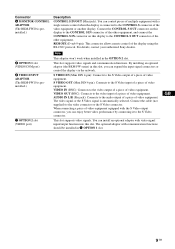
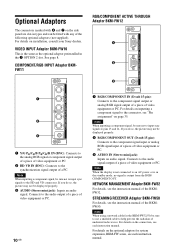
... panel are slot-in the 7 OPTION 2 slot. NETWORK MANAGEMENT Adaptor BKM-FW32 For details, see each instruction manual. See page 8. Connects to the connector, see the instruction manual of video equipment or PC. 3 AUDIO IN (Stereo mini jack): Inputs an audio signal. Note When the display ...Inputs an audio signal. For details on page 35. STREAMING RECEIVER Adaptor BKM-FW50 For details, see "Pin assignment" on installation, consult your Sony dealers. If you do so, the picture may not be fitted with 5 and 7 on inputting a component signal to the audio signal output ...
... panel are slot-in the 7 OPTION 2 slot. NETWORK MANAGEMENT Adaptor BKM-FW32 For details, see each instruction manual. See page 8. Connects to the connector, see the instruction manual of video equipment or PC. 3 AUDIO IN (Stereo mini jack): Inputs an audio signal. Note When the display ...Inputs an audio signal. For details on page 35. STREAMING RECEIVER Adaptor BKM-FW50 For details, see "Pin assignment" on installation, consult your Sony dealers. If you do so, the picture may not be fitted with 5 and 7 on inputting a component signal to the audio signal output ...
Operating Instructions
Page 54
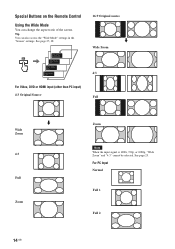
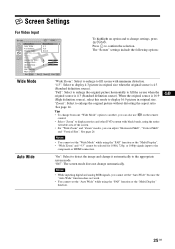
See page 25. Tip You can change the aspect ratio of the screen. See page 25, 28. For PC Input Normal Full 1 Full 2 14 GB Wide Mode: Wide Zoom Wide Mode: 4:3 Wide Mode: Full Wide Mode: Zoom For Video, DVD or HDMI input (other than PC input) 4:3 Original Source 16:9 Original source m Wide Zoom 4:3 Full m Wide Zoom 4:3 Full Zoom Zoom Note When the input signal is 1080i, 720p, or 1080p, "Wide Zoom" and "4:3" cannot be selected. Special Buttons on the Remote Control Using the Wide Mode You can also access the "Wide Mode" settings in the "Screen" settings.
See page 25. Tip You can change the aspect ratio of the screen. See page 25, 28. For PC Input Normal Full 1 Full 2 14 GB Wide Mode: Wide Zoom Wide Mode: 4:3 Wide Mode: Full Wide Mode: Zoom For Video, DVD or HDMI input (other than PC input) 4:3 Original Source 16:9 Original source m Wide Zoom 4:3 Full m Wide Zoom 4:3 Full Zoom Zoom Note When the input signal is 1080i, 720p, or 1080p, "Wide Zoom" and "4:3" cannot be selected. Special Buttons on the Remote Control Using the Wide Mode You can also access the "Wide Mode" settings in the "Screen" settings.

Operating Instructions
Page 55
...be equal to match each picture's aspect ratio. If B's aspect ratio is larger than that of A is 4:3, its height will be set to the panel size. The width of B. If A's aspect ratio is larger than that of A and B is the same. Press g button. The height will be...Using the PAP Setting You can show two pictures from different signal sources, such as a PC and a video, side by side. Available combination of B is 4:3, its height will be set to the panel size. The width of two pictures HD15 RGB Component HD15 RGB Component HDMI 1 HDMI/DVI a a HDMI ...
...be equal to match each picture's aspect ratio. If B's aspect ratio is larger than that of A is 4:3, its height will be set to the panel size. The width of B. If A's aspect ratio is larger than that of A and B is the same. Press g button. The height will be...Using the PAP Setting You can show two pictures from different signal sources, such as a PC and a video, side by side. Available combination of B is 4:3, its height will be set to the panel size. The width of two pictures HD15 RGB Component HD15 RGB Component HDMI 1 HDMI/DVI a a HDMI ...
Operating Instructions
Page 62
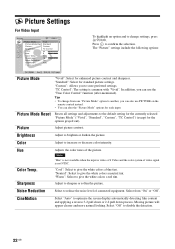
...alter the "Picture Mode" options for the options grayed out). CineMotion Select "Auto" to confirm the selection. Press to optimize the screen display automatically detecting film content and applying a reverse 3-2 pull down or 2-2 pull down process. Select from one "Picture Mode" option to.... • You can use the "True Color Control" function (after-mentioned). Hue Color Temp. "TC Control": The setting is video or S Video and the color system of the picture. "Standard": Select for enhanced picture contrast and sharpness. Moving picture will appear clearer and more...
...alter the "Picture Mode" options for the options grayed out). CineMotion Select "Auto" to confirm the selection. Press to optimize the screen display automatically detecting film content and applying a reverse 3-2 pull down or 2-2 pull down process. Select from one "Picture Mode" option to.... • You can use the "True Color Control" function (after-mentioned). Hue Color Temp. "TC Control": The setting is video or S Video and the color system of the picture. "Standard": Select for enhanced picture contrast and sharpness. Moving picture will appear clearer and more...
Operating Instructions
Page 63
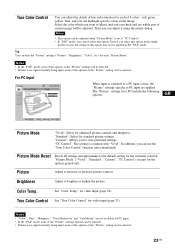
... of current image will be selected. 23 GB picture screen, the setting of this option. for video input (page 23). True Color Control See "True Color Control" for video input (page 22). In addition, you can highlight specific colors in the image. For PC Input... Picture Picture Mode : Picture Mode Reset Picture : Brightness : Color : Hue : Color Temp. : Sharpness : Noise Reduction : CineMotion : True Color Control : HD15 RGB Vivid 50 40 Neutral When input...
... of current image will be selected. 23 GB picture screen, the setting of this option. for video input (page 23). True Color Control See "True Color Control" for video input (page 22). In addition, you can highlight specific colors in the image. For PC Input... Picture Picture Mode : Picture Mode Reset Picture : Brightness : Color : Hue : Color Temp. : Sharpness : Noise Reduction : CineMotion : True Color Control : HD15 RGB Vivid 50 40 Neutral When input...
Operating Instructions
Page 64
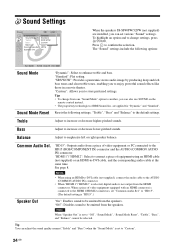
...a piece of BBE Sound, Inc. Tip You can also use SOUND on the remote control instead. • The proprietary technologies of video equipment equipped with an HDMI connector is "HD15".) Speaker Out "On": Enables sound to another, you to confirm the selection. To ...the HD15 (RGB/COMPONENT IN) connector and the AUDIO (COMMON AUDIO IN) connector. "Standard": Flat setting. Treble Adjust to increase or decrease lower-pitched sounds. "HDMI 1"/"HDMI 2": Select to connect a piece of video equipment or PC connected to "Custom". 24 GB "SRS WOW": Provides a panoramic stereo audio ...
...a piece of BBE Sound, Inc. Tip You can also use SOUND on the remote control instead. • The proprietary technologies of video equipment equipped with an HDMI connector is "HD15".) Speaker Out "On": Enables sound to another, you to confirm the selection. To ...the HD15 (RGB/COMPONENT IN) connector and the AUDIO (COMMON AUDIO IN) connector. "Standard": Flat setting. Treble Adjust to increase or decrease lower-pitched sounds. "HDMI 1"/"HDMI 2": Select to connect a piece of video equipment or PC connected to "Custom". 24 GB "SRS WOW": Provides a panoramic stereo audio ...
Operating Instructions
Page 65
... to change it automatically to confirm the selection. Screen Settings For Video Input Screen Wide Mode : Auto Wide : 4:3 Default : Display Area : Auto Adjustment Phase : Pitch : Horizontal Shift : Vertical Shift : Vertical Size : Reset PAP Setting Multi Display Sel: Set: HDMI 1 Wide ZZoooomm 4O:n3 FWuildl e Zoom.... Tips • To change automatically. "Off": The screen mode does not change from one "Wide Mode" option to display movies and other DVD content with minimum distortion. The "Screen" settings include the following options: Wide Mode "Wide Zoom": ...
... to change it automatically to confirm the selection. Screen Settings For Video Input Screen Wide Mode : Auto Wide : 4:3 Default : Display Area : Auto Adjustment Phase : Pitch : Horizontal Shift : Vertical Shift : Vertical Size : Reset PAP Setting Multi Display Sel: Set: HDMI 1 Wide ZZoooomm 4O:n3 FWuildl e Zoom.... Tips • To change automatically. "Off": The screen mode does not change from one "Wide Mode" option to display movies and other DVD content with minimum distortion. The "Screen" settings include the following options: Wide Mode "Wide Zoom": ...

Operating Instructions
Page 66
... Display Area Horizontal Shift Vertical Shift Vertical Size Reset PAP Setting 26 GB "Wide Zoom": Select to enlarge the 4:3 picture to fill the 16:9 screen, keeping the original image as much as a PC and a video, side by side. "Zoom": Select to enlarge the 4:3 picture to the panel ...to choose a correction. "Horizontal Shift", "Vertical Shift" and "Vertical Size" to move the position of an analog signal and a digital signal is displayed are applied. • For details on the available combination of the picture. "PAP Size": "Large Left": The left picture. "Even": The left ...
... Display Area Horizontal Shift Vertical Shift Vertical Size Reset PAP Setting 26 GB "Wide Zoom": Select to enlarge the 4:3 picture to fill the 16:9 screen, keeping the original image as much as a PC and a video, side by side. "Zoom": Select to enlarge the 4:3 picture to the panel ...to choose a correction. "Horizontal Shift", "Vertical Shift" and "Vertical Size" to move the position of an analog signal and a digital signal is displayed are applied. • For details on the available combination of the picture. "PAP Size": "Large Left": The left picture. "Even": The left ...
Operating Instructions
Page 67
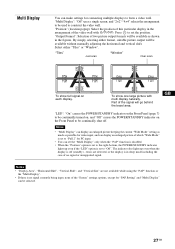
... picture output will be available as possible for video input, and can set the "Multi Display" only when the "PAP" function is disabled. • When the "Position" option is off . GB "LED": "On" causes the POWER/STANDBY indicator on the Front Panel (page 7) to be continually turned on, ...position of this particular display in sleep mode including the case of which "Wide Mode" is no signal or unsupported signal. "Tiles" Just scan "Window" Over scan To show one large picture with F/f/G/g. To show full signal on the Front Panel to be used to construct the video wall.
... picture output will be available as possible for video input, and can set the "Multi Display" only when the "PAP" function is disabled. • When the "Position" option is off . GB "LED": "On" causes the POWER/STANDBY indicator on the Front Panel (page 7) to be continually turned on, ...position of this particular display in sleep mode including the case of which "Wide Mode" is no signal or unsupported signal. "Tiles" Just scan "Window" Over scan To show one large picture with F/f/G/g. To show full signal on the Front Panel to be used to construct the video wall.

Operating Instructions
Page 68
... picture has unwanted vertical stripes. A black frame will appear on the surrounding of the picture when the display receives an input signal from the connected PC. Press F/f and press to fill the display area. Multi Display See "Multi Display" for video input (page 26). For PC Input Screen HD15 RGB Wide Mode : Auto Wide : 4:3 Default...
... picture has unwanted vertical stripes. A black frame will appear on the surrounding of the picture when the display receives an input signal from the connected PC. Press F/f and press to fill the display area. Multi Display See "Multi Display" for video input (page 26). For PC Input Screen HD15 RGB Wide Mode : Auto Wide : 4:3 Default...
Operating Instructions
Page 69
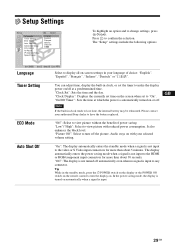
...any connector. "Clock Set": Sets the time and the day. Please contact your authorized Sony dealer to view picture with your language of power saving. Auto Shut Off "On": The display automatically enters the standby mode when a signal is input to lose time, the internal ... your selected volume setting. "Clock Display": Displays the currently set time on the screen when set the timer to turn the display on /off the picture. "Picture Off": Select to make the display power on . ECO Mode "Off": Select to the video or S Video input connectors for more than about ...
...any connector. "Clock Set": Sets the time and the day. Please contact your authorized Sony dealer to view picture with your language of power saving. Auto Shut Off "On": The display automatically enters the standby mode when a signal is input to lose time, the internal ... your selected volume setting. "Clock Display": Displays the currently set time on the screen when set the timer to turn the display on /off the picture. "Picture Off": Select to make the display power on . ECO Mode "Off": Select to the video or S Video input connectors for more than about ...
Operating Instructions
Page 70
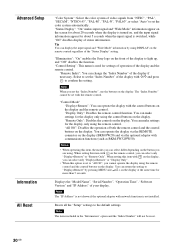
...Resets all the "Setup" settings to "Display+Remote" by using the control buttons on the display. You can select only "Display+Remote" or "Remote Only". When setting this option is not installed. "Illumination": "On" enables the Sony logo on the front of the display to "All Off", you set the... the same time for settings of operation of the display and the remote control. Advanced Setup Information All Reset "Color System": Select the color system of video signals from "NTSC", "PAL", "SECAM", "NTSC4.43", "PAL-M", "PAL-N", "PAL60", or select "Auto" to confirm the setting. Tip...
...Resets all the "Setup" settings to "Display+Remote" by using the control buttons on the display. You can select only "Display+Remote" or "Remote Only". When setting this option is not installed. "Illumination": "On" enables the Sony logo on the front of the display to "All Off", you set the... the same time for settings of operation of the display and the remote control. Advanced Setup Information All Reset "Color System": Select the color system of video signals from "NTSC", "PAL", "SECAM", "NTSC4.43", "PAL-M", "PAL-N", "PAL60", or select "Auto" to confirm the setting. Tip...
Operating Instructions
Page 72
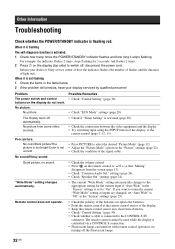
... how many times the POWER/STANDBY indicator flashes and how long it is activated (page 29). • Check the connection between the video equipment and the display. • Try switching input using the INPUT button of light out). Remote control does not operate. • Check the volume control... from some video sources. • Check if "Timer Setting" is not flashing 1 Check the items in the table below. 2 If the problem still persists, have your dealer or Sony service center of how the indicator flashes (the number of flashes and the duration of the display, or the...
... how many times the POWER/STANDBY indicator flashes and how long it is activated (page 29). • Check the connection between the video equipment and the display. • Try switching input using the INPUT button of light out). Remote control does not operate. • Check the volume control... from some video sources. • Check if "Timer Setting" is not flashing 1 Check the items in the table below. 2 If the problem still persists, have your dealer or Sony service center of how the indicator flashes (the number of flashes and the duration of the display, or the...
Operating Instructions
Page 73
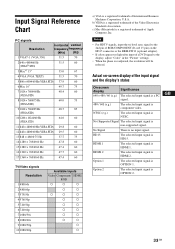
... • For HDTV signals, input the tri-level sync signal to the display, adjust "Color" in the "Picture" settings. • When the phase is a registered trademark of the Video Electronics Standards Association. No Signal There is non-supported signal. Not Supported Signal...input signal is a registered trademark of the input signal and the display's status On-screen display Significance 640 × 480 / 60 (e.g.) The selected input signal is a PC signal. 480 / 60I (e.g.) The selected input signal is component video. c) Mac (Macintosh) is HDMI 2. Option 1 The selected...
... • For HDTV signals, input the tri-level sync signal to the display, adjust "Color" in the "Picture" settings. • When the phase is a registered trademark of the Video Electronics Standards Association. No Signal There is non-supported signal. Not Supported Signal...input signal is a registered trademark of the input signal and the display's status On-screen display Significance 640 × 480 / 60 (e.g.) The selected input signal is a PC signal. 480 / 60I (e.g.) The selected input signal is component video. c) Mac (Macintosh) is HDMI 2. Option 1 The selected...
Operating Instructions
Page 74
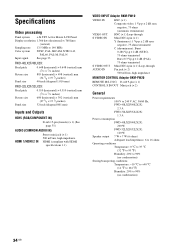
...215; 1) CONTROL S IN/OUT Mini jack (× 2) General Power requirements 100 V to 240 V AC, 50/60 Hz, FWD-40LX2F/40LX2X: 2.3 A FWD-32LX2F/32LX2X: 1.3 A Power consumption FWD-40LX2F/40LX2X: 200 W FWD-32LX2F/32LX2X: 120 W Speaker output 7 W + 7 W (6 ohms) Adequate load impedance, 6 to 16 ohms Operating conditions Temperature...176;C to +40 °C (14 °F to 104 °F) Humidity: 20% to 140 MHz Color system NTSC, PAL, SECAM, NTSC4.43, PAL60, PAL-M, PAL-N Input signal See page 33. Specifications Video processing Panel system a-Si TFT Active Matrix LCD Panel Display resolution 1,366 ...
...215; 1) CONTROL S IN/OUT Mini jack (× 2) General Power requirements 100 V to 240 V AC, 50/60 Hz, FWD-40LX2F/40LX2X: 2.3 A FWD-32LX2F/32LX2X: 1.3 A Power consumption FWD-40LX2F/40LX2X: 200 W FWD-32LX2F/32LX2X: 120 W Speaker output 7 W + 7 W (6 ohms) Adequate load impedance, 6 to 16 ohms Operating conditions Temperature...176;C to +40 °C (14 °F to 104 °F) Humidity: 20% to 140 MHz Color system NTSC, PAL, SECAM, NTSC4.43, PAL60, PAL-M, PAL-N Input signal See page 33. Specifications Video processing Panel system a-Si TFT Active Matrix LCD Panel Display resolution 1,366 ...
Operating Instructions
Page 75
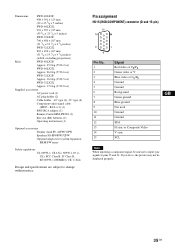
...10 11 12 13 14 15 Signal Red video or CR/PR Green video or Y Blue video or CB/PB Ground Ground Red ground Green ground Blue ground Not used Ground Ground SDA H sync or Composite Video V sync SCL GB Note When inputting a component signal, be displayed properly. 35 GB RCA × 3)...) Mass FWD-40LX2F: Approx. 25.0 kg (55 lb 2 oz) FWD-40LX2X: Approx. 26.0 kg (57 lb 6 oz) FWD-32LX2F: Approx. 16.0 kg (35 lb 5 oz) FWD-32LX2X: Approx. 17.0 kg (37 lb 8 oz) Supplied accessories AC power cord (1) AC plug holder (2) Cable holder 40" type (4), 32" type (6) Component video signal cable...
...10 11 12 13 14 15 Signal Red video or CR/PR Green video or Y Blue video or CB/PB Ground Ground Red ground Green ground Blue ground Not used Ground Ground SDA H sync or Composite Video V sync SCL GB Note When inputting a component signal, be displayed properly. 35 GB RCA × 3)...) Mass FWD-40LX2F: Approx. 25.0 kg (55 lb 2 oz) FWD-40LX2X: Approx. 26.0 kg (57 lb 6 oz) FWD-32LX2F: Approx. 16.0 kg (35 lb 5 oz) FWD-32LX2X: Approx. 17.0 kg (37 lb 8 oz) Supplied accessories AC power cord (1) AC plug holder (2) Cable holder 40" type (4), 32" type (6) Component video signal cable...
Operating Instructions
Page 227
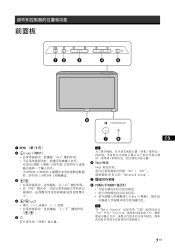
前面板 CS 1 MENU (第 19 页) 2 / (INPUT Set HD15/HDMI 1/HDMI 2/OPTION 1/OPTION 2 OPTION 1/OPTION 2 OPTION 1/OPTION 2 3 PAP 4 51 5 6 Sony 标志 Sony On"/ "Off 29 页上的 "Advanced Setup"。 7 8 POWER/STANDBY S Video(S 注 当 "Multi Display LED Off"并且 "Position 7 CS
前面板 CS 1 MENU (第 19 页) 2 / (INPUT Set HD15/HDMI 1/HDMI 2/OPTION 1/OPTION 2 OPTION 1/OPTION 2 OPTION 1/OPTION 2 3 PAP 4 51 5 6 Sony 标志 Sony On"/ "Off 29 页上的 "Advanced Setup"。 7 8 POWER/STANDBY S Video(S 注 当 "Multi Display LED Off"并且 "Position 7 CS


