Operating Instructions
Page 2
... abnormality in the unit, disconnect the main plug from the mains, connect the unit to the presence of important operating and maintenance (servicing) instructions in the United States Owner's Record The model and serial numbers are located on the rear exterior. The main switch is intended to alert the user to the presence... plug is used to the version of the unit. The unit is not disconnected from the mains as long as sunshine, fire or the like. These following FCC statement applies only to disconnect the unit from the AC outlet immediately. The following indications are...
... abnormality in the unit, disconnect the main plug from the mains, connect the unit to the presence of important operating and maintenance (servicing) instructions in the United States Owner's Record The model and serial numbers are located on the rear exterior. The main switch is intended to alert the user to the presence... plug is used to the version of the unit. The unit is not disconnected from the mains as long as sunshine, fire or the like. These following FCC statement applies only to disconnect the unit from the AC outlet immediately. The following indications are...
Operating Instructions
Page 3
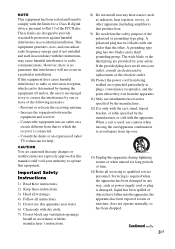
... periods of the polarized or grounding-type plug. Consult the dealer or an experienced radio/ TV technician for replacement of the obsolete outlet. 10) Protect the power cord from that produce heat. 9) Do not defeat the safety purpose of time. 14) Refer all instructions. 5) Do not use attachments/accessories specified by the manufacturer. 12) Use only with the cart, stand...
... periods of the polarized or grounding-type plug. Consult the dealer or an experienced radio/ TV technician for replacement of the obsolete outlet. 10) Protect the power cord from that produce heat. 9) Do not defeat the safety purpose of time. 14) Refer all instructions. 5) Do not use attachments/accessories specified by the manufacturer. 12) Use only with the cart, stand...
Operating Instructions
Page 4
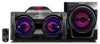
... to connect specifically to iPod and has been certified by the developer to music of a USB device 13 Playing the iPod 15 Using optional audio components 16 Adjusting the sound 17 Controlling the Speaker Light Illumination 17 Changing the display 18 Additional Information Troubleshooting 18 Messages 22 Precautions 23 Specifications 23 Compatible USB devices with this unit 26 Compatible iPod models with separate collection systems) On copyrights iPod is a trademark of Apple Inc., registered in the U.S. "WALKMAN" and "WALKMAN" logo...
... to connect specifically to iPod and has been certified by the developer to music of a USB device 13 Playing the iPod 15 Using optional audio components 16 Adjusting the sound 17 Controlling the Speaker Light Illumination 17 Changing the display 18 Additional Information Troubleshooting 18 Messages 22 Precautions 23 Specifications 23 Compatible USB devices with this unit 26 Compatible iPod models with separate collection systems) On copyrights iPod is a trademark of Apple Inc., registered in the U.S. "WALKMAN" and "WALKMAN" logo...

Operating Instructions
Page 6
... turned off. (ON) (North American model) The unit is turned on the unit or set it to standby mode. On top panel: "/1 (on/standby) (except North American model) (page 10, 19, 22) Press to turn off the AC power. B Display (page 18) C Remote sensor (page 19) D Standby indicator (except North American model) Lights up when the unit is in standby mode. E (USB) port (page 13, 14, 19, 20, 22) Connect an optional USB device. H NX (play...
... turned off. (ON) (North American model) The unit is turned on the unit or set it to standby mode. On top panel: "/1 (on/standby) (except North American model) (page 10, 19, 22) Press to turn off the AC power. B Display (page 18) C Remote sensor (page 19) D Standby indicator (except North American model) Lights up when the unit is in standby mode. E (USB) port (page 13, 14, 19, 20, 22) Connect an optional USB device. H NX (play...
Operating Instructions
Page 7
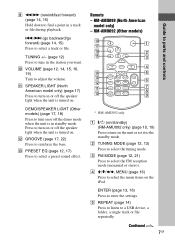
... the unit or set it to turn on or off the speaker light when the unit is turned on. ENTER (page 13, 16) Press to a USB device, a folder, a single track or file repeatedly. DEMO/SPEAKER LIGHT (Other models) (page 17, 18) Press to the standby mode. Remote - E REPEAT (page 14) Press to listen to enter the settings. I m/M (rewind/fast forward) (page 14, 15) Hold down to find a point in a track or file during playback...
... the unit or set it to turn on or off the speaker light when the unit is turned on. ENTER (page 13, 16) Press to a USB device, a folder, a single track or file repeatedly. DEMO/SPEAKER LIGHT (Other models) (page 17, 18) Press to the standby mode. Remote - E REPEAT (page 14) Press to listen to enter the settings. I m/M (rewind/fast forward) (page 14, 15) Hold down to find a point in a track or file during playback...

Operating Instructions
Page 8
... (play/pause) (page 14, 15, 16, 20) Press to select the iPod function. O TUNER MEMORY (page 12, 13) Press to change the information on the display. 8GB R DISPLAY (page 18) Press to preset the radio station. Press and hold to select a preset sound effect. P EQ (page 17) Press to stop USB playback or turn off the iPod. G ./> (go backward/go forward) (page 14, 15) Press to select a track or file...
... (play/pause) (page 14, 15, 16, 20) Press to select the iPod function. O TUNER MEMORY (page 12, 13) Press to change the information on the display. 8GB R DISPLAY (page 18) Press to preset the radio station. Press and hold to select a preset sound effect. P EQ (page 17) Press to stop USB playback or turn off the iPod. G ./> (go backward/go forward) (page 14, 15) Press to select a track or file...

Operating Instructions
Page 9
Getting Started Getting Started Hooking up noise. E AM loop antenna ANTENNA Extend the FM lead antenna horizontally Continued l 9GB Keep the antennas away from the power cord, the USB cable, the iPod and the subwoofer cable (FST-GTK2i only) to avoid picking up the system securely - Rear panel A B C* ANTENNA AUDIO IN R L E POWER ON OFF D * FST-GTK2i only A Antennas Find a location and an orientation that provide good reception, and then set up the antennas.
Getting Started Getting Started Hooking up noise. E AM loop antenna ANTENNA Extend the FM lead antenna horizontally Continued l 9GB Keep the antennas away from the power cord, the USB cable, the iPod and the subwoofer cable (FST-GTK2i only) to avoid picking up the system securely - Rear panel A B C* ANTENNA AUDIO IN R L E POWER ON OFF D * FST-GTK2i only A Antennas Find a location and an orientation that provide good reception, and then set up the antennas.
Operating Instructions
Page 10
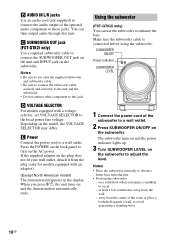
... INPUT jack on the subwoofer. Using the subwoofer (FST-GTK2i only) You can then output audio through this jack. Notes • Place the subwoofer vertically to turn on the AC power. B AUDIO IN L/R jacks Use an audio cord (not supplied) to connect the audio output of the optional audio component to a wall outlet. 2 Press SUBWOOFER ON/OFF on the subwoofer. away from the wall. - SUBWOOFER ON/OFF Power indicator SUBWOOFER LEVEL 1 Connect the power cord of the subwoofer to these jacks. C SUBWOOFER OUT jack (FST-GTK2i only) Use a supplied subwoofer cable...
... INPUT jack on the subwoofer. Using the subwoofer (FST-GTK2i only) You can then output audio through this jack. Notes • Place the subwoofer vertically to turn on the AC power. B AUDIO IN L/R jacks Use an audio cord (not supplied) to connect the audio output of the optional audio component to a wall outlet. 2 Press SUBWOOFER ON/OFF on the subwoofer. away from the wall. - SUBWOOFER ON/OFF Power indicator SUBWOOFER LEVEL 1 Connect the power cord of the subwoofer to these jacks. C SUBWOOFER OUT jack (FST-GTK2i only) Use a supplied subwoofer cable...

Operating Instructions
Page 12
... FUNCTION repeatedly to tune in the station you want . 2 Press TUNER MEMORY. Use the buttons on unit) repeatedly to select AM band. 2 Press and hold NX and PRESET EQ at the same time for this operation. 1 Tune in the station you want . 3 Adjust the volume. on the unit) repeatedly. 2 Perform tuning. Use the buttons on the unit). Tip To improve broadcast reception, adjust the supplied antennas. A preset number flashes in the display. Scanning stops...
... FUNCTION repeatedly to tune in the station you want . 2 Press TUNER MEMORY. Use the buttons on unit) repeatedly to select AM band. 2 Press and hold NX and PRESET EQ at the same time for this operation. 1 Tune in the station you want . 3 Adjust the volume. on the unit) repeatedly. 2 Perform tuning. Use the buttons on the unit). Tip To improve broadcast reception, adjust the supplied antennas. A preset number flashes in the display. Scanning stops...

Operating Instructions
Page 13
... the USB device is connected, "READING" appears and "USB MEMORY" lights up in the display. Then, press +/- Files downloaded from an online music store may take a long time to finish reading the USB device. • The unit can listen to be played back by this unit. The maximum number of a USB device You can recognize up to select the preset number you want . repeatedly to this unit. • Operation may not always be connected. The audio formats...
... the USB device is connected, "READING" appears and "USB MEMORY" lights up in the display. Then, press +/- Files downloaded from an online music store may take a long time to finish reading the USB device. • The unit can listen to be played back by this unit. The maximum number of a USB device You can recognize up to select the preset number you want . repeatedly to this unit. • Operation may not always be connected. The audio formats...

Operating Instructions
Page 14
... Repeat Play All files on the unit. Other operations To Do this Find a point in a connected USB device. • The playback order for 2 seconds or more. m or M > on the USB device • Some time may cause playback delay. To resume playback, press the button again*. • Compatibility with all encoding/writing softwares, recording devices, and recording media cannot be needed to start playback. 4 Press VOLUME +/- (or turn VOLUME on the unit) to adjust the volume. Notes on the unit) repeatedly...
... Repeat Play All files on the unit. Other operations To Do this Find a point in a connected USB device. • The playback order for 2 seconds or more. m or M > on the USB device • Some time may cause playback delay. To resume playback, press the button again*. • Compatibility with all encoding/writing softwares, recording devices, and recording media cannot be needed to start playback. 4 Press VOLUME +/- (or turn VOLUME on the unit) to adjust the volume. Notes on the unit) repeatedly...

Operating Instructions
Page 15
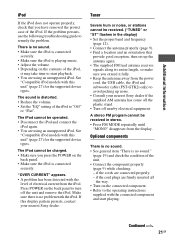
... . 1 Press iPod (or FUNCTION on . • When placing or removing the iPod - or >. • To change even if adjusted on the iPod. • This iPod connector is designed for iPod Touch). To resume playback, press the button again. m or M > on the remote or unit. The volume level does not change the volume level, use m or M while playing video. or > (or chapter of . Locate a point Hold down . Continued l 15GB Operations Update your iPod has...
... . 1 Press iPod (or FUNCTION on . • When placing or removing the iPod - or >. • To change even if adjusted on the iPod. • This iPod connector is designed for iPod Touch). To resume playback, press the button again. m or M > on the remote or unit. The volume level does not change the volume level, use m or M while playing video. or > (or chapter of . Locate a point Hold down . Continued l 15GB Operations Update your iPod has...

Operating Instructions
Page 16
... L/R jacks using an audio cord (not supplied). 2 Turn on the iPod counterclockwise or clockwise. The charging begins when the iPod is placed on . To use the unit as a battery charger You can use the unit as a battery charger for the iPod when the unit is output from an optional audio component through the speakers of this unit. Hold down the volume. 4 Press AUDIO IN (or FUNCTION on the unit counterclockwise) to turn VOLUME on the unit repeatedly). 5 Start playing...
... L/R jacks using an audio cord (not supplied). 2 Turn on the iPod counterclockwise or clockwise. The charging begins when the iPod is placed on . To use the unit as a battery charger You can use the unit as a battery charger for the iPod when the unit is output from an optional audio component through the speakers of this unit. Hold down the volume. 4 Press AUDIO IN (or FUNCTION on the unit counterclockwise) to turn VOLUME on the unit repeatedly). 5 Start playing...
Operating Instructions
Page 18
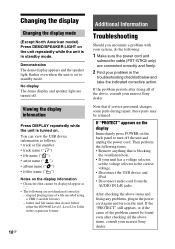
... USB device and iPod. • Disconnect audio cord from the AUDIO IN L/R jacks. elapsed playing time of the problem cannot be found even after doing all the above items and fixing any problems, plug in the expansion format. 18GB Additional Information Troubleshooting Should you encounter a problem with your system, do the following: 1 Make sure the power cord and subwoofer cable (FST-GTK2i only) are not displayed correctly: - Viewing the display information Press DISPLAY repeatedly while the unit...
... USB device and iPod. • Disconnect audio cord from the AUDIO IN L/R jacks. elapsed playing time of the problem cannot be found even after doing all the above items and fixing any problems, plug in the expansion format. 18GB Additional Information Troubleshooting Should you encounter a problem with your system, do the following: 1 Make sure the power cord and subwoofer cable (FST-GTK2i only) are not displayed correctly: - Viewing the display information Press DISPLAY repeatedly while the unit...
Operating Instructions
Page 19
... POWER on the subwoofer. Playback is output. General (Except North American model) The display starts flashing as soon as you plug in the display. There is distorted. See "Compatible USB devices with the USB device. A distorted sound is not possible. - There is no sound. • Make sure you have not press ?/1 to the power cord. • Turn off the unit and remove the USB device from the subwoofer. • Adjust the subwoofer level to the port/connector firmly. (FST-GTK2i...
... POWER on the subwoofer. Playback is output. General (Except North American model) The display starts flashing as soon as you plug in the display. There is distorted. See "Compatible USB devices with the USB device. A distorted sound is not possible. - There is no sound. • Make sure you have not press ?/1 to the power cord. • Turn off the unit and remove the USB device from the subwoofer. • Adjust the subwoofer level to the port/connector firmly. (FST-GTK2i...

Operating Instructions
Page 20
... files in Windows Media Audio Lossless and Professional format cannot be played back. • USB device formatted with this unit are unsupported.* • If you use partitioned USB device, only audio files on the back panel to 9) - The file structure is fragmented. The internal memory is extremely complex. - Symbols Other characters may not support all of these guidelines. - For details, refer to Z) - Upper cases (A to the operating instruction of files in...
... files in Windows Media Audio Lossless and Professional format cannot be played back. • USB device formatted with this unit are unsupported.* • If you use partitioned USB device, only audio files on the back panel to 9) - The file structure is fragmented. The internal memory is extremely complex. - Symbols Other characters may not support all of these guidelines. - For details, refer to Z) - Upper cases (A to the operating instruction of files in...
Operating Instructions
Page 21
...; Keep the antennas away from the power cord, the USB cable, the iPod and subwoofer cable (FST-GTK2i only) to remedy the problem. Optional components There is no sound. • See general item "There is no sound. • Make sure the iPod is connected securely. • Make sure the iPod is distorted. • Reduce the volume. • Set the "EQ" setting of the iPod to start playing. If the problem persists, use the following troubleshooting guide to avoid...
...; Keep the antennas away from the power cord, the USB cable, the iPod and subwoofer cable (FST-GTK2i only) to remedy the problem. Optional components There is no sound. • See general item "There is no sound. • Make sure the iPod is connected securely. • Make sure the iPod is distorted. • Reduce the volume. • Set the "EQ" setting of the iPod to start playing. If the problem persists, use the following troubleshooting guide to avoid...
Operating Instructions
Page 22
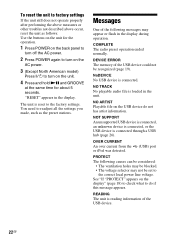
... selector may appear or flash in the display. COMPLETE The radio preset operation ended normally. OVER CURRENT An over current from the or iPod was detected. (USB) port PROTECT The following messages may not be recognized (page 19). READING The unit is reading information of the USB device could not be set to the factory settings. NO TRACK No playable audio file is connected. See "If "PROTECT" appears...
... selector may appear or flash in the display. COMPLETE The radio preset operation ended normally. OVER CURRENT An over current from the or iPod was detected. (USB) port PROTECT The following messages may not be recognized (page 19). READING The unit is reading information of the USB device could not be set to the factory settings. NO TRACK No playable audio file is connected. See "If "PROTECT" appears...
Operating Instructions
Page 23
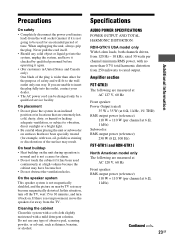
... time. Precautions On safety • Completely disconnect the power cord (mains lead) from the wall socket (mains) if it is not going to be changed only by qualified personnel before operating it again. • (For customers in locations that have become magnetically distorted. Specifications AUDIO POWER SPECIFICATIONS POWER OUTPUT AND TOTAL HARMONIC DISTORTION: RDH-GTK1i USA model only With 6-ohm loads, both channels...
... time. Precautions On safety • Completely disconnect the power cord (mains lead) from the wall socket (mains) if it is not going to be changed only by qualified personnel before operating it again. • (For customers in locations that have become magnetically distorted. Specifications AUDIO POWER SPECIFICATIONS POWER OUTPUT AND TOTAL HARMONIC DISTORTION: RDH-GTK1i USA model only With 6-ohm loads, both channels...
Operating Instructions
Page 24
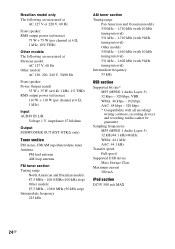
... 120, 220, 240 V, 50/60 Hz Front speaker: Power Output (rated) 35 W + 35 W (at 6 :, 1 kHz, 1% THD) RMS output power (reference) 110 W + 110 W (per channel at 6 :, 1 kHz) Input AUDIO IN L/R: Voltage 1 V, impedance 47 kilohms Output SUBWOOFER OUT (FST-GTK2i only) Tuner section FM stereo, FM/AM superheterodyne tuner Antenna: FM lead antenna AM loop antenna FM tuner section Tuning range North American and Brazilian models: 87.5 MHz - 108.0 MHz (100 kHz...
... 120, 220, 240 V, 50/60 Hz Front speaker: Power Output (rated) 35 W + 35 W (at 6 :, 1 kHz, 1% THD) RMS output power (reference) 110 W + 110 W (per channel at 6 :, 1 kHz) Input AUDIO IN L/R: Voltage 1 V, impedance 47 kilohms Output SUBWOOFER OUT (FST-GTK2i only) Tuner section FM stereo, FM/AM superheterodyne tuner Antenna: FM lead antenna AM loop antenna FM tuner section Tuning range North American and Brazilian models: 87.5 MHz - 108.0 MHz (100 kHz...


