Operating Instructions (CD/DVD Component)
Page 2
... important operating and maintenance (servicing) instructions in the U.S.A Owner's Record The model and serial numbers are designed to constitute a risk of the FCC Rules. DVP-S360/DVP-S363/DVP-S365 Serial No CAUTION You are cautioned that interference will increase eye hazard. However, there is harmful to eyes, do not attempt to correct the interference by turning the equipment off and on, the user is connected...
... important operating and maintenance (servicing) instructions in the U.S.A Owner's Record The model and serial numbers are designed to constitute a risk of the FCC Rules. DVP-S360/DVP-S363/DVP-S365 Serial No CAUTION You are cautioned that interference will increase eye hazard. However, there is harmful to eyes, do not attempt to correct the interference by turning the equipment off and on, the user is connected...
Operating Instructions (CD/DVD Component)
Page 3
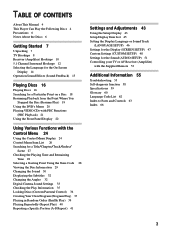
... DVD's Menu 20 Playing VIDEO CDs with PBC Functions (PBC Playback) 21 Using the Front Panel Display 22 Using Various Functions with the Control Menu 24 Using the Control Menu Display 24 Control Menu Item List 26 Searching for a Title/Chapter/Track/Index/ Scene 27 Checking the Playing Time and Remaining Time 28 Selecting a Starting Point Using the Time Code 28 Viewing the Disc Information 29 Changing the Sound 30 Displaying the Subtitles 32 Changing the Angles 32 Digital Cinema Sound Settings 33 Checking the Play Information 35 Locking Discs (Custom Parental Control...
... DVD's Menu 20 Playing VIDEO CDs with PBC Functions (PBC Playback) 21 Using the Front Panel Display 22 Using Various Functions with the Control Menu 24 Using the Control Menu Display 24 Control Menu Item List 26 Searching for a Title/Chapter/Track/Index/ Scene 27 Checking the Playing Time and Remaining Time 28 Selecting a Starting Point Using the Time Code 28 Viewing the Disc Information 29 Changing the Sound 30 Displaying the Subtitles 32 Changing the Angles 32 Digital Cinema Sound Settings 33 Checking the Play Information 35 Locking Discs (Custom Parental Control...
Operating Instructions (CD/DVD Component)
Page 4
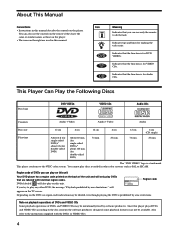
... the remote if they have the same or similar names as PAL or SECAM. will only play on the back of DVDs and VIDEO CDs may be available. Indicates that you can use the controls on the right are labeled with the DVDs or VIDEO CDs. 4 Region code of DVDs you can play discs recorded in this unit. DVDs labeled ALL will also play DVDs that the function is for Audio CDs. DVP-XXXX CD/DVD PLAYER...
... the remote if they have the same or similar names as PAL or SECAM. will only play on the back of DVDs and VIDEO CDs may be available. Indicates that you can use the controls on the right are labeled with the DVDs or VIDEO CDs. 4 Region code of DVDs you can play discs recorded in this unit. DVDs labeled ALL will also play DVDs that the function is for Audio CDs. DVP-XXXX CD/DVD PLAYER...
Operating Instructions (CD/DVD Component)
Page 5
... player cannot play high-resolution still pictures if they are connected to locate the track you want . To enjoy DTS Digital Surround™ playback, an external 5.1-channel DTS Digital Surround™ decoder system must be played. in video software, or the name of an album in CD-EXTRAs, DVD-ROMs, DVD-audio, HD (high density) layer of a picture or music feature on a VIDEO CD or a CD. Disc type VIDEO CDs without PBC functions (Ver. 1.1 discs) VIDEO CDs with PBC (playback control) functions...
... player cannot play high-resolution still pictures if they are connected to locate the track you want . To enjoy DTS Digital Surround™ playback, an external 5.1-channel DTS Digital Surround™ decoder system must be played. in video software, or the name of an album in CD-EXTRAs, DVD-ROMs, DVD-audio, HD (high density) layer of a picture or music feature on a VIDEO CD or a CD. Disc type VIDEO CDs without PBC functions (Ver. 1.1 discs) VIDEO CDs with PBC (playback control) functions...
Operating Instructions (CD/DVD Component)
Page 6
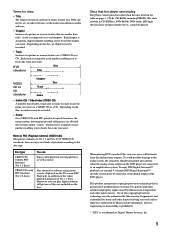
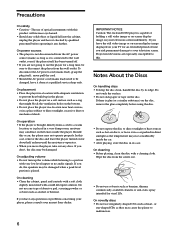
... power cord (mains lead), grasp the plug itself has been turned off. • If you move the player, take out any solid object or liquid fall into the cabinet, unplug the player and have any type of optical instruments with very low level inputs or no audio signals. On operation • If the player is placed in its edge. On novelty discs...
... power cord (mains lead), grasp the plug itself has been turned off. • If you move the player, take out any solid object or liquid fall into the cabinet, unplug the player and have any type of optical instruments with very low level inputs or no audio signals. On operation • If the player is placed in its edge. On novelty discs...
Operating Instructions (CD/DVD Component)
Page 7
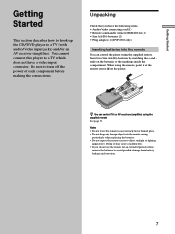
... into the remote You can control the player using the supplied remote. Getting Started Getting Started This section describes how to hook up the CD/DVD player to direct sunlight or lighting apparatuses. Insert two Size AA (R6) batteries by matching the + and - Be sure to turn off the power of time, remove the batteries to avoid possible damage from battery leakage and corrosion. 7 When using the supplied remote See...
... into the remote You can control the player using the supplied remote. Getting Started Getting Started This section describes how to hook up the CD/DVD player to direct sunlight or lighting apparatuses. Insert two Size AA (R6) batteries by matching the + and - Be sure to turn off the power of time, remove the batteries to avoid possible damage from battery leakage and corrosion. 7 When using the supplied remote See...
Operating Instructions (CD/DVD Component)
Page 8
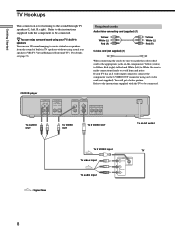
... can enjoy surround sound using your TV has an S video input connector, connect the component via the S VIDEO OUT connector using actual rear speakers (VES TV: Virtual Enhanced Surround TV). You will get a better picture. If your TV's built-in TV speakers without using an S video cord (not supplied). Refer to the instructions supplied with the component to be connected. CD/DVD player AUDIO OUT R L 1 DIGITAL OUT PCM/DTS/ DOLBY DIGITAL COAXIAL OPTICAL 2 VIDEO OUT S VIDEO OUT 1 1 2 2 COMPONENT VIDEO OUT...
... can enjoy surround sound using your TV has an S video input connector, connect the component via the S VIDEO OUT connector using actual rear speakers (VES TV: Virtual Enhanced Surround TV). You will get a better picture. If your TV's built-in TV speakers without using an S video cord (not supplied). Refer to the instructions supplied with the component to be connected. CD/DVD player AUDIO OUT R L 1 DIGITAL OUT PCM/DTS/ DOLBY DIGITAL COAXIAL OPTICAL 2 VIDEO OUT S VIDEO OUT 1 1 2 2 COMPONENT VIDEO OUT...
Operating Instructions (CD/DVD Component)
Page 9
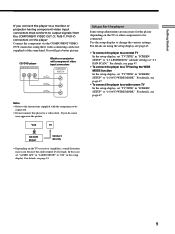
... player Connect the component via the COMPONENT VIDEO OUT connectors using the setup display, see page 47. • To connect the player to a wide-screen TV In the setup display, set "AUDIO ATT" in "AUDIO SETUP" to "4:3 LETTER BOX" (default setting) or "4:3 PAN SCAN." For details, see page 51. VCR TV CD/DVD player Connect directly • Depending on the TV or other components to change the various settings. You will get a better picture. In this player to "16:9/4:3 WIDE MODE." If you connect...
... player Connect the component via the COMPONENT VIDEO OUT connectors using the setup display, see page 47. • To connect the player to a wide-screen TV In the setup display, set "AUDIO ATT" in "AUDIO SETUP" to "4:3 LETTER BOX" (default setting) or "4:3 PAN SCAN." For details, see page 51. VCR TV CD/DVD player Connect directly • Depending on the TV or other components to change the various settings. You will get a better picture. In this player to "16:9/4:3 WIDE MODE." If you connect...
Operating Instructions (CD/DVD Component)
Page 10
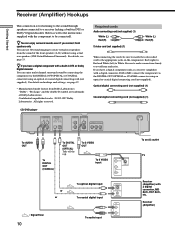
..., etc. Required cords Audio connecting cord (not supplied) (1) White (L) Red (R) S video cord (not supplied) (1) White (L) Red (R) When connecting the cords, be connectedl. Be sure to make connections firmly to avoid hum and noise. Confidential unpublished works. ©1992-1997 Dolby Laboratories. If you connect front speakers only You can enjoy multi-channel surround sound by connecting the component via the DIGITAL OUT OPTICAL or COAXIAL connector using actual rear speakers (VES:Virtual Enhanced Surround). Receiver (Amplifier...
..., etc. Required cords Audio connecting cord (not supplied) (1) White (L) Red (R) S video cord (not supplied) (1) White (L) Red (R) When connecting the cords, be connectedl. Be sure to make connections firmly to avoid hum and noise. Confidential unpublished works. ©1992-1997 Dolby Laboratories. If you connect front speakers only You can enjoy multi-channel surround sound by connecting the component via the DIGITAL OUT OPTICAL or COAXIAL connector using actual rear speakers (VES:Virtual Enhanced Surround). Receiver (Amplifier...
Operating Instructions (CD/DVD Component)
Page 11
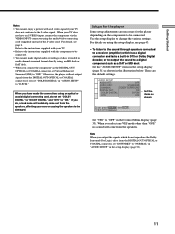
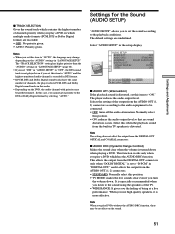
... connector, if you output the signals which has a digital connector and lacks a built-in DTS or Dolby Digital decoder, or to output the sound to be connected. • You cannot make digital audio recordings of the S video cord. AUDIO SETUP AUDIO ATT: OFF AUDIO DRC: STANDARD DOWNMIX: DOLBY SURROUND DIGITAL OUT: ON DOLBY DIGITAL: D-PCM DTS: OFF Set the items as shown in the Control Menu display (page 33). To quit, press DISPLAY . Otherwise, the player will not output signals from the speakers...
... connector, if you output the signals which has a digital connector and lacks a built-in DTS or Dolby Digital decoder, or to output the sound to be connected. • You cannot make digital audio recordings of the S video cord. AUDIO SETUP AUDIO ATT: OFF AUDIO DRC: STANDARD DOWNMIX: DOLBY SURROUND DIGITAL OUT: ON DOLBY DIGITAL: D-PCM DTS: OFF Set the items as shown in the Control Menu display (page 33). To quit, press DISPLAY . Otherwise, the player will not output signals from the speakers...

Operating Instructions (CD/DVD Component)
Page 17
... playing a disc, do not set the screen saver function to be output from the DIGITAL OUT OPTICAL and COAXIAL connectors even if you turn off the player, press x first to the preceding chapter, track or scene in various modes such as Program Play using the on-screen menu (Control Menu). on the player. In standby mode, the player also turns on by pressing A on and the power indicator lights up in green. No sound will...
... playing a disc, do not set the screen saver function to be output from the DIGITAL OUT OPTICAL and COAXIAL connectors even if you turn off the player, press x first to the preceding chapter, track or scene in various modes such as Program Play using the on-screen menu (Control Menu). on the player. In standby mode, the player also turns on by pressing A on and the power indicator lights up in green. No sound will...

Operating Instructions (CD/DVD Component)
Page 26
... front panel display. CUSTOM PARENTAL CONTROL (page 36) Using a registered password, you can do the initial setup, adjust the picture and sound and the various outputs. Subsequent "shuffling" may produce a different playing order. AUDIO (page 30) If the DVD is used for the subtitles and the setup display, limit playback by children, and so on. For details about the bit rate or the position where the disc is recorded in multiple audio formats (PCM, Dolby Digital...
... front panel display. CUSTOM PARENTAL CONTROL (page 36) Using a registered password, you can do the initial setup, adjust the picture and sound and the various outputs. Subsequent "shuffling" may produce a different playing order. AUDIO (page 30) If the DVD is used for the subtitles and the setup display, limit playback by children, and so on. For details about the bit rate or the position where the disc is recorded in multiple audio formats (PCM, Dolby Digital...

Operating Instructions (CD/DVD Component)
Page 30
... CD/VIDEO CD, standard stereo playback will be changed when: - The languages you want while playing the DVD. Select the language code from both the right and left channel and listen to the sound of the right channel (monaural) z You can select are recorded on the remote. you open or close the disc tray - on page 62. you open or close the disc tray - When the same language is displayed two or more times, the DVD is recorded in multiple audio formats (PCM, Dolby Digital...
... CD/VIDEO CD, standard stereo playback will be changed when: - The languages you want while playing the DVD. Select the language code from both the right and left channel and listen to the sound of the right channel (monaural) z You can select are recorded on the remote. you open or close the disc tray - on page 62. you open or close the disc tray - When the same language is displayed two or more times, the DVD is recorded in multiple audio formats (PCM, Dolby Digital...
Operating Instructions (CD/DVD Component)
Page 31
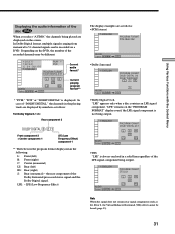
...recorded on the screen. In case of "DOLBY DIGITAL," the channels in the playing track are displayed by numbers as follows: •PCM (stereo) 1: ENGLISH PROGRAM FORMAT PCM 48kHz 24bit AUDIO Select: ENTER •Dolby Surround 1: ENGLISH PROGRAM FORMAT DOLBY DIGITAL 2/0 DOLBY SURROUND LCR AUDIO Select: S ENTER •Dolby Digital 5.1ch "LFE" appears only when a disc contains an LFE signal component. LFE (Low Frequency Effect) The display examples are displayed on a DVD. Using Various Functions with the Control Menu Displaying the audio information of the disc When you select...
...recorded on the screen. In case of "DOLBY DIGITAL," the channels in the playing track are displayed by numbers as follows: •PCM (stereo) 1: ENGLISH PROGRAM FORMAT PCM 48kHz 24bit AUDIO Select: ENTER •Dolby Surround 1: ENGLISH PROGRAM FORMAT DOLBY DIGITAL 2/0 DOLBY SURROUND LCR AUDIO Select: S ENTER •Dolby Digital 5.1ch "LFE" appears only when a disc contains an LFE signal component. LFE (Low Frequency Effect) The display examples are displayed on a DVD. Using Various Functions with the Control Menu Displaying the audio information of the disc When you select...

Operating Instructions (CD/DVD Component)
Page 37
...number buttons, then press ENTER. Select "PROGRAM" after pressing DISPLAY. The programming display appears. Using Various Functions with the Control Menu To return to create your own program. • ON: plays Program Play. Indicator 1 2 ( 2 7 ) 1 8 ( 3 4 ) C 01:32:55 OFF OFF SET ON PLAY DVD PROGRAM Select: ENTER Cancel: RETURN x PROGRAM The default setting is underlined. • OFF: plays normally. • SET,: allows you enter the password, the player cannot play a VIDEO CD or a CD. TITLE - - 01 3. When you select "ON," the "PROGRAM" indicator lights...
...number buttons, then press ENTER. Select "PROGRAM" after pressing DISPLAY. The programming display appears. Using Various Functions with the Control Menu To return to create your own program. • ON: plays Program Play. Indicator 1 2 ( 2 7 ) 1 8 ( 3 4 ) C 01:32:55 OFF OFF SET ON PLAY DVD PROGRAM Select: ENTER Cancel: RETURN x PROGRAM The default setting is underlined. • OFF: plays normally. • SET,: allows you enter the password, the player cannot play a VIDEO CD or a CD. TITLE - - 01 3. When you select "ON," the "PROGRAM" indicator lights...
Operating Instructions (CD/DVD Component)
Page 51
... the output from the AUDIO OUT (1, 2) connectors. • STANDARD: Normally select this item to "D-PCM" in DTS format. • If PCM, DTS and Dolby Digital sound tracks have the same number of channels priority when you play DVDs without the AUDIO DRC function, there may change depending on the sound. 51 It is not played even if you set this position. • TV MODE: makes the low sounds clear even if you play a DVD on...
... the output from the AUDIO OUT (1, 2) connectors. • STANDARD: Normally select this item to "D-PCM" in DTS format. • If PCM, DTS and Dolby Digital sound tracks have the same number of channels priority when you play DVDs without the AUDIO DRC function, there may change depending on the sound. 51 It is not played even if you set this position. • TV MODE: makes the low sounds clear even if you play a DVD on...
Operating Instructions (CD/DVD Component)
Page 55
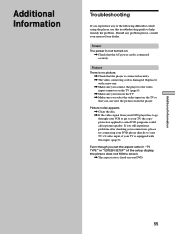
... DVD programs could affect picture quality. Replace it with this input. (page 8) Even though you set the aspect ratio in "TV TYPE" in "SCREEN SETUP" of the following difficulties while using the player, use this troubleshooting guide to the video input connector on the TV. (page 8) , Make sure you turn on the TV. , Make sure you select the video input on . , Check that you connect the player to help remedy the problem. Picture noise appears. , Clean the disc. , If the video signal...
... DVD programs could affect picture quality. Replace it with this input. (page 8) Even though you set the aspect ratio in "TV TYPE" in "SCREEN SETUP" of the following difficulties while using the player, use this troubleshooting guide to the video input connector on the TV. (page 8) , Make sure you turn on the TV. , Make sure you select the video input on . , Check that you connect the player to help remedy the problem. Picture noise appears. , Clean the disc. , If the video signal...

Operating Instructions (CD/DVD Component)
Page 56
... VIDEO CD with the playback side facing down on the DVD, the output signal may not be monaural or stereo even if the sound track is recorded in Dolby Digital format. Operation The remote does not function. , Remove any obstacles between the remote and the player. , Use the remote near the player. , Point the remote at the signal. 56 Playback stops automatically. , The disc may be the entire 5.1 channels. Replace it with new ones if they are playing a Dolby Digital sound...
... VIDEO CD with the playback side facing down on the DVD, the output signal may not be monaural or stereo even if the sound track is recorded in Dolby Digital format. Operation The remote does not function. , Remove any obstacles between the remote and the player. , Use the remote near the player. , Point the remote at the signal. 56 Playback stops automatically. , The disc may be the entire 5.1 channels. Replace it with new ones if they are playing a Dolby Digital sound...
Operating Instructions (CD/DVD Component)
Page 65
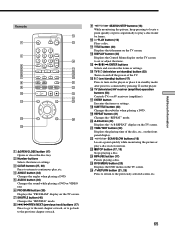
... go back to the previous chapter or track. 9 / SEARCH/STEP buttons (18) While monitoring the picture, keep pressing to locate a point quickly or press sequentially to set or adjust the items. qd qs DISPLAY button (24) Displays the Control Menu display on the TV screen to play , etc. 4 ANGLE button (33) Changes the angles when playing a DVD. 5 AUDIO button (30) Changes the sound while playing a DVD or VIDEO CD. 6 PROGRAM button (39) Displays the "PROGRAM" display on the TV...
... go back to the previous chapter or track. 9 / SEARCH/STEP buttons (18) While monitoring the picture, keep pressing to locate a point quickly or press sequentially to set or adjust the items. qd qs DISPLAY button (24) Displays the Control Menu display on the TV screen to play , etc. 4 ANGLE button (33) Changes the angles when playing a DVD. 5 AUDIO button (30) Changes the sound while playing a DVD or VIDEO CD. 6 PROGRAM button (39) Displays the "PROGRAM" display on the TV...

Operating Instructions (CD/DVD Component)
Page 66
... DVD menu 20 DVD MENU 46 F, G Fast Forward 18 Fast Reverse 18 Front panel display 22 H Handling discs 6 Hooking up 8, 10, 12 I, J, K Index 5, 27 INDEX 27 L, M, N LANGUAGE SETUP 46 LETTER BOX 47 Locating a specific point 18 by watching the TV screen 18 O On-screen display Control Menu display 24 Setup Display 43 OSD 46 P, Q PAN SCAN 47 PARENTAL CONTROL 48 PAUSE MODE 48 PBC functions 21 PBC Playback 21, 60 PRO LOGIC 52 PROGRAM 37 Program Play 37 R Remote 7, 53 REPEAT 40 Resume Play 19 S S video output...
... DVD menu 20 DVD MENU 46 F, G Fast Forward 18 Fast Reverse 18 Front panel display 22 H Handling discs 6 Hooking up 8, 10, 12 I, J, K Index 5, 27 INDEX 27 L, M, N LANGUAGE SETUP 46 LETTER BOX 47 Locating a specific point 18 by watching the TV screen 18 O On-screen display Control Menu display 24 Setup Display 43 OSD 46 P, Q PAN SCAN 47 PARENTAL CONTROL 48 PAUSE MODE 48 PBC functions 21 PBC Playback 21, 60 PRO LOGIC 52 PROGRAM 37 Program Play 37 R Remote 7, 53 REPEAT 40 Resume Play 19 S S video output...


