Limited Warranty (U.S. Only)
Page 1
... DURATION TO THE DURATION OF THIS WARRANTY. 3-062-244-14 ® CD/DVD Player LIMITED WARRANTY (U.S. In the event of incidental or consequential damages, or allow limitations on how to obtain warranty service for the applicable labor charge. If Sony elects to you may have other...factory-applied serial number has been altered or removed from the original date of purchase of the Sony product. This Limited Warranty gives you specific legal rights and you must deliver the product, freight prepaid, in either its option, (i) repair the product using new or refurbished parts or (ii) replace...
... DURATION TO THE DURATION OF THIS WARRANTY. 3-062-244-14 ® CD/DVD Player LIMITED WARRANTY (U.S. In the event of incidental or consequential damages, or allow limitations on how to obtain warranty service for the applicable labor charge. If Sony elects to you may have other...factory-applied serial number has been altered or removed from the original date of purchase of the Sony product. This Limited Warranty gives you specific legal rights and you must deliver the product, freight prepaid, in either its option, (i) repair the product using new or refurbished parts or (ii) replace...
Operating Instructions
Page 2
...CAUTION The use of the unit. Owner's Record The model and serial numbers are located at the rear of optical instruments with this CD/DVD player is connected. - DVP-NC615 Serial No CAUTION You are designed to correct the interference by turning the equipment off and on, the user is encouraged... energy and, if not installed and used in a residential installation. However, there is located on a circuit different from that any change or modifications not expressly approved in accordance with the limits for a Class B digital device, pursuant to Part 15 of electric shock to...
...CAUTION The use of the unit. Owner's Record The model and serial numbers are located at the rear of optical instruments with this CD/DVD player is connected. - DVP-NC615 Serial No CAUTION You are designed to correct the interference by turning the equipment off and on, the user is encouraged... energy and, if not installed and used in a residential installation. However, there is located on a circuit different from that any change or modifications not expressly approved in accordance with the limits for a Class B digital device, pursuant to Part 15 of electric shock to...

Operating Instructions
Page 5
... Hooking Up the Player 18 Step 1: Connecting the Video Cords 18 Step 2: Connecting the Audio Cords 20 Step 3: Connecting the Power Cord 25 Step 4: Quick Setup 25 Playing Discs 28 Playing Discs 28 Searching for a Particular Point on a Disc (Scan, Slow-motion Play, Search, Freeze Frame 31 Resuming Playback from the Point Where You Stopped the Disc (Resume Play/Multi-disc Resume 32 Using the DVD's Menu 33 Playing VIDEO CDs with PBC Functions (PBC Playback 33 Playing an MP3 Audio Track 34 Various Play Mode Functions (Program Play...
... Hooking Up the Player 18 Step 1: Connecting the Video Cords 18 Step 2: Connecting the Audio Cords 20 Step 3: Connecting the Power Cord 25 Step 4: Quick Setup 25 Playing Discs 28 Playing Discs 28 Searching for a Particular Point on a Disc (Scan, Slow-motion Play, Search, Freeze Frame 31 Resuming Playback from the Point Where You Stopped the Disc (Resume Play/Multi-disc Resume 32 Using the DVD's Menu 33 Playing VIDEO CDs with PBC Functions (PBC Playback 33 Playing an MP3 Audio Track 34 Various Play Mode Functions (Program Play...
Operating Instructions
Page 7
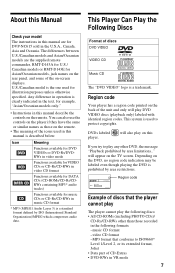
... operation is a trademark. About this Manual Check your model The instructions in this manual are the supplied remote commander, RMT-D143A for U.S./ Canadian models or RMT-D143E for Asian/Oceanian models, jack names on the rear panel, and some of the on-screen displays. This Player Can Play the Following Discs Format of CD-Extras • DVD-RWs in VR mode 7 The differences between U.S./Canadian models and Asian/Oceanian models...
... operation is a trademark. About this Manual Check your model The instructions in this manual are the supplied remote commander, RMT-D143A for U.S./ Canadian models or RMT-D143E for Asian/Oceanian models, jack names on the rear panel, and some of the on-screen displays. This Player Can Play the Following Discs Format of CD-Extras • DVD-RWs in VR mode 7 The differences between U.S./Canadian models and Asian/Oceanian models...
Operating Instructions
Page 8
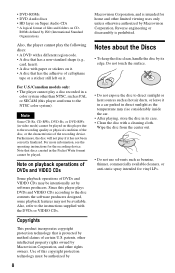
For U.S./Canadian models only: • The player cannot play a disc recorded in video mode) cannot be intentionally set by Macrovision Corporation. Note on playback operations of DVDs and VIDEO CDs Some playback operations of DVDs and VIDEO CDs may be played on this player conforms to the instructions supplied with a cleaning cloth. patents, other rights owners. ROMs defined by Macrovision Corporation, and other intellectual property rights owned by ISO (International Standard...
For U.S./Canadian models only: • The player cannot play a disc recorded in video mode) cannot be intentionally set by Macrovision Corporation. Note on playback operations of DVDs and VIDEO CDs Some playback operations of DVDs and VIDEO CDs may be played on this player conforms to the instructions supplied with a cleaning cloth. patents, other rights owners. ROMs defined by Macrovision Corporation, and other intellectual property rights owned by ISO (International Standard...
Operating Instructions
Page 13
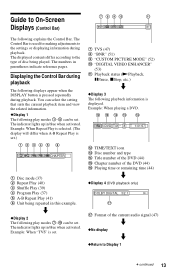
... when the DISPLAY button is displayed. Example: When "TVS" is used for making adjustments to the type of the current audio signal (47) m ◆No display m ◆Return to On-Screen Displays (Control Bar) 7 8 9 q; qs qd qf qg qh 3:DVD T41 - 8 T 1:01:57 L TIME/TEXT icon M Disc number and type N Title number of the DVD (44) O Chapter number of the DVD (44) P Playing time or remaining time (44) m ◆Display 4 (DVD playback only) DOLBY DIGITAL 3/2.1 qj Q Format of disc being repeated in parentheses...
... when the DISPLAY button is displayed. Example: When "TVS" is used for making adjustments to the type of the current audio signal (47) m ◆No display m ◆Return to On-Screen Displays (Control Bar) 7 8 9 q; qs qd qf qg qh 3:DVD T41 - 8 T 1:01:57 L TIME/TEXT icon M Disc number and type N Title number of the DVD (44) O Chapter number of the DVD (44) P Playing time or remaining time (44) m ◆Display 4 (DVD playback only) DOLBY DIGITAL 3/2.1 qj Q Format of disc being repeated in parentheses...

Operating Instructions
Page 16
... models only To change the color system The color system of the player's color system, press ?/1. When connecting to PAL. 16 To change the color system, hold ?/1 down for a few seconds while pressing X on the TV, change the aspect ratio, please refer to the TV's audio input jack. Step 3: TV Hookups Connect the supplied audio/video cord and the power cord in green. When "NTSC" does not appear, the color system is set...
... models only To change the color system The color system of the player's color system, press ?/1. When connecting to PAL. 16 To change the color system, hold ?/1 down for a few seconds while pressing X on the TV, change the aspect ratio, please refer to the TV's audio input jack. Step 3: TV Hookups Connect the supplied audio/video cord and the power cord in green. When "NTSC" does not appear, the color system is set...

Operating Instructions
Page 18
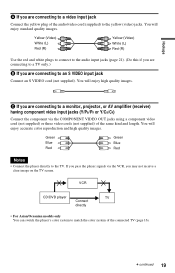
... the instructions supplied with the components to hook up and adjust the settings of the player. Step 1: Connecting the Video Cords Connect this player to your TV monitor, projector, or AV amplifier (receiver). (yellow) Audio/video cord Component video (supplied) cord (not supplied) (green) TV, projector or AV amplifier (receiver) (blue) (red) TV, projector or AV amplifier (receiver) (yellow) to the input jack on your TV monitor, projector, or AV amplifier (receiver) using a video cord. Select one...
... the instructions supplied with the components to hook up and adjust the settings of the player. Step 1: Connecting the Video Cords Connect this player to your TV monitor, projector, or AV amplifier (receiver). (yellow) Audio/video cord Component video (supplied) cord (not supplied) (green) TV, projector or AV amplifier (receiver) (blue) (red) TV, projector or AV amplifier (receiver) (yellow) to the input jack on your TV monitor, projector, or AV amplifier (receiver) using a video cord. Select one...
Operating Instructions
Page 19
... receive a clear image on the TV screen. c continued 19 C If you pass the player signals via the COMPONENT VIDEO OUT jacks using a component video cord (not supplied) or three video cords (not supplied) of the audio/video cord (supplied) to match the color system of the connected TV (page 16). If you are connecting to the TV. Green Blue Red Green Blue Red Notes • Connect the player directly to an S VIDEO input jack Connect an S VIDEO cord...
... receive a clear image on the TV screen. c continued 19 C If you pass the player signals via the COMPONENT VIDEO OUT jacks using a component video cord (not supplied) or three video cords (not supplied) of the audio/video cord (supplied) to match the color system of the connected TV (page 16). If you are connecting to the TV. Green Blue Red Green Blue Red Notes • Connect the player directly to an S VIDEO input jack Connect an S VIDEO cord...
Operating Instructions
Page 29
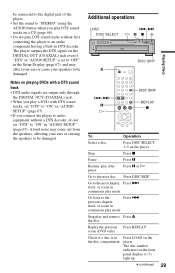
... player outputs the DTS signal via the DIGITAL OUT (COAXIAL) jack even if "DTS" in "AUDIO SETUP" is in the disc compartment Press LOAD on the player. The disc number indicators on the front panel display (1-5) light up. previous chapter, track, or scene in continuous play mode Stop play mode Go back to the Press . be connected to the digital jack of the player. • Set the sound to "STEREO" using the AUDIO button when you play DTS sound...
... player outputs the DTS signal via the DIGITAL OUT (COAXIAL) jack even if "DTS" in "AUDIO SETUP" is in the disc compartment Press LOAD on the player. The disc number indicators on the front panel display (1-5) light up. previous chapter, track, or scene in continuous play mode Stop play mode Go back to the Press . be connected to the digital jack of the player. • Set the sound to "STEREO" using the AUDIO button when you play DTS sound...

Operating Instructions
Page 30
... disc compartments appear. When the player is in standby mode, press O RETURN, ENTER, and then [/1 on the front panel display. The disc tray closes. The player turns on and "LOCKED" appears on the remote. The disc tray turns and another two disc compartments appear. 4 Replace the discs in the Control Bar (page 61), the disc tray remains locked. 30 To unlock the disc tray When the player is open the disc tray while playing a disc so that you missed. • Before loading the discs, a disc number...
... disc compartments appear. When the player is in standby mode, press O RETURN, ENTER, and then [/1 on the front panel display. The disc tray closes. The player turns on and "LOCKED" appears on the remote. The disc tray turns and another two disc compartments appear. 4 Replace the discs in the Control Bar (page 61), the disc tray remains locked. 30 To unlock the disc tray When the player is open the disc tray while playing a disc so that you missed. • Before loading the discs, a disc number...
Operating Instructions
Page 47
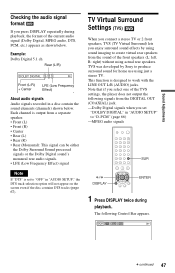
... using sound imaging to "D-PCM" (page 66) -MPEG audio signals 1 Press DISPLAY twice during playback, the format of the TVS settings, the player does not output the following Control Bar appears. TV Virtual Surround Settings (TVS) When you connect a stereo TV or 2 front speakers, TVS (TV Virtual Surround) lets you enjoy surround sound effects by Sony to produce surround sound for home use using actual rear speakers. Note that if you select one of the current audio signal (Dolby Digital...
... using sound imaging to "D-PCM" (page 66) -MPEG audio signals 1 Press DISPLAY twice during playback, the format of the TVS settings, the player does not output the following Control Bar appears. TV Virtual Surround Settings (TVS) When you connect a stereo TV or 2 front speakers, TVS (TV Virtual Surround) lets you enjoy surround sound effects by Sony to produce surround sound for home use using actual rear speakers. Note that if you select one of the current audio signal (Dolby Digital...
Operating Instructions
Page 58
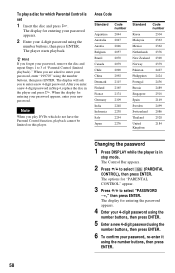
... a new 4-digit password in Step 4, replace the disc in stop mode. After you are asked to enter your password, remove the disc and repeat Steps 1 to enter a new 4-digit password. To play DVDs which Parental Control is in the player and press H. z Hint If you to 3 of "Parental Control (limited playback)." The display will ask you forget your password, enter "199703" using the number buttons, then press ENTER. The display for "PARENTAL CONTROL" appear. 3 Press X/x to select (PARENTAL CONTROL), then press...
... a new 4-digit password in Step 4, replace the disc in stop mode. After you are asked to enter your password, remove the disc and repeat Steps 1 to enter a new 4-digit password. To play DVDs which Parental Control is in the player and press H. z Hint If you to 3 of "Parental Control (limited playback)." The display will ask you forget your password, enter "199703" using the number buttons, then press ENTER. The display for "PARENTAL CONTROL" appear. 3 Press X/x to select (PARENTAL CONTROL), then press...

Operating Instructions
Page 64
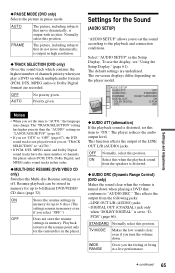
... MODE: TRACK SELECTION: MULTI-DISC RESUME: OFF OFF BRIGHT AUTO OFF ON ◆ AUTO POWER OFF (For U.S./Canadian models only) Switches the Auto Power Off setting on . ◆ DIMMER Adjusts the lighting of the front panel display. For Asian/Oceanian models, the Auto Power Off function is turned on or off the lighting. 64 JACKET PICTURE The jacket picture (still picture) appears, but only when the jacket picture is connected to set up playback related and other settings. Custom Settings (CUSTOM SETUP) Use...
... MODE: TRACK SELECTION: MULTI-DISC RESUME: OFF OFF BRIGHT AUTO OFF ON ◆ AUTO POWER OFF (For U.S./Canadian models only) Switches the Auto Power Off setting on . ◆ DIMMER Adjusts the lighting of the front panel display. For Asian/Oceanian models, the Auto Power Off function is turned on or off the lighting. 64 JACKET PICTURE The jacket picture (still picture) appears, but only when the jacket picture is connected to set up playback related and other settings. Custom Settings (CUSTOM SETUP) Use...
Operating Instructions
Page 65
... default settings are recorded. Playback restarts at a live performance. DIGITAL OUT (COAXIAL) jack only when "DOLBY DIGITAL" is output with no jitter. Settings and Adjustments c continued 65 Select "AUDIO SETUP" in pause mode. To use the display, see "Using the Setup Display" (page 61). The picture, including subjects that move dynamically, is distorted, set to 6 discs (The settings remain in high resolution. ◆ TRACK SELECTION (DVD only) Gives the sound track which contains the highest number of channels priority...
... default settings are recorded. Playback restarts at a live performance. DIGITAL OUT (COAXIAL) jack only when "DOLBY DIGITAL" is output with no jitter. Settings and Adjustments c continued 65 Select "AUDIO SETUP" in pause mode. To use the display, see "Using the Setup Display" (page 61). The picture, including subjects that move dynamically, is distorted, set to 6 discs (The settings remain in high resolution. ◆ TRACK SELECTION (DVD only) Gives the sound track which contains the highest number of channels priority...
Operating Instructions
Page 66
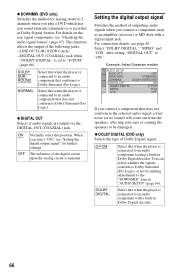
... has rear sound elements (channels) or is minimal. Setting the digital output signal Switches the method of the digital circuit upon the analog circuit is recorded in Dolby Digital format. For connection details, see "Checking the audio signal format" (page 47). DOLBY DIGITAL Select this when the player is connected to 2 channels when you connect a component such as an amplifier (receiver) or MD deck with a built-in Dolby Digital decoder. 66 ◆ DOWNMIX (DVD only) Switches the method for further settings. D-PCM Select...
... has rear sound elements (channels) or is minimal. Setting the digital output signal Switches the method of the digital circuit upon the analog circuit is recorded in Dolby Digital format. For connection details, see "Checking the audio signal format" (page 47). DOLBY DIGITAL Select this when the player is connected to 2 channels when you connect a component such as an amplifier (receiver) or MD deck with a built-in Dolby Digital decoder. 66 ◆ DOWNMIX (DVD only) Switches the method for further settings. D-PCM Select...
Operating Instructions
Page 68
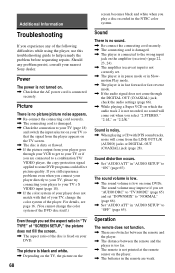
... Play mode. , The player is dirty or flawed. , If the picture output from the LINE OUT L/R (AUDIO) jacks or DIGITAL OUT (COAXIAL) jack (page 28). Sound is not correctly set "DOWNMIX" to "NORMAL" (page 66). , Set "AUDIO ATT" in the remote are connected to a combination TV/ VIDEO player, the copy-protection signal applied to help remedy the problem before requesting repairs. The sound volume may improve if you play a disc recorded in "TV TYPE" of "SCREEN SETUP," the picture...
... Play mode. , The player is dirty or flawed. , If the picture output from the LINE OUT L/R (AUDIO) jacks or DIGITAL OUT (COAXIAL) jack (page 28). Sound is not correctly set "DOWNMIX" to "NORMAL" (page 66). , Set "AUDIO ATT" in the remote are connected to a combination TV/ VIDEO player, the copy-protection signal applied to help remedy the problem before requesting repairs. The sound volume may improve if you play a disc recorded in "TV TYPE" of "SCREEN SETUP," the picture...
Operating Instructions
Page 69
... player cannot play certain discs (page 7). , The region code on the DVD being played. , The DVD prohibits the changing of the direct selection button on the remote (page 33). , Multilingual subtitles are not recorded on the disc, you want to operate abnormally, unplug the player. You cannot perform some of the language for the sound track. The MP3 audio track cannot be changed . , Try using the DVD's menu instead of the direct selection button on the remote (page 33). , Multi...
... player cannot play certain discs (page 7). , The region code on the DVD being played. , The DVD prohibits the changing of the direct selection button on the remote (page 33). , Multilingual subtitles are not recorded on the disc, you want to operate abnormally, unplug the player. You cannot perform some of the language for the sound track. The MP3 audio track cannot be changed . , Try using the DVD's menu instead of the direct selection button on the remote (page 33). , Multi...
Operating Instructions
Page 75
... 65 AUDIO DRC 65 AUDIO SETUP 65 Audio signal format 47 AUTO PLAY 64 AUTO POWER OFF 64 B BACKGROUND 64 Batteries 15 BNR 51 C CD 28 CHAPTER 43 Chapter 10, 71 Checking a disc loaded 29 Child Lock 30 COLOR SYSTEM 63 Connecting 18 Continuous play CD/VIDEO CD 28 DATA CD 34 DVD 28 Control Bar 13 CUSTOM 61 CUSTOM PARENTAL CONTROL 55 CUSTOM PICTURE MODE 52 CUSTOM SETUP 64 D DATA CD 7, 34 DIGITAL OUT 66 Digital output 66 DIGITAL VIDEO...
... 65 AUDIO DRC 65 AUDIO SETUP 65 Audio signal format 47 AUTO PLAY 64 AUTO POWER OFF 64 B BACKGROUND 64 Batteries 15 BNR 51 C CD 28 CHAPTER 43 Chapter 10, 71 Checking a disc loaded 29 Child Lock 30 COLOR SYSTEM 63 Connecting 18 Continuous play CD/VIDEO CD 28 DATA CD 34 DVD 28 Control Bar 13 CUSTOM 61 CUSTOM PARENTAL CONTROL 55 CUSTOM PICTURE MODE 52 CUSTOM SETUP 64 D DATA CD 7, 34 DIGITAL OUT 66 Digital output 66 DIGITAL VIDEO...

Marketing Specifications
Page 2
... you connect your folders. Scroll down the list using the remote or front panel cursor control to select the folder you want to show the files in part without written permission is a registered trademark of Digital Theater Systems, Inc. As soon as you 're done. Sony's new Precision Drive 2 system simplifies the process by screen. The green files screen pops up to display your DVD player, the Quick Setup screen...
... you connect your folders. Scroll down the list using the remote or front panel cursor control to select the folder you want to show the files in part without written permission is a registered trademark of Digital Theater Systems, Inc. As soon as you 're done. Sony's new Precision Drive 2 system simplifies the process by screen. The green files screen pops up to display your DVD player, the Quick Setup screen...

