Limited Warranty (CD/DVD Player)
Page 1
... customer instruction, installation, set up adjustments or signal reception problems. This warranty does not cover cosmetic damage or damage due to acts of God, accident, misuse, abuse, negligence, commercial use, or modification of, or to any Sony authorized service facility. This warranty does not cover Products sold AS IS or WITH ALL FAULTS, or consumables (such as follows: 1. This warranty gives you specific...
... customer instruction, installation, set up adjustments or signal reception problems. This warranty does not cover cosmetic damage or damage due to acts of God, accident, misuse, abuse, negligence, commercial use, or modification of, or to any Sony authorized service facility. This warranty does not cover Products sold AS IS or WITH ALL FAULTS, or consumables (such as follows: 1. This warranty gives you specific...

Operating Instructions
Page 2
... B digital device, pursuant to radio or television reception, which the receiver is no guarantee that any change or modifications not expressly approved in a residential installation. Before operating this player, please read this equipment does cause harmful interference to Part 15 of electric shock to provide reasonable protection against harmful interference in this manual could void your Sony dealer regarding this Sony CD/DVD Player...
... B digital device, pursuant to radio or television reception, which the receiver is no guarantee that any change or modifications not expressly approved in a residential installation. Before operating this player, please read this equipment does cause harmful interference to Part 15 of electric shock to provide reasonable protection against harmful interference in this manual could void your Sony dealer regarding this Sony CD/DVD Player...

Operating Instructions
Page 4
... the Point Where You Stopped the Disc (Multi-disc Resume 31 Using the DVD's Menu 32 Playing VIDEO CDs with PBC Functions (PBC Playback 33 Playing an MP3 Audio Track 34 Various Play Mode Functions (Program Play, Shuffle Play, Repeat Play, A-B Repeat Play 36 Searching for a Scene 42 Searching for a Title/Chapter/Track/Index/Scene (Search mode 42 Viewing Information About the Disc 43 Checking the Playing Time and Remaining Time 43 Sound Adjustments 45 Changing the Sound 45 TV Virtual Surround Settings (TVS 46 4
... the Point Where You Stopped the Disc (Multi-disc Resume 31 Using the DVD's Menu 32 Playing VIDEO CDs with PBC Functions (PBC Playback 33 Playing an MP3 Audio Track 34 Various Play Mode Functions (Program Play, Shuffle Play, Repeat Play, A-B Repeat Play 36 Searching for a Scene 42 Searching for a Title/Chapter/Track/Index/Scene (Search mode 42 Viewing Information About the Disc 43 Checking the Playing Time and Remaining Time 43 Sound Adjustments 45 Changing the Sound 45 TV Virtual Surround Settings (TVS 46 4

Operating Instructions
Page 6
... 2, or its extended format, Joliet • Data part of CD-Extras • DVD-RWs in VR mode • DVD-ROMs • DVD Audio discs • HD layer on Super Audio CDs * A logical format of files and folders on this player due to play any other than those on the remote. Also, the player cannot play the following discs: • A DVD with a different region code. • A disc recorded in a color system other than NTSC...
... 2, or its extended format, Joliet • Data part of CD-Extras • DVD-RWs in VR mode • DVD-ROMs • DVD Audio discs • HD layer on Super Audio CDs * A logical format of files and folders on this player due to play any other than those on the remote. Also, the player cannot play the following discs: • A DVD with a different region code. • A disc recorded in a color system other than NTSC...
Operating Instructions
Page 7
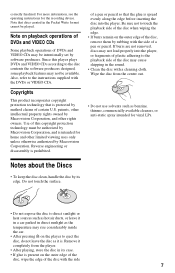
... VIDEO CDs Some playback operations of DVDs and VIDEO CDs may not be played. Be sure not to the playback side of this player plays DVDs and VIDEO CDs according to the instructions supplied with a cleaning cloth. Wipe the disc from the player. • After playing, store the disc in the sound. • Clean the disc with the DVDs or VIDEO CDs. Reverse engineering or disassembly is intended for the recording device...
... VIDEO CDs Some playback operations of DVDs and VIDEO CDs may not be played. Be sure not to the playback side of this player plays DVDs and VIDEO CDs according to the instructions supplied with a cleaning cloth. Wipe the disc from the player. • After playing, store the disc in the sound. • Clean the disc with the DVDs or VIDEO CDs. Reverse engineering or disassembly is intended for the recording device...
Operating Instructions
Page 11
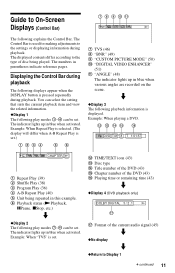
... displays appear when the DISPLAY button is used for making adjustments to the settings or displaying information during playback. The indicator lights up in blue when activated. The displayed contents differ according to the type of the current audio signal (45) m ◆No display m ◆Return to On-Screen Displays (Control Bar) 7 8 9 q; Example: When playing a DVD. F Playback status (NPlayback, XPause, xStop, etc.) m ◆Display 2 The following play modes 7~qa can be set . L TIME/TEXT icon (43) M Disc type N Title number...
... displays appear when the DISPLAY button is used for making adjustments to the settings or displaying information during playback. The indicator lights up in blue when activated. The displayed contents differ according to the type of the current audio signal (45) m ◆No display m ◆Return to On-Screen Displays (Control Bar) 7 8 9 q; Example: When playing a DVD. F Playback status (NPlayback, XPause, xStop, etc.) m ◆Display 2 The following play modes 7~qa can be set . L TIME/TEXT icon (43) M Disc type N Title number...
Operating Instructions
Page 16
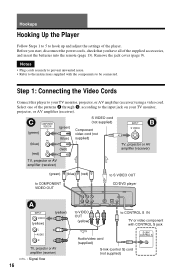
... or video component with CONTROL S jack TV, projector or AV amplifier (receiver) l : Signal flow 16 Audio/video cord (supplied) S-link (control S) cord (not supplied) Hookups Hooking Up the Player Follow Steps 1 to 5 to hook up and adjust the settings of the supplied accessories, and insert the batteries into the remote (page 13). Before you start, disconnect the power cords, check that you have all of the player. Step 1: Connecting the Video Cords Connect this player...
... or video component with CONTROL S jack TV, projector or AV amplifier (receiver) l : Signal flow 16 Audio/video cord (supplied) S-link (control S) cord (not supplied) Hookups Hooking Up the Player Follow Steps 1 to 5 to hook up and adjust the settings of the supplied accessories, and insert the batteries into the remote (page 13). Before you start, disconnect the power cords, check that you have all of the player. Step 1: Connecting the Video Cords Connect this player...

Operating Instructions
Page 17
... video component. Refer to the instructions supplied with the component to the TV. Connect the TV or video component via the COMPONENT VIDEO OUT jacks using the S-link (control S) cord (not supplied). VCR CD/DVD player TV Connect directly c continued 17 C If you are connecting to a monitor, projector, or AV amplifier (receiver) having component video input jacks (Y, PB, PR) Connect the component via the CONTROL S IN connectors using a component video cord (not supplied) or three video cords (not supplied) of the audio/video cord...
... video component. Refer to the instructions supplied with the component to the TV. Connect the TV or video component via the COMPONENT VIDEO OUT jacks using the S-link (control S) cord (not supplied). VCR CD/DVD player TV Connect directly c continued 17 C If you are connecting to a monitor, projector, or AV amplifier (receiver) having component video input jacks (Y, PB, PR) Connect the component via the CONTROL S IN connectors using a component video cord (not supplied) or three video cords (not supplied) of the audio/video cord...

Operating Instructions
Page 28
... the player. • Set the sound to an audio component having a built-in stop mode for more than 30 minutes. Depending on the TV or the amplifier (receiver). For DVDs, see page 33. 1 Turn on your TV so that the signal from the player. 28 To turn on your TV. 2 Press [/1. The player turns on and the power indicator lights up in the player. Notes on playing DTS sound tracks...
... the player. • Set the sound to an audio component having a built-in stop mode for more than 30 minutes. Depending on the TV or the amplifier (receiver). For DVDs, see page 33. 1 Turn on your TV so that the signal from the player. 28 To turn on your TV. 2 Press [/1. The player turns on and the power indicator lights up in the player. Notes on playing DTS sound tracks...
Operating Instructions
Page 32
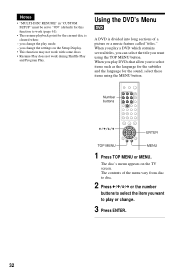
... divided into long sections of the menu vary from disc to disc. 2 Press C/X/x/c or the number buttons to select the item you play mode. - Number buttons 1 Press TOP MENU or MENU. When you want using the MENU button. Using the DVD's Menu A DVD is cleared when: - The contents of a picture or a music feature called "titles." Notes • "MULTI-DISC RESUME" in "CUSTOM SETUP" must be set to "ON" (default) for this function to work during Shuffle Play and Program Play.
... divided into long sections of the menu vary from disc to disc. 2 Press C/X/x/c or the number buttons to select the item you play mode. - Number buttons 1 Press TOP MENU or MENU. When you want using the MENU button. Using the DVD's Menu A DVD is cleared when: - The contents of a picture or a music feature called "titles." Notes • "MULTI-DISC RESUME" in "CUSTOM SETUP" must be set to "ON" (default) for this function to work during Shuffle Play and Program Play.
Operating Instructions
Page 35
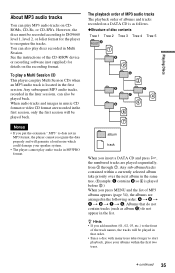
... CD-R/RW device or recording software (not supplied) for the player to start playback, place your speaker system. • The player cannot play audio tracks in MP3PRO format. However, the discs must be played in that do not contain tracks (such as album E) do not appear in the list. Playing Discs About MP3 audio tracks You can play Multi Session CDs when an MP3 audio track is...
... CD-R/RW device or recording software (not supplied) for the player to start playback, place your speaker system. • The player cannot play audio tracks in MP3PRO format. However, the discs must be played in that do not contain tracks (such as album E) do not appear in the list. Playing Discs About MP3 audio tracks You can play Multi Session CDs when an MP3 audio track is...
Operating Instructions
Page 45
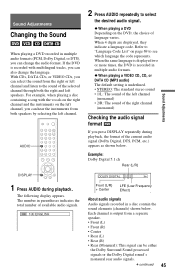
... DVD, the choice of language varies. For example, when playing a disc containing a song with multilingual tracks, you can be either the Dolby Surround Sound processed signals or the Dolby Digital sound's monaural rear audio signals. Example: Dolby Digital 5.1 ch Rear (L/R) Sound Adjustments DISPLAY 1 Press AUDIO during playback, the format of the current audio signal (Dolby Digital, DTS, PCM, etc.) appears as shown below . With CDs, DATA CDs, or VIDEO CDs, you can change the language. When 4 digits are displayed, they indicate a language code. Each channel is recorded...
... DVD, the choice of language varies. For example, when playing a disc containing a song with multilingual tracks, you can be either the Dolby Surround Sound processed signals or the Dolby Digital sound's monaural rear audio signals. Example: Dolby Digital 5.1 ch Rear (L/R) Sound Adjustments DISPLAY 1 Press AUDIO during playback, the format of the current audio signal (Dolby Digital, DTS, PCM, etc.) appears as shown below . With CDs, DATA CDs, or VIDEO CDs, you can change the language. When 4 digits are displayed, they indicate a language code. Each channel is recorded...
Operating Instructions
Page 55
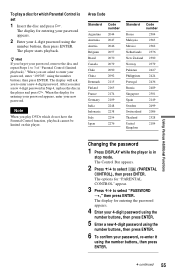
... you enter a new 4-digit password in Step 4, replace the disc in stop mode. The Control Bar appears. 2 Press X/x to enter a new 4-digit password. The player starts playback. After you forget your password, remove the disc and repeat Steps 1 to 3 of "Parental Control (limited playback)." When the display for entering your password appears, enter your password, re-enter it using the number buttons, then press ENTER. Note When you are asked to select "PASSWORD t," then press ENTER...
... you enter a new 4-digit password in Step 4, replace the disc in stop mode. The Control Bar appears. 2 Press X/x to enter a new 4-digit password. The player starts playback. After you forget your password, remove the disc and repeat Steps 1 to 3 of "Parental Control (limited playback)." When the display for entering your password appears, enter your password, re-enter it using the number buttons, then press ENTER. Note When you are asked to select "PASSWORD t," then press ENTER...
Operating Instructions
Page 60
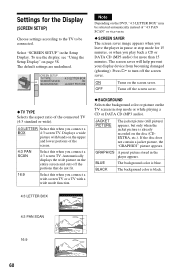
... 15 minutes. Select "SCREEN SETUP" in the player appears. To use the display, see "Using the Setup Display" on the screen saver. Displays a wide picture with a wide mode function. If the disc does not contain a jacket picture, the "GRAPHICS" picture appears. Note Depending on the TV screen in pause or stop mode for 15 minutes, or when you play back a CD or DATA CD (MP3 audio) for the Display (SCREEN SETUP) Choose settings according to the...
... 15 minutes. Select "SCREEN SETUP" in the player appears. To use the display, see "Using the Setup Display" on the screen saver. Displays a wide picture with a wide mode function. If the disc does not contain a jacket picture, the "GRAPHICS" picture appears. Note Depending on the TV screen in pause or stop mode for 15 minutes, or when you play back a CD or DATA CD (MP3 audio) for the Display (SCREEN SETUP) Choose settings according to the...
Operating Instructions
Page 61
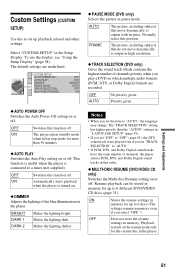
... useful when the player is output in high resolution. ◆ TRACK SELECTION (DVD only) Gives the sound track which multiple audio formats (PCM, DTS, or Dolby Digital format) are underlined. ON The player enters standby mode when left in stop mode for the current disc in the player. The picture, including subjects that move dynamically, is connected to a timer (not supplied). AUTO Priority given. The "TRACK SELECTION" setting has higher priority than 30 minutes. ◆ AUTO PLAY Switches the Auto Play setting...
... useful when the player is output in high resolution. ◆ TRACK SELECTION (DVD only) Gives the sound track which multiple audio formats (PCM, DTS, or Dolby Digital format) are underlined. ON The player enters standby mode when left in stop mode for the current disc in the player. The picture, including subjects that move dynamically, is connected to a timer (not supplied). AUTO Priority given. The "TRACK SELECTION" setting has higher priority than 30 minutes. ◆ AUTO PLAY Switches the Auto Play setting...
Operating Instructions
Page 62
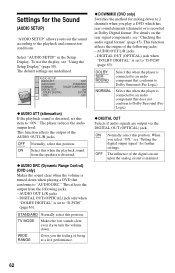
... recorded in the Setup Display. OFF The influence of being at a live performance. ◆ DOWNMIX (DVD only) Switches the method for further settings. For details on the rear signal components, see "Using the Setup Display" (page 58). STANDARD Normally select this when the player is set to the playback and connection conditions. To use the display, see "Checking the audio signal format" (page 45). This function affects the output of the AUDIO OUT L/R jacks. Select "AUDIO SETUP" in Dolby Digital format. AUDIO...
... recorded in the Setup Display. OFF The influence of being at a live performance. ◆ DOWNMIX (DVD only) Switches the method for further settings. For details on the rear signal components, see "Using the Setup Display" (page 58). STANDARD Normally select this when the player is set to the playback and connection conditions. To use the display, see "Checking the audio signal format" (page 45). This function affects the output of the AUDIO OUT L/R jacks. Select "AUDIO SETUP" in Dolby Digital format. AUDIO...

Operating Instructions
Page 64
...). Sound There is no disc inside. , The disc is dirty or flawed. , If the picture output from the AUDIO OUT L/R jacks or DIGITAL OUT (OPTICAL) jack (page 28). Sound distortion occurs. , Set "AUDIO ATT" in "TV TYPE" of "SCREEN SETUP," the picture does not fill the screen. , The aspect ratio of the following difficulties while using the player, use this troubleshooting guide to "TV MODE" (page 62). , Set "AUDIO ATT" in fast forward or fast reverse mode. , If the audio signal...
...). Sound There is no disc inside. , The disc is dirty or flawed. , If the picture output from the AUDIO OUT L/R jacks or DIGITAL OUT (OPTICAL) jack (page 28). Sound distortion occurs. , Set "AUDIO ATT" in "TV TYPE" of "SCREEN SETUP," the picture does not fill the screen. , The aspect ratio of the following difficulties while using the player, use this troubleshooting guide to "TV MODE" (page 62). , Set "AUDIO ATT" in fast forward or fast reverse mode. , If the audio signal...

Operating Instructions
Page 65
... play audio tracks in "CUSTOM SETUP" is not correctly displayed. , The player can only be changed . , Try using the DVD's menu instead of the angles. The title of the subtitles. Other characters are not recorded on the DVD being played. , The DVD prohibits changing of the MP3 audio album or track is set (page 30). The player starts playing the disc automatically. , The disc features an auto playback function. , "AUTO PLAY" in MP3PRO format. The language for the sound...
... play audio tracks in "CUSTOM SETUP" is not correctly displayed. , The player can only be changed . , Try using the DVD's menu instead of the angles. The title of the subtitles. Other characters are not recorded on the DVD being played. , The DVD prohibits changing of the MP3 audio album or track is set (page 30). The player starts playing the disc automatically. , The disc features an auto playback function. , "AUTO PLAY" in MP3PRO format. The language for the sound...
Operating Instructions
Page 70
... AUDIO DRC 62 AUDIO SETUP 62 Audio signal format 45 AUTO PLAY 61 AUTO POWER OFF 61 B BACKGROUND 60 Batteries 13 BNR 49 C CD 28 CHAPTER 42 Chapter 66 Child Lock 30 Connecting 16 Continuous play CD/VIDEO CD 28 DATA CD 34 DVD 28 Control Bar 11 CUSTOM 58 CUSTOM PARENTAL CONTROL 52 CUSTOM PICTURE MODE 50 CUSTOM SETUP 61 D DATA CD 6, 34 DIGITAL OUT 62 Digital output 63 DIGITAL VIDEO ENHANCER 51 DIMMER 61 Display Control Bar display 11 Setup Display...
... AUDIO DRC 62 AUDIO SETUP 62 Audio signal format 45 AUTO PLAY 61 AUTO POWER OFF 61 B BACKGROUND 60 Batteries 13 BNR 49 C CD 28 CHAPTER 42 Chapter 66 Child Lock 30 Connecting 16 Continuous play CD/VIDEO CD 28 DATA CD 34 DVD 28 Control Bar 11 CUSTOM 58 CUSTOM PARENTAL CONTROL 52 CUSTOM PICTURE MODE 50 CUSTOM SETUP 61 D DATA CD 6, 34 DIGITAL OUT 62 Digital output 63 DIGITAL VIDEO ENHANCER 51 DIMMER 61 Display Control Bar display 11 Setup Display...

Marketing Specifications
Page 2
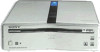
... display your DVD player, the Quick Setup screen appears ready to show the files in Operation): 9W Supplied Accessories • Instruction Manual • AV Cable • Compact Remote • AA Battery x 2 Weights & Measures • Dimensions (W x H x D): 7.7" x 2.4" x 10.4" • Weight: 4 lbs. • Box Dimensions (W x H x D): 15.7" x 6" x 14.3" • Box Weight: 6.8 lbs. *Weights & Measures are property of Sony. Select the file you connect your folders. You'll make the right configuration and connections in part...
... display your DVD player, the Quick Setup screen appears ready to show the files in Operation): 9W Supplied Accessories • Instruction Manual • AV Cable • Compact Remote • AA Battery x 2 Weights & Measures • Dimensions (W x H x D): 7.7" x 2.4" x 10.4" • Weight: 4 lbs. • Box Dimensions (W x H x D): 15.7" x 6" x 14.3" • Box Weight: 6.8 lbs. *Weights & Measures are property of Sony. Select the file you connect your folders. You'll make the right configuration and connections in part...


