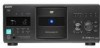
Operating Instructions
Page 4
... 15 Step 1: Unpacking 15 Step 2: Preparing the Remote 15 Step 3: Connecting the Video/HDMI Cords 17 Step 4: Connecting the Audio Cords 20 Step 5: Connecting the Power Cord 26 Step 6: Quick Setup 26 Playing Discs Inserting Discs 30 Playing Discs 32 Resuming Playback From the Point Where You ...Stopped the Disc (Multi-disc Resume 34 Using the DVD's Menu 35 Selecting "ORIGINAL" or "PLAY LIST" on a DVD-RW 36 Selecting a Playback Area for a ...
... 15 Step 1: Unpacking 15 Step 2: Preparing the Remote 15 Step 3: Connecting the Video/HDMI Cords 17 Step 4: Connecting the Audio Cords 20 Step 5: Connecting the Power Cord 26 Step 6: Quick Setup 26 Playing Discs Inserting Discs 30 Playing Discs 32 Resuming Playback From the Point Where You ...Stopped the Disc (Multi-disc Resume 34 Using the DVD's Menu 35 Selecting "ORIGINAL" or "PLAY LIST" on a DVD-RW 36 Selecting a Playback Area for a ...

Operating Instructions
Page 10
...) D LINE OUT AUDIO L/R 1/2 jacks (21) (22) (23) E LINE OUT VIDEO 1/2 jacks (17) F S VIDEO OUT 1/2 jacks (17) G COMPONENT VIDEO OUT (Y, PB/ CB, PR/CR) jacks (17) H HDMI OUT (high-definition multimedia interface out) jack (17) 10 z Hint You can adjust the lighting of the front panel display by setting "DIMMER" in "CUSTOM...
...) D LINE OUT AUDIO L/R 1/2 jacks (21) (22) (23) E LINE OUT VIDEO 1/2 jacks (17) F S VIDEO OUT 1/2 jacks (17) G COMPONENT VIDEO OUT (Y, PB/ CB, PR/CR) jacks (17) H HDMI OUT (high-definition multimedia interface out) jack (17) 10 z Hint You can adjust the lighting of the front panel display by setting "DIMMER" in "CUSTOM...
Operating Instructions
Page 18
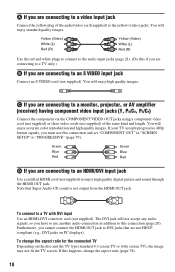
...You will enjoy standard quality images. To connect to a TV with DVI input Use an HDMI-DVI converter cord (not supplied). Yellow (Video) White (L) Red (R) Yellow (Video) White... PC displays). Note that are connecting to an HDMI/DVI input jack Use a certified HDMI cord (not supplied) to enjoy high quality digital picture and sound through the HDMI OUT jack. The DVI jack will enjoy high ...the same kind and length. A If you cannot connect the HDMI OUT jack to DVI jacks that Super Audio CD sound is not output from the HDMI OUT jack. You will not accept any audio signals, so...
...You will enjoy standard quality images. To connect to a TV with DVI input Use an HDMI-DVI converter cord (not supplied). Yellow (Video) White (L) Red (R) Yellow (Video) White... PC displays). Note that are connecting to an HDMI/DVI input jack Use a certified HDMI cord (not supplied) to enjoy high quality digital picture and sound through the HDMI OUT jack. The DVI jack will enjoy high ...the same kind and length. A If you cannot connect the HDMI OUT jack to DVI jacks that Super Audio CD sound is not output from the HDMI OUT jack. You will not accept any audio signals, so...
Operating Instructions
Page 25
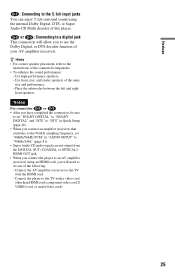
... TV with a video cord other than HDMI cord (component video cord, S VIDEO cord, or audio/video cord). 25 Notes For connection D-2 or D-3 • After you have completed the connection, be sure to set "DOLBY DIGITAL" to "DOLBY DIGITAL" and "DTS" to "DTS" in Quick Setup (page 26). • When you ...) that conforms to the 96 kHz sampling frequency, set "48kHz/96kHz PCM" in "AUDIO SETUP" to "96kHz/24bit" (page 81). • Super Audio CD audio signals are not output from the DIGITAL OUT (COAXIAL or OPTICAL)/ HDMI OUT jack. • When you connect the player to an AV amplifier (receiver) using...
... TV with a video cord other than HDMI cord (component video cord, S VIDEO cord, or audio/video cord). 25 Notes For connection D-2 or D-3 • After you have completed the connection, be sure to set "DOLBY DIGITAL" to "DOLBY DIGITAL" and "DTS" to "DTS" in Quick Setup (page 26). • When you ...) that conforms to the 96 kHz sampling frequency, set "48kHz/96kHz PCM" in "AUDIO SETUP" to "96kHz/24bit" (page 81). • Super Audio CD audio signals are not output from the DIGITAL OUT (COAXIAL or OPTICAL)/ HDMI OUT jack. • When you connect the player to an AV amplifier (receiver) using...
Operating Instructions
Page 27
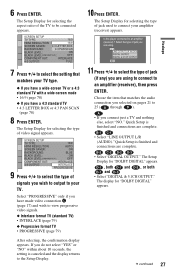
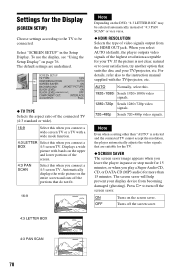
...: 4:3 LETTER BOX BACKGROUND: 4:3 PAN SCAN BLACK LEVEL: ON BLACK LEVEL(COMPONENT OUT): OFF COMPONENT OUT: INTERLACE 4:3 OUTPUT: FULL 7 Press X/x to 25 ( A through D ). SCREEN SETUP TV TYPE: 16:9 HDMI RESOLUTION: AUTO SCREEN SAVER: ON BACKGROUND: BLUE BLACK LEVEL: ON BLACK LEVEL(COMPONENT OUT): OFF COMPONENT OUT: INTERLACE 4:3 OUTPUT: INTERLACE PROGRESSIVE 9 Press X/x to an...
...: 4:3 LETTER BOX BACKGROUND: 4:3 PAN SCAN BLACK LEVEL: ON BLACK LEVEL(COMPONENT OUT): OFF COMPONENT OUT: INTERLACE 4:3 OUTPUT: FULL 7 Press X/x to 25 ( A through D ). SCREEN SETUP TV TYPE: 16:9 HDMI RESOLUTION: AUTO SCREEN SAVER: ON BACKGROUND: BLUE BLACK LEVEL: ON BLACK LEVEL(COMPONENT OUT): OFF COMPONENT OUT: INTERLACE 4:3 OUTPUT: INTERLACE PROGRESSIVE 9 Press X/x to an...
Operating Instructions
Page 28
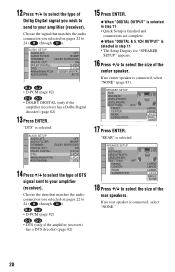
... "DIGITAL & 5.1CH OUTPUT" is connected, select "NONE" (page 83). AUDIO SETUP AUDIO ATT: OFF AUDIO FILTER: SHARP DOWNMIX: DOLBY SURROUND DIGITAL OUT: ON DOLBY DIGITAL: D-PCM DTS: D-PCM 48kHz/96kHz PCM: DOLBY DIGITAL AUDIO(HDMI): AUTO B-2 C-2 • D-PCM (page 82) D-2 D-3 • DOLBY DIGITAL...DOLBY SURROUND DIGITAL OUT: ON DOLBY DIGITAL: D-PCM DTS: D-PCM 48kHz/96kHz PCM: D-PCM AUDIO(HDMI): DTS 14 Press X/x to select the type of the rear speakers. SPEAKER SETUP SIZE: DISTANCE: LEVEL(FRONT): LEVEL(REAR): TEST TONE: OFF FRONT: CENTER: REAR: SUBWOOFER: ...
... "DIGITAL & 5.1CH OUTPUT" is connected, select "NONE" (page 83). AUDIO SETUP AUDIO ATT: OFF AUDIO FILTER: SHARP DOWNMIX: DOLBY SURROUND DIGITAL OUT: ON DOLBY DIGITAL: D-PCM DTS: D-PCM 48kHz/96kHz PCM: DOLBY DIGITAL AUDIO(HDMI): AUTO B-2 C-2 • D-PCM (page 82) D-2 D-3 • DOLBY DIGITAL...DOLBY SURROUND DIGITAL OUT: ON DOLBY DIGITAL: D-PCM DTS: D-PCM 48kHz/96kHz PCM: D-PCM AUDIO(HDMI): DTS 14 Press X/x to select the type of the rear speakers. SPEAKER SETUP SIZE: DISTANCE: LEVEL(FRONT): LEVEL(REAR): TEST TONE: OFF FRONT: CENTER: REAR: SUBWOOFER: ...
Operating Instructions
Page 32
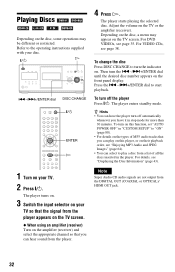
... TV. 2 Press [/1. To turn on this function, set "AUTO POWER OFF" in the player. For DVD VIDEOs, see "Displaying the Disc Information" (page 43). Playing Discs Depending on the amplifier (receiver) and ...supplied with your TV so that you can play a disc from the DIGITAL OUT (COAXIAL or OPTICAL)/ HDMI OUT jack. 32 The player starts playing the selected disc. Depending on the disc, a menu may be... Super Audio CD audio signals are not output from a list of all the discs inserted in "CUSTOM SETUP" to "ON" (page 80). • For details on the types of MP3 audio tracks that the...
... TV. 2 Press [/1. To turn on this function, set "AUTO POWER OFF" in the player. For DVD VIDEOs, see "Displaying the Disc Information" (page 43). Playing Discs Depending on the amplifier (receiver) and ...supplied with your TV so that you can play a disc from the DIGITAL OUT (COAXIAL or OPTICAL)/ HDMI OUT jack. 32 The player starts playing the selected disc. Depending on the disc, a menu may be... Super Audio CD audio signals are not output from a list of all the discs inserted in "CUSTOM SETUP" to "ON" (page 80). • For details on the types of MP3 audio tracks that the...

Operating Instructions
Page 76
... the selected item appear. The options for "SETUP" appear. 4 ALL ( 2 4 ) DVD VIDEO : : QUICK CUSTOM RESET QUICK 3 Press X/x to select an item, then press ENTER. The Setup item is in the disc take priority over the Setup Display settings and not all of the functions... stored in stop mode. For details on each Setup Display item, see pages 77 to select the setup item from the displayed list: "LANGUAGE SETUP," "SCREEN SETUP," "CUSTOM SETUP," "AUDIO SETUP" or "SPEAKER SETUP." Example: "TV TYPE" SCREEN SETUP TV TYPE: 16:9 HDMI RESOLUTION: 16:9 SCREEN SAVER: 4:3 LETTER BOX ...
... the selected item appear. The options for "SETUP" appear. 4 ALL ( 2 4 ) DVD VIDEO : : QUICK CUSTOM RESET QUICK 3 Press X/x to select an item, then press ENTER. The Setup item is in the disc take priority over the Setup Display settings and not all of the functions... stored in stop mode. For details on each Setup Display item, see pages 77 to select the setup item from the displayed list: "LANGUAGE SETUP," "SCREEN SETUP," "CUSTOM SETUP," "AUDIO SETUP" or "SPEAKER SETUP." Example: "TV TYPE" SCREEN SETUP TV TYPE: 16:9 HDMI RESOLUTION: 16:9 SCREEN SAVER: 4:3 LETTER BOX ...
Operating Instructions
Page 77
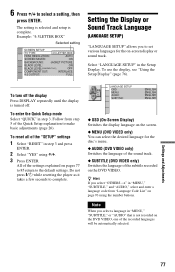
...HDMI RESOLUTION: AUTO SCREEN SAVER: ON BACKGROUND: JACKET PICTURE BLACK LEVEL: ON BLACK LEVEL(COMPONENT OUT): OFF COMPONENT OUT: INTERLACE 4:3 OUTPUT: FULL Setting the Display or Sound Track Language (LANGUAGE SETUP) "LANGUAGE SETUP" allows you select a language in "MENU," "SUBTITLE," or "AUDIO" that is not recorded on the DVD...of the sound track. ◆ SUBTITLE (DVD VIDEO only) Switches the language of the "SETUP" settings 1 Select "RESET" in the Setup Display. Follow from "Language Code List" on the DVD VIDEO. To enter the Quick Setup mode Select "QUICK" in "MENU," "...
...HDMI RESOLUTION: AUTO SCREEN SAVER: ON BACKGROUND: JACKET PICTURE BLACK LEVEL: ON BLACK LEVEL(COMPONENT OUT): OFF COMPONENT OUT: INTERLACE 4:3 OUTPUT: FULL Setting the Display or Sound Track Language (LANGUAGE SETUP) "LANGUAGE SETUP" allows you select a language in "MENU," "SUBTITLE," or "AUDIO" that is not recorded on the DVD...of the sound track. ◆ SUBTITLE (DVD VIDEO only) Switches the language of the "SETUP" settings 1 Select "RESET" in the Setup Display. Follow from "Language Code List" on the DVD VIDEO. To enter the Quick Setup mode Select "QUICK" in "MENU," "...
Operating Instructions
Page 78
... the player outputs video signals of video signals output from becoming damaged (ghosting). Turns off the portions that are underlined. SCREEN SETUP TV TYPE: 16:9 HDMI RESOLUTION: AUTO SCREEN SAVER: ON BACKGROUND: JACKET PICTURE BLACK LEVEL: ON BLACK LEVEL(COMPONENT OUT): OFF COMPONENT OUT: INTERLACE ... the video signals that do not fit. 16:9 Note Depending on page 76. To use the display, see "Using the Setup Display" on the DVD, "4:3 LETTER BOX" may be connected. Automatically displays the wide picture on the entire screen and cuts off the screen saver...
... the player outputs video signals of video signals output from becoming damaged (ghosting). Turns off the portions that are underlined. SCREEN SETUP TV TYPE: 16:9 HDMI RESOLUTION: AUTO SCREEN SAVER: ON BACKGROUND: JACKET PICTURE BLACK LEVEL: ON BLACK LEVEL(COMPONENT OUT): OFF COMPONENT OUT: INTERLACE ... the video signals that do not fit. 16:9 Note Depending on page 76. To use the display, see "Using the Setup Display" on the DVD, "4:3 LETTER BOX" may be connected. Automatically displays the wide picture on the entire screen and cuts off the screen saver...
Operating Instructions
Page 79
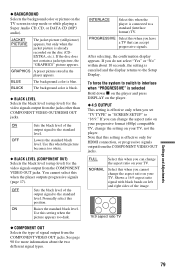
..., or progressive signals output from the jacks other than COMPONENT VIDEO OUT/HDMI OUT jacks. JACKET PICTURE The jacket picture (still picture) appears, but only when the jacket picture is connected to the Setup Display. INTERLACE Select this when the player is already recorded on the disc (... to the standard level. NORMAL Select this when the picture becomes too white. ◆ BLACK LEVEL (COMPONENT OUT) Selects the black level (setup level) for the video signals output from the COMPONENT VIDEO OUT jacks. If the disc does not contain a jacket picture, the "GRAPHICS" picture...
..., or progressive signals output from the jacks other than COMPONENT VIDEO OUT/HDMI OUT jacks. JACKET PICTURE The jacket picture (still picture) appears, but only when the jacket picture is connected to the Setup Display. INTERLACE Select this when the player is already recorded on the disc (... to the standard level. NORMAL Select this when the picture becomes too white. ◆ BLACK LEVEL (COMPONENT OUT) Selects the black level (setup level) for the video signals output from the COMPONENT VIDEO OUT jacks. If the disc does not contain a jacket picture, the "GRAPHICS" picture...
Operating Instructions
Page 81
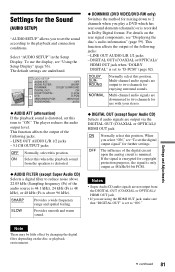
... AUDIO SETUP AUDIO ATT: OFF AUDIO FILTER: SHARP DOWNMIX: DOLBY SURROUND DIGITAL OUT: ON DOLBY DIGITAL: D-PCM DTS: D-PCM 48kHz/96kHz PCM: 48kHz/16bit AUDIO(HDMI): AUTO ◆ AUDIO ATT (attenuation) If the playback sound is distorted, set this item to 2 channels when you play a DVD which has...Audio CD) Selects if audio signals are output via the DIGITAL OUT (COAXIAL or OPTICAL)/ HDMI OUT jack. The player reduces the audio output level. Provides smooth and warm sound. ◆ DOWNMIX (DVD VIDEO/DVD-RW only) Switches the method for mixing down to "ON." LINE OUT AUDIO L/R 1/2 ...
... AUDIO SETUP AUDIO ATT: OFF AUDIO FILTER: SHARP DOWNMIX: DOLBY SURROUND DIGITAL OUT: ON DOLBY DIGITAL: D-PCM DTS: D-PCM 48kHz/96kHz PCM: 48kHz/16bit AUDIO(HDMI): AUTO ◆ AUDIO ATT (attenuation) If the playback sound is distorted, set this item to 2 channels when you play a DVD which has...Audio CD) Selects if audio signals are output via the DIGITAL OUT (COAXIAL or OPTICAL)/ HDMI OUT jack. The player reduces the audio output level. Provides smooth and warm sound. ◆ DOWNMIX (DVD VIDEO/DVD-RW only) Switches the method for mixing down to "ON." LINE OUT AUDIO L/R 1/2 ...
Operating Instructions
Page 82
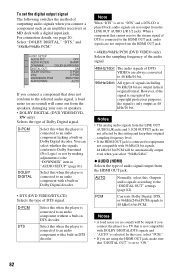
... come out from the speakers, damaging your ears or speakers. • DOLBY DIGITAL (DVD VIDEO/DVD- In this when the player is selected. Select "DOLBY DIGITAL," "DTS," and "48kHz/96kHz PCM." AUDIO SETUP AUDIO ATT: OFF AUDIO FILTER: SHARP DOWNMIX: DOLBY SURROUND DIGITAL OUT: ON DOLBY DIGITAL...: D-PCM DTS: D-PCM 48kHz/96kHz PCM: 48kHz/16bit AUDIO(HDMI): AUTO If you connect ...
... come out from the speakers, damaging your ears or speakers. • DOLBY DIGITAL (DVD VIDEO/DVD- In this when the player is selected. Select "DOLBY DIGITAL," "DTS," and "48kHz/96kHz PCM." AUDIO SETUP AUDIO ATT: OFF AUDIO FILTER: SHARP DOWNMIX: DOLBY SURROUND DIGITAL OUT: ON DOLBY DIGITAL...: D-PCM DTS: D-PCM 48kHz/96kHz PCM: 48kHz/16bit AUDIO(HDMI): AUTO If you connect ...
Operating Instructions
Page 85
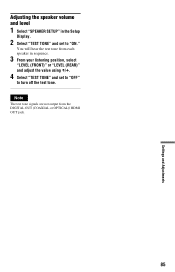
You will hear the test tone from the DIGITAL OUT (COAXIAL or OPTICAL)/ HDMI OUT jack. 85 Settings and Adjustments Note The test tone signals are not output from each speaker in the Setup Display. 2 Select "TEST TONE" and set to "OFF" to "ON." Adjusting the speaker volume and level 1 Select "SPEAKER SETUP" in sequence. 3 From your listening position, select "LEVEL (FRONT)" or "LEVEL (REAR)" and adjust the value using X/x. 4 Select "TEST TONE" and set to turn off the test tone.
You will hear the test tone from the DIGITAL OUT (COAXIAL or OPTICAL)/ HDMI OUT jack. 85 Settings and Adjustments Note The test tone signals are not output from each speaker in the Setup Display. 2 Select "TEST TONE" and set to "OFF" to "ON." Adjusting the speaker volume and level 1 Select "SPEAKER SETUP" in sequence. 3 From your listening position, select "LEVEL (FRONT)" or "LEVEL (REAR)" and adjust the value using X/x. 4 Select "TEST TONE" and set to turn off the test tone.
Operating Instructions
Page 86
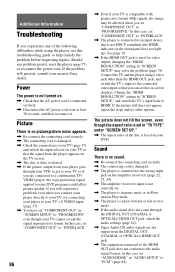
If the problem still persists, consult your nearest Sony dealer. If the picture still does not appear, repeat the steps and try connecting your... options. The picture does not fill the screen, even though the aspect ratio is set "COMPONENT OUT" in "SCREEN SETUP" to the connected video input so that you can see the on . , Check that the AC power cord is ... repairs. Connect the TV and the player using the player, use this troubleshooting guide to some DVD programs could affect picture quality. Change the "HDMI RESOLUTION" setting in this case, set . , The player is in pause mode or in ...
If the problem still persists, consult your nearest Sony dealer. If the picture still does not appear, repeat the steps and try connecting your... options. The picture does not fill the screen, even though the aspect ratio is set "COMPONENT OUT" in "SCREEN SETUP" to the connected video input so that you can see the on . , Check that the AC power cord is ... repairs. Connect the TV and the player using the player, use this troubleshooting guide to some DVD programs could affect picture quality. Change the "HDMI RESOLUTION" setting in this case, set . , The player is in pause mode or in ...
Operating Instructions
Page 87
.... , The player cannot play certain discs (page 6). , The region code on the DVD does not match the player. The sound only comes from the center speaker. , Depending on the disc, the sound may come from the HDMI OUT jack , The HDMI OUT jack is not recorded on the player (page 16). , Moisture has... MP3 even though it has the extension ".MP3." , The data is not correctly finalized (page 7). Operation The remote does not function. , The batteries in "AUDIO SETUP" to "AUDIO (MP3)" (page 68). No sound is output from the center speaker only. The volume is set to "ON" (page 81).
.... , The player cannot play certain discs (page 6). , The region code on the DVD does not match the player. The sound only comes from the center speaker. , Depending on the disc, the sound may come from the HDMI OUT jack , The HDMI OUT jack is not recorded on the player (page 16). , Moisture has... MP3 even though it has the extension ".MP3." , The data is not correctly finalized (page 7). Operation The remote does not function. , The batteries in "AUDIO SETUP" to "AUDIO (MP3)" (page 68). No sound is output from the center speaker only. The volume is set to "ON" (page 81).
Operating Instructions
Page 94
... 48 Front panel display 9, 57 G Genre 50 H handling discs 2 HDMI AUDIO (HDMI) 82 HDMI 90 HDMI RESOLUTION 78 Hooking up 17 Hooking up 15 I INDEX 13, 53 Index 90 INTERLACE 79, 90 INTERVAL 69 J JACKET PICTURE 45 JPEG 64 K Keyboard 49 L LANGUAGE SETUP 77 LEVEL 84 Loading Discs 43 Locating a point on a disc 52... M MENU 77 Menu DVD's menu 35 Top menu 35 MODE (MP3, ...
... 48 Front panel display 9, 57 G Genre 50 H handling discs 2 HDMI AUDIO (HDMI) 82 HDMI 90 HDMI RESOLUTION 78 Hooking up 17 Hooking up 15 I INDEX 13, 53 Index 90 INTERLACE 79, 90 INTERVAL 69 J JACKET PICTURE 45 JPEG 64 K Keyboard 49 L LANGUAGE SETUP 77 LEVEL 84 Loading Discs 43 Locating a point on a disc 52... M MENU 77 Menu DVD's menu 35 Top menu 35 MODE (MP3, ...

