
Operating Instructions
Page 1
3-064-299-11(1) CD/DVD Player Operating Instructions DVP-CX860 © 2000 Sony Corporation
3-064-299-11(1) CD/DVD Player Operating Instructions DVP-CX860 © 2000 Sony Corporation

Operating Instructions
Page 2
...this product will not occur in a particular installation. Before operating the unit, please read this Sony CD/ DVD Player. As the laser beam used in accordance with this CD/DVD player is encouraged to try to correct the interference by turning the equipment off and on, the ... the enclosure. This label is no guarantee that any change or modifications not expressly approved in the literature accompanying the appliance. DVP-CX860 Serial No CAUTION You are designed to radio communications. Consult the dealer or an experienced radio/TV technician for future reference. ...
...this product will not occur in a particular installation. Before operating the unit, please read this Sony CD/ DVD Player. As the laser beam used in accordance with this CD/DVD player is encouraged to try to correct the interference by turning the equipment off and on, the ... the enclosure. This label is no guarantee that any change or modifications not expressly approved in the literature accompanying the appliance. DVP-CX860 Serial No CAUTION You are designed to radio communications. Consult the dealer or an experienced radio/TV technician for future reference. ...

Operating Instructions
Page 3
... (Disc Explorer - File Mode) 30 Labeling Discs and Folders (Disc Explorer - Edit Mode) 32 Sorting Discs (Disc Explorer - TABLE OF CONTENTS About This Manual 4 This Player Can Play the Following Discs 4 Precautions 6 Notes About the Discs 6 Getting Started 7 Unpacking 7 TV Hookups 8 Receiver (Amplifier) Hookups 10 5.1 Channel Surround Hookups 12 Selecting the...
... (Disc Explorer - File Mode) 30 Labeling Discs and Folders (Disc Explorer - Edit Mode) 32 Sorting Discs (Disc Explorer - TABLE OF CONTENTS About This Manual 4 This Player Can Play the Following Discs 4 Precautions 6 Notes About the Discs 6 Getting Started 7 Unpacking 7 TV Hookups 8 Receiver (Amplifier) Hookups 10 5.1 Channel Surround Hookups 12 Selecting the...

Operating Instructions
Page 4
... by area restrictions. The "DVD VIDEO" logo is for VIDEO CDs. SONY CORPORATION MADE IN JAPAN 0-000-000-00 Region code If you try to do the task. X MODEL NO. Depending on this player plays DVDs and VIDEO CDs according to the disc contents the software producers designed... to the NTSC color system. Region code of DVDs you can play discs recorded in this unit Your DVD player has a region code printed on the player. DVP-XXXX CD/DVD PLAYER AC 00V 00Hz 00W NO. About This Manual Conventions • Instructions in other DVD, the message "Playback prohibited...
... by area restrictions. The "DVD VIDEO" logo is for VIDEO CDs. SONY CORPORATION MADE IN JAPAN 0-000-000-00 Region code If you try to do the task. X MODEL NO. Depending on this player plays DVDs and VIDEO CDs according to the disc contents the software producers designed... to the NTSC color system. Region code of DVDs you can play discs recorded in this unit Your DVD player has a region code printed on the player. DVP-XXXX CD/DVD PLAYER AC 00V 00Hz 00W NO. About This Manual Conventions • Instructions in other DVD, the message "Playback prohibited...

Operating Instructions
Page 5
...Macrovision Corporation and other rights owners. Play interactive software using menu screens displayed on PBC (Playback Control) (VIDEO CDs) This player conforms to an amplification system. Moreover, you to the disc type. When playing DTS*-encoded CDs, excessive noise will be authorized... 5 Terms for home and other limited viewing uses only unless otherwise authorized by Macrovision Corporation, and is composed of the DVD player. Reverse engineering or disassembly is assigned a track number enabling you can play discs other intellectual property rights owned by method claims ...
...Macrovision Corporation and other rights owners. Play interactive software using menu screens displayed on PBC (Playback Control) (VIDEO CDs) This player conforms to an amplification system. Moreover, you to the disc type. When playing DTS*-encoded CDs, excessive noise will be authorized... 5 Terms for home and other limited viewing uses only unless otherwise authorized by Macrovision Corporation, and is composed of the DVD player. Reverse engineering or disassembly is assigned a track number enabling you can play discs other intellectual property rights owned by method claims ...

Operating Instructions
Page 6
... for an extended period of holding a still video image or on-screen display image on your nearest Sony dealer. Do not use the player for vinyl LPs. If you move the player, take out any type of optical instruments with very low level inputs or no audio signals. On ...as benzine, thinner, commercially available cleaners or anti-static spray intended for a long time, be changed, have any questions or problems concerning your player, please consult your television screen indefinitely. Wipe the disc from the center out. • Do not use irregularly shaped CDs such as a ...
... for an extended period of holding a still video image or on-screen display image on your nearest Sony dealer. Do not use the player for vinyl LPs. If you move the player, take out any type of optical instruments with very low level inputs or no audio signals. On ...as benzine, thinner, commercially available cleaners or anti-static spray intended for a long time, be changed, have any questions or problems concerning your player, please consult your television screen indefinitely. Wipe the disc from the center out. • Do not use irregularly shaped CDs such as a ...

Operating Instructions
Page 7
... their original positions. 1 Remove all the discs from battery leakage and corrosion. on the batteries to direct sunlight or lighting apparatuses. You cannot connect this player to a TV which does not have the following items: • Audio/video/S-link (control S) connecting cord (1) • S video cord (1) • ... on the remote, followed by matching the + and - Getting Started Getting Started This section describes how to hook up the CD/DVD player to close the front cover. Unpacking Check that "NO DISC" appears on the front panel display. 3 Wait for an extended period of...
... their original positions. 1 Remove all the discs from battery leakage and corrosion. on the batteries to direct sunlight or lighting apparatuses. You cannot connect this player to a TV which does not have the following items: • Audio/video/S-link (control S) connecting cord (1) • S video cord (1) • ... on the remote, followed by matching the + and - Getting Started Getting Started This section describes how to hook up the CD/DVD player to close the front cover. Unpacking Check that "NO DISC" appears on the front panel display. 3 Wait for an extended period of...

Operating Instructions
Page 8
...get a better picture. z You can enjoy surround sound using your TV's built-in speakers You can control the CD/DVD player from the sound of built-in TV speakers without using the supplied S video cord. Required cords Audio/video/S-link connecting cord... (supplied) (1) Yellow White (L) Red (R) S-LINK (CONTROL S) Yellow White (L) Red (R) S-LINK (CONTROL S) S video cord (supplied) (1) CD/DVD player L L R R 2 1 AUDIO OUT AUDIO IN COAXIAL OPTICAL PCM/DTS/ DOLBY DIGITAL DIGITAL OUT VIDEO S VIDEO OUTPUT OUTPUT 1 1 2 2 COMPONENT VIDEO OUT MEGA CONTROL S-...
...get a better picture. z You can enjoy surround sound using your TV's built-in speakers You can control the CD/DVD player from the sound of built-in TV speakers without using the supplied S video cord. Required cords Audio/video/S-link connecting cord... (supplied) (1) Yellow White (L) Red (R) S-LINK (CONTROL S) Yellow White (L) Red (R) S-LINK (CONTROL S) S video cord (supplied) (1) CD/DVD player L L R R 2 1 AUDIO OUT AUDIO IN COAXIAL OPTICAL PCM/DTS/ DOLBY DIGITAL DIGITAL OUT VIDEO S VIDEO OUTPUT OUTPUT 1 1 2 2 COMPONENT VIDEO OUT MEGA CONTROL S-...

Operating Instructions
Page 9
...set "TV TYPE" in "SCREEN SETUP" to "4:3 LETTER BOX" (default setting) or "4:3 PAN SCAN." For details, see page 64. • To connect the player to a wide-screen TV In the setup display, set "TV TYPE" in "SCREEN SETUP" to "16:9/4:3 WIDE MODE." For details, see page 70. VCR TV...settings. Use the setup display to "ON" in "SCREEN SETUP" to "16:9/4:3 WIDE MODE." For details, see page 64. • To connect the player to a TV having component video input connectors that conform to output signals from the TV. You will get a better picture. Getting Started If you do...
...set "TV TYPE" in "SCREEN SETUP" to "4:3 LETTER BOX" (default setting) or "4:3 PAN SCAN." For details, see page 64. • To connect the player to a wide-screen TV In the setup display, set "TV TYPE" in "SCREEN SETUP" to "16:9/4:3 WIDE MODE." For details, see page 70. VCR TV...settings. Use the setup display to "ON" in "SCREEN SETUP" to "16:9/4:3 WIDE MODE." For details, see page 64. • To connect the player to a TV having component video input connectors that conform to output signals from the TV. You will get a better picture. Getting Started If you do...

Operating Instructions
Page 10
... an optical or coaxial digital connecting cord (not supplied). Required cords Audio connecting cord (not supplied) (1) White (L) Red (R) S video cord (supplied) (1) White (L) Red (R) CD/DVD player L L R R 2 1 AUDIO OUT AUDIO IN COAXIAL OPTICAL PCM/DTS/ DOLBY DIGITAL DIGITAL OUT When connecting the cords, be sure to match the color-coded cord to...
... an optical or coaxial digital connecting cord (not supplied). Required cords Audio connecting cord (not supplied) (1) White (L) Red (R) S video cord (supplied) (1) White (L) Red (R) CD/DVD player L L R R 2 1 AUDIO OUT AUDIO IN COAXIAL OPTICAL PCM/DTS/ DOLBY DIGITAL DIGITAL OUT When connecting the cords, be sure to match the color-coded cord to...
Operating Instructions
Page 11
... supplied). When your TV. • You cannot make digital audio recordings of the S video cord. Refer to be damaged. Setups for the player Some setup adjustments are the default settings. For details on using an optical or coaxial digital connecting cord, do not set , press , then ...ENTER . These are necessary for the player depending on hookups and settings, see page 60. • To listen to the sound through speakers connected to a receiver (amplifier) which do , ...
... supplied). When your TV. • You cannot make digital audio recordings of the S video cord. Refer to be damaged. Setups for the player Some setup adjustments are the default settings. For details on using an optical or coaxial digital connecting cord, do not set , press , then ...ENTER . These are necessary for the player depending on hookups and settings, see page 60. • To listen to the sound through speakers connected to a receiver (amplifier) which do , ...
Operating Instructions
Page 12
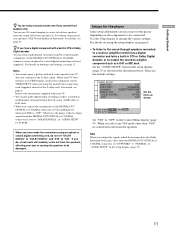
The player outputs the surround sound signals from the DIGITAL OUT OPTICAL and COAXIAL connectors. You do not need to be fully inserted into the jacks. To ... the POWER switch before completing all connections. • Refer to the instructions supplied with the component to be connected. Setups for the player Some setup adjustments are necessary for the player depending on the next page. Required cords Optical digital connecting cord* (not supplied) (1) Coaxial digital connecting cord* (not supplied) (1) S video cord...
The player outputs the surround sound signals from the DIGITAL OUT OPTICAL and COAXIAL connectors. You do not need to be fully inserted into the jacks. To ... the POWER switch before completing all connections. • Refer to the instructions supplied with the component to be connected. Setups for the player Some setup adjustments are necessary for the player depending on the next page. Required cords Optical digital connecting cord* (not supplied) (1) Coaxial digital connecting cord* (not supplied) (1) S video cord...
Operating Instructions
Page 13
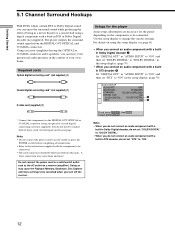
... VIDEO S VIDEO OUTPUT OUTPUT 1 1 2 2 COMPONENT VIDEO OUT MEGA CONTROL S-LINK Y PB PR CONTROL S IN To S VIDEO input TV S VIDEO IN To S VIDEO OUTPUT CD/DVD player To optical digital input AV Receiver (Amplifier) with a built-in DTS decoder or Dolby Digital decoder To coaxial digital input DIGITAL TV/LD IN AC...
... VIDEO S VIDEO OUTPUT OUTPUT 1 1 2 2 COMPONENT VIDEO OUT MEGA CONTROL S-LINK Y PB PR CONTROL S IN To S VIDEO input TV S VIDEO IN To S VIDEO OUTPUT CD/DVD player To optical digital input AV Receiver (Amplifier) with a built-in DTS decoder or Dolby Digital decoder To coaxial digital input DIGITAL TV/LD IN AC...
Operating Instructions
Page 14
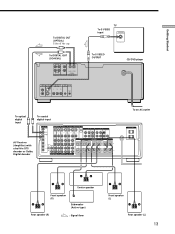
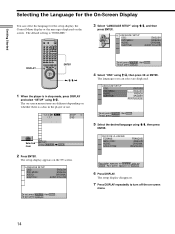
DISPLAY 123 45 6 7 8 9 MEGA 0 A B C D ALL FILE SORT EDIT DVD CD LOAD ENTER Getting Started Selecting the Language for the On-Screen Display You can select the language for the setup display, the Control Menu display or the messages displayed on the screen. The default setting is "ENGLISH."
DISPLAY 123 45 6 7 8 9 MEGA 0 A B C D ALL FILE SORT EDIT DVD CD LOAD ENTER Getting Started Selecting the Language for the On-Screen Display You can select the language for the setup display, the Control Menu display or the messages displayed on the screen. The default setting is "ENGLISH."
Operating Instructions
Page 15
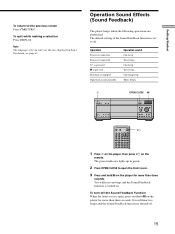
... LOAD ?/1 1 Press ! The power indicator lights up in Step 4. Note The languages you can select are performed. Operation Sound Effects (Sound Feedback) The player beeps when the following operations are the ones displayed in green. 2 Press OPEN/CLOSE to open , press and hold X on . You will hear two... beeps and the Sound Feedback function is turned on the player for more than three seconds. You will hear one beep and the Sound Feedback function is turned off . To quit while making a selection Press DISPLAY...
... LOAD ?/1 1 Press ! The power indicator lights up in Step 4. Note The languages you can select are performed. Operation Sound Effects (Sound Feedback) The player beeps when the following operations are the ones displayed in green. 2 Press OPEN/CLOSE to open , press and hold X on . You will hear two... beeps and the Sound Feedback function is turned on the player for more than three seconds. You will hear one beep and the Sound Feedback function is turned off . To quit while making a selection Press DISPLAY...
Operating Instructions
Page 16
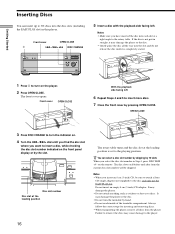
... to remove the discs may damage the player or the disc. • Gently place the disc all discs from the current disc slot number will be sure to attach a Sony CD-single adaptor (not supplied) to discs...1 Press ! Do not insert an empty 8 cm (3-inch) CD adaptor. on the player. 2 Press OPEN/CLOSE. It may damage the player. • Do not attach anything such as stickers or sleeves to the disc and only... use the EASY PLAY slot. It may damage the player or the disc. • Do not turn on the remote. Getting Started Inserting Discs You can...
... to remove the discs may damage the player or the disc. • Gently place the disc all discs from the current disc slot number will be sure to attach a Sony CD-single adaptor (not supplied) to discs...1 Press ! Do not insert an empty 8 cm (3-inch) CD adaptor. on the player. 2 Press OPEN/CLOSE. It may damage the player. • Do not attach anything such as stickers or sleeves to the disc and only... use the EASY PLAY slot. It may damage the player or the disc. • Do not turn on the remote. Getting Started Inserting Discs You can...
Operating Instructions
Page 17
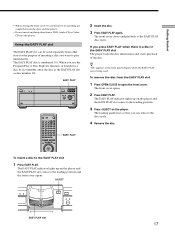
... open the front cover. The loading guide rises so that you can be careful not to let anything get caught between the door and the player. • Do not insert anything other slots for a disc by slot number, enter the disc in the EASY PLAY slot The... player loads the disc information and starts playback of the EASY PLAY disc starts. To insert a disc to the EASY PLAY slot 1 Press EASY PLAY. The ...
... open the front cover. The loading guide rises so that you can be careful not to let anything get caught between the door and the player. • Do not insert anything other slots for a disc by slot number, enter the disc in the EASY PLAY slot The... player loads the disc information and starts playback of the EASY PLAY disc starts. To insert a disc to the EASY PLAY slot 1 Press EASY PLAY. The ...
Operating Instructions
Page 18
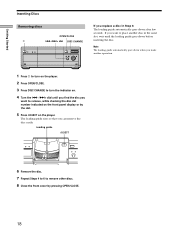
... guide AEJECT 6 Remove the disc. 7 Repeat Steps 4 to 6 to remove other discs. 8 Close the front cover by the slot. 5 Press AEJECT on the player. to turn on the player. 2 Press OPEN/CLOSE. 3 Press DISC CHANGE to turn the indicator on. 4 Turn the .-/>+ dial until the loading guide goes down after few seconds...
... guide AEJECT 6 Remove the disc. 7 Repeat Steps 4 to 6 to remove other discs. 8 Close the front cover by the slot. 5 Press AEJECT on the player. to turn on the player. 2 Press OPEN/CLOSE. 3 Press DISC CHANGE to turn the indicator on. 4 Turn the .-/>+ dial until the loading guide goes down after few seconds...
Operating Instructions
Page 19
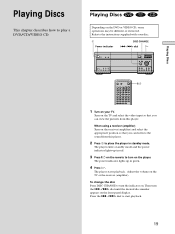
...the remote to turn the indicator on the receiver (amplifier) and select the appropriate position so that you can view the pictures from this player. The player enters standby mode and the power indicator lights up in green. 4 Press H. Then turn the .-/>+ dial until the desired disc number ... the TV and select the video input so that you can listen to the instructions supplied with your TV. Refer to the sound from this player. 2 Press ! The power indicator lights up in standby mode. When using a receiver (amplifier) Turn on . Playing Discs This chapter describes ...
...the remote to turn the indicator on the receiver (amplifier) and select the appropriate position so that you can view the pictures from this player. The player enters standby mode and the power indicator lights up in green. 4 Press H. Then turn the .-/>+ dial until the desired disc number ... the TV and select the video input so that you can listen to the instructions supplied with your TV. Refer to the sound from this player. 2 Press ! The power indicator lights up in standby mode. When using a receiver (amplifier) Turn on . Playing Discs This chapter describes ...
Operating Instructions
Page 20
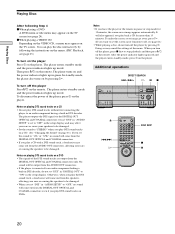
..." in the setup display. Notes • If you set the sound to an audio component lacking a built-in DTS decoder, do not turn off the player by pressing H. After the power indicator lights up in green. Additional operations DIRECT SEARCH .-/>+ HX x Z ./> H 123 45 6 7 8 9 MEGA 0 A B C D ALL FILE SORT...press @/1 on the remote. To make the screen saver image go away, press H. (If you play DTS sound tracks without first connecting the player to "OFF," no sound will be damaged. Notes on playing DTS sound tracks on a DVD • The signals of the DTS sound tracks...
..." in the setup display. Notes • If you set the sound to an audio component lacking a built-in DTS decoder, do not turn off the player by pressing H. After the power indicator lights up in green. Additional operations DIRECT SEARCH .-/>+ HX x Z ./> H 123 45 6 7 8 9 MEGA 0 A B C D ALL FILE SORT...press @/1 on the remote. To make the screen saver image go away, press H. (If you play DTS sound tracks without first connecting the player to "OFF," no sound will be damaged. Notes on playing DTS sound tracks on a DVD • The signals of the DTS sound tracks...

