
Operating Guide
Page 8
...the lens to make sure the image and sound are normal results of the manufacturing process and do not affect the recording in color) that you destroy the actual body of the camcorder. On recording • Before starting to record, test the recording function to direct sunlight for a long time...and the viewfinder. It adopts the MTF measurement system for trial recording. - Doing so might cause your camcorder if necessary (p. 26). Take images of data occurs on the internal memory, the data may be copyrighted. DCR-DVD650 Use a DVD-RW/DVD+RW for About disposal/transfer (DCRDVD850)...
...the lens to make sure the image and sound are normal results of the manufacturing process and do not affect the recording in color) that you destroy the actual body of the camcorder. On recording • Before starting to record, test the recording function to direct sunlight for a long time...and the viewfinder. It adopts the MTF measurement system for trial recording. - Doing so might cause your camcorder if necessary (p. 26). Take images of data occurs on the internal memory, the data may be copyrighted. DCR-DVD650 Use a DVD-RW/DVD+RW for About disposal/transfer (DCRDVD850)...

Operating Guide
Page 10
... disc on , and setting the date and time 25 Changing the language setting ... 26 Step 4: Making adjustments before operating your camcorder 5 Table of still images (Slide show 46 Playing the images on a TV ......... 47 Editing (OTHERS) category 49 Deleting images...Memory Stick PRO Duo" media 30 Recording/Playback Recording and playing back with ease (Easy Handycam operation) ....... 34 Recording 38 Zooming 40 10 Recording sound with more presence (5.1ch surround recording) (DCR-DVD850) ........ 40 Adjusting the exposure for backlit subjects 41 Recording in mirror mode 41 Playback 42...
... disc on , and setting the date and time 25 Changing the language setting ... 26 Step 4: Making adjustments before operating your camcorder 5 Table of still images (Slide show 46 Playing the images on a TV ......... 47 Editing (OTHERS) category 49 Deleting images...Memory Stick PRO Duo" media 30 Recording/Playback Recording and playing back with ease (Easy Handycam operation) ....... 34 Recording 38 Zooming 40 10 Recording sound with more presence (5.1ch surround recording) (DCR-DVD850) ........ 40 Adjusting the exposure for backlit subjects 41 Recording in mirror mode 41 Playback 42...
Operating Guide
Page 11
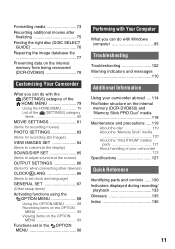
... being recovered (DCR-DVD850 78 Customizing Your Camcorder What you can do with the (SETTINGS) category of the HOME MENU 79 Using the HOME MENU 79 List of the (SETTINGS) category items 80 MOVIE SETTINGS 81 (Items for recording movies) PHOTO SETTINGS 83 (Items for recording still images) ...VIEW IMAGES SET 84 (Items to customize the display) SOUND/DISP SET 85 (Items to adjust sound and the screen) OUTPUT SETTINGS 86 (Items for when connecting other ...
... being recovered (DCR-DVD850 78 Customizing Your Camcorder What you can do with the (SETTINGS) category of the HOME MENU 79 Using the HOME MENU 79 List of the (SETTINGS) category items 80 MOVIE SETTINGS 81 (Items for recording movies) PHOTO SETTINGS 83 (Items for recording still images) ...VIEW IMAGES SET 84 (Items to customize the display) SOUND/DISP SET 85 (Items to adjust sound and the screen) OUTPUT SETTINGS 86 (Items for when connecting other ...
Operating Guide
Page 15
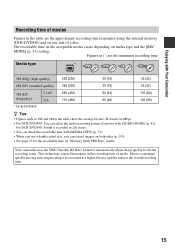
...DCR-DVD650: Sound is recorded in the table show the average bit rate. Movies containing quickly moving and complex images are the minimum recording time. Media type * 9M (HQ) (high quality) 230 (205) 20 (18) 35 (32) 6M (SP) (standard quality) 340 (205) 30 (18) 55 (32) 3M (LP) (long play) * DCR...adjust image quality to suit the recording scene. M stands for the recordable time on media type and the [REC MODE] (p. 81) setting. Enjoying with Your Camcorder Recording time of movies Figures in the table are the approximate recording time in ( ) are recorded at a higher bit rate,...
...DCR-DVD650: Sound is recorded in the table show the average bit rate. Movies containing quickly moving and complex images are the minimum recording time. Media type * 9M (HQ) (high quality) 230 (205) 20 (18) 35 (32) 6M (SP) (standard quality) 340 (205) 30 (18) 55 (32) 3M (LP) (long play) * DCR...adjust image quality to suit the recording scene. M stands for the recordable time on media type and the [REC MODE] (p. 81) setting. Enjoying with Your Camcorder Recording time of movies Figures in the table are the approximate recording time in ( ) are recorded at a higher bit rate,...

Operating Guide
Page 27
... the LENS COVER switch to CLOSE to OPEN. Adjust the viewfinder to your camcorder properly. 27 Adjusting the LCD panel Open the LCD panel 90 degrees to the camcorder (1), then rotate it to the best angle to record or play (2). 290 degrees (max.) 190 degrees to the lens side, you ...open or adjust the LCD panel. Viewfinder Viewfinder lens adjustment lever Move it 180 degrees to the camcorder • Touch (HOME) t (SETTINGS) t [SOUND/DISP SET] t [LCD BRIGHT] (p. 85), and adjust ...
... the LENS COVER switch to CLOSE to OPEN. Adjust the viewfinder to your camcorder properly. 27 Adjusting the LCD panel Open the LCD panel 90 degrees to the camcorder (1), then rotate it to the best angle to record or play (2). 290 degrees (max.) 190 degrees to the lens side, you ...open or adjust the LCD panel. Viewfinder Viewfinder lens adjustment lever Move it 180 degrees to the camcorder • Touch (HOME) t (SETTINGS) t [SOUND/DISP SET] t [LCD BRIGHT] (p. 85), and adjust ...
Operating Guide
Page 33
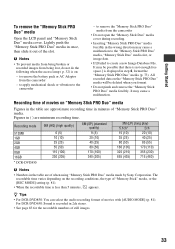
... * DCR-DVD850 b Notes • Numbers in minutes of when using "Memory Stick PRO Duo" media made by Sony Corporation. to apply mechanical shock or vibration to remove the battery pack or AC Adaptor from the camcorder • Do not open the "Memory Stick Duo" media cover during recording. &#...audio recording format of the slot. Getting Started To remove the "Memory Stick PRO Duo" media Open the LCD panel and "Memory Stick Duo" media cover. to create a new Image Database File. For DCR-DVD650: Sound is displayed in the wrong direction may cause a malfunction. to the camcorder ...
... * DCR-DVD850 b Notes • Numbers in minutes of when using "Memory Stick PRO Duo" media made by Sony Corporation. to apply mechanical shock or vibration to remove the battery pack or AC Adaptor from the camcorder • Do not open the "Memory Stick Duo" media cover during recording. &#...audio recording format of the slot. Getting Started To remove the "Memory Stick PRO Duo" media Open the LCD panel and "Memory Stick Duo" media cover. to create a new Image Database File. For DCR-DVD650: Sound is displayed in the wrong direction may cause a malfunction. to the camcorder ...

Operating Guide
Page 34
... with ease (Easy Handycam operation) Easy Handycam operation makes nearly all settings automatic so that you can perform recording or playing back operation without detailed settings. appears on the screen. , 3 Press START/STOP H (or E) to start recording.* 3 Press PHOTO F lightly to OFF (CHG), turn it fully B (a shutter click sounds). [STBY] t [REC] To stop recording, press START...
... with ease (Easy Handycam operation) Easy Handycam operation makes nearly all settings automatic so that you can perform recording or playing back operation without detailed settings. appears on the screen. , 3 Press START/STOP H (or E) to start recording.* 3 Press PHOTO F lightly to OFF (CHG), turn it fully B (a shutter click sounds). [STBY] t [REC] To stop recording, press START...

Operating Guide
Page 39
...STOP B (or C). When disappears, the image has been recorded. b Notes • You cannot record still images on a disc. Flashing t Lights up . 2 Press PHOTO F lightly to [ON] (the default setting) during movie recording (p. 82). • You can switch recording between movies and still images by touching (HOME) D ... 15 for the recordable time of movies, and page 83 for the number of recordable still images. • appears when [ FACE SET] is set to adjust the focus A (a beep sounds), then press it fully B (a shutter click sounds). [STBY] t [REC] To stop recording, press START/STOP...
...STOP B (or C). When disappears, the image has been recorded. b Notes • You cannot record still images on a disc. Flashing t Lights up . 2 Press PHOTO F lightly to [ON] (the default setting) during movie recording (p. 82). • You can switch recording between movies and still images by touching (HOME) D ... 15 for the recordable time of movies, and page 83 for the number of recordable still images. • appears when [ FACE SET] is set to adjust the focus A (a beep sounds), then press it fully B (a shutter click sounds). [STBY] t [REC] To stop recording, press START/STOP...

Operating Guide
Page 40
... camcorder and subject while maintaining sharp focus is about 1 cm (about 13/32 in.) for wide angle and about 150 cm (about 59 1/8 in microphone is set to the T (Telephoto) side. • Be sure to 60 times the original size with more presence (5.1ch surround recording) (DCR-DVD850) Sound... picked up to keep your finger off the power zoom lever, the operation sound of view: (Wide angle) Recording sound with the power zoom lever or the zoom buttons on the LCD frame...
... camcorder and subject while maintaining sharp focus is about 1 cm (about 13/32 in.) for wide angle and about 150 cm (about 59 1/8 in microphone is set to the T (Telephoto) side. • Be sure to 60 times the original size with more presence (5.1ch surround recording) (DCR-DVD850) Sound... picked up to keep your finger off the power zoom lever, the operation sound of view: (Wide angle) Recording sound with the power zoom lever or the zoom buttons on the LCD frame...
Operating Guide
Page 44
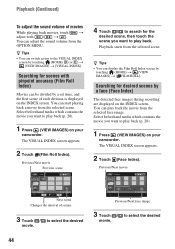
...contains the movie you want to select the desired movie. Previous/Next movie Next scene Changes the interval of each division is displayed on your camcorder. Previous/Next face image 3 Touch / to play back the movie from the selected scene. z Tips • You can display the Film...contains the movie you want to the VISUAL INDEX screen by a face (Face Index) The detected face images during recording are displayed on your camcorder. You can adjust the sound volume from the selected scene. You can play back. Playback starts from the selected face image. Previous/Next movie ...
...contains the movie you want to select the desired movie. Previous/Next movie Next scene Changes the interval of each division is displayed on your camcorder. Previous/Next face image 3 Touch / to play back the movie from the selected scene. z Tips • You can display the Film...contains the movie you want to the VISUAL INDEX screen by a face (Face Index) The detected face images during recording are displayed on your camcorder. You can adjust the sound volume from the selected scene. You can play back. Playback starts from the selected face image. Previous/Next movie ...

Operating Guide
Page 81
... quality from 3 levels. B 5.1ch SURROUND ( ) Records 5.1ch surround sound. 2ch STEREO ( ) Records stereo sound. b Notes • Set [TV TYPE] correctly according to the TV connected. WIDE SELECT When recording images, you want to 60 × zoom is not... on a 4:3 TV screen. Note that the image quality decreases when you select the zooming level. Continued , 81 Customizing Your Camcorder...
... quality from 3 levels. B 5.1ch SURROUND ( ) Records 5.1ch surround sound. 2ch STEREO ( ) Records stereo sound. b Notes • Set [TV TYPE] correctly according to the TV connected. WIDE SELECT When recording images, you want to 60 × zoom is not... on a 4:3 TV screen. Note that the image quality decreases when you select the zooming level. Continued , 81 Customizing Your Camcorder...
Operating Guide
Page 85
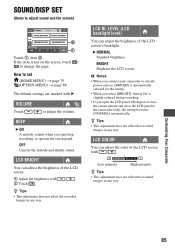
... of the LCD screen. 1 Adjust the brightness with 2 Touch . /. z Tips • This adjustment does not affect the recorded images in any way. How to the camcorder body, the setting becomes [NORMAL] automatically. BEEP B ON A melody sounds when you select [BRIGHT], battery life is not on the screen, touch / to change the page. LCD...
... of the LCD screen. 1 Adjust the brightness with 2 Touch . /. z Tips • This adjustment does not affect the recorded images in any way. How to the camcorder body, the setting becomes [NORMAL] automatically. BEEP B ON A melody sounds when you select [BRIGHT], battery life is not on the screen, touch / to change the page. LCD...
Operating Guide
Page 94
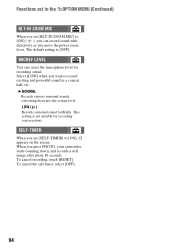
... (Continued) BLT-IN ZOOM MIC When you can select the microphone level for recording conversations. B NORMAL Records various surround sounds, converting them into the certain level. MICREF LEVEL You can record sound with directivity as you press PHOTO, your camcorder starts counting down, and records a still image after about 10 seconds. When you move the power zoom...
... (Continued) BLT-IN ZOOM MIC When you can select the microphone level for recording conversations. B NORMAL Records various surround sounds, converting them into the certain level. MICREF LEVEL You can record sound with directivity as you press PHOTO, your camcorder starts counting down, and records a still image after about 10 seconds. When you move the power zoom...
Operating Guide
Page 107
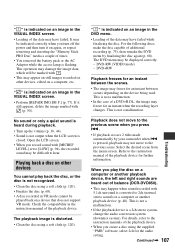
... freezes for an instant between the scenes. • The image may not move to the instruction manuals of balance (DCR-DVD850). • This may happen when sound recorded with . • This may have failed while finalizing the disc. Playback does not move to the previous scene. ...on a computer or another playback device (p. 40). " " is not a malfunction. • In the case of additional recording (p. 75), then remake the DVD menu by your camcorder when . Select the desired scene from the menu screen. This is a 2ch stereo system, change the audio conversion system (...
... freezes for an instant between the scenes. • The image may not move to the instruction manuals of balance (DCR-DVD850). • This may happen when sound recorded with . • This may have failed while finalizing the disc. Playback does not move to the previous scene. ...on a computer or another playback device (p. 40). " " is not a malfunction. • In the case of additional recording (p. 75), then remake the DVD menu by your camcorder when . Select the desired scene from the menu screen. This is a 2ch stereo system, change the audio conversion system (...
Operating Guide
Page 109
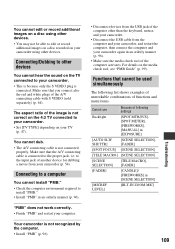
... USB cable from the computer and your camcorder, and restart the computer, then connect the computer and your camcorder (p. 54). Functions that cannot be able to edit or record additional images on a disc recorded on the 4:3 TV connected to your camcorder using other devices. • You may...SELECTION] [MICREF LEVEL] [BLT-IN ZOOM MIC] Troubleshooting 109 The aspect ratio of the computer other devices You cannot hear the sound on the TV connected to your camcorder. • Set [TV TYPE] depending on the media check tool, see "PMB Guide" (p. 99). Connecting/Dubbing to ...
... USB cable from the computer and your camcorder, and restart the computer, then connect the computer and your camcorder (p. 54). Functions that cannot be able to edit or record additional images on a disc recorded on the 4:3 TV connected to your camcorder using other devices. • You may...SELECTION] [MICREF LEVEL] [BLT-IN ZOOM MIC] Troubleshooting 109 The aspect ratio of the computer other devices You cannot hear the sound on the TV connected to your camcorder. • Set [TV TYPE] depending on the media check tool, see "PMB Guide" (p. 99). Connecting/Dubbing to ...
Operating Guide
Page 135
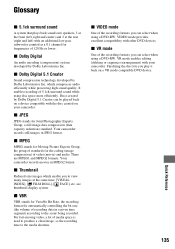
which enable you can select when using disc space more efficiently. Your camcorder records movies in a given time segment) according to the scene being recorded. x Dolby Digital 5.1 Creator Sound compression technology developed by Dolby Laboratories Inc. x JPEG JPEG stands for frequencies of 120 Hz or lower. x Thumbnail Reduced-size images which compresses audio efficiently ...
which enable you can select when using disc space more efficiently. Your camcorder records movies in a given time segment) according to the scene being recorded. x Dolby Digital 5.1 Creator Sound compression technology developed by Dolby Laboratories Inc. x JPEG JPEG stands for frequencies of 120 Hz or lower. x Thumbnail Reduced-size images which compresses audio efficiently ...
Operating Guide
Page 136
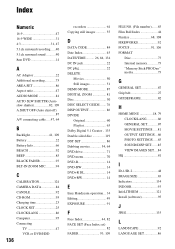
...Numeric 16:9 47 16:9 WIDE 31 4:3 31, 47 5.1ch surround recording......40 5.1ch surround sound ...........40 8cm DVD 14 A AC Adaptor 22 Additional recording 75 AREA SET 86 Aspect ratio 47 AUDIO MODE 81 AUTO SLW SHUTTR...time 23 CLOCK SET 25 CLOCK/LANG 86 Computer 95 Connecting TV 47 VCR or DVD/HDD 136 recorders 64 Copying still images 55 D DATA CODE 84 Date Index 45 DATE/TIME.......... 26, 84, ... DVD drive 71 DVD menu 70 DVD-R 14 DVD-RW 14 DVD+R DL 14 DVD+RW 14 E Easy Handycam operation ... 34 Editing 49 EXPOSURE 91 F Face Index 44, 82 FACE SET (Face Index set 82 FADER ...
...Numeric 16:9 47 16:9 WIDE 31 4:3 31, 47 5.1ch surround recording......40 5.1ch surround sound ...........40 8cm DVD 14 A AC Adaptor 22 Additional recording 75 AREA SET 86 Aspect ratio 47 AUDIO MODE 81 AUTO SLW SHUTTR...time 23 CLOCK SET 25 CLOCK/LANG 86 Computer 95 Connecting TV 47 VCR or DVD/HDD 136 recorders 64 Copying still images 55 D DATA CODE 84 Date Index 45 DATE/TIME.......... 26, 84, ... DVD drive 71 DVD menu 70 DVD-R 14 DVD-RW 14 DVD+R DL 14 DVD+RW 14 E Easy Handycam operation ... 34 Editing 49 EXPOSURE 91 F Face Index 44, 82 FACE SET (Face Index set 82 FADER ...

Operating Guide
Page 137
...cord (mains lead) ...... 22 Precautions 119 Preparation 22 Protect 57, 113 R REC MODE (Recording mode 81 Recording 34, 38 Recording format 14 Recording time ......... 15, 23, 33 Remaining battery 66 REMAINING SET (Remaining media display setting 82 ...REPAIR IMG.DB F 77 S S video cable 47, 64 SCENE SELECTION 92, 109 Self-diagnosis display ........ 110 SELF-TIMER 94 SETTINGS category 79 Slide show 46 SNOW 92 SOUND SETTINGS 80 SOUND...
...cord (mains lead) ...... 22 Precautions 119 Preparation 22 Protect 57, 113 R REC MODE (Recording mode 81 Recording 34, 38 Recording format 14 Recording time ......... 15, 23, 33 Remaining battery 66 REMAINING SET (Remaining media display setting 82 ...REPAIR IMG.DB F 77 S S video cable 47, 64 SCENE SELECTION 92, 109 Self-diagnosis display ........ 110 SELF-TIMER 94 SETTINGS category 79 Slide show 46 SNOW 92 SOUND SETTINGS 80 SOUND...


