Operating Guide
Page 5
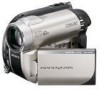
... or injury may not cause harmful interference, and (2) this manual thoroughly, and retain it for future reference. CAUTION The use...while connected to charge the battery pack using a genuine Sony battery charger or a device that may result in the instructions. Even if your camcorder is turned off, AC power source (mains) is ...chemical burns. Observe the following two conditions: (1) This device may result. Read this before operating your camcorder Before operating the unit, please read this device must accept any interference received, including interference that can...
... or injury may not cause harmful interference, and (2) this manual thoroughly, and retain it for future reference. CAUTION The use...while connected to charge the battery pack using a genuine Sony battery charger or a device that may result in the instructions. Even if your camcorder is turned off, AC power source (mains) is ...chemical burns. Observe the following two conditions: (1) This device may result. Read this before operating your camcorder Before operating the unit, please read this device must accept any interference received, including interference that can...
Operating Guide
Page 6
...the user is encouraged to try to which can be used in this manual could void your camcorder with a computer connected (stored on use Your camcorder is for help. "Operating Guide" (This manual) - However, there is an internationally recognized safety organization. The number ... must accept any changes or modifications not expressly approved in accordance with Part 15 of Conformity Trade Name: SONY Model No.: DCR-DVD650 Responsible Party:Sony Electronics Inc. Consult the dealer or an experienced radio/TV technician for the FCC related matters only. Declaration...
...the user is encouraged to try to which can be used in this manual could void your camcorder with a computer connected (stored on use Your camcorder is for help. "Operating Guide" (This manual) - However, there is an internationally recognized safety organization. The number ... must accept any changes or modifications not expressly approved in accordance with Part 15 of Conformity Trade Name: SONY Model No.: DCR-DVD650 Responsible Party:Sony Electronics Inc. Consult the dealer or an experienced radio/TV technician for the FCC related matters only. Declaration...
Operating Guide
Page 7
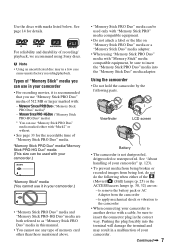
...Duo" media are on "Memory Stick PRO Duo" media or a "Memory Stick Duo" media adaptor. • When using Sony discs. For reliability and durability of your camcorder to another device with a cable, be sure to remove the battery pack or AC Adaptor from being broken or recorded images ... recommended that you can use in your camcorder • For recording movies, it in your camcorder" (p. 123). • To prevent media from being lost, do not do the following parts. b Note • Using an uncertificated disc may result in this manual. • You cannot use any type of memory...
...Duo" media are on "Memory Stick PRO Duo" media or a "Memory Stick Duo" media adaptor. • When using Sony discs. For reliability and durability of your camcorder to another device with a cable, be sure to remove the battery pack or AC Adaptor from being broken or recorded images ... recommended that you can use in your camcorder • For recording movies, it in your camcorder" (p. 123). • To prevent media from being lost, do not do the following parts. b Note • Using an uncertificated disc may result in this manual. • You cannot use any type of memory...
Operating Guide
Page 9
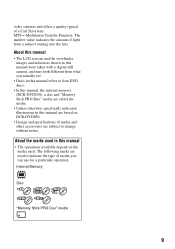
... media you actually see. • Discs in this manual refers to change without notice. About this manual • The LCD screens and the viewfinder images and indicators shown in this manual • The operations available depend on DCR-DVD850. • Design and specifications of media and... marks are subject to 8cm DVD discs. • In this manual, the internal memory (DCR-DVD850), a disc and "Memory Stick PRO Duo" media are called the media. • Unless otherwise specifically indicated, illustrations in this manual were taken with a digital still camera, and may look different ...
... media you actually see. • Discs in this manual refers to change without notice. About this manual • The LCD screens and the viewfinder images and indicators shown in this manual • The operations available depend on DCR-DVD850. • Design and specifications of media and... marks are subject to 8cm DVD discs. • In this manual, the internal memory (DCR-DVD850), a disc and "Memory Stick PRO Duo" media are called the media. • Unless otherwise specifically indicated, illustrations in this manual were taken with a digital still camera, and may look different ...
Operating Guide
Page 14
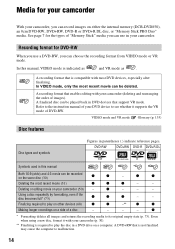
...z - - Even when using a new disc, format it with your camcorder (deleting and rearranging the order of your DVD device to malfunction. 14 In this manual Both 16:9 (wide) and 4:3 movie can record images on either the internal memory (DCR-DVD850), an 8cm DVD-RW, DVD+RW, DVD-R or DVD+R DL... disc, or "Memory Stick PRO Duo" media. Refer to the instruction manual of images). A DVD+RW that enables editing with your camcorder (p. 30). ** Finalizing is not finalized may cause...
...z - - Even when using a new disc, format it with your camcorder (deleting and rearranging the order of your DVD device to malfunction. 14 In this manual Both 16:9 (wide) and 4:3 movie can record images on either the internal memory (DCR-DVD850), an 8cm DVD-RW, DVD+RW, DVD-R or DVD+R DL... disc, or "Memory Stick PRO Duo" media. Refer to the instruction manual of images). A DVD+RW that enables editing with your camcorder (p. 30). ** Finalizing is not finalized may cause...

Operating Guide
Page 17
...there is , the more it takes time to add movies (p. 75). But finalizing is not guaranteed. Refer to the instruction manual supplied with your DVD device or consult your camcorder on other devices, you to finalize the disc. The features of the disc is free space left. Playback compatibility Playback compatibility... back without unfinalizing. The disc can be played back in most DVD devices after finalizing. For details, see page 68. Enjoying with Your Camcorder 4Viewing on other devices x Viewing images on a TV (p. 47) You can view the images recorded and edited on your...
...there is , the more it takes time to add movies (p. 75). But finalizing is not guaranteed. Refer to the instruction manual supplied with your DVD device or consult your camcorder on other devices, you to finalize the disc. The features of the disc is free space left. Playback compatibility Playback compatibility... back without unfinalizing. The disc can be played back in most DVD devices after finalizing. For details, see page 68. Enjoying with Your Camcorder 4Viewing on other devices x Viewing images on a TV (p. 47) You can view the images recorded and edited on your...
Operating Guide
Page 21
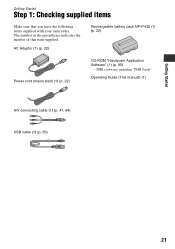
AC Adaptor (1) (p. 22) Rechargeable battery pack NP-FH30 (1) (p. 22) Power cord (mains lead) (1) (p. 22) CD-ROM "Handycam Application Software" (1) (p. 95) - Getting Started Getting Started Step 1: Checking supplied items Make sure that item supplied. PMB (software) including "PMB Guide" Operating Guide (This manual) (1) A/V connecting cable (1) (p. 47, 64) USB cable (1) (p. 65) 21 The number in the parentheses indicates the number of that you have the following items supplied with your camcorder.
AC Adaptor (1) (p. 22) Rechargeable battery pack NP-FH30 (1) (p. 22) Power cord (mains lead) (1) (p. 22) CD-ROM "Handycam Application Software" (1) (p. 95) - Getting Started Getting Started Step 1: Checking supplied items Make sure that item supplied. PMB (software) including "PMB Guide" Operating Guide (This manual) (1) A/V connecting cable (1) (p. 47, 64) USB cable (1) (p. 65) 21 The number in the parentheses indicates the number of that you have the following items supplied with your camcorder.
Operating Guide
Page 47
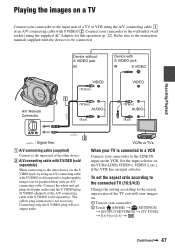
...not output audio. Connect your TV is not necessary. VCRs or TVs When your camcorder to the LINE IN input on the VCR to be produced than with S VIDEO (sold separately). Refer also to the instruction manuals supplied with S VIDEO 2. Connecting only the S VIDEO plug will view images on.... 1 Turn on your camcorder to the wall outlet (wall socket) using the supplied AC Adaptor for this operation (p. 22)....
...not output audio. Connect your TV is not necessary. VCRs or TVs When your camcorder to the LINE IN input on the VCR to be produced than with S VIDEO (sold separately). Refer also to the instruction manuals supplied with S VIDEO 2. Connecting only the S VIDEO plug will view images on.... 1 Turn on your camcorder to the wall outlet (wall socket) using the supplied AC Adaptor for this operation (p. 22)....
Operating Guide
Page 48
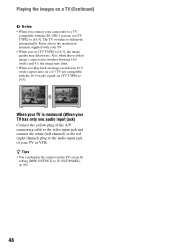
...] (p. 86). 48 Refer also to [16:9]. Playing the images on a TV (Continued) b Notes • When you connect your camcorder to a TV compatible with the ID-1/ID-2 system, set [TV TYPE] to the instruction manuals supplied with the 16:9 (wide) signal, set [TV TYPE] to [4:3], the image quality may jitter. • When you...
...] (p. 86). 48 Refer also to [16:9]. Playing the images on a TV (Continued) b Notes • When you connect your camcorder to a TV compatible with the ID-1/ID-2 system, set [TV TYPE] to the instruction manuals supplied with the 16:9 (wide) signal, set [TV TYPE] to [4:3], the image quality may jitter. • When you...
Operating Guide
Page 64
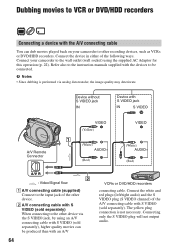
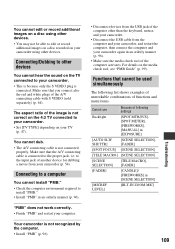
...movies to VCR or DVD/HDD recorders Connecting a device with the A/V connecting cable You can be connected. Refer also to the instruction manuals supplied with the devices to the wall outlet (wall socket) using an A/V connecting cable with S VIDEO (sold separately) When connecting ... recorders. Connect the white and red plugs (left/right audio) and the S VIDEO plug (S VIDEO channel) of the following ways. Connect your camcorder to the other device. b Notes • Since dubbing is not necessary. B A/V connecting cable with S VIDEO (sold separately). Connecting only the...
...movies to VCR or DVD/HDD recorders Connecting a device with the A/V connecting cable You can be connected. Refer also to the instruction manuals supplied with the devices to the wall outlet (wall socket) using an A/V connecting cable with S VIDEO (sold separately) When connecting ... recorders. Connect the white and red plugs (left/right audio) and the S VIDEO plug (S VIDEO channel) of the following ways. Connect your camcorder to the other device. b Notes • Since dubbing is not necessary. B A/V connecting cable with S VIDEO (sold separately). Connecting only the...
Operating Guide
Page 65
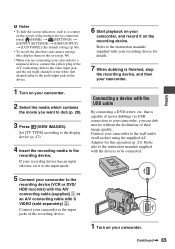
Refer to the instruction manuals supplied with S VIDEO (sold separately) 2. Editing 1 Turn on your camcorder. 2 Select the media which contains the movie you can dub movies without the declination of their image quality. Connect your camcorder to the input jacks of the A/V connecting cable... to the recording device (VCR or DVD/ HDD recorder) with the A/V connecting cable (supplied) 1 or an A/V connecting cable with your camcorder to the display device (p. 47). 4 Insert the recording media in the recording device. Connecting a device with the devices to be connected. ...
Refer to the instruction manuals supplied with S VIDEO (sold separately) 2. Editing 1 Turn on your camcorder. 2 Select the media which contains the movie you can dub movies without the declination of their image quality. Connect your camcorder to the input jacks of the A/V connecting cable... to the recording device (VCR or DVD/ HDD recorder) with the A/V connecting cable (supplied) 1 or an A/V connecting cable with your camcorder to the display device (p. 47). 4 Insert the recording media in the recording device. Connecting a device with the devices to be connected. ...
Operating Guide
Page 66
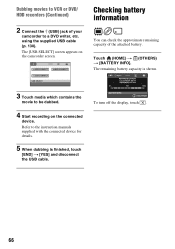
...Dubbing movies to VCR or DVD/ HDD recorders (Continued) 2 Connect the (USB) jack of the attached battery. Refer to the instruction manuals supplied with the connected device for details. 5 When dubbing is shown. 3 Touch media which contains the movie to a DVD writer, etc...The [USB SELECT] screen appears on the connected device. Checking battery information You can check the approximate remaining capacity of your camcorder to be dubbed. 4 Start recording on the camcorder screen. The remaining battery capacity is finished, touch [END] t [YES] and disconnect the USB cable. To turn off...
...Dubbing movies to VCR or DVD/ HDD recorders (Continued) 2 Connect the (USB) jack of the attached battery. Refer to the instruction manuals supplied with the connected device for details. 5 When dubbing is shown. 3 Touch media which contains the movie to a DVD writer, etc...The [USB SELECT] screen appears on the connected device. Checking battery information You can check the approximate remaining capacity of your camcorder to be dubbed. 4 Start recording on the camcorder screen. The remaining battery capacity is finished, touch [END] t [YES] and disconnect the USB cable. To turn off...

Operating Guide
Page 71
... an 8 cm DVD as that DVD playback application is placed in the menu. b Notes • During Easy Handycam operation (p. 34), the DVD menu style is fixed to [STYLE1]. • You cannot create a DVD menu ... DVD drive of your device. • If you have created a DVD menu (p. 70), you to the instruction manual of the computer can be placed horizontally. • On some devices, some discs may not be disabled. z Tips...DVD-RW (VR mode). Refer to view movies recorded by your camcorder, you must finalize the disc (p. 68). Continued , 71 Utilizing Media However, we do not guarantee proper ...
... an 8 cm DVD as that DVD playback application is placed in the menu. b Notes • During Easy Handycam operation (p. 34), the DVD menu style is fixed to [STYLE1]. • You cannot create a DVD menu ... DVD drive of your device. • If you have created a DVD menu (p. 70), you to the instruction manual of the computer can be placed horizontally. • On some devices, some discs may not be disabled. z Tips...DVD-RW (VR mode). Refer to view movies recorded by your camcorder, you must finalize the disc (p. 68). Continued , 71 Utilizing Media However, we do not guarantee proper ...

Operating Guide
Page 81
... the expected recording time of the bar shows the digital zooming factor. b Notes • Set [TV TYPE] correctly according to the instruction manuals supplied with B. Continued , 81 Customizing Your Camcorder AUDIO MODE (DCRDVD850) You can select a recording mode to zoom greater than optical zoom magnification. B 5.1ch SURROUND ( ) Records 5.1ch surround sound. 2ch...
... the expected recording time of the bar shows the digital zooming factor. b Notes • Set [TV TYPE] correctly according to the instruction manuals supplied with B. Continued , 81 Customizing Your Camcorder AUDIO MODE (DCRDVD850) You can select a recording mode to zoom greater than optical zoom magnification. B 5.1ch SURROUND ( ) Records 5.1ch surround sound. 2ch...
Operating Guide
Page 87
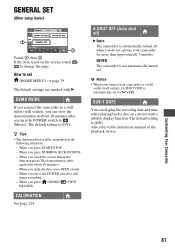
...will be suspended in about 10 minutes after about 10 minutes). - b Notes • When you move the POWER switch to the instruction manual of the playback device. SUB-T DATE You can view the demonstration in the following situations. - The default setting is automatically set (HOME ... more than approximately 5 minutes. Also refer to still image recording. - When you press DUBBING (DCR-DVD850) - When you press (HOME)/ (VIEW IMAGES). A.SHUT OFF (Auto shut off) B 5min The camcorder is not automatically turned off when you turn the POWER switch to set to a wall outlet ...
...will be suspended in about 10 minutes after about 10 minutes). - b Notes • When you move the POWER switch to the instruction manual of the playback device. SUB-T DATE You can view the demonstration in the following situations. - The default setting is automatically set (HOME ... more than approximately 5 minutes. Also refer to still image recording. - When you press DUBBING (DCR-DVD850) - When you press (HOME)/ (VIEW IMAGES). A.SHUT OFF (Auto shut off) B 5min The camcorder is not automatically turned off when you turn the POWER switch to set to a wall outlet ...
Operating Guide
Page 90
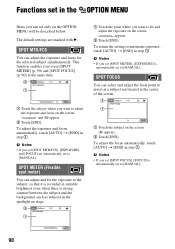
...set [SPOT MTR/FCS], [EXPOSURE] and [FOCUS] are marked with B. b Notes • If you set [SPOT FOCUS], [FOCUS] is automatically set to [MANUAL]. To adjust the exposure and focus automatically, touch [AUTO] t [END] in step 1. SPOT MTR/FCS You can adjust and fix the exposure to the subject... [END]. The default settings are automatically set to aim it is recorded in step 1. SPOT FOCUS You can select and adjust the focal point to [MANUAL]. 90 To adjust the focus automatically, touch [AUTO] t [END] in step 1. appears. 2 Touch [END]. SPOT METER (Flexible spot meter) You ...
...set [SPOT MTR/FCS], [EXPOSURE] and [FOCUS] are marked with B. b Notes • If you set [SPOT FOCUS], [FOCUS] is automatically set to [MANUAL]. To adjust the exposure and focus automatically, touch [AUTO] t [END] in step 1. SPOT MTR/FCS You can adjust and fix the exposure to the subject... [END]. The default settings are automatically set to aim it is recorded in step 1. SPOT FOCUS You can select and adjust the focal point to [MANUAL]. 90 To adjust the focus automatically, touch [AUTO] t [END] in step 1. appears. 2 Touch [END]. SPOT METER (Flexible spot meter) You ...
Operating Guide
Page 91
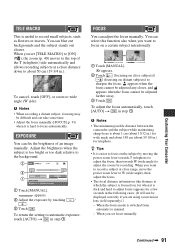
...separately).) - b Notes • When recording a distant subject, focusing may be difficult and can adjust the focus manually. b Notes • The minimum possible distance between the camcorder and the subject while maintaining sharp focus is useful to focus automatically. EXPOSURE You can blur out backgrounds and the subject...and appears when the focus cannot be displayed correctly if you set focus manually. Continued , 91 When the focus mode is too bright or too dark relative to wide angle (W side). Customizing Your Camcorder TELE MACRO This is about 1 cm (about 13/32 in.) for ...
...separately).) - b Notes • When recording a distant subject, focusing may be difficult and can adjust the focus manually. b Notes • The minimum possible distance between the camcorder and the subject while maintaining sharp focus is useful to focus automatically. EXPOSURE You can blur out backgrounds and the subject...and appears when the focus cannot be displayed correctly if you set focus manually. Continued , 91 When the focus mode is too bright or too dark relative to wide angle (W side). Customizing Your Camcorder TELE MACRO This is about 1 cm (about 13/32 in.) for ...
Operating Guide
Page 106
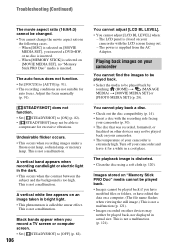
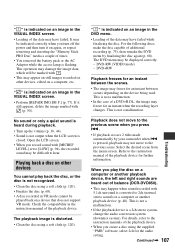
...a malfunction. Undesirable flicker occurs. • This occurs when recording images under a fluorescent lamp, sodium lamp, or mercury lamp. Turn off your camcorder is not a malfunction. This is extremely high. You cannot play back a disc. • Check out the disc compatibility (p. 14). •... Insert a disc with the LCD screen facing out. - Adjust the focus manually (p. 91). [ STEADYSHOT] does not function. • Set [ STEADYSHOT] to [ON] (p. 82). • [ STEADYSHOT] may neither be changed. •...
...a malfunction. Undesirable flicker occurs. • This occurs when recording images under a fluorescent lamp, sodium lamp, or mercury lamp. Turn off your camcorder is not a malfunction. This is extremely high. You cannot play back a disc. • Check out the disc compatibility (p. 14). •... Insert a disc with the LCD screen facing out. - Adjust the focus manually (p. 91). [ STEADYSHOT] does not function. • Set [ STEADYSHOT] to [ON] (p. 82). • [ STEADYSHOT] may neither be changed. •...
Operating Guide
Page 107
...disc on a computer or another playback device, the left and right sounds are heard out of balance (DCR-DVD850). • This may happen when sound recorded with [MICREF LEVEL] set to [LOW] (p....Clean the disc using a soft cloth (p. 120). " " is indicated on an image in the instruction manual of the playback device. When you create a disc using the supplied "PMB" software, select 2ch for ... discs, make the disc capable of additional recording (p. 75), then remake the DVD menu by your camcorder when . Refer to the previous scene when you turn off the power and then turn it still ...
...disc on a computer or another playback device, the left and right sounds are heard out of balance (DCR-DVD850). • This may happen when sound recorded with [MICREF LEVEL] set to [LOW] (p....Clean the disc using a soft cloth (p. 120). " " is indicated on an image in the instruction manual of the playback device. When you create a disc using the supplied "PMB" software, select 2ch for ... discs, make the disc capable of additional recording (p. 75), then remake the DVD menu by your camcorder when . Refer to the previous scene when you turn off the power and then turn it still ...
Operating Guide
Page 109
... list shows examples of unworkable combinations of functions and menu items. Cannot use Because of following settings Backlight [SPOT MTR/FCS], [SPOT METER], [FIREWORKS], [MANUAL] in [EXPOSURE] [AUTO SLW SHUTTR] [SCENE SELECTION], [FADER] [SPOT FOCUS] [SCENE SELECTION] [TELE MACRO] [SCENE SELECTION] [SCENE SELECTION] [TELE.../Dubbing to other devices. You cannot dub. • The A/V connecting cable is not correct on the 4:3 TV connected to your camcorder. • Set [TV TYPE] depending on your TV (p. 47). You cannot edit or record additional images on a disc using other...
... list shows examples of unworkable combinations of functions and menu items. Cannot use Because of following settings Backlight [SPOT MTR/FCS], [SPOT METER], [FIREWORKS], [MANUAL] in [EXPOSURE] [AUTO SLW SHUTTR] [SCENE SELECTION], [FADER] [SPOT FOCUS] [SCENE SELECTION] [TELE MACRO] [SCENE SELECTION] [SCENE SELECTION] [TELE.../Dubbing to other devices. You cannot dub. • The A/V connecting cable is not correct on the 4:3 TV connected to your camcorder. • Set [TV TYPE] depending on your TV (p. 47). You cannot edit or record additional images on a disc using other...


