
Operating Instructions
Page 4
... Contents Getting Started Notes on Bluetooth 7 Resetting the unit 7 Canceling the Demo mode 8 Preparing the card remote commander 8 Setting the clock 8 Detaching the front panel 8 Attaching the front panel 9 Quick Guide for Bluetooth function 3 steps to the USB device using the SensMe™ function . . . . . 22 Installing "SensMe™ Setup" and "Content Transfer...
... Contents Getting Started Notes on Bluetooth 7 Resetting the unit 7 Canceling the Demo mode 8 Preparing the card remote commander 8 Setting the clock 8 Detaching the front panel 8 Attaching the front panel 9 Quick Guide for Bluetooth function 3 steps to the USB device using the SensMe™ function . . . . . 22 Installing "SensMe™ Setup" and "Content Transfer...

Operating Instructions
Page 7
...and the electronic device connected to this product. Remember, in usage of this unit not expressly approved by Sony may not be possible on Bluetooth Caution IN NO EVENT SHALL SONY BE LIABLE FOR ANY INCIDENTAL, INDIRECT OR CONSEQUENTIAL DAMAGES OR OTHER DAMAGES INCLUDING, WITHOUT LIMITATION, LOSS OF ... device. Check regularly that the use Changes or modifications to this device, please consult with the manufacturer of your car. Detach the front panel (page 8) and press the RESET button (page 14) with your car to driving and pull off the road and park before using radio...
...and the electronic device connected to this product. Remember, in usage of this unit not expressly approved by Sony may not be possible on Bluetooth Caution IN NO EVENT SHALL SONY BE LIABLE FOR ANY INCIDENTAL, INDIRECT OR CONSEQUENTIAL DAMAGES OR OTHER DAMAGES INCLUDING, WITHOUT LIMITATION, LOSS OF ... device. Check regularly that the use Changes or modifications to this device, please consult with the manufacturer of your car. Detach the front panel (page 8) and press the RESET button (page 14) with your car to driving and pull off the road and park before using radio...
Operating Instructions
Page 8
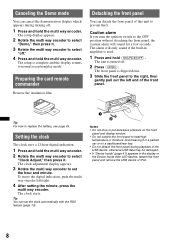
...sound if the built-in the display or the Device Inside Alert LED flashes, detach the front panel and remove the USB device or iPod. 8 Setting the clock The clock uses a 12-hour digital indication. 1 Press and hold the multi way encoder. Avoid leaving it in a parked car...setting the minute, press the multi way encoder. The front panel is turned off ." 4 Press and hold (SOURCE/OFF). Detaching the front panel You can cancel the demonstration display which appears during playback of the front panel. To move the digital indication, push the multi way encoder left end of the...
...sound if the built-in the display or the Device Inside Alert LED flashes, detach the front panel and remove the USB device or iPod. 8 Setting the clock The clock uses a 12-hour digital indication. 1 Press and hold the multi way encoder. Avoid leaving it in a parked car...setting the minute, press the multi way encoder. The front panel is turned off ." 4 Press and hold (SOURCE/OFF). Detaching the front panel You can cancel the demonstration display which appears during playback of the front panel. To move the digital indication, push the multi way encoder left end of the...

Operating Instructions
Page 9
Press (SOURCE/OFF) on the unit, then lightly push the left side in. Attaching the front panel Place the hole A of the front panel. 9 Note Do not put anything on the inner surface of the front panel onto the spindle B on the unit to operate the unit.
Press (SOURCE/OFF) on the unit, then lightly push the left side in. Attaching the front panel Place the hole A of the front panel. 9 Note Do not put anything on the inner surface of the front panel onto the spindle B on the unit to operate the unit.
Operating Instructions
Page 14
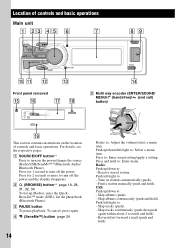
... albums (push). - enter the QuickBrowZer™ mode (USB); list the phonebook (Bluetooth Phone). Press and hold ). Location of controls and basic operations Main unit Front panel removed E Multi way encoder (ENTER/SOUND/ MENU/ (handsfree)/ (end call) button) This section contains instructions on the power/change the source (Radio/USB/SensMe™...
... albums (push). - enter the QuickBrowZer™ mode (USB); list the phonebook (Bluetooth Phone). Press and hold ). Location of controls and basic operations Main unit Front panel removed E Multi way encoder (ENTER/SOUND/ MENU/ (handsfree)/ (end call) button) This section contains instructions on the power/change the source (Radio/USB/SensMe™...

Operating Instructions
Page 20
... the internal/ external or both USB connectors. Playing back via the USB (internal) connector 1 Press (OPEN). Support site http://esupport.sony.com http://www.sony.com/mobileAV • MSC (Mass Storage Class) type USB devices compliant with wireless communication functions on the TUNE TRAY, as it may... locks shut. USB devices For details on the TUNE TRAY. 4 Remove the USB device. 5 Slide in the TUNE TRAY, and close the front panel. Playing back a USB device A USB device can be connected to start playback, repeat step 6. "USB Internal" appears, and playback starts. To ...
... the internal/ external or both USB connectors. Playing back via the USB (internal) connector 1 Press (OPEN). Support site http://esupport.sony.com http://www.sony.com/mobileAV • MSC (Mass Storage Class) type USB devices compliant with wireless communication functions on the TUNE TRAY, as it may... locks shut. USB devices For details on the TUNE TRAY. 4 Remove the USB device. 5 Slide in the TUNE TRAY, and close the front panel. Playing back a USB device A USB device can be connected to start playback, repeat step 6. "USB Internal" appears, and playback starts. To ...

Operating Instructions
Page 21
...the number of folders exceeds 5,000, it may take time for playback to begin, depending on the amount of recorded data. • DRM (Digital Rights Management) files may not be played. • During playback or fast-forward/reverse of a VBR (Variable Bit Rate) MP3/WMA/AAC ... To change display items C, press (DSPL). copyright-protected * The maximum recommended number of an obstruction in the TUNE TRAY and close the front panel before playback, as follows. - It is recommended. lossless compression - For details, visit the support site. • The maximum number of displayable...
...the number of folders exceeds 5,000, it may take time for playback to begin, depending on the amount of recorded data. • DRM (Digital Rights Management) files may not be played. • During playback or fast-forward/reverse of a VBR (Variable Bit Rate) MP3/WMA/AAC ... To change display items C, press (DSPL). copyright-protected * The maximum recommended number of an obstruction in the TUNE TRAY and close the front panel before playback, as follows. - It is recommended. lossless compression - For details, visit the support site. • The maximum number of displayable...

Operating Instructions
Page 25
... http://www.sony.com/mobileAV Notes • Do not place a cellular phone or a device with wireless communication functions on the TUNE TRAY. To switch between USB devices, press (MODE). The front panel is used as malfunction may be connected to the internal/ external or both USB connectors. Playing back via ... USB (internal) connector Before connecting the iPod, turn down . 2 Press PUSH OPEN on the TUNE TRAY, as it locks shut. 6 Close the front panel. Playing back iPod The iPod can be terminated. • Do not leave an iPod in the TUNE TRAY by pressing PUSH CLOSE on the iPod...
... http://www.sony.com/mobileAV Notes • Do not place a cellular phone or a device with wireless communication functions on the TUNE TRAY. To switch between USB devices, press (MODE). The front panel is used as malfunction may be connected to the internal/ external or both USB connectors. Playing back via ... USB (internal) connector Before connecting the iPod, turn down . 2 Press PUSH OPEN on the TUNE TRAY, as it locks shut. 6 Close the front panel. Playing back iPod The iPod can be terminated. • Do not leave an iPod in the TUNE TRAY by pressing PUSH CLOSE on the iPod...

Operating Instructions
Page 26
... the dock connector. "USB Internal" appears. The iPod will appear on the iPod, or may not appear in the TUNE TRAY, and close the front panel. Press and hold (SOURCE/OFF) for iPhone When you connect an iPhone via the USB (external) connector Before connecting the iPod, turn on automatically, and...
... the dock connector. "USB Internal" appears. The iPod will appear on the iPod, or may not appear in the TUNE TRAY, and close the front panel. Press and hold (SOURCE/OFF) for iPhone When you connect an iPhone via the USB (external) connector Before connecting the iPod, turn on automatically, and...
Operating Instructions
Page 27
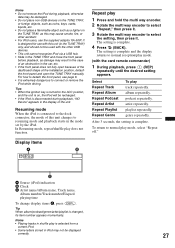
... the unit is on the TUNE TRAY, as damage may result in the case of an obstruction in the car, etc. • If the front panel does not fully open because of the unit. Select Repeat Track Repeat Album Repeat Podcast Repeat Artist Repeat Playlist Repeat Genre To play 1 Press and... by the iPod. To return to resuming mode and playback starts in the display of the dashboard shape at the installation position, detach the front panel and open the TUNE TRAY manually. In Resuming mode, repeat/shuffle play mode, select "Repeat off." The setting is designed for use with this may...
... the unit is on the TUNE TRAY, as damage may result in the case of an obstruction in the car, etc. • If the front panel does not fully open because of the unit. Select Repeat Track Repeat Album Repeat Podcast Repeat Artist Repeat Playlist Repeat Genre To play 1 Press and... by the iPod. To return to resuming mode and playback starts in the display of the dashboard shape at the installation position, detach the front panel and open the TUNE TRAY manually. In Resuming mode, repeat/shuffle play mode, select "Repeat off." The setting is designed for use with this may...

Operating Instructions
Page 33
The name and the phone number appear in microphone of this unit is located on the rear of the front panel (page 15). Operations during a call Press (SOURCE/OFF). Note Configurable during a call Presetting the volume of the ringtone and talker's voice. Note Depending on the ...
The name and the phone number appear in microphone of this unit is located on the rear of the front panel (page 15). Operations during a call Press (SOURCE/OFF). Note Configurable during a call Presetting the volume of the ringtone and talker's voice. Note Depending on the ...

Operating Instructions
Page 41
...cellular phone: "Default," "Cellular." Bluetooth PhoneBook Select Select the phonebook : "Cellular," "Head Unit." Open the front panel to not answer automatically until the multi way encoder is turned off the unit beforehand if your car has been parked... in the display. If the front panel is detached when the ignition is used. • For how to remove the USB device or iPod, ... BT Initialize*3 (page 36) *1 When USB/SensMe™/iPod source is activated. *2 When FM is received. *3 When the unit is pressed. -
...cellular phone: "Default," "Cellular." Bluetooth PhoneBook Select Select the phonebook : "Cellular," "Head Unit." Open the front panel to not answer automatically until the multi way encoder is turned off the unit beforehand if your car has been parked... in the display. If the front panel is detached when the ignition is used. • For how to remove the USB device or iPod, ... BT Initialize*3 (page 36) *1 When USB/SensMe™/iPod source is activated. *2 When FM is received. *3 When the unit is pressed. -
Operating Instructions
Page 43
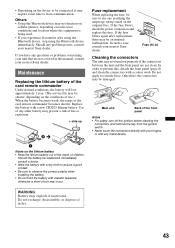
...stop using the Bluetooth device immediately. In such a case, consult your nearest Sony dealer. Fuse (10 A) Cleaning the connectors The unit may not function properly if the connectors between the unit and the front panel are not covered in fire. 43 Notes on the lithium battery • ..., and remove the key from the ignition switch. • Never touch the connectors directly with your nearest Sony dealer. Do not recharge, disassemble, or dispose of in this , detach the front panel (page 8) and clean the connectors with metallic tweezers, otherwise a short-circuit may be sure to use...
...stop using the Bluetooth device immediately. In such a case, consult your nearest Sony dealer. Fuse (10 A) Cleaning the connectors The unit may not function properly if the connectors between the unit and the front panel are not covered in fire. 43 Notes on the lithium battery • ..., and remove the key from the ignition switch. • Never touch the connectors directly with your nearest Sony dealer. Do not recharge, disassemble, or dispose of in this , detach the front panel (page 8) and clean the connectors with metallic tweezers, otherwise a short-circuit may be sure to use...

Operating Instructions
Page 44
... kHz Antenna (aerial) terminal: External antenna (aerial) connector Intermediate frequency: 25 kHz Sensitivity: 26 µV USB Player section Interface: USB (High-speed) Maximum current: 500 mA Wireless Communication Communication System: Bluetooth Standard version 2.1 + EDR... at 4 Ohms < 1% THD+N SN Ratio: 80 dBA (reference: 1 Watt into 4 Ohms) Tuner section FM Tuning range: 87.5 - 107.9 MHz Antenna (aerial) terminal: External antenna (aerial) connector Intermediate frequency: 150 ...protection collar. 1 Detach the front panel (page 8). 2 Pinch both release keys simultaneously until they click.
... kHz Antenna (aerial) terminal: External antenna (aerial) connector Intermediate frequency: 25 kHz Sensitivity: 26 µV USB Player section Interface: USB (High-speed) Maximum current: 500 mA Wireless Communication Communication System: Bluetooth Standard version 2.1 + EDR... at 4 Ohms < 1% THD+N SN Ratio: 80 dBA (reference: 1 Watt into 4 Ohms) Tuner section FM Tuning range: 87.5 - 107.9 MHz Antenna (aerial) terminal: External antenna (aerial) connector Intermediate frequency: 150 ...protection collar. 1 Detach the front panel (page 8). 2 Pinch both release keys simultaneously until they click.


