Operating Instructions
Page 2
... LA PROVINCE DE QUÉBEC. Reorient or relocate the receiving antenna. - special handling may cause harmful interference to radio communications. Applicable accessory: Remote commander 2 If this equipment does cause harmful interference to radio or television reception, which can radiate radio frequency energy and, if not installed and used in accordance with separate collection systems) This symbol on the...
... LA PROVINCE DE QUÉBEC. Reorient or relocate the receiving antenna. - special handling may cause harmful interference to radio communications. Applicable accessory: Remote commander 2 If this equipment does cause harmful interference to radio or television reception, which can radiate radio frequency energy and, if not installed and used in accordance with separate collection systems) This symbol on the...
Operating Instructions
Page 3
... sure to set the Auto Off function, press and hold (SOURCE/OFF) until the display disappears each time you will be caused by qualified service staff only. and XM Satellite Radio Inc. On certain batteries this symbol might be used in the European Union and other countries. 3 By ensuring these batteries are trademarks of electrical and electronic equipment. iPod, iPod classic, iPod nano, and iPod touch...
... sure to set the Auto Off function, press and hold (SOURCE/OFF) until the display disappears each time you will be caused by qualified service staff only. and XM Satellite Radio Inc. On certain batteries this symbol might be used in the European Union and other countries. 3 By ensuring these batteries are trademarks of electrical and electronic equipment. iPod, iPod classic, iPod nano, and iPod touch...
Operating Instructions
Page 4
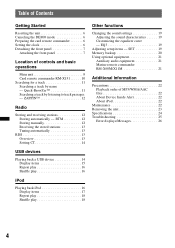
... manually 12 Receiving the stored stations 13 Tuning automatically 13 RDS 13 Overview 13 Setting CT 14 USB devices Playing back a USB device 14 Display items 15 Repeat play 16 Shuffle play 16 iPod Playing back iPod 16 Display items 17 Repeat play 18 Shuffle play 18 Other functions Changing the sound settings 19 Adjusting the sound characteristics 19 Customizing the equalizer curve - ZAPPIN 12 Radio Storing and receiving stations 12 Storing automatically - EQ3 19 Adjusting setup items - SET 19 Memory backup 20 Using...
... manually 12 Receiving the stored stations 13 Tuning automatically 13 RDS 13 Overview 13 Setting CT 14 USB devices Playing back a USB device 14 Display items 15 Repeat play 16 Shuffle play 16 iPod Playing back iPod 16 Display items 17 Repeat play 18 Shuffle play 18 Other functions Changing the sound settings 19 Adjusting the sound characteristics 19 Customizing the equalizer curve - ZAPPIN 12 Radio Storing and receiving stations 12 Storing automatically - EQ3 19 Adjusting setup items - SET 19 Memory backup 20 Using...
Operating Instructions
Page 6
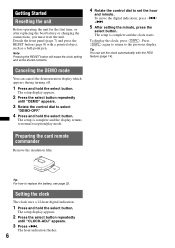
... the DEMO mode You can set the hour and minute. Preparing the card remote commander Remove the insulation film. Note Pressing the RESET button will erase the clock setting and some stored contents. 4 Rotate the control dial to normal reception/play mode. Getting Started Resetting the unit Before operating the unit for the first time, or after replacing the boat battery or changing the connections, you must reset the unit. To display the clock, press...
... the DEMO mode You can set the hour and minute. Preparing the card remote commander Remove the insulation film. Note Pressing the RESET button will erase the clock setting and some stored contents. 4 Rotate the control dial to normal reception/play mode. Getting Started Resetting the unit Before operating the unit for the first time, or after replacing the boat battery or changing the connections, you must reset the unit. To display the clock, press...
Operating Instructions
Page 7
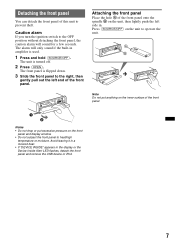
... alarm will only sound if the built-in the display or the Device Inside Alert LED flashes, detach the front panel and remove the USB device or iPod. 7 Notes • Do not drop or put anything on the unit to prevent theft. Attaching the front panel Place the hole A of the front panel onto the spindle B on the front panel and display window. •...
... alarm will only sound if the built-in the display or the Device Inside Alert LED flashes, detach the front panel and remove the USB device or iPod. 7 Notes • Do not drop or put anything on the unit to prevent theft. Attaching the front panel Place the hole A of the front panel onto the spindle B on the front panel and display window. •...
Operating Instructions
Page 9
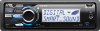
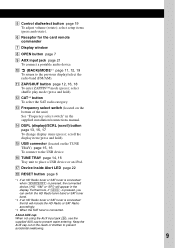
... the HD Radio or SAT Radio accordingly. *3 When the SAT tuner is pressed, the connected device ("HD," "XM" or "SR") will appear in the supplied installation/connections manual. About AUX cap When not using the AUX input jack (9), use the supplied AUX cap to prevent accidental swallowing. 9 K ZAP/SHUF button page 12, 16, 18 To enter ZAPPIN™ mode (press); E Control dial/select button page 19 To adjust volume (rotate); O USB connector (located on...
... the HD Radio or SAT Radio accordingly. *3 When the SAT tuner is pressed, the connected device ("HD," "XM" or "SR") will appear in the supplied installation/connections manual. About AUX cap When not using the AUX input jack (9), use the supplied AUX cap to prevent accidental swallowing. 9 K ZAP/SHUF button page 12, 16, 18 To enter ZAPPIN™ mode (press); E Control dial/select button page 19 To adjust volume (rotate); O USB connector (located on...
Operating Instructions
Page 10
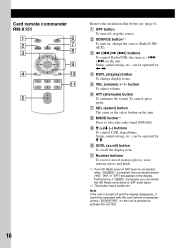
..., the connected device ("HD," "XM" or "SR") will appear in the display. A OFF button To turn on the unit is turned off ; C buttons To control Radio/USB, the same as the select button on the unit. Setup, sound setting, etc., can be operated by < ,. Card remote commander RM-X151 1 2 3 4 OFF ATT SOURCE SEL MODE + - DSPL SCRL 6 7 8 9 q; 1 2 3 4 5 6 qa 5 + VOL - F ATT (attenuate) button To attenuate the sound. button To adjust volume. H MODE button*1 Press to activate the unit first. 10 D DSPL (display) button To change the source (Radio/USB/ AUX). G SEL...
..., the connected device ("HD," "XM" or "SR") will appear in the display. A OFF button To turn on the unit is turned off ; C buttons To control Radio/USB, the same as the select button on the unit. Setup, sound setting, etc., can be operated by < ,. Card remote commander RM-X151 1 2 3 4 OFF ATT SOURCE SEL MODE + - DSPL SCRL 6 7 8 9 q; 1 2 3 4 5 6 qa 5 + VOL - F ATT (attenuate) button To attenuate the sound. button To adjust volume. H MODE button*1 Press to activate the unit first. 10 D DSPL (display) button To change the source (Radio/USB/ AUX). G SEL...
Operating Instructions
Page 12
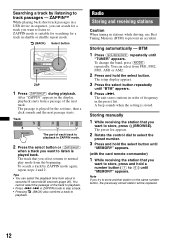
... 20). Tips • You can select the playback time from a passage of frequency in stations while driving, use Best Tuning Memory (BTM) to playback. Radio Storing and receiving stations Caution When tuning in the preset list. The unit stores stations in order of the next track. ZAPPIN™ While playing back short track passages in a USB device in shuffle or shuffle repeat mode. (BACK) Select button ZAP 1 Press (ZAP/SHUF) during...
... 20). Tips • You can select the playback time from a passage of frequency in stations while driving, use Best Tuning Memory (BTM) to playback. Radio Storing and receiving stations Caution When tuning in the preset list. The unit stores stations in order of the next track. ZAPPIN™ While playing back short track passages in a USB device in shuffle or shuffle repeat mode. (BACK) Select button ZAP 1 Press (ZAP/SHUF) during...

Operating Instructions
Page 13
... button to the desired frequency (manual tuning). Scanning stops when the unit receives a station. Repeat this procedure until the desired station appears. repeatedly to fine adjust to receive the station. to receive via a list. 1 Select the band, then press (BROWSE). RDS services This unit automatically provides RDS services as follows: CT (Clock Time) The CT data from the RDS transmission sets the clock. To change display items A, B, press (DSPL). A Radio band, Function, Frequency, Preset number B Program service name, Clock, Frequency*, Preset number * While receiving...
... button to the desired frequency (manual tuning). Scanning stops when the unit receives a station. Repeat this procedure until the desired station appears. repeatedly to fine adjust to receive the station. to receive via a list. 1 Select the band, then press (BROWSE). RDS services This unit automatically provides RDS services as follows: CT (Clock Time) The CT data from the RDS transmission sets the clock. To change display items A, B, press (DSPL). A Radio band, Function, Frequency, Preset number B Program service name, Clock, Frequency*, Preset number * While receiving...
Operating Instructions
Page 14
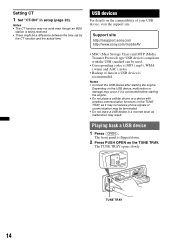
... it may not receive phone signals or communication may be a difference between the time set by the CT function and the actual time. Playing back a USB device 1 Press (OPEN). TUNE TRAY 14 Depending on the compatibility of data in a USB device is being received. • There might be terminated. • Do not leave a USB device in setup (page 20). Support site http://esupport.sony.com http://www.sony.com/mobileAV...
... it may not receive phone signals or communication may be a difference between the time set by the CT function and the actual time. Playing back a USB device 1 Press (OPEN). TUNE TRAY 14 Depending on the compatibility of data in a USB device is being received. • There might be terminated. • Do not leave a USB device in setup (page 20). Support site http://esupport.sony.com http://www.sony.com/mobileAV...
Operating Instructions
Page 15
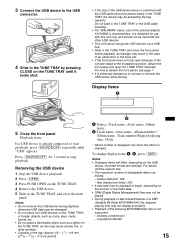
... the support site. • The maximum number of displayable data is extremely dangerous to connect or remove the USB device while driving. Do not slide in the TUNE TRAY or the USB cable forcefully. • For "WALKMAN" users, use with this may cause smoke, fire, or other USB devices. • This unit cannot recognize USB devices via a USB hub. • Slide in the TUNE TRAY and close the front panel. If a USB device...
... the support site. • The maximum number of displayable data is extremely dangerous to connect or remove the USB device while driving. Do not slide in the TUNE TRAY or the USB cable forcefully. • For "WALKMAN" users, use with this may cause smoke, fire, or other USB devices. • This unit cannot recognize USB devices via a USB hub. • Slide in the TUNE TRAY and close the front panel. If a USB device...
Operating Instructions
Page 16
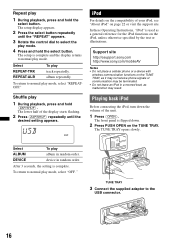
... Operating Instructions, "iPod" is flipped down the volume of the unit. 1 Press (OPEN). The TUNE TRAY opens slowly. Repeat play track repeatedly. To return to the USB connector. 16 Support site http://esupport.sony.com http://www.sony.com/mobileAV Notes • Do not place a cellular phone or a device with wireless communication functions on the TUNE TRAY. The front panel is used as malfunction may result. Select ALBUM DEVICE To play mode, select...
... Operating Instructions, "iPod" is flipped down the volume of the unit. 1 Press (OPEN). The TUNE TRAY opens slowly. Repeat play track repeatedly. To return to the USB connector. 16 Support site http://esupport.sony.com http://www.sony.com/mobileAV Notes • Do not place a cellular phone or a device with wireless communication functions on the TUNE TRAY. The front panel is used as malfunction may result. Select ALBUM DEVICE To play mode, select...
Operating Instructions
Page 17
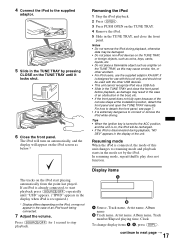
... unit cannot recognize iPod via a USB hub. • Slide in the TUNE TRAY and close the front panel. Resuming mode When the iPod is already connected, to next page t Press (SOURCE/OFF) for use the supplied adaptor XA-50IP. In resuming mode, repeat/shuffle play does not function. A Source, Track name, Artist name, Album name B Track name, Artist name, Album name, Track number/Elapsed playing time, Clock To change display...
... unit cannot recognize iPod via a USB hub. • Slide in the TUNE TRAY and close the front panel. Resuming mode When the iPod is already connected, to next page t Press (SOURCE/OFF) for use the supplied adaptor XA-50IP. In resuming mode, repeat/shuffle play does not function. A Source, Track name, Artist name, Album name B Track name, Artist name, Album name, Track number/Elapsed playing time, Clock To change display...
Operating Instructions
Page 19
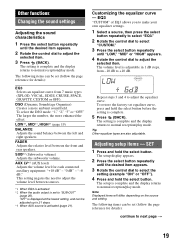
... 7 music types (XPLOD, VOCAL, EDGE, CRUISE, SPACE, GRAVITY, CUSTOM or OFF). LOW*1, MID*1, HIGH*1 (page 19) BALANCE Adjusts the sound balance between the front and rear speakers. "0 dB" - The volume level is complete and the display returns to normal reception/play mode. The setting is activated (page 21). Tip Other equalizer types are also adjustable. The setup display appears. 2 Press the select button repeatedly until the desired item appears. 3 Rotate the control...
... 7 music types (XPLOD, VOCAL, EDGE, CRUISE, SPACE, GRAVITY, CUSTOM or OFF). LOW*1, MID*1, HIGH*1 (page 19) BALANCE Adjusts the sound balance between the front and rear speakers. "0 dB" - The volume level is complete and the display returns to normal reception/play mode. The setting is activated (page 21). Tip Other equalizer types are also adjustable. The setup display appears. 2 Press the select button repeatedly until the desired item appears. 3 Rotate the control...
Operating Instructions
Page 20
... unit is turned off frequency: "OFF," "80Hz," "100Hz," "120Hz," "140Hz," "160Hz." Sound settings (except volume), setup items (except clock) and tuner presets are stored automatically. "AT": to "SUB-OUT." CONTRAST Adjusts the contrast for the installed viewing angle. "OFF": deactivate the dimmer. MONO*2 (Monaural Mode) Selects monaural reception mode to tune normal reception. HPF (High Pass Filter) Selects the front/rear speaker cut -off : "NO," "30S (Seconds)," "30M (Minutes)," "60M (Minutes)." DEMO (Demonstration) Activates...
... unit is turned off frequency: "OFF," "80Hz," "100Hz," "120Hz," "140Hz," "160Hz." Sound settings (except volume), setup items (except clock) and tuner presets are stored automatically. "AT": to "SUB-OUT." CONTRAST Adjusts the contrast for the installed viewing angle. "OFF": deactivate the dimmer. MONO*2 (Monaural Mode) Selects monaural reception mode to tune normal reception. HPF (High Pass Filter) Selects the front/rear speaker cut -off : "NO," "30S (Seconds)," "30M (Minutes)," "60M (Minutes)." DEMO (Demonstration) Activates...
Operating Instructions
Page 21
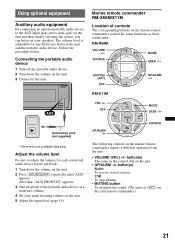
... volume on the unit. 3 Connect to the unit. RM-X60M VOLUME +/- MODE SOURCE SEEK -/+ MUTING (ATT) OFF RM-X11M VOL +/- Adjust the volume level Be sure to adjust the volume for any difference between the unit and the portable audio device. USB: To skip albums. • MUTING button To attenuate the sound. (The same as those on the card remote commander.) 21 Using optional equipment Auxiliary audio equipment By connecting an optional portable audio device to the AUX input jack (stereo...
... volume on the unit. 3 Connect to the unit. RM-X60M VOLUME +/- MODE SOURCE SEEK -/+ MUTING (ATT) OFF RM-X11M VOL +/- Adjust the volume level Be sure to adjust the volume for any difference between the unit and the portable audio device. USB: To skip albums. • MUTING button To attenuate the sound. (The same as those on the card remote commander.) 21 Using optional equipment Auxiliary audio equipment By connecting an optional portable audio device to the AUX input jack (stereo...
Operating Instructions
Page 22
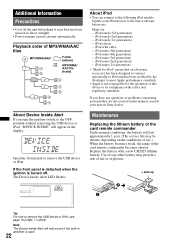
... is not responsible for the operation of this manual, consult your nearest Sony dealer. Maintenance Replacing the lithium battery of the card remote commander Under normal conditions, the battery will only sound if the built-in direct sunlight. • Power antenna (aerial) extends automatically. Update your boat has been moored in amplifier is turned off the unit beforehand if your iPod devices to the latest software before...
... is not responsible for the operation of this manual, consult your nearest Sony dealer. Maintenance Replacing the lithium battery of the card remote commander Under normal conditions, the battery will only sound if the built-in direct sunlight. • Power antenna (aerial) extends automatically. Update your boat has been moored in amplifier is turned off the unit beforehand if your iPod devices to the latest software before...
Operating Instructions
Page 24
... 4 ohms) General Outputs: Audio outputs terminal (front, sub/rear switchable) Power antenna (aerial) relay control terminal Power amplifier control terminal Inputs: BUS control input terminal BUS audio input terminal Remote controller input terminal Antenna (aerial) input terminal 24 Telephone ATT control terminal Illumination control terminal AUX input jack (stereo mini jack) USB signal input connector Tone controls: Low: ±10 dB at 60 Hz (XPLOD) Mid: ±10 dB at 1 kHz (XPLOD) High: ±10 dB at 10 kHz (XPLOD) Power requirements: 12 V DC boat battery (negative ground...
... 4 ohms) General Outputs: Audio outputs terminal (front, sub/rear switchable) Power antenna (aerial) relay control terminal Power amplifier control terminal Inputs: BUS control input terminal BUS audio input terminal Remote controller input terminal Antenna (aerial) input terminal 24 Telephone ATT control terminal Illumination control terminal AUX input jack (stereo mini jack) USB signal input connector Tone controls: Low: ±10 dB at 60 Hz (XPLOD) Mid: ±10 dB at 1 kHz (XPLOD) High: ±10 dB at 10 kHz (XPLOD) Power requirements: 12 V DC boat battery (negative ground...
Operating Instructions
Page 25
.... The Auto Off function activates after turning off the unit. t Turn off the unit. The sound is not correct. t When the DSO mode is turned off and the display disappears, it . t Perform manual tuning. t Set "MONO-ON" (page 20). USB playback You cannot play back items. A USB device does not work. This unit cannot recognize USB devices via a USB hub. The USB device takes longer to the unit. • Check the connection or fuse. • If the unit is...
.... The Auto Off function activates after turning off the unit. t Turn off the unit. The sound is not correct. t When the DSO mode is turned off and the display disappears, it . t Perform manual tuning. t Set "MONO-ON" (page 20). USB playback You cannot play back items. A USB device does not work. This unit cannot recognize USB devices via a USB hub. The USB device takes longer to the unit. • Check the connection or fuse. • If the unit is...
Operating Instructions
Page 26
... disconnecting a USB device, make sure to stop playback first for about 1 second.) When the SAT tuner is connected, storing an SAT radio channel into a preset failed. t Wait until any further. t Be sure to receive the channel that the USB device is out of this unit. The local seek mode is finished. NO MUSIC The USB device does not contain a music file. t Disconnect the USB device, then change the source by pressing (SOURCE/OFF...
... disconnecting a USB device, make sure to stop playback first for about 1 second.) When the SAT tuner is connected, storing an SAT radio channel into a preset failed. t Wait until any further. t Be sure to receive the channel that the USB device is out of this unit. The local seek mode is finished. NO MUSIC The USB device does not contain a music file. t Disconnect the USB device, then change the source by pressing (SOURCE/OFF...


