
Operating Instructions
Page 3
These limits are cautioned that any interference received, including interference that interference will not occur in CANADA "Memory Stick" This Class B digital apparatus complies with Canadian ICES-003. If this equipment. Connect the equipment into an outlet on , the user is connected...approved in order to comply with the limits for a digital device pursuant to Part 15 of FCC Rules. •This product contains mercury. "Memory Stick" This device complies with Part 15 of this product may be used in accordance with the instructions, may cause harmful interference to the ...
These limits are cautioned that any interference received, including interference that interference will not occur in CANADA "Memory Stick" This Class B digital apparatus complies with Canadian ICES-003. If this equipment. Connect the equipment into an outlet on , the user is connected...approved in order to comply with the limits for a digital device pursuant to Part 15 of FCC Rules. •This product contains mercury. "Memory Stick" This device complies with Part 15 of this product may be used in accordance with the instructions, may cause harmful interference to the ...

Operating Instructions
Page 4
...;Playing back a tape (p. 41) •Recording still images on a "Memory Stick" (p. 48, 144) •Recording moving pictures on a "Memory Stick" (p. 160) •Viewing still images recorded on a "Memory Stick" (p. 172) •Viewing moving pictures on a "Memory Stick" (p. 175) Main Features •Viewing images recorded on a "Memory Stick" using the USB cable (p. 206, 210) •Viewing...
...;Playing back a tape (p. 41) •Recording still images on a "Memory Stick" (p. 48, 144) •Recording moving pictures on a "Memory Stick" (p. 160) •Viewing still images recorded on a "Memory Stick" (p. 172) •Viewing moving pictures on a "Memory Stick" (p. 175) Main Features •Viewing images recorded on a "Memory Stick" using the USB cable (p. 206, 210) •Viewing...

Operating Instructions
Page 5
... than 12 ×, select the digital zoom power in D ZOOM in the menu settings.) •Fader (p. 55) •Digital effect (p. 58) •Titles (p. 126) •MEMORY MIX (p. 155) Functions for giving a natural appearance to your recordings •Sports lesson (p. 66) •Landscape (p. 66) •Manual focus (p. 75) •Spot Focus (p. 77...
... than 12 ×, select the digital zoom power in D ZOOM in the menu settings.) •Fader (p. 55) •Digital effect (p. 58) •Titles (p. 126) •MEMORY MIX (p. 155) Functions for giving a natural appearance to your recordings •Sports lesson (p. 66) •Landscape (p. 66) •Manual focus (p. 75) •Spot Focus (p. 77...

Operating Instructions
Page 6
... LIGHT 36 Shooting subjects lit by date - Display function 43 Viewing the recording on TV 47 Advanced Recording Operations Recording still images on a "Memory Stick" during tape recording ........ 48 Recording still images on a tape 8 - Digital effect 58 Presetting the adjustment for a photo - Spot ... 116 Setting time values 121 Superimposing a title 126 Making your own titles 129 Labeling a cassette 131 Erasing the cassette memory data .... 133 6 END SEARCH / EDITSEARCH / Rec Review 39 Playback - TITLE SEARCH ..... 89 Searching a recording by strong light - Digital...
... LIGHT 36 Shooting subjects lit by date - Display function 43 Viewing the recording on TV 47 Advanced Recording Operations Recording still images on a "Memory Stick" during tape recording ........ 48 Recording still images on a tape 8 - Digital effect 58 Presetting the adjustment for a photo - Spot ... 116 Setting time values 121 Superimposing a title 126 Making your own titles 129 Labeling a cassette 131 Erasing the cassette memory data .... 133 6 END SEARCH / EDITSEARCH / Rec Review 39 Playback - TITLE SEARCH ..... 89 Searching a recording by strong light - Digital...

Operating Instructions
Page 7
... trouble 224 Self-diagnosis display 231 Warning indicators and messages .... 232 Additional Information Compatibility of contents Getting Started "Memory Stick" Operations Using a "Memory Stick" - Digital program editing (on an image - SLIDE SHOW 182 Preventing accidental erasure - PRINT MARK 187...Specifications 250 Quick Reference Identifying parts and controls 252 Index 262 7 For Windows users 201 Viewing images recorded on a "Memory Stick" on a "Memory Stick" - Table of DVCAM and DV formats 234 Usable cassettes 236 About the "InfoLITHIUM" battery pack 239 About ...
... trouble 224 Self-diagnosis display 231 Warning indicators and messages .... 232 Additional Information Compatibility of contents Getting Started "Memory Stick" Operations Using a "Memory Stick" - Digital program editing (on an image - SLIDE SHOW 182 Preventing accidental erasure - PRINT MARK 187...Specifications 250 Quick Reference Identifying parts and controls 252 Index 262 7 For Windows users 201 Viewing images recorded on a "Memory Stick" on a "Memory Stick" - Table of DVCAM and DV formats 234 Usable cassettes 236 About the "InfoLITHIUM" battery pack 239 About ...

Operating Instructions
Page 9
To MEMORY CAMERA stop recording, press START/STOP again. If you purchase your camcorder by holding the viewfinder, the LCD panel, the battery pack or the microphone. 9 ... green button. 2 Press m to CAMERA while pressing the small green button. POWER VCR Your camcorder OFF (CHG) starts recording. OFF (CHG) VCR MEMORY CAMERA 3 Press OPEN to start playback. REW MEMORY CAMERA 3 Press N to open the LCD panel. Recording a picture (p. 25) 1 Remove the lens cap. Viewfinder When the LCD panel is set...
To MEMORY CAMERA stop recording, press START/STOP again. If you purchase your camcorder by holding the viewfinder, the LCD panel, the battery pack or the microphone. 9 ... green button. 2 Press m to CAMERA while pressing the small green button. POWER VCR Your camcorder OFF (CHG) starts recording. OFF (CHG) VCR MEMORY CAMERA 3 Press OPEN to start playback. REW MEMORY CAMERA 3 Press N to open the LCD panel. Recording a picture (p. 25) 1 Remove the lens cap. Viewfinder When the LCD panel is set...

Operating Instructions
Page 10
...Use the battery pack when using your camcorder. "Memory Stick" slot 10 MEMORY EJECT Press the MEMORY EJECT once lightly to open the "Memory Stick" slot. 2 Insert a "Memory Stick" in the "Memory Stick" slot as far as illustrated. Recording on a "Memory Stick" This chapter introduces you to the basic features...adaptor (supplied) Quick Start Guide Connect the plug with the B mark facing up . Quick Start Guide - Inserting a "Memory Stick" (p. 137) 1 Slide MEMORY OPEN in parentheses "( )" for more information. See the page in the direction of your camcorder outdoors (p. 15).
...Use the battery pack when using your camcorder. "Memory Stick" slot 10 MEMORY EJECT Press the MEMORY EJECT once lightly to open the "Memory Stick" slot. 2 Insert a "Memory Stick" in the "Memory Stick" slot as far as illustrated. Recording on a "Memory Stick" This chapter introduces you to the basic features...adaptor (supplied) Quick Start Guide Connect the plug with the B mark facing up . Quick Start Guide - Inserting a "Memory Stick" (p. 137) 1 Slide MEMORY OPEN in parentheses "( )" for more information. See the page in the direction of your camcorder outdoors (p. 15).

Operating Instructions
Page 11
...the date and time for a picture, set to off. The last recorded image is closed, use the viewfinder with your eyesight (p. 29). OFF (CHG) MEMORY CAMERA 4 Press PHOTO 5 PressPHOTO lightly. up your camcorder, the clock setting is on the screen stops recorded on the LCD screen (p. 172) 1 Set... the POWER switch to POWER VCR MEMORY or VCR while OFF (CHG) pressing the small green button. If you purchase your camcorder by holding the viewfinder, the LCD panel, the battery...
...the date and time for a picture, set to off. The last recorded image is closed, use the viewfinder with your eyesight (p. 29). OFF (CHG) MEMORY CAMERA 4 Press PHOTO 5 PressPHOTO lightly. up your camcorder, the clock setting is on the screen stops recorded on the LCD screen (p. 172) 1 Set... the POWER switch to POWER VCR MEMORY or VCR while OFF (CHG) pressing the small green button. If you purchase your camcorder by holding the viewfinder, the LCD panel, the battery...
Operating Instructions
Page 12
...you can hear a beep to indicate that you need an NTSC system-based TV. PHOTO SEARCH (p. 92) Functions you can operate only with cassette memory. Superimposing a title (p. 126) - Note on TV color systems TV color systems differ depending on the DVCAM/DV format. Set the POWER switch ...that the operation is based on the country or region. You see this manual, buttons and settings on whether or not the tape has a cassette memory are shown in the introduction of cassette types, see page 236. DATE SEARCH (p. 90) - Unauthorized recording of such materials may be contrary to...
...you can hear a beep to indicate that you need an NTSC system-based TV. PHOTO SEARCH (p. 92) Functions you can operate only with cassette memory. Superimposing a title (p. 126) - Note on TV color systems TV color systems differ depending on the DVCAM/DV format. Set the POWER switch ...that the operation is based on the country or region. You see this manual, buttons and settings on whether or not the tape has a cassette memory are shown in the introduction of cassette types, see page 236. DATE SEARCH (p. 90) - Unauthorized recording of such materials may be contrary to...

Operating Instructions
Page 14
...-FM50 battery pack (1) (p. 15, 16) 3 A/V connecting cable (1) (p. 47) 4 Wireless Remote Commander (1) (p. 258) 5 Size AA (R6) battery for Remote Commander (2) (p. 259) 6 Shoulder strap (1) 7 Lens cap (1) (p. 25) 8 "Memory Stick" (1) (p. 135) 9 USB cable (1) (p. 190) 0 CD-ROM (SPVD-008 USB Driver) (1) (p. 195) qa Cleaning cloth (1) (p. 245) qs Wide lens hood (1) (p. 32) qd XLR adaptor (with...
...-FM50 battery pack (1) (p. 15, 16) 3 A/V connecting cable (1) (p. 47) 4 Wireless Remote Commander (1) (p. 258) 5 Size AA (R6) battery for Remote Commander (2) (p. 259) 6 Shoulder strap (1) 7 Lens cap (1) (p. 25) 8 "Memory Stick" (1) (p. 135) 9 USB cable (1) (p. 190) 0 CD-ROM (SPVD-008 USB Driver) (1) (p. 195) qa Cleaning cloth (1) (p. 245) qs Wide lens hood (1) (p. 32) qd XLR adaptor (with...

Operating Instructions
Page 16
... appears in minutes on your camcorder. 16 Fully charging the battery allows you to use the battery longer than usual. 2 14 POWER VCR OFF (CHG) MEMORY CAMERA After charging the battery pack Disconnect the AC power adaptor from the DC IN jack on the display window. See page 239 for your...
... appears in minutes on your camcorder. 16 Fully charging the battery allows you to use the battery longer than usual. 2 14 POWER VCR OFF (CHG) MEMORY CAMERA After charging the battery pack Disconnect the AC power adaptor from the DC IN jack on the display window. See page 239 for your...

Operating Instructions
Page 20
.... (1) Press MENU to display the menu settings while the POWER switch is set the POWER switch to CAMERA or MEMORY unless you do not use your camcorder for about four month,sthedateandtimemaybe cleared from memory (bars may appear) because the built-in rechargeable battery installed in that you set to CAMERA or... MEMORY. (2) Turn the SEL/PUSH EXEC dial to select , then press the dial. (3) Turn the SEL/PUSH EXEC dial to select CLOCK SET, then press the ...
.... (1) Press MENU to display the menu settings while the POWER switch is set the POWER switch to CAMERA or MEMORY unless you do not use your camcorder for about four month,sthedateandtimemaybe cleared from memory (bars may appear) because the built-in rechargeable battery installed in that you set to CAMERA or... MEMORY. (2) Turn the SEL/PUSH EXEC dial to select , then press the dial. (3) Turn the SEL/PUSH EXEC dial to select CLOCK SET, then press the ...

Operating Instructions
Page 21
... and time "--:--:--" and are recorded on the data code of your camcorder operates on the time indicator The internal clock of the tape and the "Memory Stick."
... and time "--:--:--" and are recorded on the data code of your camcorder operates on the time indicator The internal clock of the tape and the "Memory Stick."
Operating Instructions
Page 22
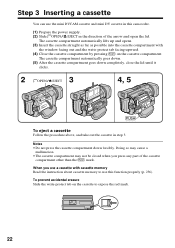
... lid. The cassette compartment automatically lifts up and opens. (3) Insert the cassette straight as far as possible into the cassette compartment with cassette memory Read the instruction about cassette memory to expose the red mark. 22 Doing so may cause a malfunction. •The cassette compartment may not be closed when you use...
... lid. The cassette compartment automatically lifts up and opens. (3) Insert the cassette straight as far as possible into the cassette compartment with cassette memory Read the instruction about cassette memory to expose the red mark. 22 Doing so may cause a malfunction. •The cassette compartment may not be closed when you use...

Operating Instructions
Page 23
The display returns to PAGE1/PAGE2. Operation buttons appear on the LCD screen. (6) Press a desired operation item. CAMERA OFF (CHG) VCR 3 POWER 1 MEMORY 23 Operation buttons appear on the LCD screen. (5) Press PAGE2 to go to PAGE2. To execute settings Press OK. Getting Started Step 4 Using the touch ...
The display returns to PAGE1/PAGE2. Operation buttons appear on the LCD screen. (6) Press a desired operation item. CAMERA OFF (CHG) VCR 3 POWER 1 MEMORY 23 Operation buttons appear on the LCD screen. (5) Press PAGE2 to go to PAGE2. To execute settings Press OK. Getting Started Step 4 Using the touch ...

Operating Instructions
Page 24
... (CALIBRATION) (p. 246). • WhentheLCDscreengetsdirty,cleanitwiththesuppliedcleaningcloth. Step 4 Using the touch panel Notes • Whenusingthetouchpanel,pressoperationbuttonswithyourthumbsupportingthe LCD panel from the back side of the items changes to MEMORY. 24
... (CALIBRATION) (p. 246). • WhentheLCDscreengetsdirty,cleanitwiththesuppliedcleaningcloth. Step 4 Using the touch panel Notes • Whenusingthetouchpanel,pressoperationbuttonswithyourthumbsupportingthe LCD panel from the back side of the items changes to MEMORY. 24
Operating Instructions
Page 25
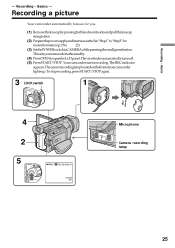
... the standby. (4) PressOPENtoopentheLCDpanel.Theviewfinderautomaticallyturnsoff. (5) PressSTART/STOP.Yourcamcorderstartsrecording.TheRECindicator appears. Recording - Basics - To stop recording, press START/STOP again. 3 LOCK switch 1 VCR POWER LOCK OFF (CHG) MEMORY CAMERA 4 2 5 POWER OFF (CHG) VCR 40min REC 00:00:00:01 DVCAM 32K Microphone Camera recording lamp...
... the standby. (4) PressOPENtoopentheLCDpanel.Theviewfinderautomaticallyturnsoff. (5) PressSTART/STOP.Yourcamcorderstartsrecording.TheRECindicator appears. Recording - Basics - To stop recording, press START/STOP again. 3 LOCK switch 1 VCR POWER LOCK OFF (CHG) MEMORY CAMERA 4 2 5 POWER OFF (CHG) VCR 40min REC 00:00:00:01 DVCAM 32K Microphone Camera recording lamp...
Operating Instructions
Page 26
... you use the Remote Commander for five minutes The head drum of the arrow, the POWER switch can also use a cassette with cassette memory, however, you can make the transition smooth even after ejecting the cassette if you leave your camcorder. Note on the recording format The playback...as you do not eject the cassette even if you record using the viewfinder. However, check the following: - The LOCK switch is set to MEMORY accidentally. If you use time when you turn off your camcorder in the DVCAM format and the DV format on PAGE2 during playback. After recording...
... you use the Remote Commander for five minutes The head drum of the arrow, the POWER switch can also use a cassette with cassette memory, however, you can make the transition smooth even after ejecting the cassette if you leave your camcorder. Note on the recording format The playback...as you do not eject the cassette even if you record using the viewfinder. However, check the following: - The LOCK switch is set to MEMORY accidentally. If you use time when you turn off your camcorder in the DVCAM format and the DV format on PAGE2 during playback. After recording...

Operating Instructions
Page 28
LCD BRT + the bar indicator OPEN To return to display PAGE1. (2) PressLCDBRT.ThescreentoadjustthebrightnessoftheLCDscreenappears. (3) AdjustthebrightnessoftheLCDscreenusing-/+. - : todim + : tobrighten (4) Press OKtoreturntoPAGE1/PAGE2. 1 2,3 FN LCD BRT OK - When you adjust LCD BRT The recorded picture will not be affected. 28 Even if you set the POWER switch to VCR, press FN to FN Press EXIT. Recording a picture Adjusting the brightness of the LCD screen (1) PressFNandselectPAGE2whilethePOWERswitchissettoCAMERAor MEMORY.
LCD BRT + the bar indicator OPEN To return to display PAGE1. (2) PressLCDBRT.ThescreentoadjustthebrightnessoftheLCDscreenappears. (3) AdjustthebrightnessoftheLCDscreenusing-/+. - : todim + : tobrighten (4) Press OKtoreturntoPAGE1/PAGE2. 1 2,3 FN LCD BRT OK - When you adjust LCD BRT The recorded picture will not be affected. 28 Even if you set the POWER switch to VCR, press FN to FN Press EXIT. Recording a picture Adjusting the brightness of the LCD screen (1) PressFNandselectPAGE2whilethePOWERswitchissettoCAMERAor MEMORY.

Operating Instructions
Page 33
... you shoot close to a subject If you cannot get a sharp focus, move the power zoom lever to the "W" side until the focus is set to MEMORY You cannot use zoom greater than 12× Zoom greater than 12× is at least about 80 cm (about 2 feet 5/8 inch) away from the...
... you shoot close to a subject If you cannot get a sharp focus, move the power zoom lever to the "W" side until the focus is set to MEMORY You cannot use zoom greater than 12× Zoom greater than 12× is at least about 80 cm (about 2 feet 5/8 inch) away from the...


