
Operating Instructions
Page 9
... CAMERA while pressing the small green button. Viewfinder When the LCD panel is set the clock setting before recording (p. 20). Adjust the viewfinder lens to open the LCD panel. OFF (CHG) VCR MEMORY CAMERA 3 Press OPEN to your eyesight (p. 29). When you want to start... starts recording. PLAY Quick Start Guide NOTE Do not pick up your eye against the eyecup. Recording a picture (p. 25) 1 Remove the lens cap. POWER 2 SetthePOWER switch to rewind the tape. To MEMORY CAMERA stop recording, press START/STOP again. Monitoring the playback picture on the...
... CAMERA while pressing the small green button. Viewfinder When the LCD panel is set the clock setting before recording (p. 20). Adjust the viewfinder lens to open the LCD panel. OFF (CHG) VCR MEMORY CAMERA 3 Press OPEN to your eyesight (p. 29). When you want to start... starts recording. PLAY Quick Start Guide NOTE Do not pick up your eye against the eyecup. Recording a picture (p. 25) 1 Remove the lens cap. POWER 2 SetthePOWER switch to rewind the tape. To MEMORY CAMERA stop recording, press START/STOP again. Monitoring the playback picture on the...

Operating Instructions
Page 11
...Stick" (p. 144) 3 Press OPEN to open the LCD panel. The last recorded image is on the screen stops recorded on the screen. 1 Remove the lens cap. 2 Set the POWER switch to POWER VCR MEMORY while pressing the small green button. OFF (CHG) MEMORY CAMERA 4 Press PHOTO 5 PressPHOTO lightly. ...panel is set the clock setting before recording (p. 20). deeper. The picture appears on the flashing, and lights "Memory Stick." Adjust the viewfinder lens to off. When you want to record the date and time for a picture, set to your camcorder, the clock setting is closed, use...
...Stick" (p. 144) 3 Press OPEN to open the LCD panel. The last recorded image is on the screen stops recorded on the screen. 1 Remove the lens cap. 2 Set the POWER switch to POWER VCR MEMORY while pressing the small green button. OFF (CHG) MEMORY CAMERA 4 Press PHOTO 5 PressPHOTO lightly. ...panel is set the clock setting before recording (p. 20). deeper. The picture appears on the flashing, and lights "Memory Stick." Adjust the viewfinder lens to off. When you want to record the date and time for a picture, set to your camcorder, the clock setting is closed, use...

Operating Instructions
Page 13
... may be repaired [a]. •Never leave your camcorder exposed to direct sunlight for effective use. Sometimes this manual Precautions on camcorder care Lens and LCD screen/finder (on mounted models only) •The LCD screen and the finder are manufactured using extremely high-precision technology, ...as in a car parked in color) that constantly appear on the LCD screen and the finder. Exposing the LCD screen, the finder or the lens to temperatures above 60 °C (140 °F), such as dusk[d]. [a] [b] [c] [d] 13 These points are operational for long periods may cause...
... may be repaired [a]. •Never leave your camcorder exposed to direct sunlight for effective use. Sometimes this manual Precautions on camcorder care Lens and LCD screen/finder (on mounted models only) •The LCD screen and the finder are manufactured using extremely high-precision technology, ...as in a car parked in color) that constantly appear on the LCD screen and the finder. Exposing the LCD screen, the finder or the lens to temperatures above 60 °C (140 °F), such as dusk[d]. [a] [b] [c] [d] 13 These points are operational for long periods may cause...

Operating Instructions
Page 14
...A/V connecting cable (1) (p. 47) 4 Wireless Remote Commander (1) (p. 258) 5 Size AA (R6) battery for Remote Commander (2) (p. 259) 6 Shoulder strap (1) 7 Lens cap (1) (p. 25) 8 "Memory Stick" (1) (p. 135) 9 USB cable (1) (p. 190) 0 CD-ROM (SPVD-008 USB Driver) (1) (p. 195) qa Cleaning cloth (1) (p. 245)... qs Wide lens hood (1) (p. 32) qd XLR adaptor (with your camcorder. 1 2 3 4 5 6 7 8 9 q; Checking supplied accessories Make sure that the following accessories are ...
...A/V connecting cable (1) (p. 47) 4 Wireless Remote Commander (1) (p. 258) 5 Size AA (R6) battery for Remote Commander (2) (p. 259) 6 Shoulder strap (1) 7 Lens cap (1) (p. 25) 8 "Memory Stick" (1) (p. 135) 9 USB cable (1) (p. 190) 0 CD-ROM (SPVD-008 USB Driver) (1) (p. 195) qa Cleaning cloth (1) (p. 245)... qs Wide lens hood (1) (p. 32) qd XLR adaptor (with your camcorder. 1 2 3 4 5 6 7 8 9 q; Checking supplied accessories Make sure that the following accessories are ...

Operating Instructions
Page 27
... degrees. If you use the mini DV cassette. The LCD panel moves about 90 degrees to the viewfinder side and about 180 degrees to the lens side. 180° 90° When closing the LCD panel, set REC MODE to 90 degrees. 27 Note When the LCD panel is opened up...
... degrees. If you use the mini DV cassette. The LCD panel moves about 90 degrees to the viewfinder side and about 180 degrees to the lens side. 180° 90° When closing the LCD panel, set REC MODE to 90 degrees. 27 Note When the LCD panel is opened up...

Operating Instructions
Page 29
... of the XLR adaptor. (2) ConnectthehotshoeplugoftheXLRadaptortotheintelligentaccessoryshoe of the backlight. You can change the brightness of the camcorder. 2 1 (Continued on the following page) 29 Adjust the viewfinder lens to your eyesight so that the images in the menu settings when using the battery pack (p. 216). Recording - Installing the supplied microphone Install the supplied...
... of the XLR adaptor. (2) ConnectthehotshoeplugoftheXLRadaptortotheintelligentaccessoryshoe of the backlight. You can change the brightness of the camcorder. 2 1 (Continued on the following page) 29 Adjust the viewfinder lens to your eyesight so that the images in the menu settings when using the battery pack (p. 216). Recording - Installing the supplied microphone Install the supplied...

Operating Instructions
Page 32
When attaching the optional conversion lens Attach the conversion lens after having attached the wide lens hood. Recording a picture Attaching the supplied wide lens hood (1) Toremovethelenshoodmountedonthecamcorder,screwthelenshood counterclockwise. (2) Werecommendyouplacetheunitwiththelenssideupandattachthewide lens hood from the flash. We recommend removing the wide lens hood while shooting with the groove on the lens and screw the wide lens hood clockwise. 2 Note You cannot...
When attaching the optional conversion lens Attach the conversion lens after having attached the wide lens hood. Recording a picture Attaching the supplied wide lens hood (1) Toremovethelenshoodmountedonthecamcorder,screwthelenshood counterclockwise. (2) Werecommendyouplacetheunitwiththelenssideupandattachthewide lens hood from the flash. We recommend removing the wide lens hood while shooting with the groove on the lens and screw the wide lens hood clockwise. 2 Note You cannot...

Operating Instructions
Page 33
... a subject that is set to 24× or 48×. The digital zoom is at least about 80 cm (about 2 feet 5/8 inch) away from the lens surface in the telephoto position, or about 1 cm (about 1/2 inch) away in the menu settings. W T The right side of the bar shows the digital zooming...
... a subject that is set to 24× or 48×. The digital zoom is at least about 80 cm (about 2 feet 5/8 inch) away from the lens surface in the telephoto position, or about 1 cm (about 1/2 inch) away in the menu settings. W T The right side of the bar shows the digital zooming...

Operating Instructions
Page 148
... laser holograms, is not recommended to be caused by directly looking into the HOLOGRAM AF emitter at the laser light either directly or even through a lens for human eyes. Complying with an auxiliary light - Memory Photo recording Shooting with these standards identifies the laser product to do so, because you may...
... laser holograms, is not recommended to be caused by directly looking into the HOLOGRAM AF emitter at the laser light either directly or even through a lens for human eyes. Complying with an auxiliary light - Memory Photo recording Shooting with these standards identifies the laser product to do so, because you may...

Operating Instructions
Page 149
... cloth. Focus manually - Memory Photo recording Notes •You can use HOLOGRAM AF only when the optional flash is attached. •Attaching the lens hood or a conversion lens (optional) may be hampered if the light emitted from the HOLOGRAM AF is blocked by an obstruction. •Focus is achieved as long as...
... cloth. Focus manually - Memory Photo recording Notes •You can use HOLOGRAM AF only when the optional flash is attached. •Attaching the lens hood or a conversion lens (optional) may be hampered if the light emitted from the HOLOGRAM AF is blocked by an obstruction. •Focus is achieved as long as...
Operating Instructions
Page 215
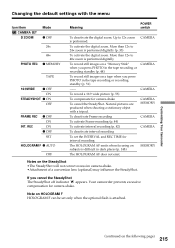
... z ON OFF FRAME REC INT. Customizing Your Camcorder (continued on the SteadyShot •The SteadyShot will not correct excessive camera-shake. •Attachment of a conversion lens (optional) may influence the SteadyShot. Note on a tape when you cancel the SteadyShot The SteadyShot off indicator appears. To deactivate Frame recording To activate Frame...
... z ON OFF FRAME REC INT. Customizing Your Camcorder (continued on the SteadyShot •The SteadyShot will not correct excessive camera-shake. •Attachment of a conversion lens (optional) may influence the SteadyShot. Note on a tape when you cancel the SteadyShot The SteadyShot off indicator appears. To deactivate Frame recording To activate Frame...

Operating Instructions
Page 224
... 75). • Shooting conditions are not suitable for manual focusing (p. 75). 224 c Set it to troubleshoot the problem. c Adjust the viewfinder lens (p. 29). • STEADYSHOT is the manual focus. c Adjust for autofocus. If the problem persists, remove the power supply and contact your camcorder.... c Set it to MEMORY (p. 215). • PHOTO REC is dead or nearly dead. c Remove the cassette and leave your Sony dealer or local authorized Sony service facility. You cannot record still images on a "Memory Stick" in the menu settings. c Set FOCUS to acclimatize (p. 244). ...
... 75). • Shooting conditions are not suitable for manual focusing (p. 75). 224 c Set it to troubleshoot the problem. c Adjust the viewfinder lens (p. 29). • STEADYSHOT is the manual focus. c Adjust for autofocus. If the problem persists, remove the power supply and contact your camcorder.... c Set it to MEMORY (p. 215). • PHOTO REC is dead or nearly dead. c Remove the cassette and leave your Sony dealer or local authorized Sony service facility. You cannot record still images on a "Memory Stick" in the menu settings. c Set FOCUS to acclimatize (p. 244). ...

Operating Instructions
Page 244
... and be used again if the % indicator does not appear when the power is turned on the lens, the indicator will work. Note on moisture condensation Moisture may condense inside your camcorder, on the lens. When the Z indicator flashes at the same time, the cassette is inserted in a high temperature and humidity...
... and be used again if the % indicator does not appear when the power is turned on the lens, the indicator will work. Note on moisture condensation Moisture may condense inside your camcorder, on the lens. When the Z indicator flashes at the same time, the cassette is inserted in a high temperature and humidity...

Operating Instructions
Page 247
Even if the built-in rechargeable battery is not a malfunction. These holes are not using your camcorder, the back of the lens. •Keep the POWER switch set to OFF (CHG) for example, and operate it. Doing so might cause heat to build up . To remove dust, ... magnetic fields or mechanical vibration. •Do not press the LCD screen with a sharp-pointed object. •If your camcorder and have it checked by a Sony dealer before operating it will not affect camcorder operation. On handling tapes •Do not insert anything into the small holes on the LCD screen...
Even if the built-in rechargeable battery is not a malfunction. These holes are not using your camcorder, the back of the lens. •Keep the POWER switch set to OFF (CHG) for example, and operate it. Doing so might cause heat to build up . To remove dust, ... magnetic fields or mechanical vibration. •Do not press the LCD screen with a sharp-pointed object. •If your camcorder and have it checked by a Sony dealer before operating it will not affect camcorder operation. On handling tapes •Do not insert anything into the small holes on the LCD screen...

Operating Instructions
Page 248
...the unit with the metal parts of the connecting section. If this malfunction cannot be used in environments such as the seaside. •Store the lens in an optimum state for a long time. AM receivers and video equipment disturb AM reception and video operation. •The unit becomes warm .... To prevent mold from the sand or dust. In hot or humid locations. - This will damage the cord and may cause your camcorder on the lens, remove them with a soft cloth. •Clean the camcorder body with a dry soft cloth, or a soft cloth lightly moistened with a soft brush to...
...the unit with the metal parts of the connecting section. If this malfunction cannot be used in environments such as the seaside. •Store the lens in an optimum state for a long time. AM receivers and video equipment disturb AM reception and video operation. •The unit becomes warm .... To prevent mold from the sand or dust. In hot or humid locations. - This will damage the cord and may cause your camcorder on the lens, remove them with a soft cloth. •Clean the camcorder body with a dry soft cloth, or a soft cloth lightly moistened with a soft brush to...

Operating Instructions
Page 250
...lb 1 oz) main unit only 1.4 kg (3 lb) including the battery pack NP-FM50, the XLR adaptor, the Microphone, cassette PDVM40ME, the lens cap and the shoulder strap Supplied accessories See page 14. and 45 seconds Viewfinder Electric viewfinder (B&W) Image device 3.8 mm (1/4.7 type) 3 CCD (...Charge Coupled Device) Gross: Approx. 1 070 000 pixels Effective (still): Approx. 1 000 000 pixels Effective (moving): Approx. 690 000 pixels Lens Combined power zoom lens Filter diameter: 37 mm (1 1/2 in) 12× (Optical), 48× (Digital) F 1.6 - 2.8 250 Focal length 3.6 - 43.2 mm (5/32 ...
...lb 1 oz) main unit only 1.4 kg (3 lb) including the battery pack NP-FM50, the XLR adaptor, the Microphone, cassette PDVM40ME, the lens cap and the shoulder strap Supplied accessories See page 14. and 45 seconds Viewfinder Electric viewfinder (B&W) Image device 3.8 mm (1/4.7 type) 3 CCD (...Charge Coupled Device) Gross: Approx. 1 070 000 pixels Effective (still): Approx. 1 000 000 pixels Effective (moving): Approx. 690 000 pixels Lens Combined power zoom lens Filter diameter: 37 mm (1 1/2 in) 12× (Optical), 48× (Digital) F 1.6 - 2.8 250 Focal length 3.6 - 43.2 mm (5/32 ...

Operating Instructions
Page 252
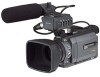
... controls Camcorder 1 8 9 2 0 qa 3 qs qd 4 5 qf 6 qg 7 1 Focus ring (p. 75) 7 Camera recording lamp (p. 25) 2 Lens 8 Display window (p. 16) 3 Lens hood 9 INDEX button (p. 86) 4 HOLOGRAM AF emitter (p. 148) q; To attach the lens hood again, align the protrusions on the lens hood with the groove on the recorded image due to use the ECM-S80 for...
... controls Camcorder 1 8 9 2 0 qa 3 qs qd 4 5 qf 6 qg 7 1 Focus ring (p. 75) 7 Camera recording lamp (p. 25) 2 Lens 8 Display window (p. 16) 3 Lens hood 9 INDEX button (p. 86) 4 HOLOGRAM AF emitter (p. 148) q; To attach the lens hood again, align the protrusions on the lens hood with the groove on the recorded image due to use the ECM-S80 for...

Operating Instructions
Page 253
... controls qh ws qj wd qk wf wg wh ql Quick Reference w; Speaker wa Video control buttons * ws DISPLAY/TOUCH PANEL button (p. 43) wf Viewfinder lens adjustment lever (p. 29) wg VOLUME buttons ** (p. 41) wh Hooks for further information. • Theintelligentaccessoryshoehasasafetydeviceforfixingtheinstalledaccessory securely. RESET button (p. 230) wd Viewfinder (p. 29) * ThePLAYbuttonoftheVideocontrolbuttonshasaraisedtactiledotforeasy operation. ** The + side...
... controls qh ws qj wd qk wf wg wh ql Quick Reference w; Speaker wa Video control buttons * ws DISPLAY/TOUCH PANEL button (p. 43) wf Viewfinder lens adjustment lever (p. 29) wg VOLUME buttons ** (p. 41) wh Hooks for further information. • Theintelligentaccessoryshoehasasafetydeviceforfixingtheinstalledaccessory securely. RESET button (p. 230) wd Viewfinder (p. 29) * ThePLAYbuttonoftheVideocontrolbuttonshasaraisedtactiledotforeasy operation. ** The + side...

Operating Instructions
Page 256
yj Lens cap (p. 25) 256 Otherwise, you cannot attach the tripod securely, and the screw may damage your camcorder. Identifying parts and controls ya ys yd yf yh yj yg ya Power zoom lever (p. 33, 96, 180) ys PHOTO button (p. 48, 51, 144) yd OPEN/ Z EJECT lever (p. 22) yf Cassette lid yg Battery Pack (p. 15) yh Tripod receptacle Make sure that the length of the tripod screw is less than 5.5 mm (7/32 inch).
yj Lens cap (p. 25) 256 Otherwise, you cannot attach the tripod securely, and the screw may damage your camcorder. Identifying parts and controls ya ys yd yf yh yj yg ya Power zoom lever (p. 33, 96, 180) ys PHOTO button (p. 48, 51, 144) yd OPEN/ Z EJECT lever (p. 22) yf Cassette lid yg Battery Pack (p. 15) yh Tripod receptacle Make sure that the length of the tripod screw is less than 5.5 mm (7/32 inch).

Operating Instructions
Page 262
... TV color systems 243 USB jack 190 USB Streaming 193 User bits 124 Volume 41 W, X, Y, Z Warning indicators 232 White balance 71 Wide-angle 33 Wide lens hood 32 Wide mode 53 WIPE 55 Write-protect switch 135 Write-protect tab 22 XLR adaptor ...... 29, 79, 116, 257 Zebra pattern 64 Zoom...
... TV color systems 243 USB jack 190 USB Streaming 193 User bits 124 Volume 41 W, X, Y, Z Warning indicators 232 White balance 71 Wide-angle 33 Wide lens hood 32 Wide mode 53 WIPE 55 Write-protect switch 135 Write-protect tab 22 XLR adaptor ...... 29, 79, 116, 257 Zebra pattern 64 Zoom...


