
Operating Instructions
Page 9
Monitoring the playback picture on the screen. 4 PressSTART/STOP. REW MEMORY CAMERA 3 Press N to open the LCD panel. PLAY Quick Start Guide NOTE Do not pick up your eyesight (p. 29). Recording a picture (p. 25) 1 Remove the lens cap. ... the small green button. 2 Press m to your camcorder by holding the viewfinder, the LCD panel, the battery pack or the microphone. 9 OFF (CHG) VCR MEMORY CAMERA 3 Press OPEN to start playback. If you purchase your camcorder, the clock setting is closed, use the viewfinder with your eye against the eyecup. When...
Monitoring the playback picture on the screen. 4 PressSTART/STOP. REW MEMORY CAMERA 3 Press N to open the LCD panel. PLAY Quick Start Guide NOTE Do not pick up your eyesight (p. 29). Recording a picture (p. 25) 1 Remove the lens cap. ... the small green button. 2 Press m to your camcorder by holding the viewfinder, the LCD panel, the battery pack or the microphone. 9 OFF (CHG) VCR MEMORY CAMERA 3 Press OPEN to start playback. If you purchase your camcorder, the clock setting is closed, use the viewfinder with your eye against the eyecup. When...

Operating Instructions
Page 11
... pressing the small green button. The last recorded image is on the screen stops recorded on the flashing, and lights "Memory Stick." OFF (CHG) MEMORY CAMERA 4 Press PHOTO 5 PressPHOTO lightly. Viewfinder When the LCD panel is closed, use the viewfinder with your camcorder by holding the viewfinder, the LCD panel, the... image on a "Memory Stick" (p. 144) 3 Press OPEN to your camcorder, the clock setting is set the clock setting before recording (p. 20). Quick Start Guide MEMORY CAMERA NOTE Do not pick up . deeper.
... pressing the small green button. The last recorded image is on the screen stops recorded on the flashing, and lights "Memory Stick." OFF (CHG) MEMORY CAMERA 4 Press PHOTO 5 PressPHOTO lightly. Viewfinder When the LCD panel is closed, use the viewfinder with your camcorder by holding the viewfinder, the LCD panel, the... image on a "Memory Stick" (p. 144) 3 Press OPEN to your camcorder, the clock setting is set the clock setting before recording (p. 20). Quick Start Guide MEMORY CAMERA NOTE Do not pick up . deeper.
Operating Instructions
Page 12
... that the operation is based on a TV, you use a tape with cassette memory are shown in the introduction of such materials may be contrary to CAMERA. INDEX SEARCH (p. 87) - DATE SEARCH (p. 90) - To view your camcorder are marked by (Cassette Memory). Unauthorized recording of features that you need an NTSC system...
... that the operation is based on a TV, you use a tape with cassette memory are shown in the introduction of such materials may be contrary to CAMERA. INDEX SEARCH (p. 87) - DATE SEARCH (p. 90) - To view your camcorder are marked by (Cassette Memory). Unauthorized recording of features that you need an NTSC system...

Operating Instructions
Page 13
... are normal in the manufacturing process and do not affect the recording in the sun or under direct sunlight[b]. •Be careful when placing the camera near a window or outdoors. Sometimes this manual Precautions on camcorder care Lens and LCD screen/finder (on the LCD screen and the finder. Doing so...
... are normal in the manufacturing process and do not affect the recording in the sun or under direct sunlight[b]. •Be careful when placing the camera near a window or outdoors. Sometimes this manual Precautions on camcorder care Lens and LCD screen/finder (on the LCD screen and the finder. Doing so...

Operating Instructions
Page 16
.... (3) Connect the power cord to the wall outlet. (4) Set the POWER switch to use the battery longer than usual. 2 14 POWER VCR OFF (CHG) MEMORY CAMERA After charging the battery pack Disconnect the AC power adaptor from the DC IN jack on the display window.
.... (3) Connect the power cord to the wall outlet. (4) Set the POWER switch to use the battery longer than usual. 2 14 POWER VCR OFF (CHG) MEMORY CAMERA After charging the battery pack Disconnect the AC power adaptor from the DC IN jack on the display window.

Operating Instructions
Page 20
... about four month,sthedateandtimemaybe cleared from memory (bars may appear) because the built-in rechargeable battery installed in that you set the POWER switch to CAMERA or MEMORY unless you use your camcorder will be displayed each time that order. (1) Press MENU to display the menu settings while the POWER switch... EXEC dial and pressing the dial by the time signal. Step 2 Setting the date and time Set the date and time when you set to CAMERA or MEMORY. (2) Turn the SEL/PUSH EXEC dial to select , then press the dial. (3) Turn the SEL/PUSH EXEC dial to select CLOCK SET, then...
... about four month,sthedateandtimemaybe cleared from memory (bars may appear) because the built-in rechargeable battery installed in that you set the POWER switch to CAMERA or MEMORY unless you use your camcorder will be displayed each time that order. (1) Press MENU to display the menu settings while the POWER switch... EXEC dial and pressing the dial by the time signal. Step 2 Setting the date and time Set the date and time when you set to CAMERA or MEMORY. (2) Turn the SEL/PUSH EXEC dial to select , then press the dial. (3) Turn the SEL/PUSH EXEC dial to select CLOCK SET, then...

Operating Instructions
Page 23
...panel during recording or playing back images on the LCD screen. (5) Press PAGE2 to go to FN Press EXIT. The display returns to PAGE1/PAGE2. CAMERA OFF (CHG) VCR 3 POWER 1 MEMORY 23 Touch the LCD screen directly with your finger to operate each function. 5,6 When the POWER switch ...PAGE2 EXIT SPOT DIG FOCUS EFFT MEM M I X END SCH SPOT METER PAGE1 PAGE2 EXIT LCD SELF BRT TIMER 4 FN 2 To return to PAGE2. Refer to CAMERA or VCR while pressing the small green button. (4) Press FN. Operation buttons appear on a tape. (1) Prepare the power supply. (p. 15 to 19) (2) ...
...panel during recording or playing back images on the LCD screen. (5) Press PAGE2 to go to FN Press EXIT. The display returns to PAGE1/PAGE2. CAMERA OFF (CHG) VCR 3 POWER 1 MEMORY 23 Touch the LCD screen directly with your finger to operate each function. 5,6 When the POWER switch ...PAGE2 EXIT SPOT DIG FOCUS EFFT MEM M I X END SCH SPOT METER PAGE1 PAGE2 EXIT LCD SELF BRT TIMER 4 FN 2 To return to PAGE2. Refer to CAMERA or VCR while pressing the small green button. (4) Press FN. Operation buttons appear on a tape. (1) Prepare the power supply. (p. 15 to 19) (2) ...

Operating Instructions
Page 24
... your camcorder. • Whenoperationbuttonsdonotworkevenifyoupressthem,anadjustmentis required (CALIBRATION) (p. 246). • WhentheLCDscreengetsdirty,cleanitwiththesuppliedcleaningcloth. Press FN to display the following buttons: When the POWER switch is set to CAMERA PAGE1 PAGE2 END SCH, SPOT FOCUS, DIG EFFT, MEM MIX, SPOT METER LCD BRT, SELFTIMER When the POWER switch is set to VCR PAGE1 PAGE2...
... your camcorder. • Whenoperationbuttonsdonotworkevenifyoupressthem,anadjustmentis required (CALIBRATION) (p. 246). • WhentheLCDscreengetsdirty,cleanitwiththesuppliedcleaningcloth. Press FN to display the following buttons: When the POWER switch is set to CAMERA PAGE1 PAGE2 END SCH, SPOT FOCUS, DIG EFFT, MEM MIX, SPOT METER LCD BRT, SELFTIMER When the POWER switch is set to VCR PAGE1 PAGE2...
Operating Instructions
Page 25
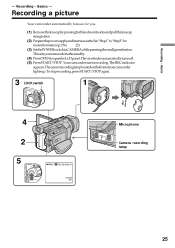
... stop recording, press START/STOP again. 3 LOCK switch 1 VCR POWER LOCK OFF (CHG) MEMORY CAMERA 4 2 5 POWER OFF (CHG) VCR 40min REC 00:00:00:01 DVCAM 32K Microphone Camera recording lamp MEMORY CAMERA 25 Recording - Recording - Basics - The camera recording lamp located on the front of your camcorder to "Step3"for moreinformation.(p.15to 22...
... stop recording, press START/STOP again. 3 LOCK switch 1 VCR POWER LOCK OFF (CHG) MEMORY CAMERA 4 2 5 POWER OFF (CHG) VCR 40min REC 00:00:00:01 DVCAM 32K Microphone Camera recording lamp MEMORY CAMERA 25 Recording - Recording - Basics - The camera recording lamp located on the front of your camcorder to "Step3"for moreinformation.(p.15to 22...

Operating Instructions
Page 34
... press FN The does not appear on the LCD screen. When you look at the subject in the viewfinder. The subject uses this feature to CAMERA. The indicator appears in the mirror mode The picture on the LCD screen. During recording in the mirror mode FN appears mirror-reversed in the... screen. 34 Some of other indicators appear mirror-reversed and others are not displayed. Recording a picture Shooting with the Mirror Mode This feature allows the camera subject to CAMERA or MEMORY.
... press FN The does not appear on the LCD screen. When you look at the subject in the viewfinder. The subject uses this feature to CAMERA. The indicator appears in the mirror mode The picture on the LCD screen. During recording in the mirror mode FN appears mirror-reversed in the... screen. 34 Some of other indicators appear mirror-reversed and others are not displayed. Recording a picture Shooting with the Mirror Mode This feature allows the camera subject to CAMERA or MEMORY.

Operating Instructions
Page 36
BACK LIGHT When you shoot a subject with the light source behind the subject or a subject with a light background, use the backlight function. 36 To cancel, press BACK LIGHT again. The . indicator appears on the screen. When you press SPOT LIGHT, EXPOSURE or SPOT METER, the backlight function will be canceled. Recording a picture Shooting backlit subjects - BACK LIGHT When shooting backlit subjects If you manually adjust the exposure You cannot use the backlight function. Press BACK LIGHT while the POWER switch is set to CAMERA or MEMORY.
BACK LIGHT When you shoot a subject with the light source behind the subject or a subject with a light background, use the backlight function. 36 To cancel, press BACK LIGHT again. The . indicator appears on the screen. When you press SPOT LIGHT, EXPOSURE or SPOT METER, the backlight function will be canceled. Recording a picture Shooting backlit subjects - BACK LIGHT When shooting backlit subjects If you manually adjust the exposure You cannot use the backlight function. Press BACK LIGHT while the POWER switch is set to CAMERA or MEMORY.

Operating Instructions
Page 37
... excessively white when shooting subjects lit by strong light - To cancel, press SPOT LIGHT again. Press SPOT LIGHT while the POWER switch is set to CAMERA or MEMORY. The indicator appears on the screen. SPOT LIGHT When shooting spotlighted subjects If you manually adjust the exposure You cannot use the spot...
... excessively white when shooting subjects lit by strong light - To cancel, press SPOT LIGHT again. Press SPOT LIGHT while the POWER switch is set to CAMERA or MEMORY. The indicator appears on the screen. SPOT LIGHT When shooting spotlighted subjects If you manually adjust the exposure You cannot use the spot...

Operating Instructions
Page 41
... + : To turn up When you close the LCD panel, you close the LCD panel, sound is muted. 6 VOLUME 2 POWER VCR Playback - Basics OFF (CHG) MEMORY CAMERA 3 1 4 REW 5 PLAY To stop playback Press x. 41 If you can monitor the playback picture in the viewfinder. Basics - Playback -
... + : To turn up When you close the LCD panel, you close the LCD panel, sound is muted. 6 VOLUME 2 POWER VCR Playback - Basics OFF (CHG) MEMORY CAMERA 3 1 4 REW 5 PLAY To stop playback Press x. 41 If you can monitor the playback picture in the viewfinder. Basics - Playback -

Operating Instructions
Page 49
... on the screen when you use the Memory Photo recording (p. 144). When you press PHOTO will be recorded. 49 The image when you want to CAMERA You cannot select image quality. The image quality when you set the POWER switch to 640 × 480. Advanced Recording Operations Recording still images on...
... on the screen when you use the Memory Photo recording (p. 144). When you press PHOTO will be recorded. 49 The image when you want to CAMERA You cannot select image quality. The image quality when you set the POWER switch to 640 × 480. Advanced Recording Operations Recording still images on...

Operating Instructions
Page 53
... a 16:9 wide-screen TV (16:9WIDE). Advanced Recording Operations Using the wide mode You can watch on the screen during recording in the menu settings. 2 CAMERA SET D ZOOM PHOTO REC 16:9WIDE ON STEADYSHOT FRAME REC INT. REC RETURN [MENU] : END 53
... a 16:9 wide-screen TV (16:9WIDE). Advanced Recording Operations Using the wide mode You can watch on the screen during recording in the menu settings. 2 CAMERA SET D ZOOM PHOTO REC 16:9WIDE ON STEADYSHOT FRAME REC INT. REC RETURN [MENU] : END 53

Operating Instructions
Page 59
.... LUMI. + The bar appears when setting following digital effects modes : STILL, FLASH, LUMI., TRAIL. To cancel the digital effect Press OFFtoreturntoPAGE1. 59 The screen to CAMERA. (2) Press DIG EFFT. To return to be adjusted STILL The rate of the still image you want to superimpose on the moving picture TRAIL The...
.... LUMI. + The bar appears when setting following digital effects modes : STILL, FLASH, LUMI., TRAIL. To cancel the digital effect Press OFFtoreturntoPAGE1. 59 The screen to CAMERA. (2) Press DIG EFFT. To return to be adjusted STILL The rate of the still image you want to superimpose on the moving picture TRAIL The...

Operating Instructions
Page 61
... menu disappears and the indicator appears on a TV (p. 47). (1) Press CUSTOM PRESET to display the CUSTOM PRESET menu while the POWER switch is set to CAMERA or MEMORY. (2) Press the SEL/PUSH EXEC dial. (3) Turn the SEL/PUSH EXEC dial to select SET, then press the dial. (4) Turn the SEL/PUSH...
... menu disappears and the indicator appears on a TV (p. 47). (1) Press CUSTOM PRESET to display the CUSTOM PRESET menu while the POWER switch is set to CAMERA or MEMORY. (2) Press the SEL/PUSH EXEC dial. (3) Turn the SEL/PUSH EXEC dial to select SET, then press the dial. (4) Turn the SEL/PUSH...

Operating Instructions
Page 62
...color intensity y Increases color intensity Softer y Sharper Bluish y Reddish Dim y Brighten 6 dB/12 dB/OFF To cancel using the custom preset Select OFF in CAMERA or MEMORY The preset is still maintained at this moment. To return to preset in each mode you preset the desired picture quality in step...COLOR LVL Meaning Color intensity SHARPNESS WB SHIFT AE SHIFT AGC LIMIT RESET Sharpness White balance Brightness Auto Gain-limit Sets items above to CAMERA or MEMORY. Presetting the adjustment for picture quality - The setting is only available in step 6. If you want to use a preset both ...
...color intensity y Increases color intensity Softer y Sharper Bluish y Reddish Dim y Brighten 6 dB/12 dB/OFF To cancel using the custom preset Select OFF in CAMERA or MEMORY The preset is still maintained at this moment. To return to preset in each mode you preset the desired picture quality in step...COLOR LVL Meaning Color intensity SHARPNESS WB SHIFT AE SHIFT AGC LIMIT RESET Sharpness White balance Brightness Auto Gain-limit Sets items above to CAMERA or MEMORY. Presetting the adjustment for picture quality - The setting is only available in step 6. If you want to use a preset both ...

Operating Instructions
Page 63
... Stick." (1) Set GUIDE FRAME in to ON in the menu setting while the POWER switch is displayed on the screen. 63 If you set to CAMERA or MEMORY. (p. 216) (2) Press MENU to OFF in the menu setting or simply press DISPLAY/TOUCH PANEL. GU I DEFRAME ON RETURN [MENU] : END [MENU] : END...
... Stick." (1) Set GUIDE FRAME in to ON in the menu setting while the POWER switch is displayed on the screen. 63 If you set to CAMERA or MEMORY. (p. 216) (2) Press MENU to OFF in the menu setting or simply press DISPLAY/TOUCH PANEL. GU I DEFRAME ON RETURN [MENU] : END [MENU] : END...

Operating Instructions
Page 64
... The zebra pattern appears in the portion of the picture on the screen with a subject whose brightness exceeds a certain level. Set the ZEBRA selector to CAMERA or MEMORY. To erase the zebra pattern Set the ZEBRA selector to 100 The portion of the picture where zebra pattern appears is about 70...
... The zebra pattern appears in the portion of the picture on the screen with a subject whose brightness exceeds a certain level. Set the ZEBRA selector to CAMERA or MEMORY. To erase the zebra pattern Set the ZEBRA selector to 100 The portion of the picture where zebra pattern appears is about 70...


