
Operating Instructions
Page 190
... 193. (USB) jack Push into the computer's "Memory Stick" slot. Viewing Images Using your computer's connectors and editing software, contact the computer manufacturer. For details about your Computer - Tape stills and movies "Memory Stick" stills and movies Camcorder ... cable USB cable (supplied) i.LINK cable (optional) USB cable (supplied) Computer environment requirements USB connector, editing software DV connector, editing software USB connector, editing software When connecting to a computer via the USB jack, complete installation of connecting the camcorder to a computer in order...
... 193. (USB) jack Push into the computer's "Memory Stick" slot. Viewing Images Using your computer's connectors and editing software, contact the computer manufacturer. For details about your Computer - Tape stills and movies "Memory Stick" stills and movies Camcorder ... cable USB cable (supplied) i.LINK cable (optional) USB cable (supplied) Computer environment requirements USB connector, editing software DV connector, editing software USB connector, editing software When connecting to a computer via the USB jack, complete installation of connecting the camcorder to a computer in order...

Operating Instructions
Page 191
Introduction When connecting to a computer using the i.LINK (DV interface) Your computer must have a DV connector and editing software installed that can also use the camcorder with a standard USB connection (NORMAL). Viewing Images Using your Computer DV is NORMAL. See page 193 when using ...
Introduction When connecting to a computer using the i.LINK (DV interface) Your computer must have a DV connector and editing software installed that can also use the camcorder with a standard USB connection (NORMAL). Viewing Images Using your Computer DV is NORMAL. See page 193 when using ...

Operating Instructions
Page 192
... image on your camcorder, the image format will differ so a file error indicator may appear and you may increase when you open the file. Software •Depending on your application software, the file size may be played back on using retouching software from Suspend, Resume, or Sleep. 192 Introduction Notes on your camcorder.
... image on your camcorder, the image format will differ so a file error indicator may appear and you may increase when you open the file. Software •Depending on your application software, the file size may be played back on using retouching software from Suspend, Resume, or Sleep. 192 Introduction Notes on your camcorder.
Operating Instructions
Page 193
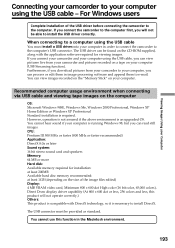
...USB connector must install a USB driveronto your computer, you can view pictures live from your camcorder to your computer in image processing software and append them in order to connect the camcorder to the computer's USB connector. If you connect the camcorder to the computer ...camcorder and your computer using the USB cable - If you will not operate correctly.) Others: This product is compatible with the application software required for installation: at least 200MB Available hard disc memory recommended: at least 1GB (depending on your computer using the USB cable, ...
...USB connector must install a USB driveronto your computer, you can view pictures live from your camcorder to your computer in image processing software and append them in order to connect the camcorder to the computer's USB connector. If you connect the camcorder to the computer ...camcorder and your computer using the USB cable - If you will not operate correctly.) Others: This product is compatible with the application software required for installation: at least 200MB Available hard disc memory recommended: at least 1GB (depending on your computer using the USB cable, ...

Operating Instructions
Page 195
... you go to "Making the computer recognize the camcorder." Carry out installation again in accordance with permission of Administrators. (1) TurnonyourcomputerandallowWindowstoload. (2) InsertthesuppliedCD-ROMintotheCD-ROMdriveofyourcomputer.The application software starts up and the title screen appears. (3) Movethecursorto"USBDriver"andclick.ThisstartsUSBdriverinstallation. (4) Followtheon-screenmessagestoinstalltheUSBdriver. (5) RemovetheCD-ROMandthenrestartthecomputer,inaccordancewiththe instructions on page 198. Viewing Images Using your Computer...
... you go to "Making the computer recognize the camcorder." Carry out installation again in accordance with permission of Administrators. (1) TurnonyourcomputerandallowWindowstoload. (2) InsertthesuppliedCD-ROMintotheCD-ROMdriveofyourcomputer.The application software starts up and the title screen appears. (3) Movethecursorto"USBDriver"andclick.ThisstartsUSBdriverinstallation. (4) Followtheon-screenmessagestoinstalltheUSBdriver. (5) RemovetheCD-ROMandthenrestartthecomputer,inaccordancewiththe instructions on page 198. Viewing Images Using your Computer...
Operating Instructions
Page 196
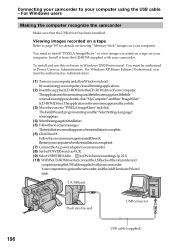
... up and the "Select Settings Language" screen appears. (4) Selectthelanguageforinstallation. (5) Followtheon-screenmessages. The application software screen appears after a while. (3) Movethecursorto"PIXELAImageMixer"andclick. Viewing images recorded on a tape Refer to page 197 for details on...For Windows users Making the computer recognize the camcorder Make sure that the USB driver has been installed. To install and use this software in Windows 2000 Professional. For Windows XP Home Edition/Professional, you are using the USB cable - The installation screen disappears when installation...
... up and the "Select Settings Language" screen appears. (4) Selectthelanguageforinstallation. (5) Followtheon-screenmessages. The application software screen appears after a while. (3) Movethecursorto"PIXELAImageMixer"andclick. Viewing images recorded on a tape Refer to page 197 for details on...For Windows users Making the computer recognize the camcorder Make sure that the USB driver has been installed. To install and use this software in Windows 2000 Professional. For Windows XP Home Edition/Professional, you are using the USB cable - The installation screen disappears when installation...

Operating Instructions
Page 201
... taped images on your computer. SelectUSBSTREAMin toONinthemenusettings.(p.221) (4) Select"Start" t"Programs" t"PIXELA" t"ImageMixer" t"PIXELA ImageMixer Ver.1.0 for Sony" startup screen appears on your computer - The "PIXELA ImageMixer Ver.1.0 for Sony." To install and use the software in Windows 2000 Professional, you must be authorized as Power Users or Administrators. Viewing images recorded on...
... taped images on your computer. SelectUSBSTREAMin toONinthemenusettings.(p.221) (4) Select"Start" t"Programs" t"PIXELA" t"ImageMixer" t"PIXELA ImageMixer Ver.1.0 for Sony" startup screen appears on your computer - The "PIXELA ImageMixer Ver.1.0 for Sony." To install and use the software in Windows 2000 Professional, you must be authorized as Power Users or Administrators. Viewing images recorded on...
Operating Instructions
Page 205
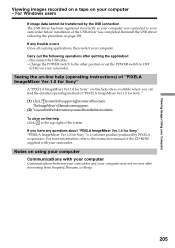
...help (operating instructions) of the USB driver was connected to your computer. To close on-line help site is a software product produced by the USB connection The USB driver has been registered incorrectly as your computer was completed. Reinstall the USB...you have any trouble occurs Close all running applications, then restart your camcorder before installation of "PIXELA ImageMixer Ver.1.0 for Sony" A "PIXELA ImageMixer Ver.1.0 for Sony." (1) Click locatedintheupper-rightcornerofthescreen. Change the POWER switch to the other position or set the POWER switch to the instruction...
...help (operating instructions) of the USB driver was connected to your computer. To close on-line help site is a software product produced by the USB connection The USB driver has been registered incorrectly as your computer was completed. Reinstall the USB...you have any trouble occurs Close all running applications, then restart your camcorder before installation of "PIXELA ImageMixer Ver.1.0 for Sony" A "PIXELA ImageMixer Ver.1.0 for Sony." (1) Click locatedintheupper-rightcornerofthescreen. Change the POWER switch to the other position or set the POWER switch to the instruction...

Operating Instructions
Page 208
.... However, note that is used for viewing images on your computer Mac OS 8.5.1/8.6/9.0/9.1/9.2 or Mac OS X (v10.0/v10.1) Standard installation is packaged together with application software for the following models. •iMac with the Mac OS 8.6 standard installation and a slot loading type CD-ROM drive •iBook or Power Mac G4...
.... However, note that is used for viewing images on your computer Mac OS 8.5.1/8.6/9.0/9.1/9.2 or Mac OS X (v10.0/v10.1) Standard installation is packaged together with application software for the following models. •iMac with the Mac OS 8.6 standard installation and a slot loading type CD-ROM drive •iBook or Power Mac G4...
Operating Instructions
Page 209
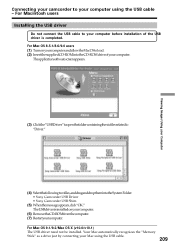
...TurnonyourcomputerandallowtheMacOStoload. (2) InsertthesuppliedCD-ROMintotheCD-ROMdriveofyourcomputer. Connecting your camcorder to your computer. (6) RemovetheCD-ROMfromthecomputer. (7) Restartyourcomputer. The application software screen appears. Viewing Images Using your Computer (3) Clickthe"USBDriver"toopenthefoldercontainingthesixfilesrelatedto "Driver." (4) Selectthefollowingtwofiles,anddraganddropthemintotheSystemFolder. • Sony Camcorder USB Driver • Sony Camcorder USB Shim (5) Whenthemessageappears,click"OK." For Mac OS 9.1/9.2/Mac OS X (v10.0/v10.1) The USB driver...
...TurnonyourcomputerandallowtheMacOStoload. (2) InsertthesuppliedCD-ROMintotheCD-ROMdriveofyourcomputer. Connecting your camcorder to your computer. (6) RemovetheCD-ROMfromthecomputer. (7) Restartyourcomputer. The application software screen appears. Viewing Images Using your Computer (3) Clickthe"USBDriver"toopenthefoldercontainingthesixfilesrelatedto "Driver." (4) Selectthefollowingtwofiles,anddraganddropthemintotheSystemFolder. • Sony Camcorder USB Driver • Sony Camcorder USB Shim (5) Whenthemessageappears,click"OK." For Mac OS 9.1/9.2/Mac OS X (v10.0/v10.1) The USB driver...

Operating Instructions
Page 211
...connector You can connect using a USB cable, but images may not be transferred smoothly. 211 For details on your computer and the software you are using . Capturing images from an analog video unit connected to your computer which has the i.LINK jack connected to the ...connecting cable (supplied). Signal convert function You can capture images and sound with an S video cable (optional) instead of your computer and software you convert video signals into digital video signals via your camcorder. •You cannot record or capture the video output via your computer -...
...connector You can connect using a USB cable, but images may not be transferred smoothly. 211 For details on your computer and the software you are using . Capturing images from an analog video unit connected to your computer which has the i.LINK jack connected to the ...connecting cable (supplied). Signal convert function You can capture images and sound with an S video cable (optional) instead of your computer and software you convert video signals into digital video signals via your camcorder. •You cannot record or capture the video output via your computer -...

Operating Instructions
Page 233
The video heads are more than two of software (p. 237).* The tape has reached its end.* Insert a cassette.* You selected MARKED in 9PIC PRINT on the touch panel using a "Memory Stick" containing no recorded ...
The video heads are more than two of software (p. 237).* The tape has reached its end.* Insert a cassette.* You selected MARKED in 9PIC PRINT on the touch panel using a "Memory Stick" containing no recorded ...

Operating Instructions
Page 237
...sound during playback and audio dubbing. Your camcorder does not record copyright control signals on the TV screen if you try to record such software. In this case, "NS" appears on a DV-formatted tape. You can be indicated on the screen. Additional Information Usable cassettes Copyright...When you play back Using any other video camera recorder, you cannot record on tape that contains copyright control signals for copyright protection of software. You may not add a sound on a DVCAM-formatted tape which is played back on your camcorder that has recorded copyright control ...
...sound during playback and audio dubbing. Your camcorder does not record copyright control signals on the TV screen if you try to record such software. In this case, "NS" appears on a DV-formatted tape. You can be indicated on the screen. Additional Information Usable cassettes Copyright...When you play back Using any other video camera recorder, you cannot record on tape that contains copyright control signals for copyright protection of software. You may not add a sound on a DVCAM-formatted tape which is played back on your camcorder that has recorded copyright control ...

Operating Instructions
Page 242
i.LINK and are trademarks. 242 For details on how to dub when this unit is connected to other than video equipment. About i.LINK i.LINK functions on this unit For details on connection with i.LINK cable and necessary software, refer to the operating instructions supplied with the connected device. Required i.LINK cable Use the Sony i.LINK 4-pin-to other i.LINK (DV Interface) compatible equipment made by SONY other video equipment having DV Interface, see page 100 and 114. This unit can also be connected to -4-pin cable (during DV dubbing).
i.LINK and are trademarks. 242 For details on how to dub when this unit is connected to other than video equipment. About i.LINK i.LINK functions on this unit For details on connection with i.LINK cable and necessary software, refer to the operating instructions supplied with the connected device. Required i.LINK cable Use the Sony i.LINK 4-pin-to other i.LINK (DV Interface) compatible equipment made by SONY other video equipment having DV Interface, see page 100 and 114. This unit can also be connected to -4-pin cable (during DV dubbing).


