
Operating Instructions
Page 1
DSR-PD170 3-087-447-14 (1) Digital Camcorder Operating Instructions Before operating the unit, please read this product. Record the serial number in the space provided below. DSR-PD170 ©2003 Sony Corporation DSR-PD170 Model No. Model No. Serial No. Serial No. AC- Owner's Record The model and serial numbers are located on the bottom. Refer to these numbers whenever you call upon your Sony dealer regarding this manual thoroughly, and retain it for future reference.
DSR-PD170 3-087-447-14 (1) Digital Camcorder Operating Instructions Before operating the unit, please read this product. Record the serial number in the space provided below. DSR-PD170 ©2003 Sony Corporation DSR-PD170 Model No. Model No. Serial No. Serial No. AC- Owner's Record The model and serial numbers are located on the bottom. Refer to these numbers whenever you call upon your Sony dealer regarding this manual thoroughly, and retain it for future reference.

Operating Instructions
Page 3
...purchase of FCC Rules. • This product contains mercury. Operation is intended to alert the user to operate this Sony Digital camcorder. These limits are cautioned that may be of sufficient magnitude to constitute a CAUTION Notice risk of important operating and ... static electricity or electromagnetism causes data transfer to comply with Part 15 of Conformity Trade Name: SONY Model No.: DSR-PD170 Responsible Party: Sony Electronics Inc. Welcome! Regulatory Information Declaration of the FCC Rules. Increase the separation between the equipment and receiver. ...
...purchase of FCC Rules. • This product contains mercury. Operation is intended to alert the user to operate this Sony Digital camcorder. These limits are cautioned that may be of sufficient magnitude to constitute a CAUTION Notice risk of important operating and ... static electricity or electromagnetism causes data transfer to comply with Part 15 of Conformity Trade Name: SONY Model No.: DSR-PD170 Responsible Party: Sony Electronics Inc. Welcome! Regulatory Information Declaration of the FCC Rules. Increase the separation between the equipment and receiver. ...
Operating Instructions
Page 4
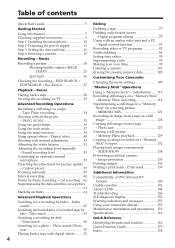
... Warning indicators and messages 153 Using your own titles 99 Labeling a cassette 101 Erasing the cassette memory data 103 Customizing Your Camcorder Changing the menu settings 105 "Memory Stick" Operations Using a "Memory Stick" - Sound recording level 53 Connecting an optional ...convert function 81 Recording video or TV programs 82 Audio dubbing 86 Setting time values 90 Superimposing a title 95 Making your camcorder abroad 155 Maintenance information and precautions .. 156 Specifications 161 Quick Reference Identifying the parts and controls 162 Quick Function Guide 173...
... Warning indicators and messages 153 Using your own titles 99 Labeling a cassette 101 Erasing the cassette memory data 103 Customizing Your Camcorder Changing the menu settings 105 "Memory Stick" Operations Using a "Memory Stick" - Sound recording level 53 Connecting an optional ...convert function 81 Recording video or TV programs 82 Audio dubbing 86 Setting time values 90 Superimposing a title 95 Making your camcorder abroad 155 Maintenance information and precautions .. 156 Specifications 161 Quick Reference Identifying the parts and controls 162 Quick Function Guide 173...
Operating Instructions
Page 5
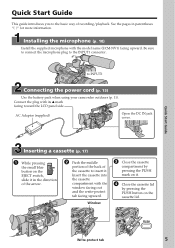
... on the cassette lid. Be sure to connect the microphone plug to INPUT1 Connecting the power cord (p. 15) Use the battery pack when using your camcorder outdoors (p. 11). Quick Start Guide Inserting a cassette (p. 17) 1 While pressing the small blue button on the EJECT switch, slide it . 4 Close the cassette lid by...
... on the cassette lid. Be sure to connect the microphone plug to INPUT1 Connecting the power cord (p. 15) Use the battery pack when using your camcorder outdoors (p. 11). Quick Start Guide Inserting a cassette (p. 17) 1 While pressing the small blue button on the EJECT switch, slide it . 4 Close the cassette lid by...
Operating Instructions
Page 6
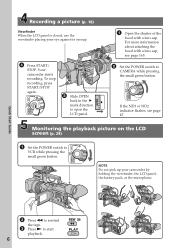
MEMORY OFF CAMERA (CHG) VCR 4 Press START/ STOP. MEMORY OFF CAMERA (CHG) VCR NOTE Do not pick up your eye against its eyecup. Your camcorder starts recording. For more information about attaching the hood with a lens cap. Quick Start Guide 2 Press m to rewind REW the tape. 3 Press N ...hood with a lens cap, see page 47. Recording a picture (p. 18) Viewfinder When the LCD panel is closed, use the viewfinder placing your camcorder by holding the viewfinder, the LCD panel, the battery pack, or the microphone. To stop recording, press START/STOP again. PLAY 6
MEMORY OFF CAMERA (CHG) VCR 4 Press START/ STOP. MEMORY OFF CAMERA (CHG) VCR NOTE Do not pick up your eye against its eyecup. Your camcorder starts recording. For more information about attaching the hood with a lens cap. Quick Start Guide 2 Press m to rewind REW the tape. 3 Press N ...hood with a lens cap, see page 47. Recording a picture (p. 18) Viewfinder When the LCD panel is closed, use the viewfinder placing your camcorder by holding the viewfinder, the LCD panel, the battery pack, or the microphone. To stop recording, press START/STOP again. PLAY 6
Operating Instructions
Page 7
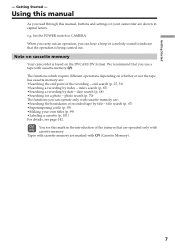
... which require different operations depending on the DVCAM/DV format. title search (p. 67) •Superimposing a title (p. 95) •Making your camcorder are : •Searching the end point of recorded tape by title - Getting Started - index search (p. 65) •Searching a recording by... (Cassette Memory). 7 Tapes with cassette memory are : •Searching the boundaries of the recording - e.g. Note on cassette memory Your camcorder is being carried out. We recommend that are operated only with cassette memory are marked with cassette memory . date search (p. 68) •...
... which require different operations depending on the DVCAM/DV format. title search (p. 67) •Superimposing a title (p. 95) •Making your camcorder are : •Searching the end point of recorded tape by title - Getting Started - index search (p. 65) •Searching a recording by... (Cassette Memory). 7 Tapes with cassette memory are : •Searching the boundaries of the recording - e.g. Note on cassette memory Your camcorder is being carried out. We recommend that are operated only with cassette memory are marked with cassette memory . date search (p. 68) •...

Operating Instructions
Page 8
...above 60 °C (140 °F), such as in a car parked in any way. •Do not directly shoot the sun. Doing so might cause your camcorder to the provision of the pixels are normal in the manufacturing process and do not affect the recording in the sun or under direct sunlight... points (white, red, blue or green in low light conditions such as dusk. •Do not let your camcorder get wet may be contrary to malfunction. Sometimes this manual Note on camcorder care Lens and LCD screen/finder •The LCD screen and the finder are manufactured using extremely high-precision...
...above 60 °C (140 °F), such as in a car parked in any way. •Do not directly shoot the sun. Doing so might cause your camcorder to the provision of the pixels are normal in the manufacturing process and do not affect the recording in the sun or under direct sunlight... points (white, red, blue or green in low light conditions such as dusk. •Do not let your camcorder get wet may be contrary to malfunction. Sometimes this manual Note on camcorder care Lens and LCD screen/finder •The LCD screen and the finder are manufactured using extremely high-precision...
Operating Instructions
Page 9
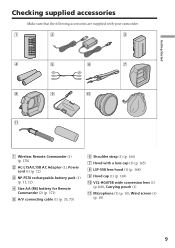
Getting Started Checking supplied accessories Make sure that the following accessories are supplied with your camcorder. 1 2 3 4 5 6 7 8 9 0 qa 1 Wireless Remote Commander (1) (p. 170) 2 AC-L15A/L15B AC Adaptor (1), Power cord (1) (p. 12) 3 NP-F570 rechargeable battery pack (1) (p. 11, 12) 4 Size AA (R6) battery for ...
Getting Started Checking supplied accessories Make sure that the following accessories are supplied with your camcorder. 1 2 3 4 5 6 7 8 9 0 qa 1 Wireless Remote Commander (1) (p. 170) 2 AC-L15A/L15B AC Adaptor (1), Power cord (1) (p. 12) 3 NP-F570 rechargeable battery pack (1) (p. 11, 12) 4 Size AA (R6) battery for ...
Operating Instructions
Page 11
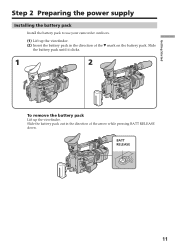
BATT RELEASE 11 Getting Started Step 2 Preparing the power supply Installing the battery pack Install the battery pack to use your camcorder outdoors. (1) Lift up the viewfinder. Slide the battery pack out in the direction of the arrow while pressing BATT RELEASE down. Slide the battery pack until it clicks. 1 2 To remove the battery pack Lift up the viewfinder. (2) Insert the battery pack in the direction of the V mark on the battery pack.
BATT RELEASE 11 Getting Started Step 2 Preparing the power supply Installing the battery pack Install the battery pack to use your camcorder outdoors. (1) Lift up the viewfinder. Slide the battery pack out in the direction of the arrow while pressing BATT RELEASE down. Slide the battery pack until it clicks. 1 2 To remove the battery pack Lift up the viewfinder. (2) Insert the battery pack in the direction of the V mark on the battery pack.

Operating Instructions
Page 12
.... 4 POWER VCR 1 MEMORY OFF CAMERA (CHG) After charging the battery pack Disconnect the AC Adaptor from the DC IN jack on the display window. Your camcorder operates only with the "InfoLITHIUM" battery pack (L series). (1) Open the DC IN jack cover and connect the AC Adaptor supplied with your... on the remaining battery time indicator The remaining battery time indicator on the LCD screen/display window or in minutes on your camcorder to the DC IN jack with the plug's v mark facing toward the LCD panel side. (2) Connect the power cord to the AC Adaptor. (3) Connect the ...
.... 4 POWER VCR 1 MEMORY OFF CAMERA (CHG) After charging the battery pack Disconnect the AC Adaptor from the DC IN jack on the display window. Your camcorder operates only with the "InfoLITHIUM" battery pack (L series). (1) Open the DC IN jack cover and connect the AC Adaptor supplied with your... on the remaining battery time indicator The remaining battery time indicator on the LCD screen/display window or in minutes on your camcorder to the DC IN jack with the plug's v mark facing toward the LCD panel side. (2) Connect the power cord to the AC Adaptor. (3) Connect the ...

Operating Instructions
Page 13
...wrong with the metal parts of the DC plug of recording time when you repeat recording start/stop, zooming and turning the power on your camcorder calculates the actual remaining battery time "- - - - You cannot use it until it near the wall outlet. While charging the battery pack..., no indicator appears or the indicator flashes in the display window in the display window. Until your camcorder. * Approximate minutes when recording while you use it fully discharges again. The AC Adaptor is not to use a fully charged battery Numbers ...
...wrong with the metal parts of the DC plug of recording time when you repeat recording start/stop, zooming and turning the power on your camcorder calculates the actual remaining battery time "- - - - You cannot use it until it near the wall outlet. While charging the battery pack..., no indicator appears or the indicator flashes in the display window in the display window. Until your camcorder. * Approximate minutes when recording while you use it fully discharges again. The AC Adaptor is not to use a fully charged battery Numbers ...

Operating Instructions
Page 14
...on LCD screen 150 (135) 230 (205) 265 (240) 315 (275) 470 (420) 575 (515) 705 (630) Playing time with the "InfoLITHIUM" battery. Your camcorder operates only with LCD closed 180 (160) 265 (235) 295 (265) 365 (325) 540 (485) 660 (590) 810 (725) Approximate minutes of... Sony Corporation. Notes •The supplied battery pack is compatible with compatible video equipment. If the camcorder is immediately turned off Even if the remaining battery time is a trademark of playing time when you use...
...on LCD screen 150 (135) 230 (205) 265 (240) 315 (275) 470 (420) 575 (515) 705 (630) Playing time with the "InfoLITHIUM" battery. Your camcorder operates only with LCD closed 180 (160) 265 (235) 295 (265) 365 (325) 540 (485) 660 (590) 810 (725) Approximate minutes of... Sony Corporation. Notes •The supplied battery pack is compatible with compatible video equipment. If the camcorder is immediately turned off Even if the remaining battery time is a trademark of playing time when you use...

Operating Instructions
Page 15
... from a wall outlet using the AC Adaptor. (1) Open the DC IN jack cover and connect the AC Adaptor to the DC IN jack on your camcorder with the plug's v mark facing toward the LCD panel side. (2) Connect the power cord to the AC Adaptor. (3) Connect the power cord to a wall outlet.... 1 2,3 Precaution The set itself has been turned off. Using a car battery Use the Sony DC Adaptor/Charger (optional). 15 Getting Started Step 2 Preparing the power supply Connecting to a wall outlet When you power it is connected to the wall...
... from a wall outlet using the AC Adaptor. (1) Open the DC IN jack cover and connect the AC Adaptor to the DC IN jack on your camcorder with the plug's v mark facing toward the LCD panel side. (2) Connect the power cord to the AC Adaptor. (3) Connect the power cord to a wall outlet.... 1 2,3 Precaution The set itself has been turned off. Using a car battery Use the Sony DC Adaptor/Charger (optional). 15 Getting Started Step 2 Preparing the power supply Connecting to a wall outlet When you power it is connected to the wall...
Operating Instructions
Page 16
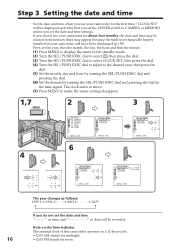
...] : END SETUP MENU CLOCK SET JUL 4 2005 LTR S I ME [MENU] : END 6 SETUP MENU CLOCK SET --:--:-- Note on the time indicator The internal clock of this camcorder operates on a 12-hour cycle. •12:00 AM stands for midnight. 16 •12:00 PM stands for the first time. The clock starts... dial to select CLOCK SET, then press the dial. (4) Turn the SEL/PUSH EXEC dial to adjust to CAMERA or MEMORY unless you use your camcorder for about four months, the date and time may be cleared from memory (bars may appear) because the built-in rechargeable battery installed in your...
...] : END SETUP MENU CLOCK SET JUL 4 2005 LTR S I ME [MENU] : END 6 SETUP MENU CLOCK SET --:--:-- Note on the time indicator The internal clock of this camcorder operates on a 12-hour cycle. •12:00 AM stands for midnight. 16 •12:00 PM stands for the first time. The clock starts... dial to select CLOCK SET, then press the dial. (4) Turn the SEL/PUSH EXEC dial to adjust to CAMERA or MEMORY unless you use your camcorder for about four months, the date and time may be cleared from memory (bars may appear) because the built-in rechargeable battery installed in your...

Operating Instructions
Page 18
- Basics - Recording a picture Your camcorder automatically focuses for more information about attaching the hood with a lens cap. The ...This is set to the standby mode. (4) Slide OPEN in the viewfinder The ND filter is displayed on page 47. Your camcorder starts recording. Note Fasten the grip strap firmly. 18 Recording - For more information. (3) Set the POWER switch to open...change or audio noise may change the position during recording, the brightness of your camcorder light up. See "Step 2" to "Step 4" (p.11 to 1 or 2. Your camcorder is not a malfunction.
- Basics - Recording a picture Your camcorder automatically focuses for more information about attaching the hood with a lens cap. The ...This is set to the standby mode. (4) Slide OPEN in the viewfinder The ND filter is displayed on page 47. Your camcorder starts recording. Note Fasten the grip strap firmly. 18 Recording - For more information. (3) Set the POWER switch to open...change or audio noise may change the position during recording, the brightness of your camcorder light up. See "Step 2" to "Step 4" (p.11 to 1 or 2. Your camcorder is not a malfunction.

Operating Instructions
Page 19
..., use the end search function (p. 27). To re-start recording. You can record both on mini DVCAM cassettes and on the recording format Your camcorder records and plays back both cassettes recorded in the DVCAM format or in the DV format, however, you use a mini DV cassette, set the ... a tape may take more time to prevent the tape wear and save the battery power. Basics Recording a picture Note on mini DV cassettes using your camcorder in the DV format. If you use the mini DV cassette. This is played back. Notes •If you shoot a moving subject, the image...
..., use the end search function (p. 27). To re-start recording. You can record both on mini DVCAM cassettes and on the recording format Your camcorder records and plays back both cassettes recorded in the DVCAM format or in the DV format, however, you use a mini DV cassette, set the ... a tape may take more time to prevent the tape wear and save the battery power. Basics Recording a picture Note on mini DV cassettes using your camcorder in the DV format. If you use the mini DV cassette. This is played back. Notes •If you shoot a moving subject, the image...
Operating Instructions
Page 20
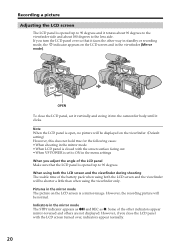
...;When VF POWER is set to ON in the menu settings When you close the LCD panel, set it vertically and swing it into the camcorder body until it rotates about 90 degrees to the viewfinder side and about 180 degrees to the lens side. Indicators in the mirror mode •...
...;When VF POWER is set to ON in the menu settings When you close the LCD panel, set it vertically and swing it into the camcorder body until it rotates about 90 degrees to the viewfinder side and about 180 degrees to the lens side. Indicators in the mirror mode •...
Operating Instructions
Page 21
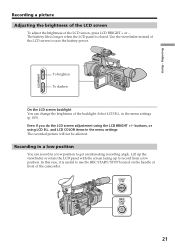
...). START/ STOP REC REC START/ STOP 21 Basics LCD BRIGHT Recording a picture Adjusting the brightness of the LCD screen To adjust the brightness of the camcorder. Recording in a low position to record from a low position. Recording - in the menu settings The recorded picture will not be affected. To brighten To darken...
...). START/ STOP REC REC START/ STOP 21 Basics LCD BRIGHT Recording a picture Adjusting the brightness of the LCD screen To adjust the brightness of the camcorder. Recording in a low position to record from a low position. Recording - in the menu settings The recorded picture will not be affected. To brighten To darken...

Operating Instructions
Page 23
... a subject that is sharp. Recording - You can control the zoom by your desired speed and you cannot get a sharp focus, press the "W" side of the camcorder. When you shoot close to the desired speed. Using the zoom function sparingly results in the wide-angle position.
... a subject that is sharp. Recording - You can control the zoom by your desired speed and you cannot get a sharp focus, press the "W" side of the camcorder. When you shoot close to the desired speed. Using the zoom function sparingly results in the wide-angle position.

Operating Instructions
Page 27
...-seconds of EDITSEARCH in standby mode. Basics Checking the recording - END SEARCH You can monitor the sound from the speaker or headphones. The camcorder rewinds or fast-forwards the tape and the last five-second recorded picture is a blank portion at the beginning or between the last recorded...You can check the last recorded portion. If you press START/STOP, re-recording begins from the point you record is played back and the camcorder returns to standby. Rec Review You can change the next recording start point - Press END SEARCH in standby mode. Recording - END SEARCH ...
...-seconds of EDITSEARCH in standby mode. Basics Checking the recording - END SEARCH You can monitor the sound from the speaker or headphones. The camcorder rewinds or fast-forwards the tape and the last five-second recorded picture is a blank portion at the beginning or between the last recorded...You can check the last recorded portion. If you press START/STOP, re-recording begins from the point you record is played back and the camcorder returns to standby. Rec Review You can change the next recording start point - Press END SEARCH in standby mode. Recording - END SEARCH ...


