
Operating Instructions
Page 3
... and receiver. - For disposal or recycling information, please contact your purchase of the FCC Rules. Your Digital camcorder is very easy to the presence of important operating and maintenance (servicing) instructions in a residential installation. product's...but at the same time it is loaded with Part 15 of this device must be producing home video that you may call toll free 1-800-822-8837, or visit http://www.rbrc.org/. You ... found to constitute a CAUTION Notice risk of Conformity Trade Name: SONY Model No.: DSR-PD170 Responsible Party: Sony Electronics Inc.
... and receiver. - For disposal or recycling information, please contact your purchase of the FCC Rules. Your Digital camcorder is very easy to the presence of important operating and maintenance (servicing) instructions in a residential installation. product's...but at the same time it is loaded with Part 15 of this device must be producing home video that you may call toll free 1-800-822-8837, or visit http://www.rbrc.org/. You ... found to constitute a CAUTION Notice risk of Conformity Trade Name: SONY Model No.: DSR-PD170 Responsible Party: Sony Electronics Inc.
Operating Instructions
Page 4
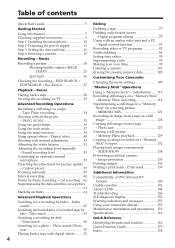
... the fader function 38 Using special effects - Signal convert function 81 Recording video or TV programs 82 Audio dubbing 86 Setting time values 90 Superimposing a title 95 Making your camcorder abroad 155 Maintenance information and precautions .. 156 Specifications 161 Quick Reference Identifying... Warning indicators and messages 153 Using your own titles 99 Labeling a cassette 101 Erasing the cassette memory data 103 Customizing Your Camcorder Changing the menu settings 105 "Memory Stick" Operations Using a "Memory Stick" - Sound recording level 53 Connecting an optional ...
... the fader function 38 Using special effects - Signal convert function 81 Recording video or TV programs 82 Audio dubbing 86 Setting time values 90 Superimposing a title 95 Making your camcorder abroad 155 Maintenance information and precautions .. 156 Specifications 161 Quick Reference Identifying... Warning indicators and messages 153 Using your own titles 99 Labeling a cassette 101 Erasing the cassette memory data 103 Customizing Your Camcorder Changing the menu settings 105 "Memory Stick" Operations Using a "Memory Stick" - Sound recording level 53 Connecting an optional ...

Operating Instructions
Page 8
... the recording in any way. •Do not directly shoot the sun. Copyright precautions Television programs, films, video tapes, and other materials may cause your camcorder to malfunction. Keep your recordings on a TV, you need an NTSC system-based TV. Sometimes this manual ...of the recording cannot be compensated if recording or playback is not made due to a malfunction of the camcorder, video tape, etc. 8 Using this malfunction cannot be repaired [a]. •Never leave your camcorder exposed to temperatures above 60 °C (140 °F), such as dusk. •Do not let your...
... the recording in any way. •Do not directly shoot the sun. Copyright precautions Television programs, films, video tapes, and other materials may cause your camcorder to malfunction. Keep your recordings on a TV, you need an NTSC system-based TV. Sometimes this manual ...of the recording cannot be compensated if recording or playback is not made due to a malfunction of the camcorder, video tape, etc. 8 Using this malfunction cannot be repaired [a]. •Never leave your camcorder exposed to temperatures above 60 °C (140 °F), such as dusk. •Do not let your...

Operating Instructions
Page 14
...battery pack fully again. Your camcorder operates only with the "InfoLITHIUM" battery pack (L series). If the camcorder is immediately turned off Even if the remaining battery time is "InfoLITHIUM?" Notes •The supplied battery pack is charged a little. •Some types of Sony Corporation. This unit is a ... LCD screen 150 (135) 230 (205) 265 (240) 315 (275) 470 (420) 575 (515) 705 (630) Playing time with compatible video equipment. The correct remaining time is a trademark of battery packs may not be shorter if you use a fully charged battery Numbers in parentheses "( )"...
...battery pack fully again. Your camcorder operates only with the "InfoLITHIUM" battery pack (L series). If the camcorder is immediately turned off Even if the remaining battery time is "InfoLITHIUM?" Notes •The supplied battery pack is charged a little. •Some types of Sony Corporation. This unit is a ... LCD screen 150 (135) 230 (205) 265 (240) 315 (275) 470 (420) 575 (515) 705 (630) Playing time with compatible video equipment. The correct remaining time is a trademark of battery packs may not be shorter if you use a fully charged battery Numbers in parentheses "( )"...

Operating Instructions
Page 28
You can also control playback using the Remote Commander supplied with your camcorder. (1) Install the power source and insert the recorded tape. (2) Set the POWER switch to start playback. (6) To adjust the volume, press either of the B mark ...to open the LCD panel. (4) Press m to rewind the tape. (5) Press N to VCR while pressing the small green button. The video control buttons light up. (3) Slide OPEN in the viewfinder. - Playing back a tape You can monitor the playback picture in the direction of the VOLUME +/- buttons...
You can also control playback using the Remote Commander supplied with your camcorder. (1) Install the power source and insert the recorded tape. (2) Set the POWER switch to start playback. (6) To adjust the volume, press either of the B mark ...to open the LCD panel. (4) Press m to rewind the tape. (5) Press N to VCR while pressing the small green button. The video control buttons light up. (3) Slide OPEN in the viewfinder. - Playing back a tape You can monitor the playback picture in the direction of the VOLUME +/- buttons...

Operating Instructions
Page 31
... pause mode lasts for a signal output through the DV Interface. Slow playback Slow playback can be performed smoothly on your camcorder, however, this function does not work for five minutes Your camcorder automatically enters the stop mode. When you play back a tape in the reverse direction, press Remote Commander, then press...) Keep pressing m or M during playback. To resume normal playback, press N. To resume playback, press N. Basics Playing back a tape Various playback modes To operate video control buttons, set the POWER switch to reverse the playback direction. Playback -
... pause mode lasts for a signal output through the DV Interface. Slow playback Slow playback can be performed smoothly on your camcorder, however, this function does not work for five minutes Your camcorder automatically enters the stop mode. When you play back a tape in the reverse direction, press Remote Commander, then press...) Keep pressing m or M during playback. To resume normal playback, press N. To resume playback, press N. Basics Playing back a tape Various playback modes To operate video control buttons, set the POWER switch to reverse the playback direction. Playback -
Operating Instructions
Page 33
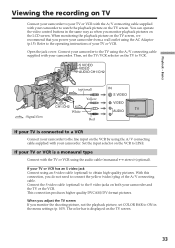
...). You can operate the video control buttons in the menu settings (p. 105). When you adjust the TV screen If you power your camcorder and the TV or the VCR. S VIDEO VIDEO AUDIO CH1/CH2 : Signal flow (optional) AUDIO CH1/CH2 White Yellow Red IN S VIDEO VIDEO AUDIO If your TV is... displayed on the LCD screen. Connect the S video cable (optional) to connect the yellow (video) plug of your camcorder. With this ...
...). You can operate the video control buttons in the menu settings (p. 105). When you adjust the TV screen If you power your camcorder and the TV or the VCR. S VIDEO VIDEO AUDIO CH1/CH2 : Signal flow (optional) AUDIO CH1/CH2 White Yellow Red IN S VIDEO VIDEO AUDIO If your TV is... displayed on the LCD screen. Connect the S video cable (optional) to connect the yellow (video) plug of your camcorder. With this ...
Operating Instructions
Page 34
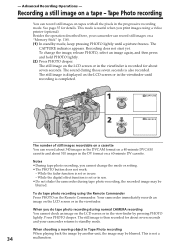
... recorded image may be blurred. Press PHOTO deeper. - Recording a still image on the Remote Commander. Besides the operation described here, your camcorder returns to standby mode. This is completed. 1 PHOTO CAPTURE 2 PHOTO The number of still images recordable on a cassette You can record about...screen or in the viewfinder until a picture freezes. Notes •During tape photo recording, you do tape photo recording using a video printer (optional). Tape Photo recording You can record still images on the LCD screen or in Tape Photo recording When playing back ...
... recorded image may be blurred. Press PHOTO deeper. - Recording a still image on the Remote Commander. Besides the operation described here, your camcorder returns to standby mode. This is completed. 1 PHOTO CAPTURE 2 PHOTO The number of still images recordable on a cassette You can record about...screen or in the viewfinder until a picture freezes. Notes •During tape photo recording, you do tape photo recording using a video printer (optional). Tape Photo recording You can record still images on the LCD screen or in Tape Photo recording When playing back ...

Operating Instructions
Page 37
...ID-1/ID-2) system. - In wide mode, you connect a TV compatible with ID-1 signals inserted between video signals when you connect your camcorder to the full mode, you set 16:9WIDE to the S video jack on a TV. Progressive recording mode During recording You cannot operate the wide mode function. ID-1 ... in the menu settings (p. 105). If you can record a 16:9 wide picture to OFF in the widthwise direction. Old movie - You connect your camcorder to OFF in the 4:3 mode on the LCD screen or in the viewfinder [a]. [a] [b] [d] 16:9WIDE [c] In standby mode, set the screen ...
...ID-1/ID-2) system. - In wide mode, you connect a TV compatible with ID-1 signals inserted between video signals when you connect your camcorder to the full mode, you set 16:9WIDE to the S video jack on a TV. Progressive recording mode During recording You cannot operate the wide mode function. ID-1 ... in the menu settings (p. 105). If you can record a 16:9 wide picture to OFF in the widthwise direction. Old movie - You connect your camcorder to OFF in the 4:3 mode on the LCD screen or in the viewfinder [a]. [a] [b] [d] 16:9WIDE [c] In standby mode, set the screen ...
Operating Instructions
Page 52
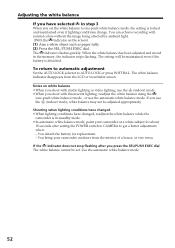
... indicator flashes quickly. Shooting when lighting conditions have changed , readjust the white balance while the camcorder is in standby mode. •In automatic white balance mode, point your camcorder outdoors from the LCD or viewfinder screen. If you press the SEL/PUSH EXEC dial The white...mode. 52 Notes on the screen) (1) Aim a white object such as paper fully. (2) Press the SEL/PUSH EXEC dial. You bring your camcorder at a white subject for replacement. - Adjusting the white balance If you have changed •When lighting conditions have selected in step 3 When ...
... indicator flashes quickly. Shooting when lighting conditions have changed , readjust the white balance while the camcorder is in standby mode. •In automatic white balance mode, point your camcorder outdoors from the LCD or viewfinder screen. If you press the SEL/PUSH EXEC dial The white...mode. 52 Notes on the screen) (1) Aim a white object such as paper fully. (2) Press the SEL/PUSH EXEC dial. You bring your camcorder at a white subject for replacement. - Adjusting the white balance If you have changed •When lighting conditions have selected in step 3 When ...

Operating Instructions
Page 73
..., however, is not satisfying for professional use. Editing S VIDEO : Signal flow S video cable (optional) IN VIDEO AUDIO CH1/CH2 S VIDEO VIDEO AUDIO A/V connecting cable (supplied) When you want to VCR. (4) Play back the recorded tape on the VCR. - Dubbing a tape Using the A/V connecting cable Connect your camcorder to the operating instructions of the VCR. (3) Set the...
..., however, is not satisfying for professional use. Editing S VIDEO : Signal flow S video cable (optional) IN VIDEO AUDIO CH1/CH2 S VIDEO VIDEO AUDIO A/V connecting cable (supplied) When you want to VCR. (4) Play back the recorded tape on the VCR. - Dubbing a tape Using the A/V connecting cable Connect your camcorder to the operating instructions of the VCR. (3) Set the...

Operating Instructions
Page 74
...digital form for high-quality editing. And when you play back the picture using other video equipment having a fine synchro-editing function, using this camcorder as a player. Connect an S video cable (optional) to the S video jacks of the VCR. (3) Set the POWER switch to VCR. (4) Play back the... recorded tape on your camcorder. (2) Set the input selector on the VCR. Using an i.LINK cable Simply ...
...digital form for high-quality editing. And when you play back the picture using other video equipment having a fine synchro-editing function, using this camcorder as a player. Connect an S video cable (optional) to the S video jacks of the VCR. (3) Set the POWER switch to VCR. (4) Play back the... recorded tape on your camcorder. (2) Set the input selector on the VCR. Using an i.LINK cable Simply ...

Operating Instructions
Page 78
... Programs (1) Insert the tape for playback into your camcorder, and insert a tape for recording into the VCR. (2) Press MENU to display the menu. (3) Turn the SEL/PUSH EXEC dial to select , then press the dial. (4) Turn the SEL/PUSH EXEC dial to select VIDEO EDIT, then press the dial. (5) Search for the... beginning of the first scene you want to insert using the video control buttons, then pause playback (p. 31). 5 STOP REW PLAY FF PAUSE 2 MENU 3,4 OTHERS BEEP MELODY COMMANDER D I SPLAY V I DEO ED I T ED I T SET HRS METER RETURN [MENU] : ...
... Programs (1) Insert the tape for playback into your camcorder, and insert a tape for recording into the VCR. (2) Press MENU to display the menu. (3) Turn the SEL/PUSH EXEC dial to select , then press the dial. (4) Turn the SEL/PUSH EXEC dial to select VIDEO EDIT, then press the dial. (5) Search for the... beginning of the first scene you want to insert using the video control buttons, then pause playback (p. 31). 5 STOP REW PLAY FF PAUSE 2 MENU 3,4 OTHERS BEEP MELODY COMMANDER D I SPLAY V I DEO ED I T ED I T SET HRS METER RETURN [MENU] : ...
Operating Instructions
Page 80
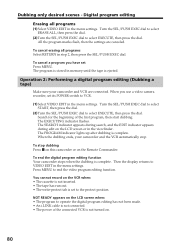
...select ERASE ALL, then press the dial. (2) Turn the SEL/PUSH EXEC dial to end the video program editing function. To end the digital program editing function Your camcorder stops when the dubbing is complete. Press MENU to select EXECUTE, then press the dial. NOT READY...settings. Operation 2: Performing a digital program editing (Dubbing a tape) Make sure your camcorder and the VCR automatically stop dubbing Press x on this camcorder or on . 80 When you have set to VCR. (1) Select VIDEO EDIT in the viewfinder. Search for the beginning of the connected VCR is ejected....
...select ERASE ALL, then press the dial. (2) Turn the SEL/PUSH EXEC dial to end the video program editing function. To end the digital program editing function Your camcorder stops when the dubbing is complete. Press MENU to select EXECUTE, then press the dial. NOT READY...settings. Operation 2: Performing a digital program editing (Dubbing a tape) Make sure your camcorder and the VCR automatically stop dubbing Press x on this camcorder or on . 80 When you have set to VCR. (1) Select VIDEO EDIT in the viewfinder. Search for the beginning of the connected VCR is ejected....

Operating Instructions
Page 81
...;Depending on the condition of the analog video signals, the PC may contain noise or incorrect colors. •The camcorder cannot output the digital signal when you convert analog video signals into digital video signals via your camcorder. S VIDEO S video cable (optional) OUT S VIDEO VIDEO AUDIO Editing i.LINK (IEEE1394) A/V connecting...install an appropriate software which you want to your software. For details on the analog video unit slightly ahead of your PC and your camcorder. After capturing images and sound Stop capturing procedures on your PC. Notes •When ...
...;Depending on the condition of the analog video signals, the PC may contain noise or incorrect colors. •The camcorder cannot output the digital signal when you convert analog video signals into digital video signals via your camcorder. S VIDEO S video cable (optional) OUT S VIDEO VIDEO AUDIO Editing i.LINK (IEEE1394) A/V connecting...install an appropriate software which you want to your software. For details on the analog video unit slightly ahead of your PC and your camcorder. After capturing images and sound Stop capturing procedures on your PC. Notes •When ...

Operating Instructions
Page 82
... CH1/CH2 S video cable (optional) VIDEO OUT S VIDEO VIDEO AUDIO A/V connecting cable (supplied) When you want to erase the menu display. (5) Press z REC and the button on its right simultaneously on your camcorder, then immediately press X on your camcorder. (6) Press N on your camcorder at the scene from the VCR, insert a recorded tape into your camcorder and the VCR...
... CH1/CH2 S video cable (optional) VIDEO OUT S VIDEO VIDEO AUDIO A/V connecting cable (supplied) When you want to erase the menu display. (5) Press z REC and the button on its right simultaneously on your camcorder, then immediately press X on your camcorder. (6) Press N on your camcorder at the scene from the VCR, insert a recorded tape into your camcorder and the VCR...

Operating Instructions
Page 83
...On the commander mode Your camcorder works in the commander mode VTR 2, we recommend changing the commander mode or covering the sensor of the VCR with a VCR using an S video cable (optional) to connect the yellow (video) plug of the A/V connecting cable. Editing Recording video or TV programs If your... marked on the VCR during recording The recorded picture may be blurred. Connect an S video cable (optional) to the S video jacks of both your camcorder from other Sony VCRs to distinguish your camcorder and the VCR. On index signal The index is recorded on cassette memory. 83 If...
...On the commander mode Your camcorder works in the commander mode VTR 2, we recommend changing the commander mode or covering the sensor of the VCR with a VCR using an S video cable (optional) to connect the yellow (video) plug of the A/V connecting cable. Editing Recording video or TV programs If your... marked on the VCR during recording The recorded picture may be blurred. Connect an S video cable (optional) to the S video jacks of both your camcorder from other Sony VCRs to distinguish your camcorder and the VCR. On index signal The index is recorded on cassette memory. 83 If...
Operating Instructions
Page 84
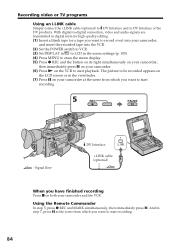
... on the LCD screen or in the viewfinder. (7) Press X on your camcorder at the scene from which you have finished recording Press x on both your camcorder and the VCR. With digital-to-digital connection, video and audio signals are transmitted in digital form for high-quality editing. (1) ...Insert a blank tape (or a tape you want to record over) into your camcorder. (6) Press N on your camcorder, and insert the recorded tape...
... on the LCD screen or in the viewfinder. (7) Press X on your camcorder at the scene from which you have finished recording Press x on both your camcorder and the VCR. With digital-to-digital connection, video and audio signals are transmitted in digital form for high-quality editing. (1) ...Insert a blank tape (or a tape you want to record over) into your camcorder. (6) Press N on your camcorder, and insert the recorded tape...

Operating Instructions
Page 85
... appears on both pieces of the display may be uneven. However this does not affect the dubbed picture. Editing Recording video or TV programs You can connect only one VCR using your camcorder, the picture may appear on the LCD screen or in the viewfinder. If you dub a picture in digital form...
... appears on both pieces of the display may be uneven. However this does not affect the dubbed picture. Editing Recording video or TV programs You can connect only one VCR using your camcorder, the picture may appear on the LCD screen or in the viewfinder. If you dub a picture in digital form...

Operating Instructions
Page 92
... editing Set TC MAKE to REGEN in fact 29.97 frames per second and the real time, or 18 frames per second, but the exact video frame frequency is in the menu settings to make the time code continuous when the recording has been interrupted or when the cassette tape has... been removed from the camcorder between shootings. When the camcorder is in the menu settings, the running mode is automatically set to FREE RUN in recording pause mode, the recorded time code is...
... editing Set TC MAKE to REGEN in fact 29.97 frames per second and the real time, or 18 frames per second, but the exact video frame frequency is in the menu settings to make the time code continuous when the recording has been interrupted or when the cassette tape has... been removed from the camcorder between shootings. When the camcorder is in the menu settings, the running mode is automatically set to FREE RUN in recording pause mode, the recorded time code is...


