
Instruction Manual (Large File - 11.45 MB)
Page 7
... connected device or the software used of metering or the exposure mode. • In Live View or focus check Live View mode, the recorded image may be compensated for if recording or playback is manufactured using extremely high-precision technology so over 99.99% of the pixels are normal in the manufacturing process and do not affect the images in Live View mode, you monitored with the LCD monitor. Black, white, red, blue and green points...
... connected device or the software used of metering or the exposure mode. • In Live View or focus check Live View mode, the recorded image may be compensated for if recording or playback is manufactured using extremely high-precision technology so over 99.99% of the pixels are normal in the manufacturing process and do not affect the images in Live View mode, you monitored with the LCD monitor. Black, white, red, blue and green points...
Instruction Manual (Large File - 11.45 MB)
Page 10
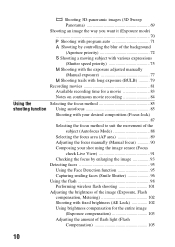
... Shooting an image the way you want it (Exposure mode 70 Shooting with program auto 71 Shooting by controlling the blur of the background (Aperture priority 72 Shooting a moving subject with various expressions (Shutter speed priority 75 Shooting with the exposure adjusted manually (Manual exposure 77 Shooting trails with long exposure (BULB 79 Recording movies 81 Available recording time for a movie 83 Notes on continuous movie recording 84 Using the Selecting the focus method 85 shooting function Using autofocus 85 Shooting with your desired composition (Focus-lock...
... Shooting an image the way you want it (Exposure mode 70 Shooting with program auto 71 Shooting by controlling the blur of the background (Aperture priority 72 Shooting a moving subject with various expressions (Shutter speed priority 75 Shooting with the exposure adjusted manually (Manual exposure 77 Shooting trails with long exposure (BULB 79 Recording movies 81 Available recording time for a movie 83 Notes on continuous movie recording 84 Using the Selecting the focus method 85 shooting function Using autofocus 85 Shooting with your desired composition (Focus-lock...
Instruction Manual (Large File - 11.45 MB)
Page 12
... setup Setting image size and image quality 140 Setting the method for recording on a memory card ..... 144 Changing the noise reduction setting 148 Changing the function of the buttons 149 Changing other settings 150 Setting the LCD monitor 152 Confirming the version of the camera 154 Resetting to the default 155 Viewing images on a computer Using with your computer 158 Using the software 160 Connecting the camera to the computer 164 Creating a movie disc 167 Printing images Specifying DPOF 171 Others Specifications 173 Troubleshooting 178 Warning messages...
... setup Setting image size and image quality 140 Setting the method for recording on a memory card ..... 144 Changing the noise reduction setting 148 Changing the function of the buttons 149 Changing other settings 150 Setting the LCD monitor 152 Confirming the version of the camera 154 Resetting to the default 155 Viewing images on a computer Using with your computer 158 Using the software 160 Connecting the camera to the computer 164 Creating a movie disc 167 Printing images Specifying DPOF 171 Others Specifications 173 Troubleshooting 178 Warning messages...

Instruction Manual (Large File - 11.45 MB)
Page 36
... capacity. The number of images that can record more images than those indicated depending on the CIPA standard. (CIPA: Camera & Imaging Products Association) 36 Using Sony "Memory Stick PRO Duo" media (sold separately). - [Image: Quality] is set to [Fine]. - [Autofocus Mode] is set to [Automatic AF]. - Note that is charged for an hour after the CHARGE lamp goes out. - The flash strobes once every two times. - DSLR-A560 (Units: Images) Size Capacity 2GB 4GB...
... capacity. The number of images that can record more images than those indicated depending on the CIPA standard. (CIPA: Camera & Imaging Products Association) 36 Using Sony "Memory Stick PRO Duo" media (sold separately). - [Image: Quality] is set to [Fine]. - [Autofocus Mode] is set to [Automatic AF]. - Note that is charged for an hour after the CHARGE lamp goes out. - The flash strobes once every two times. - DSLR-A560 (Units: Images) Size Capacity 2GB 4GB...
Instruction Manual (Large File - 11.45 MB)
Page 51
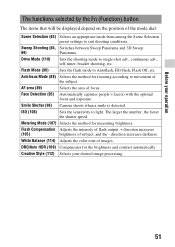
.... White Balance (114) Adjusts the color tone of the subject. Creative Style (112) Selects your operation The functions selected by the Fn (Function) button The items that will be displayed depend on the position of the mode dial. Autofocus Mode (88) Selects the method for focusing according to single-shot adv., continuous adv., self-timer, bracket shooting, etc. Drive Mode (118) Sets the shooting mode to movement of images. The larger the number, the faster the shutter speed...
.... White Balance (114) Adjusts the color tone of the subject. Creative Style (112) Selects your operation The functions selected by the Fn (Function) button The items that will be displayed depend on the position of the mode dial. Autofocus Mode (88) Selects the method for focusing according to single-shot adv., continuous adv., self-timer, bracket shooting, etc. Drive Mode (118) Sets the shooting mode to movement of images. The larger the number, the faster the shutter speed...
Instruction Manual (Large File - 11.45 MB)
Page 54
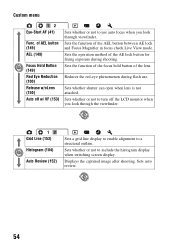
... line display to enable alignment to include the histogram display when switching screen display. Sets the function of the focus hold button of the AEL button between AE lock and Focus Magnifier in focus check Live View mode. Sets whether shutter can open when lens is not attached. Displays the captured image after shooting. Sets whether or not to a structural outline. Sets auto review. 54 Reduces the red-eye phenomenon during shooting. Sets whether or not to turn off w/ VF (153) Sets whether or not to use . Custom menu Eye-Start...
... line display to enable alignment to include the histogram display when switching screen display. Sets the function of the focus hold button of the AEL button between AE lock and Focus Magnifier in focus check Live View mode. Sets whether shutter can open when lens is not attached. Displays the captured image after shooting. Sets whether or not to a structural outline. Sets auto review. 54 Reduces the red-eye phenomenon during shooting. Sets whether or not to turn off w/ VF (153) Sets whether or not to use . Custom menu Eye-Start...

Instruction Manual (Large File - 11.45 MB)
Page 57
...) Version (154) Demo Mode (151) Reset Default (155) Sets the upload function of a movie to clean the image sensor. Starts the cleaning mode to on the LCD monitor in viewfinder mode. USB Connection (164) Sets the USB connection method. Sets the demonstration playback of the camera when using an Eye-Fi card. Executes this function when dots appear and remain on or off. Language (151) Selects the language. Power Save (LV) (150) Sets the interval after which power save mode (150) engages in Live View mode. CTRL FOR HDMI (137) Operates the camera...
...) Version (154) Demo Mode (151) Reset Default (155) Sets the upload function of a movie to clean the image sensor. Starts the cleaning mode to on the LCD monitor in viewfinder mode. USB Connection (164) Sets the USB connection method. Sets the demonstration playback of the camera when using an Eye-Fi card. Executes this function when dots appear and remain on or off. Language (151) Selects the language. Power Save (LV) (150) Sets the interval after which power save mode (150) engages in Live View mode. CTRL FOR HDMI (137) Operates the camera...
Instruction Manual (Large File - 11.45 MB)
Page 71
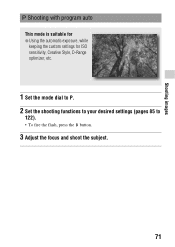
Shooting images Shooting with program auto This mode is suitable for z Using the automatic exposure, while keeping the custom settings for ISO sensitivity, Creative Style, D-Range optimizer, etc. 1 Set the mode dial to P. 2 Set the shooting functions to your desired settings (pages 85 to 122). • To fire the flash, press the button. 3 Adjust the focus and shoot the subject. 71
Shooting images Shooting with program auto This mode is suitable for z Using the automatic exposure, while keeping the custom settings for ISO sensitivity, Creative Style, D-Range optimizer, etc. 1 Set the mode dial to P. 2 Set the shooting functions to your desired settings (pages 85 to 122). • To fire the flash, press the button. 3 Adjust the focus and shoot the subject. 71
Instruction Manual (Large File - 11.45 MB)
Page 80
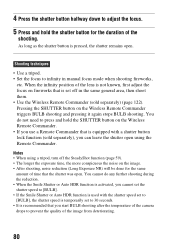
... lens is not known, first adjust the focus on fireworks that is set off the SteadyShot function (page 59). • The longer the exposure time, the more conspicuous the noise on the image. • After shooting, noise reduction (Long Exposure NR) will be done for the duration of the shooting. Pressing the SHUTTER button on the Wireless Remote Commander triggers BULB shooting and pressing it again stops BULB shooting. As long as the shutter button is used with a shutter button lock function...
... lens is not known, first adjust the focus on fireworks that is set off the SteadyShot function (page 59). • The longer the exposure time, the more conspicuous the noise on the image. • After shooting, noise reduction (Long Exposure NR) will be done for the duration of the shooting. Pressing the SHUTTER button on the Wireless Remote Commander triggers BULB shooting and pressing it again stops BULB shooting. As long as the shutter button is used with a shutter button lock function...

Instruction Manual (Large File - 11.45 MB)
Page 83
... 20:33:00 83 Shooting images Audio recording When you record movies, the operating noise of the camera or lens may vary depending on the shooting conditions and the type of the camera by using a memory card formatted with this camera. MENU button t 1 t [Movie: Audio Rec.] t [Off] To change the size MENU button t 1 t [Movie: Size] t Select the desired size For details, see page 141. Available recording time for testing. You can also record movies without audio. You can reduce the noise of memory card used.
... 20:33:00 83 Shooting images Audio recording When you record movies, the operating noise of the camera or lens may vary depending on the shooting conditions and the type of the camera by using a memory card formatted with this camera. MENU button t 1 t [Movie: Audio Rec.] t [Off] To change the size MENU button t 1 t [Movie: Size] t Select the desired size For details, see page 141. Available recording time for testing. You can also record movies without audio. You can reduce the noise of memory card used.

Instruction Manual (Large File - 11.45 MB)
Page 99
... light. Remove any shutter speed. When the exposure mode is set to P, A, S, or M, press the button to the Auto- Notes • Do not hold the camera by slowing the shutter speed. Fires if it (Wireless flash shooting). Fires every time you trigger the shutter. Fires right before shooting. Using the shooting function Shooting techniques • The lens hood (sold separately) that is off the camera and away from the Auto-lock Accessory shoe. 99 Fires an external flash...
... light. Remove any shutter speed. When the exposure mode is set to P, A, S, or M, press the button to the Auto- Notes • Do not hold the camera by slowing the shutter speed. Fires if it (Wireless flash shooting). Fires every time you trigger the shutter. Fires right before shooting. Using the shooting function Shooting techniques • The lens hood (sold separately) that is off the camera and away from the Auto-lock Accessory shoe. 99 Fires an external flash...
Instruction Manual (Large File - 11.45 MB)
Page 101
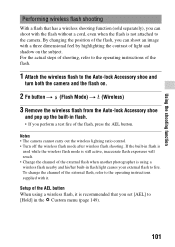
... a flash that you set [AEL] to [Hold] in flash light causes your external flash to the Auto-lock Accessory shoe and turn both the camera and the flash on the subject. Notes • The camera cannot carry out the wireless lighting ratio control. • Turn off the wireless flash mode after wireless flash shooting. To change the channel of the AEL button When using a wireless flash nearby and his/her built-in the Custom menu (page 149). 101 Setup of the external flash, refer to the operating instructions...
... a flash that you set [AEL] to [Hold] in flash light causes your external flash to the Auto-lock Accessory shoe and turn both the camera and the flash on the subject. Notes • The camera cannot carry out the wireless lighting ratio control. • Turn off the wireless flash mode after wireless flash shooting. To change the channel of the AEL button When using a wireless flash nearby and his/her built-in the Custom menu (page 149). 101 Setup of the external flash, refer to the operating instructions...
Instruction Manual (Large File - 11.45 MB)
Page 102
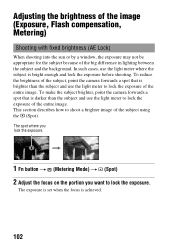
... brightness of the subject using the (Spot). In such cases, use the light meter to lock the exposure of the big difference in lighting between the subject and the background. The exposure is set when the focus is bright enough and lock the exposure before shooting. Adjusting the brightness of the image (Exposure, Flash compensation, Metering) Shooting with fixed brightness (AE Lock) When shooting into the sun or by a window, the exposure may not be...
... brightness of the subject using the (Spot). In such cases, use the light meter to lock the exposure of the big difference in lighting between the subject and the background. The exposure is set when the focus is bright enough and lock the exposure before shooting. Adjusting the brightness of the image (Exposure, Flash compensation, Metering) Shooting with fixed brightness (AE Lock) When shooting into the sun or by a window, the exposure may not be...

Instruction Manual (Large File - 11.45 MB)
Page 119
... self-timer The 10-second self-timer is activated, audio signals and the self-timer lamp indicate the condition. Using the shooting function The maximum number of continuous shots The number of seconds that is currently selected. 2 Adjust the focus and shoot the subject. • When the self-timer is convenient when the photographer appears in the viewfinder. The exposure and focus are set to reduce the camera shake because the mirror is raised first. 1 button t (Self-timer...
... self-timer The 10-second self-timer is activated, audio signals and the self-timer lamp indicate the condition. Using the shooting function The maximum number of continuous shots The number of seconds that is currently selected. 2 Adjust the focus and shoot the subject. • When the self-timer is convenient when the photographer appears in the viewfinder. The exposure and focus are set to reduce the camera shake because the mirror is raised first. 1 button t (Self-timer...
Instruction Manual (Large File - 11.45 MB)
Page 142
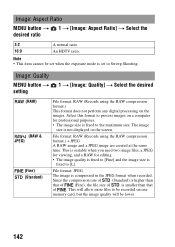
... be set when the exposure mode is smaller than that of . File format: RAW (Records using the RAW compression format.) This format does not perform any digital processing on the screen. Select this format to process images on one memory card, but the image quality will allow more files to Sweep Shooting. Note • This item cannot be recorded on a computer for editing. • The image quality is fixed to [L]. Image: Aspect Ratio MENU button t 1 t [Image: Aspect Ratio...
... be set when the exposure mode is smaller than that of . File format: RAW (Records using the RAW compression format.) This format does not perform any digital processing on the screen. Select this format to process images on one memory card, but the image quality will allow more files to Sweep Shooting. Note • This item cannot be recorded on a computer for editing. • The image quality is fixed to [L]. Image: Aspect Ratio MENU button t 1 t [Image: Aspect Ratio...

Instruction Manual (Large File - 11.45 MB)
Page 147
... images. • If (error) is displayed, remove the memory card and reinsert it, or turn on an airplane. For details, refer to [Off]. If the communication status is prohibited to the latest version. is displayed on the screen when [Upload Settings] is an Eye-Fi card inserted in the camera, set up the wireless LAN access point and forwarding destination. Changing your computer before formatting the card. • Use an Eye-Fi card after updating...
... images. • If (error) is displayed, remove the memory card and reinsert it, or turn on an airplane. For details, refer to [Off]. If the communication status is prohibited to the latest version. is displayed on the screen when [Upload Settings] is an Eye-Fi card inserted in the camera, set up the wireless LAN access point and forwarding destination. Changing your computer before formatting the card. • Use an Eye-Fi card after updating...

Instruction Manual (Large File - 11.45 MB)
Page 152
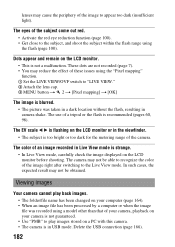
... is automatically adjusted to [Auto], do not cover the light sensor with the AC-PW10AM AC Adaptor (sold separately), the brightness of the image right after the shooting. Setting the displayed time of LCD monitor is set to [Auto Rotate] (page 123). 152 You can check the recorded image on the screen right after shooting (Auto review) You can change the displayed time. MENU button t 2 t [Auto Review] t Select the desired setting Note • In auto review, the image will not...
... is automatically adjusted to [Auto], do not cover the light sensor with the AC-PW10AM AC Adaptor (sold separately), the brightness of the image right after the shooting. Setting the displayed time of LCD monitor is set to [Auto Rotate] (page 123). 152 You can check the recorded image on the screen right after shooting (Auto review) You can change the displayed time. MENU button t 2 t [Auto Review] t Select the desired setting Note • In auto review, the image will not...
Instruction Manual (Large File - 11.45 MB)
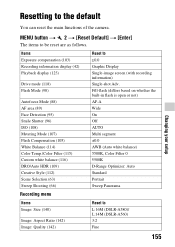
Page 155
Items Exposure compensation (103) Recording information display (42) Playback display (123) Drive mode (118) Flash Mode (98) Autofocus Mode (88) AF area (89) Face Detection (95) Smile Shutter (96) ISO (108) Metering Mode (107) Flash Compensation (105) White Balance (114) Color Temp./Color Filter (115) Custom white balance (116) DRO/Auto HDR (109) Creative Style (112) Scene Selection (63) Sweep Shooting (66) Reset to L:16M (DSLR-A580)/ L:14M (DSLR-A560) 3:2 Fine 155 Fill-flash (differs based on whether the built-in flash is...
Items Exposure compensation (103) Recording information display (42) Playback display (123) Drive mode (118) Flash Mode (98) Autofocus Mode (88) AF area (89) Face Detection (95) Smile Shutter (96) ISO (108) Metering Mode (107) Flash Compensation (105) White Balance (114) Color Temp./Color Filter (115) Custom white balance (116) DRO/Auto HDR (109) Creative Style (112) Scene Selection (63) Sweep Shooting (66) Reset to L:16M (DSLR-A580)/ L:14M (DSLR-A560) 3:2 Fine 155 Fill-flash (differs based on whether the built-in flash is...

Instruction Manual (Large File - 11.45 MB)
Page 174
....4 lens) DSLR-A560 -2 EV to 16 EV on all metering modes (ISO 100 equivalent with F1.4 lens) ISO sensitivity (Recommended exposure index) AUTO, ISO 100 to 12800 Exposure compensation ±2.0 EV (1/3 EV step) [Shutter] Type Electronically-controlled, vertical-traverse, focalplane type Speed range 1/4000 second to 30 seconds, bulb, (1/3 EV step) Flash sync speed 1/160 second [Built-In-Flash] Flash guide number GN 12 (in meters at ISO 100) Recycling time Approx. 4 seconds Flash coverage Covering 18...
....4 lens) DSLR-A560 -2 EV to 16 EV on all metering modes (ISO 100 equivalent with F1.4 lens) ISO sensitivity (Recommended exposure index) AUTO, ISO 100 to 12800 Exposure compensation ±2.0 EV (1/3 EV step) [Shutter] Type Electronically-controlled, vertical-traverse, focalplane type Speed range 1/4000 second to 30 seconds, bulb, (1/3 EV step) Flash sync speed 1/160 second [Built-In-Flash] Flash guide number GN 12 (in meters at ISO 100) Recycling time Approx. 4 seconds Flash coverage Covering 18...
Instruction Manual (Large File - 11.45 MB)
Page 182
... flash, resulting in camera shake. In such cases, the expected result may reduce the effect of these issues using the "Pixel mapping" function. 1 Set the LIVE VIEW/OVF switch to the subject, and shoot the subject within the flash range using a model other than that of the subject come out red. • Activate the red eye reduction function (page 100). • Get close to "LIVE VIEW." 2 Attach the lens cap. 3 MENU button...
... flash, resulting in camera shake. In such cases, the expected result may reduce the effect of these issues using the "Pixel mapping" function. 1 Set the LIVE VIEW/OVF switch to the subject, and shoot the subject within the flash range using a model other than that of the subject come out red. • Activate the red eye reduction function (page 100). • Get close to "LIVE VIEW." 2 Attach the lens cap. 3 MENU button...


