Instruction Manual
Page 6
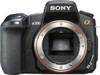
... perchlorate Perchlorate Material: Lithium battery contains perchlorate. 6 For Customers in Europe This product has been tested and found to comply with the limits for a digital device pursuant to which can radiate radio frequency energy and, if not installed and used with the equipment in accordance with the limits for a Class...operate this product, please contact your local Civic Office, your authority to discontinue midway (fail), restart the application or disconnect and connect the communication cable (USB, etc.) again. CAUTION You are designed to conserve natural resources.
... perchlorate Perchlorate Material: Lithium battery contains perchlorate. 6 For Customers in Europe This product has been tested and found to comply with the limits for a digital device pursuant to which can radiate radio frequency energy and, if not installed and used with the equipment in accordance with the limits for a Class...operate this product, please contact your local Civic Office, your authority to discontinue midway (fail), restart the application or disconnect and connect the communication cable (USB, etc.) again. CAUTION You are designed to conserve natural resources.

Instruction Manual
Page 13
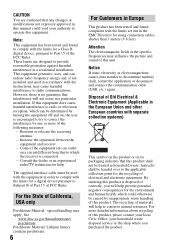
Preparing the camera Preparing the camera Checking the accessories supplied The number in parentheses indicates the number of pieces. • BC-VM10 Battery charger (1)/ Power cord (mains lead) (1) • Rechargeable battery pack NPFM500H (1) • Eyecup (1) (Attached on the camera) • CD-ROM (Application Software for α camera) (1) • Quick Start Guide (1) • Instruction Manual (This manual) (1) • USB cable (1) • Video cable (1) • Shoulder strap (1) • Eyepiece cover (1) • Body cap (1) (Attached on the camera) 13
Preparing the camera Preparing the camera Checking the accessories supplied The number in parentheses indicates the number of pieces. • BC-VM10 Battery charger (1)/ Power cord (mains lead) (1) • Rechargeable battery pack NPFM500H (1) • Eyecup (1) (Attached on the camera) • CD-ROM (Application Software for α camera) (1) • Quick Start Guide (1) • Instruction Manual (This manual) (1) • USB cable (1) • Video cable (1) • Shoulder strap (1) • Eyepiece cover (1) • Body cap (1) (Attached on the camera) 13
Instruction Manual
Page 27
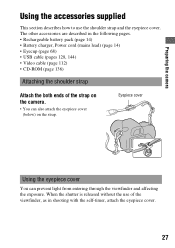
...the camera. • You can prevent light from entering through the viewfinder and affecting the exposure. The other accessories are described in the following pages. • Rechargeable battery pack (page 14) • Battery charger, Power cord (mains lead) (page 14) • Eyecup (page 68) • USB cable ...(pages 128, 144) • Video cable (page 112) • CD-ROM (page 136) Attaching the shoulder strap Attach the both ends of the viewfinder, as in shooting with...
...the camera. • You can prevent light from entering through the viewfinder and affecting the exposure. The other accessories are described in the following pages. • Rechargeable battery pack (page 14) • Battery charger, Power cord (mains lead) (page 14) • Eyecup (page 68) • USB cable ...(pages 128, 144) • Video cable (page 112) • CD-ROM (page 136) Attaching the shoulder strap Attach the both ends of the viewfinder, as in shooting with...
Instruction Manual
Page 127
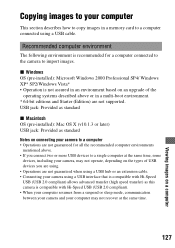
...8226; When your computer resumes from a suspend or sleep mode, communication between your camera and your computer This section describes how to copy images in an environment based on an upgrade of USB devices you are using a USB cable. x Windows OS (pre-installed): Microsoft Windows 2000 Professional SP4/ Windows XP* ... not operate, depending on the types of the operating systems described above . • If you connect two or more USB devices to a single computer at the same time, some devices, including your camera, may not recover at the same time. 127 Viewing images on a computer
...8226; When your computer resumes from a suspend or sleep mode, communication between your camera and your computer This section describes how to copy images in an environment based on an upgrade of USB devices you are using a USB cable. x Windows OS (pre-installed): Microsoft Windows 2000 Professional SP4/ Windows XP* ... not operate, depending on the types of the operating systems described above . • If you connect two or more USB devices to a single computer at the same time, some devices, including your camera, may not recover at the same time. 127 Viewing images on a computer

Instruction Manual
Page 128
... your computer 1 Insert a memory card with recorded images into the camera. 2 Insert the sufficiently charged battery pack in the camera, or connect the camera to a wall outlet (wall socket) with the AC Adaptor/charger (not supplied). • When you copy images to your computer ... become corrupted if the battery pack shuts down too soon. 3 Turn on the camera and the computer. 4 Check that [USB connection] in 2 is set to [Mass Storage]. 5 Connect the camera and your computer. • The AutoPlay wizard appears on the desktop. 1 To the USB terminal USB cable 2 To the USB terminal 128
... your computer 1 Insert a memory card with recorded images into the camera. 2 Insert the sufficiently charged battery pack in the camera, or connect the camera to a wall outlet (wall socket) with the AC Adaptor/charger (not supplied). • When you copy images to your computer ... become corrupted if the battery pack shuts down too soon. 3 Turn on the camera and the computer. 4 Check that [USB connection] in 2 is set to [Mass Storage]. 5 Connect the camera and your computer. • The AutoPlay wizard appears on the desktop. 1 To the USB terminal USB cable 2 To the USB terminal 128

Instruction Manual
Page 132
...the confirmation window, then click [OK] t [OK] (unnecessary for Windows XP/Vista). The device is disconnected from the computer. The camera is disconnected. x For Macintosh Drag and drop the drive icon or the icon of the memory card to the "Trash" icon. Confirm ...the device on the memory card. 132 x For Windows Double-click on the tasktray, then click (USB Mass Storage Device) t [Stop]. Deleting the USB connection Perform the procedures listed below beforehand when: • Disconnecting the USB cable. • Removing the memory card. • Turning off the camera.
...the confirmation window, then click [OK] t [OK] (unnecessary for Windows XP/Vista). The device is disconnected from the computer. The camera is disconnected. x For Macintosh Drag and drop the drive icon or the icon of the memory card to the "Trash" icon. Confirm ...the device on the memory card. 132 x For Windows Double-click on the tasktray, then click (USB Mass Storage Device) t [Stop]. Deleting the USB connection Perform the procedures listed below beforehand when: • Disconnecting the USB cable. • Removing the memory card. • Turning off the camera.

Instruction Manual
Page 144
Stage 2: Connecting the camera to the printer 1 Connect the camera to the printer. 1 To the USB terminal USB cable 2 To the USB terminal 2 Turn on setting items, see "PictBridge menu." 4 Select [Print] t [OK] in the menu, then press the center of the controller. 144 Stage 3: Printing 1 Select ... screen used for selecting images you want to print other images. 3 Press the MENU button and set up each item. • For details on your camera and the printer.
Stage 2: Connecting the camera to the printer 1 Connect the camera to the printer. 1 To the USB terminal USB cable 2 To the USB terminal 2 Turn on setting items, see "PictBridge menu." 4 Select [Print] t [OK] in the menu, then press the center of the controller. 144 Stage 3: Printing 1 Select ... screen used for selecting images you want to print other images. 3 Press the MENU button and set up each item. • For details on your camera and the printer.

Instruction Manual
Page 145
... same number of prints is specified on all the selected images. When you want to print again, follow the procedure (Stages 1 to 20. Remove the USB cable or turn off the camera.
... same number of prints is specified on all the selected images. When you want to print again, follow the procedure (Stages 1 to 20. Remove the USB cable or turn off the camera.

Instruction Manual
Page 156
... 16), or use the AC Adaptor/charger (not supplied). • Use the USB cable (supplied) (page 128). • Disconnect the USB cable, and connect it in the correct direction (page 21). 156 Your computer does not recognize your camera. • Check that the camera is turned on. • When the battery level is wrong. Shoot using...
... 16), or use the AC Adaptor/charger (not supplied). • Use the USB cable (supplied) (page 128). • Disconnect the USB cable, and connect it in the correct direction (page 21). 156 Your computer does not recognize your camera. • Check that the camera is turned on. • When the battery level is wrong. Shoot using...

Instruction Manual
Page 158
... is indicated on the date-inserted part of the image. • Images that the camera and the printer are properly connected using the USB cable. • RAW data files cannot be printed. • Images shot using cameras other than this camera or images modified with the manufacturer of the printer or the software. • When...
... is indicated on the date-inserted part of the image. • Images that the camera and the printer are properly connected using the USB cable. • RAW data files cannot be printed. • Images shot using cameras other than this camera or images modified with the manufacturer of the printer or the software. • When...
Instruction Manual
Page 159
... USB cable and reconnect it whenever you change the paper size after the printer has been connected to the camera. • The print setting of the camera ...camera does not work after canceling printing. • Wait for sometime with a low battery or no battery pack. When removing the battery pack, make sure the POWER switch is set to ON. If an AC Adaptor/charger (not supplied) is carrying out the cancellation. Others The lens...a JPEG image (page 115). If the camera is charged, consult your Sony dealer or local authorized Sony service facility. 159 Others If the date setting...
... USB cable and reconnect it whenever you change the paper size after the printer has been connected to the camera. • The print setting of the camera ...camera does not work after canceling printing. • Wait for sometime with a low battery or no battery pack. When removing the battery pack, make sure the POWER switch is set to ON. If an AC Adaptor/charger (not supplied) is carrying out the cancellation. Others The lens...a JPEG image (page 115). If the camera is charged, consult your Sony dealer or local authorized Sony service facility. 159 Others If the date setting...

Instruction Manual
Page 162
... image in the memory card. If the message appears frequently, consult your Sony dealer or local authorized Sony service facility. 162 Unable to protect images or specified DPOF without changing the specification of those images. Disconnect the USB cable or turn the camera off , remove the battery pack, then re-insert it again. Turn the...
... image in the memory card. If the message appears frequently, consult your Sony dealer or local authorized Sony service facility. 162 Unable to protect images or specified DPOF without changing the specification of those images. Disconnect the USB cable or turn the camera off , remove the battery pack, then re-insert it again. Turn the...