
Instruction Manual
Page 8
...up recommendation To avoid the potential risk of data loss, always copy (back up , the monitor will function normally. • Do not press against the LCD monitor. However, there may be some tiny black points and/or bright points (white, red, blue or green in color) that may cause a malfunction...materials may be different from the image you monitored with such issues that may appear in Live view mode, you must place the camera under direct sunlight, attach the lens cap. • Images may be contrary to a malfunction of the pixels are normal in the manufacturing process and do not ...
...up recommendation To avoid the potential risk of data loss, always copy (back up , the monitor will function normally. • Do not press against the LCD monitor. However, there may be some tiny black points and/or bright points (white, red, blue or green in color) that may cause a malfunction...materials may be different from the image you monitored with such issues that may appear in Live view mode, you must place the camera under direct sunlight, attach the lens cap. • Images may be contrary to a malfunction of the pixels are normal in the manufacturing process and do not ...
Instruction Manual
Page 9
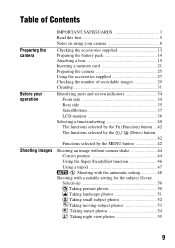
... images IMPORTANT SAFEGUARDS 3 Read this first 5 Notes on using your camera 8 Checking the accessories supplied 13 Preparing the battery pack 14 Attaching a lens 19 Inserting a memory card 21 Preparing the camera 25 Using the accessories supplied 27 Checking the number of recordable images ...29 Cleaning 31 Identifying parts and screen indicators 34 Front side 34 Rear side 35 Sides/Bottom 37 LCD monitor 38 Selecting...
... images IMPORTANT SAFEGUARDS 3 Read this first 5 Notes on using your camera 8 Checking the accessories supplied 13 Preparing the battery pack 14 Attaching a lens 19 Inserting a memory card 21 Preparing the camera 25 Using the accessories supplied 27 Checking the number of recordable images ...29 Cleaning 31 Identifying parts and screen indicators 34 Front side 34 Rear side 35 Sides/Bottom 37 LCD monitor 38 Selecting...
Instruction Manual
Page 10
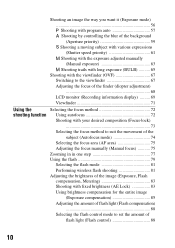
... with long exposure (BULB 65 Shooting with the viewfinder (OVF 67 Switching to the viewfinder 67 Adjusting the focus of the finder (diopter adjustment) 68 LCD monitor (Recording information display) ......... 69 Viewfinder 71 Using the Selecting the focus method 72 shooting function Using autofocus 72 Shooting with your desired composition (Focus...
... with long exposure (BULB 65 Shooting with the viewfinder (OVF 67 Switching to the viewfinder 67 Adjusting the focus of the finder (diopter adjustment) 68 LCD monitor (Recording information display) ......... 69 Viewfinder 71 Using the Selecting the focus method 72 shooting function Using autofocus 72 Shooting with your desired composition (Focus...

Instruction Manual
Page 11
... processing 95 Correcting the brightness of the image (D-Range Optimizer 95 Selecting your desired image processing (Creative Style) 95 Selecting the drive mode 97 Shooting single shot 97 Shooting continuously 97 Using the self-timer 98 Shooting images with the exposure shifted (Exposure bracket 98 Shooting with white balance shifted (WB... the conditions under which the shutter can be released 119 Changing the functions of the button and dial 120 Changing other settings 121 Setting the LCD monitor 122 Resetting to the default 124 11
... processing 95 Correcting the brightness of the image (D-Range Optimizer 95 Selecting your desired image processing (Creative Style) 95 Selecting the drive mode 97 Shooting single shot 97 Shooting continuously 97 Using the self-timer 98 Shooting images with the exposure shifted (Exposure bracket 98 Shooting with white balance shifted (WB... the conditions under which the shutter can be released 119 Changing the functions of the button and dial 120 Changing other settings 121 Setting the LCD monitor 122 Resetting to the default 124 11
Instruction Manual
Page 17
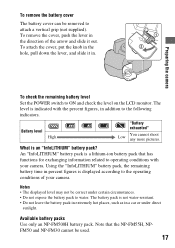
... in a car or under certain circumstances. • Do not expose the battery pack to ON and check the level on the LCD monitor. Preparing the camera To check the remaining battery level Set the POWER switch to water. To attach the cover, put the knob in the hole, ... "InfoLITHIUM" battery pack? To remove the cover, push the lever in the direction of your camera. Using the "InfoLITHIUM" battery pack, the remaining battery time in percent figures is indicated with your camera. Notes • The displayed level may not be correct under direct sunlight. Note that has...
... in a car or under certain circumstances. • Do not expose the battery pack to ON and check the level on the LCD monitor. Preparing the camera To check the remaining battery level Set the POWER switch to water. To attach the cover, put the knob in the hole, ... "InfoLITHIUM" battery pack? To remove the cover, push the lever in the direction of your camera. Using the "InfoLITHIUM" battery pack, the remaining battery time in percent figures is indicated with your camera. Notes • The displayed level may not be correct under direct sunlight. Note that has...
Instruction Manual
Page 21
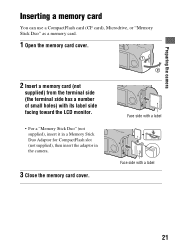
Face side with a label Face side with its label side facing toward the LCD monitor. • For a "Memory Stick Duo" (not supplied), insert it in a Memory Stick Duo Adaptor for CompactFlash slot (not supplied), then insert the adaptor in the camera. 3 Close the memory card cover. Preparing the camera Inserting a memory card You can use a CompactFlash card (CF card), Microdrive, or "Memory Stick Duo" as a memory card. 1 Open the memory card cover. 2 Insert a memory card (not supplied) from the terminal side (the terminal side has a number of small holes) with a label 21
Face side with a label Face side with its label side facing toward the LCD monitor. • For a "Memory Stick Duo" (not supplied), insert it in a Memory Stick Duo Adaptor for CompactFlash slot (not supplied), then insert the adaptor in the camera. 3 Close the memory card cover. Preparing the camera Inserting a memory card You can use a CompactFlash card (CF card), Microdrive, or "Memory Stick Duo" as a memory card. 1 Open the memory card cover. 2 Insert a memory card (not supplied) from the terminal side (the terminal side has a number of small holes) with a label 21
Instruction Manual
Page 25
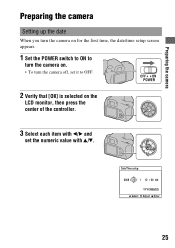
Preparing the camera Preparing the camera Setting up the date When you turn the camera on for the first time, the date/time setup screen appears. 1 Set the POWER switch to ON to turn the camera on. • To turn the camera off, set it to OFF. 2 Verify that [OK] is selected on the LCD monitor, then press the center of the controller. 3 Select each item with b/B and set the numeric value with v/V. 25
Preparing the camera Preparing the camera Setting up the date When you turn the camera on for the first time, the date/time setup screen appears. 1 Set the POWER switch to ON to turn the camera on. • To turn the camera off, set it to OFF. 2 Verify that [OK] is selected on the LCD monitor, then press the center of the controller. 3 Select each item with b/B and set the numeric value with v/V. 25
Instruction Manual
Page 28
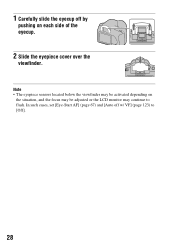
In such cases, set [Eye-Start AF] (page 67) and [Auto off by pushing on the situation, and the focus may continue to [Off]. 28 1 Carefully slide the eyecup off w/ VF] (page 123) to flash. Note • The eyepiece sensors located below the viewfinder may be adjusted or the LCD monitor may be activated depending on each side of the eyecup. 2 Slide the eyepiece cover over the viewfinder.
In such cases, set [Eye-Start AF] (page 67) and [Auto off by pushing on the situation, and the focus may continue to [Off]. 28 1 Carefully slide the eyecup off w/ VF] (page 123) to flash. Note • The eyepiece sensors located below the viewfinder may be adjusted or the LCD monitor may be activated depending on each side of the eyecup. 2 Slide the eyepiece cover over the viewfinder.
Instruction Manual
Page 29
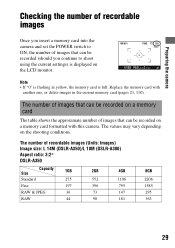
...(DSLR-A350)/L 10M (DSLR-A300) Aspect ratio: 3:2* DSLR-A350 Size Capacity 1GB 2GB 4GB 8GB Standard 275 552 1106 2206 Fine 197 396 795 1585 RAW & JPEG 36 73 147 295 RAW 44 90 181 363 29 The values may vary depending on the shooting conditions. Preparing the camera Checking... the number of recordable images Once you continue to shoot using the current settings) is displayed on the LCD monitor. Note • If "0" is flashing in the current memory card ...
...(DSLR-A350)/L 10M (DSLR-A300) Aspect ratio: 3:2* DSLR-A350 Size Capacity 1GB 2GB 4GB 8GB Standard 275 552 1106 2206 Fine 197 396 795 1585 RAW & JPEG 36 73 147 295 RAW 44 90 181 363 29 The values may vary depending on the shooting conditions. Preparing the camera Checking... the number of recordable images Once you continue to shoot using the current settings) is displayed on the LCD monitor. Note • If "0" is flashing in the current memory card ...
Instruction Manual
Page 31
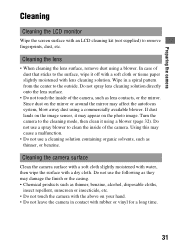
... with water, then wipe the surface with rubber or vinyl for a long time. 31 Cleaning the lens • When cleaning the lens surface, remove dust using a blower (page 32). Turn the camera to the cleaning mode, then clean it off with a soft cloth or tissue paper slightly moistened with...using a blower. In case of dust that sticks to clean the inside of the camera. If dust lands on the photo image. Preparing the camera Cleaning Cleaning the LCD monitor Wipe the screen surface with an LCD cleaning kit (not supplied) to the outside. Do not use a cleaning solution containing...
... with water, then wipe the surface with rubber or vinyl for a long time. 31 Cleaning the lens • When cleaning the lens surface, remove dust using a blower (page 32). Turn the camera to the cleaning mode, then clean it off with a soft cloth or tissue paper slightly moistened with...using a blower. In case of dust that sticks to clean the inside of the camera. If dust lands on the photo image. Preparing the camera Cleaning Cleaning the LCD monitor Wipe the screen surface with an LCD cleaning kit (not supplied) to the outside. Do not use a cleaning solution containing...
Instruction Manual
Page 35
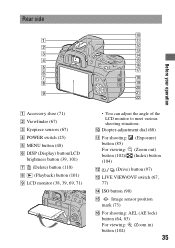
...) button (102) 35 Rear side Before your operation A Accessory shoe (71) B Viewfinder (67) C Eyepiece sensors (67) D POWER switch (25) E MENU button (40) F DISP (Display) button/LCD brightness button (39, 101) G (Delete) button (110) H (Playback) button (101) I LCD monitor (38, 39, 69, 71) • You can adjust the angle of the...
...) button (102) 35 Rear side Before your operation A Accessory shoe (71) B Viewfinder (67) C Eyepiece sensors (67) D POWER switch (25) E MENU button (40) F DISP (Display) button/LCD brightness button (39, 101) G (Delete) button (110) H (Playback) button (101) I LCD monitor (38, 39, 69, 71) • You can adjust the angle of the...
Instruction Manual
Page 38
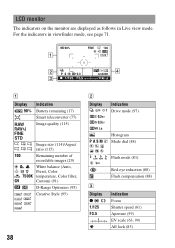
... (81) C Display z 1/125 F3.5 Red-eye reduction (80) Flash compensation (88) Indication Focus Shutter speed (61) Aperture (59) EV scale (63, 99) AE lock (83) LCD monitor The indicators on the monitor are displayed as follows in viewfinder mode, see page 71. For the indicators in Live view mode.
... (81) C Display z 1/125 F3.5 Red-eye reduction (80) Flash compensation (88) Indication Focus Shutter speed (61) Aperture (59) EV scale (63, 99) AE lock (83) LCD monitor The indicators on the monitor are displayed as follows in viewfinder mode, see page 71. For the indicators in Live view mode.

Instruction Manual
Page 43
Playback menu Delete (110) Format (117) 1 Protect (109) DPOF setup (141) • Date imprint (142) • Index print (142) Setup menu LCD brightness (122) Info.disp.time (122) 1 Power save (121) Video output (113) Language (121) Date/Time setup (121) Pixel mapping (154) 3 Cleaning mode (32) Reset default (125) PlaybackDisplay (101) Slide show (105) 2 • Interval (105) File number (116) Folder name (116) 2 Select folder (117) • New folder (117) USB connection (128, 143) Audio signals (121) Before your operation 43
Playback menu Delete (110) Format (117) 1 Protect (109) DPOF setup (141) • Date imprint (142) • Index print (142) Setup menu LCD brightness (122) Info.disp.time (122) 1 Power save (121) Video output (113) Language (121) Date/Time setup (121) Pixel mapping (154) 3 Cleaning mode (32) Reset default (125) PlaybackDisplay (101) Slide show (105) 2 • Interval (105) File number (116) Folder name (116) 2 Select folder (117) • New folder (117) USB connection (128, 143) Audio signals (121) Before your operation 43
Instruction Manual
Page 44
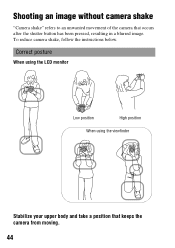
To reduce camera shake, follow the instructions below. Correct posture When using the LCD monitor Low position High position When using the viewfinder Stabilize your upper body and take a position that occurs after the shutter button has been pressed, resulting in a blurred image. Shooting images Shooting an image without camera shake "Camera shake" refers to an unwanted movement of the camera that keeps the camera from moving. 44
To reduce camera shake, follow the instructions below. Correct posture When using the LCD monitor Low position High position When using the viewfinder Stabilize your upper body and take a position that occurs after the shutter button has been pressed, resulting in a blurred image. Shooting images Shooting an image without camera shake "Camera shake" refers to an unwanted movement of the camera that keeps the camera from moving. 44

Instruction Manual
Page 45
... is not displayed in a kneeling position, steady your upper body by placing your elbow on your body. Point 4 When shooting with your shooting situation. Point 2 Take a secure stance with the LCD monitor, adjust the angle of the camera, and the other hand supports the lens. Camera shake warning indicator Due to suit your feet shoulder-width...
... is not displayed in a kneeling position, steady your upper body by placing your elbow on your body. Point 4 When shooting with your shooting situation. Point 2 Take a secure stance with the LCD monitor, adjust the angle of the camera, and the other hand supports the lens. Camera shake warning indicator Due to suit your feet shoulder-width...
Instruction Manual
Page 67
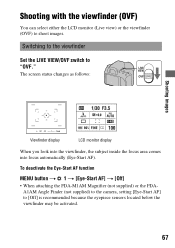
...; When attaching the FDA-M1AM Magnifier (not supplied) or the FDAA1AM Angle Finder (not supplied) to the camera, setting [Eye-Start AF] to "OVF." The screen status changes as follows: Shooting images Viewfinder display LCD monitor display When you look into the viewfinder, the subject inside the focus area comes into focus... [Off] is recommended because the eyepiece sensors located below the viewfinder may be activated. 67 Shooting with the viewfinder (OVF) You can select either the LCD monitor (Live view) or the viewfinder (OVF) to shoot images.
...; When attaching the FDA-M1AM Magnifier (not supplied) or the FDAA1AM Angle Finder (not supplied) to the camera, setting [Eye-Start AF] to "OVF." The screen status changes as follows: Shooting images Viewfinder display LCD monitor display When you look into the viewfinder, the subject inside the focus area comes into focus... [Off] is recommended because the eyepiece sensors located below the viewfinder may be activated. 67 Shooting with the viewfinder (OVF) You can select either the LCD monitor (Live view) or the viewfinder (OVF) to shoot images.
Instruction Manual
Page 69
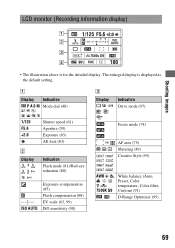
...) AF area (75) Metering (89) Creative Style (95) AWB 7500K G9 White balance (Auto, Preset, Color temperature, Color filter, Custom) (91) D-Range Optimizer (95) 69 LCD monitor (Recording information display) Shooting images • The illustration above is displayed as the default setting.
...) AF area (75) Metering (89) Creative Style (95) AWB 7500K G9 White balance (Auto, Preset, Color temperature, Color filter, Custom) (91) D-Range Optimizer (95) 69 LCD monitor (Recording information display) Shooting images • The illustration above is displayed as the default setting.
Instruction Manual
Page 70
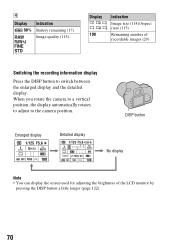
When you rotate the camera to a vertical position, the display automatically rotates to adjust to switch between the enlarged display and the detailed display. DISP button Enlarged display Detailed display ...; You can display the screen used for adjusting the brightness of recordable images (29) Switching the recording information display Press the DISP button to the camera position. D Display 90% Indication Battery remaining (17) Image quality (115) Display 100 Indication Image size (114)/Aspect ratio (115) Remaining number of the...
When you rotate the camera to a vertical position, the display automatically rotates to adjust to switch between the enlarged display and the detailed display. DISP button Enlarged display Detailed display ...; You can display the screen used for adjusting the brightness of recordable images (29) Switching the recording information display Press the DISP button to the camera position. D Display 90% Indication Battery remaining (17) Image quality (115) Display 100 Indication Image size (114)/Aspect ratio (115) Remaining number of the...
Instruction Manual
Page 88
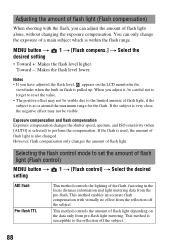
... effect may not be careful not to forget to the reflection off the subject. This method controls the amount of flash light depending on the LCD monitor/in the viewfinder when the built-in the focus distance information and light metering data from the pre-flash. Adjusting the amount of flash...
... effect may not be careful not to forget to the reflection off the subject. This method controls the amount of flash light depending on the LCD monitor/in the viewfinder when the built-in the focus distance information and light metering data from the pre-flash. Adjusting the amount of flash...
Instruction Manual
Page 94
... this value, the indicator turns yellow on the recording information display on a subject in close proximity or a subject with a bright color is used on the LCD monitor. Take pictures with the flash in the frame.) If you set the white balance again to get a more correct white balance value. To call...
... this value, the indicator turns yellow on the recording information display on a subject in close proximity or a subject with a bright color is used on the LCD monitor. Take pictures with the flash in the frame.) If you set the white balance again to get a more correct white balance value. To call...
