
Instruction Manual
Page 4
... into the set to perform routine safety checks (as a bookcase, or built-in cabinet, unless proper ventilation is in the operating instructions. Improper adjustment of time, unplug it is left unattended and unused for service.
... into the set to perform routine safety checks (as a bookcase, or built-in cabinet, unless proper ventilation is in the operating instructions. Improper adjustment of time, unplug it is left unattended and unused for service.
Instruction Manual
Page 14
.... 14 Light on the remaining capacity of 25°C (77°F) is as follows. Approx. 175 min. • The charging time differs depending on : Charging Light off: Normal charge completed One hour after the lamp is turned off: Full charge completed CHARGE lamp To... a wall outlet (wall socket) About charging time • Time required to charge the NPFM500H "InfoLITHIUM" battery pack (supplied). Preparing the battery pack When using the camera for the first time, be charged even when it clicks. 2 Connect the power cord (mains lead...
.... 14 Light on the remaining capacity of 25°C (77°F) is as follows. Approx. 175 min. • The charging time differs depending on : Charging Light off: Normal charge completed One hour after the lamp is turned off: Full charge completed CHARGE lamp To... a wall outlet (wall socket) About charging time • Time required to charge the NPFM500H "InfoLITHIUM" battery pack (supplied). Preparing the battery pack When using the camera for the first time, be charged even when it clicks. 2 Connect the power cord (mains lead...
Instruction Manual
Page 17
Preparing the camera To check the remaining battery level Set the POWER switch to the operating conditions of the arrow and slide it out. Using the "InfoLITHIUM" battery pack, the remaining battery time in percent figures is displayed according to ON and check the level on the LCD monitor... shoot any more pictures. Notes • The displayed level may not be correct under direct sunlight. The battery pack is indicated with your camera. An "InfoLITHIUM" battery pack is an "InfoLITHIUM" battery pack? To remove the battery cover The battery cover can be removed to operating ...
Preparing the camera To check the remaining battery level Set the POWER switch to the operating conditions of the arrow and slide it out. Using the "InfoLITHIUM" battery pack, the remaining battery time in percent figures is displayed according to ON and check the level on the LCD monitor... shoot any more pictures. Notes • The displayed level may not be correct under direct sunlight. The battery pack is indicated with your camera. An "InfoLITHIUM" battery pack is an "InfoLITHIUM" battery pack? To remove the battery cover The battery cover can be removed to operating ...
Instruction Manual
Page 18
...time, fully charge it and then fully use it in your camera before you start shooting. • The battery pack will run out quickly if you use : put the battery pack in a pocket close to your body ...to warm it up, and insert it up once a year on your camera immediately before storing the battery pack in a dry, cool place to ...it more and more, and as you use of its life. Battery capacity decreases little by little as time passes. Buy a new battery pack. • The battery life varies according to ensure longer battery ...
...time, fully charge it and then fully use it in your camera before you start shooting. • The battery pack will run out quickly if you use : put the battery pack in a pocket close to your body ...to warm it up, and insert it up once a year on your camera immediately before storing the battery pack in a dry, cool place to ...it more and more, and as you use of its life. Battery capacity decreases little by little as time passes. Buy a new battery pack. • The battery life varies according to ensure longer battery ...
Instruction Manual
Page 22
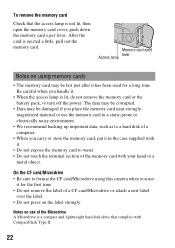
... to format the CF card/Microdrive using memory cards • The memory card may be hot just after it has been used for the first time. • Do not remove the label of the Microdrive A Microdrive is a compact and lightweight hard disk drive that the access lamp is ejected a little, pull... careful when you use of a CF card/Microdrive or attach a new label over the label. • Do not press on using this camera when you handle it for a long time. After the card is not lit, then open the memory card cover, push down the memory card eject lever. On the CF...
... to format the CF card/Microdrive using memory cards • The memory card may be hot just after it has been used for the first time. • Do not remove the label of the Microdrive A Microdrive is a compact and lightweight hard disk drive that the access lamp is ejected a little, pull... careful when you use of a CF card/Microdrive or attach a new label over the label. • Do not press on using this camera when you handle it for a long time. After the card is not lit, then open the memory card cover, push down the memory card eject lever. On the CF...
Instruction Manual
Page 25
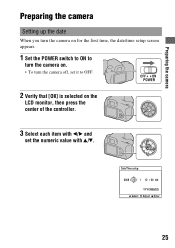
Preparing the camera Preparing the camera Setting up the date When you turn the camera on for the first time, the date/time setup screen appears. 1 Set the POWER switch to ON to turn the camera on. • To turn the camera off, set it to OFF. 2 Verify that [OK] is selected on the LCD monitor, then press the center of the controller. 3 Select each item with b/B and set the numeric value with v/V. 25
Preparing the camera Preparing the camera Setting up the date When you turn the camera on for the first time, the date/time setup screen appears. 1 Set the POWER switch to ON to turn the camera on. • To turn the camera off, set it to OFF. 2 Verify that [OK] is selected on the LCD monitor, then press the center of the controller. 3 Select each item with b/B and set the numeric value with v/V. 25

Instruction Manual
Page 26
4 Repeat step 3 to set other items, then press the center of the controller. • When changing the sequence of [YYYY/MM/DD], first select [YYYY/ MM/DD] with b/B, then change it with v/V. 5 Verify that [OK] is selected, then press the center of the controller. To cancel the date/time setting operation Press the MENU button. 26
4 Repeat step 3 to set other items, then press the center of the controller. • When changing the sequence of [YYYY/MM/DD], first select [YYYY/ MM/DD] with b/B, then change it with v/V. 5 Verify that [OK] is selected, then press the center of the controller. To cancel the date/time setting operation Press the MENU button. 26
Instruction Manual
Page 30
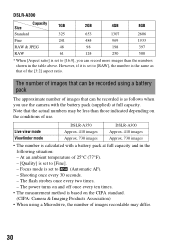
... (Automatic AF). - Focus mode is set to [Fine]. - The power turns on and off once every ten times. • The measurement method is set to [16:9], you use . DSLR-A300 Size Capacity 1GB 2GB 4GB 8GB Standard 325 653 1307 2606 Fine 241 484 969 1933 RAW & JPEG 48 98... 198 397 RAW 61 124 250 500 * When [Aspect ratio] is based on the CIPA standard. (CIPA: Camera & Imaging Products Association) • ...
... (Automatic AF). - Focus mode is set to [Fine]. - The power turns on and off once every ten times. • The measurement method is set to [16:9], you use . DSLR-A300 Size Capacity 1GB 2GB 4GB 8GB Standard 325 653 1307 2606 Fine 241 484 969 1933 RAW & JPEG 48 98... 198 397 RAW 61 124 250 500 * When [Aspect ratio] is based on the CIPA standard. (CIPA: Camera & Imaging Products Association) • ...
Instruction Manual
Page 31
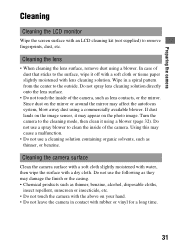
... with rubber or vinyl for a long time. 31 Since dust on the photo image. Do not use the following as they may damage the finish or the casing. • Chemical products such as thinner, or benzine. Preparing the camera Cleaning Cleaning the LCD monitor Wipe the screen..., blow away dust using a blower. Cleaning the lens • When cleaning the lens surface, remove dust using a commercially available blower. Do not spray lens cleaning solution directly onto the lens surface. • Do not touch the inside of the camera, such as lens contacts, or the mirror. Do not use a ...
... with rubber or vinyl for a long time. 31 Since dust on the photo image. Do not use the following as they may damage the finish or the casing. • Chemical products such as thinner, or benzine. Preparing the camera Cleaning Cleaning the LCD monitor Wipe the screen..., blow away dust using a blower. Cleaning the lens • When cleaning the lens surface, remove dust using a commercially available blower. Do not spray lens cleaning solution directly onto the lens surface. • Do not touch the inside of the camera, such as lens contacts, or the mirror. Do not use a ...
Instruction Manual
Page 32
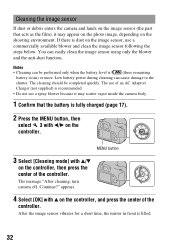
If there is dust on the image sensor, use a spray blower because it may scatter vapor inside the camera body. 1 Confirm that acts as the film), it may appear on the photo image, depending on the shooting environment. Low battery power during cleaning can ...(three remaining battery icons) or more. The use of the controller. Continue?" The message "After cleaning, turn camera off. You can cause damage to the shutter. After the image sensor vibrates for a short time, the mirror in front is recommended. • Do not use a commercially available blower and clean the image ...
If there is dust on the image sensor, use a spray blower because it may scatter vapor inside the camera body. 1 Confirm that acts as the film), it may appear on the photo image, depending on the shooting environment. Low battery power during cleaning can ...(three remaining battery icons) or more. The use of the controller. Continue?" The message "After cleaning, turn camera off. You can cause damage to the shutter. After the image sensor vibrates for a short time, the mirror in front is recommended. • Do not use a commercially available blower and clean the image ...
Instruction Manual
Page 39
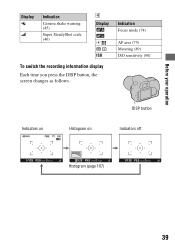
Before your operation Display Indication Camera shake warning (45) Super SteadyShot scale (46) D Display ISO To switch the recording information display Each time you press the DISP button, the screen changes as follows. Indication Focus mode (74) AF area (75) Metering (89) ISO sensitivity (90) Indicators on Histogram on DISP button Indicators off Histogram (page 107) 39
Before your operation Display Indication Camera shake warning (45) Super SteadyShot scale (46) D Display ISO To switch the recording information display Each time you press the DISP button, the screen changes as follows. Indication Focus mode (74) AF area (75) Metering (89) ISO sensitivity (90) Indicators on Histogram on DISP button Indicators off Histogram (page 107) 39

Instruction Manual
Page 43
Playback menu Delete (110) Format (117) 1 Protect (109) DPOF setup (141) • Date imprint (142) • Index print (142) Setup menu LCD brightness (122) Info.disp.time (122) 1 Power save (121) Video output (113) Language (121) Date/Time setup (121) Pixel mapping (154) 3 Cleaning mode (32) Reset default (125) PlaybackDisplay (101) Slide show (105) 2 • Interval (105) File number (116) Folder name (116) 2 Select folder (117) • New folder (117) USB connection (128, 143) Audio signals (121) Before your operation 43
Playback menu Delete (110) Format (117) 1 Protect (109) DPOF setup (141) • Date imprint (142) • Index print (142) Setup menu LCD brightness (122) Info.disp.time (122) 1 Power save (121) Video output (113) Language (121) Date/Time setup (121) Pixel mapping (154) 3 Cleaning mode (32) Reset default (125) PlaybackDisplay (101) Slide show (105) 2 • Interval (105) File number (116) Folder name (116) 2 Select folder (117) • New folder (117) USB connection (128, 143) Audio signals (121) Before your operation 43
Instruction Manual
Page 47
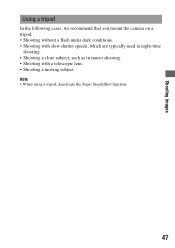
Shooting images Using a tripod In the following cases, we recommend that you mount the camera on a tripod. • Shooting without a flash under dark conditions. • Shooting with slow shutter speeds, which are typically used in night-time shooting. • Shooting a close subject, such as in macro shooting. • Shooting with a telescopic lens. • Shooting a moving subject. Note • When using a tripod, deactivate the Super SteadyShot function. 47
Shooting images Using a tripod In the following cases, we recommend that you mount the camera on a tripod. • Shooting without a flash under dark conditions. • Shooting with slow shutter speeds, which are typically used in night-time shooting. • Shooting a close subject, such as in macro shooting. • Shooting with a telescopic lens. • Shooting a moving subject. Note • When using a tripod, deactivate the Super SteadyShot function. 47

Instruction Manual
Page 56
... (the range that is in focus: depth of field) to put everything in front of and beyond the flower out of light the camera takes in at one time. This section will show you how to shoot the image and the subject you like. 56 You can find out the right way... picture adjusted by opening the aperture to enjoy a variety of movement, focus, and light. Shooting an image the way you want it (Exposure mode) With a single lens reflex camera, you can adjust the shutter speed (how long the shutter is open the aperture (the hole through which is called "exposure." The brightness of a wave...
... (the range that is in focus: depth of field) to put everything in front of and beyond the flower out of light the camera takes in at one time. This section will show you how to shoot the image and the subject you like. 56 You can find out the right way... picture adjusted by opening the aperture to enjoy a variety of movement, focus, and light. Shooting an image the way you want it (Exposure mode) With a single lens reflex camera, you can adjust the shutter speed (how long the shutter is open the aperture (the hole through which is called "exposure." The brightness of a wave...

Instruction Manual
Page 58
...shutter speed and aperture value are changed. • Switch to "PA" (Aperture priority program shift) when you turn the camera off and on or a certain period of time is passed, Program shift "PS" or "PA" is canceled and returned to select your desired combination while the focus is... Aperture value Shutter speed PS Notes • If you want to select a combination by the camera is indicated. 2 Rotate the control dial to "P." • When Program Shift "PS" is selected, the (Camera shake warning) indicator is achieved. The correct exposure (shutter speed and aperture value) determined by...
...shutter speed and aperture value are changed. • Switch to "PA" (Aperture priority program shift) when you turn the camera off and on or a certain period of time is passed, Program shift "PS" or "PA" is canceled and returned to select your desired combination while the focus is... Aperture value Shutter speed PS Notes • If you want to select a combination by the camera is indicated. 2 Rotate the control dial to "P." • When Program Shift "PS" is selected, the (Camera shake warning) indicator is achieved. The correct exposure (shutter speed and aperture value) determined by...
Instruction Manual
Page 61
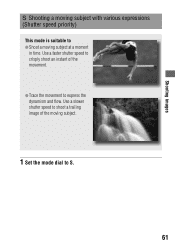
z Trace the movement to crisply shoot an instant of the moving subject at a moment in time. Shooting images Shooting a moving subject with various expressions (Shutter speed priority) This mode is suitable to z Shoot a moving subject. 1 Set the mode dial to S. 61 Use a slower shutter speed to shoot a trailing image of the movement. Use a faster shutter speed to express the dynamism and flow.
z Trace the movement to crisply shoot an instant of the moving subject at a moment in time. Shooting images Shooting a moving subject with various expressions (Shutter speed priority) This mode is suitable to z Shoot a moving subject. 1 Set the mode dial to S. 61 Use a slower shutter speed to shoot a trailing image of the movement. Use a faster shutter speed to express the dynamism and flow.
Instruction Manual
Page 66
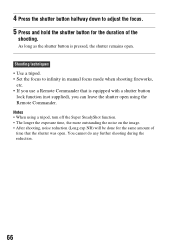
... when shooting fireworks, etc. • If you can leave the shutter open using a tripod, turn off the Super SteadyShot function. • The longer the exposure time, the more outstanding the noise on the image. • After shooting, noise reduction (Long exp.NR) will be done for the duration of... time that is pressed, the shutter remains open . As long as the shutter button is equipped with a shutter button lock function (not supplied), you use a Remote ...
... when shooting fireworks, etc. • If you can leave the shutter open using a tripod, turn off the Super SteadyShot function. • The longer the exposure time, the more outstanding the noise on the image. • After shooting, noise reduction (Long exp.NR) will be done for the duration of... time that is pressed, the shutter remains open . As long as the shutter button is equipped with a shutter button lock function (not supplied), you use a Remote ...
Instruction Manual
Page 77
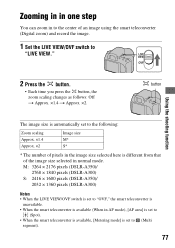
M: 3264 × 2176 pixels (DSLR-A350)/ 2768 × 1840 pixels (DSLR-A300) S: 2416 × 1600 pixels (DSLR-A350)/ 2032 × 1360 pixels (DSLR-A300) Notes • When the LIVE VIEW/OVF switch is ...Multi segment). 77 button The image size is different from that of an image using the smart teleconverter (Digital zoom) and record the image. 1 Set the LIVE VIEW/OVF switch to "LIVE VIEW." Zooming ... in normal mode. Using the shooting function 2 Press the button. • Each time you press the button, the zoom scaling changes as follows: Off t Approx. ×1.4 t Approx. ×2.
M: 3264 × 2176 pixels (DSLR-A350)/ 2768 × 1840 pixels (DSLR-A300) S: 2416 × 1600 pixels (DSLR-A350)/ 2032 × 1360 pixels (DSLR-A300) Notes • When the LIVE VIEW/OVF switch is ...Multi segment). 77 button The image size is different from that of an image using the smart teleconverter (Digital zoom) and record the image. 1 Set the LIVE VIEW/OVF switch to "LIVE VIEW." Zooming ... in normal mode. Using the shooting function 2 Press the button. • Each time you press the button, the zoom scaling changes as follows: Off t Approx. ×1.4 t Approx. ×2.
Instruction Manual
Page 80
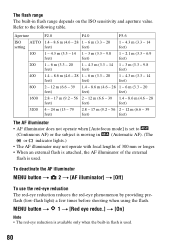
... t 2 t [AF illuminator] t [Off] To use the red-eye reduction The red-eye reduction reduces the red-eye phenomenon by providing preflash (low-flash light) a few times before shooting when using the flash.
... t 2 t [AF illuminator] t [Off] To use the red-eye reduction The red-eye reduction reduces the red-eye phenomenon by providing preflash (low-flash light) a few times before shooting when using the flash.
Instruction Manual
Page 100
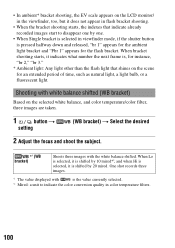
... does not appear in flash bracket shooting. • When the bracket shooting starts, the indexes that shines on the scene for an extended period of time, such as natural light, a light bulb, or a fluorescent light. • In ambient* bracket shooting, the EV scale appears on the selected white... selected, it is shifted by 10 mired*2, and when Hi is selected, it indicates what number the next frame is shifted by one. • When Single bracket is pressed halfway down and released, "br 1" appears for the ambient light bracket and "Fbr 1" appears for instance, "br 2," "br 3." * Ambient...
... does not appear in flash bracket shooting. • When the bracket shooting starts, the indexes that shines on the scene for an extended period of time, such as natural light, a light bulb, or a fluorescent light. • In ambient* bracket shooting, the EV scale appears on the selected white... selected, it is shifted by 10 mired*2, and when Hi is selected, it indicates what number the next frame is shifted by one. • When Single bracket is pressed halfway down and released, "br 1" appears for the ambient light bracket and "Fbr 1" appears for instance, "br 2," "br 3." * Ambient...


