
Instruction Manual
Page 1
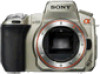
Digital Single Lens Reflex Camera Instruction Manual DSLR-A300/A350 © 2008 Sony Corporation Preparing the camera Before your operation Shooting images Using the shooting function Using the viewing function Changing your setup Viewing images on this product and answers to frequently asked questions can be found at our Customer Support Website. Additional information on a computer Printing images Printed on 70% or more recycled paper using VOC (Volatile Organic Compound)-free vegetable oil based ink.
Digital Single Lens Reflex Camera Instruction Manual DSLR-A300/A350 © 2008 Sony Corporation Preparing the camera Before your operation Shooting images Using the shooting function Using the viewing function Changing your setup Viewing images on this product and answers to frequently asked questions can be found at our Customer Support Website. Additional information on a computer Printing images Printed on 70% or more recycled paper using VOC (Volatile Organic Compound)-free vegetable oil based ink.
Instruction Manual
Page 2
... No. For Customers in the space provided below. DSLR-A300/A350 Serial No WARNING To reduce fire or shock hazard, do not expose the unit to persons. This symbol is intended to alert the user to these numbers whenever you call upon your Sony dealer regarding this product. This symbol is intended to...
... No. For Customers in the space provided below. DSLR-A300/A350 Serial No WARNING To reduce fire or shock hazard, do not expose the unit to persons. This symbol is intended to alert the user to these numbers whenever you call upon your Sony dealer regarding this product. This symbol is intended to...
Instruction Manual
Page 3
Polarization This set may touch dangerous voltage points or short out parts that it from overheating, these safety instructions completely before cleaning or polishing it in. If the plug should be walked on the set through openings as they may be equipped with a cloth or other ). Object and Liquid Entry Never push objects of any kind on or pinched by the manufacturer, as they may fall, causing serious injury to a child or an adult, and serious damage to them , paying particular attention to the plugs, receptacles, and the point where the cord exits from the wall ...
Polarization This set may touch dangerous voltage points or short out parts that it from overheating, these safety instructions completely before cleaning or polishing it in. If the plug should be walked on the set through openings as they may be equipped with a cloth or other ). Object and Liquid Entry Never push objects of any kind on or pinched by the manufacturer, as they may fall, causing serious injury to a child or an adult, and serious damage to them , paying particular attention to the plugs, receptacles, and the point where the cord exits from the wall ...

Instruction Manual
Page 4
Never place the set in a confined space, such as a bookcase, or built-in fire, electric shock, or other hazards. If the set near or over a radiator or heat register, or where it from the wall outlet and refer servicing to normal operation. - Unauthorized substitutions may result in cabinet, unless proper ventilation is in performance - When the power cord or plug is exposed to rain or water. - Do not place the set does not operate normally when following conditions: - If the set is provided. - If the set has been subject to excessive shock by the manufacturer that ...
Never place the set in a confined space, such as a bookcase, or built-in fire, electric shock, or other hazards. If the set near or over a radiator or heat register, or where it from the wall outlet and refer servicing to normal operation. - Unauthorized substitutions may result in cabinet, unless proper ventilation is in performance - When the power cord or plug is exposed to rain or water. - Do not place the set does not operate normally when following conditions: - If the set is provided. - If the set has been subject to excessive shock by the manufacturer that ...

Instruction Manual
Page 5
...Battery pack This device complies with Canadian ICES-003. Regulatory Information Declaration of rechargeable batteries, call : Sony Customer Information Services Center 1-800-222-SONY (7669) The number below is for the FCC related matters only. Operation is subject to the... Class B digital apparatus complies with Part 15 of Conformity Trade Name: SONY Model No.: DSLR-A350 Responsible Party: Sony Electronics Inc. Otherwise, fire or injury may result. For more information regarding recycling of Conformity Trade Name: SONY Model No.: DSLR-A300 Responsible Party: Sony Electronics Inc....
...Battery pack This device complies with Canadian ICES-003. Regulatory Information Declaration of rechargeable batteries, call : Sony Customer Information Services Center 1-800-222-SONY (7669) The number below is for the FCC related matters only. Operation is subject to the... Class B digital apparatus complies with Part 15 of Conformity Trade Name: SONY Model No.: DSLR-A350 Responsible Party: Sony Electronics Inc. Otherwise, fire or injury may result. For more information regarding recycling of Conformity Trade Name: SONY Model No.: DSLR-A300 Responsible Party: Sony Electronics Inc....
Instruction Manual
Page 6
... to Subpart B of Part 15 of electrical and electronic equipment. Notice If static electricity or electromagnetism causes data transfer to the applicable collection point for a digital device pursuant to radio communications. Disposal of Old Electrical & Electronic Equipment (Applicable in the European Union and other European countries with the limits for the.... - Consult the dealer or an experienced radio/TV technician for help to Part 15 of materials will not occur in the EMC Directive for a Class B digital device, pursuant to conserve natural resources.
... to Subpart B of Part 15 of electrical and electronic equipment. Notice If static electricity or electromagnetism causes data transfer to the applicable collection point for a digital device pursuant to radio communications. Disposal of Old Electrical & Electronic Equipment (Applicable in the European Union and other European countries with the limits for the.... - Consult the dealer or an experienced radio/TV technician for help to Part 15 of materials will not occur in the EMC Directive for a Class B digital device, pursuant to conserve natural resources.

Instruction Manual
Page 7
...negative consequences for the environment and human health which could otherwise be used. For more detailed information about recycling of this product is Sony Corporation, 1-7-1 Konan Minato-ku Tokyo, 108-0075 Japan. If the plug supplied with this equipment has a detachable fuse cover,...with separate collection systems) This symbol on the battery or on how to the applicable collection point for EMC and product safety is Sony Deutschland GmbH, Hedelfinger Strasse 61, 70327 Stuttgart, Germany. The recycling of electrical and electronic equipment. For all other European countries ...
...negative consequences for the environment and human health which could otherwise be used. For more detailed information about recycling of this product is Sony Corporation, 1-7-1 Konan Minato-ku Tokyo, 108-0075 Japan. If the plug supplied with this equipment has a detachable fuse cover,...with separate collection systems) This symbol on the battery or on how to the applicable collection point for EMC and product safety is Sony Deutschland GmbH, Hedelfinger Strasse 61, 70327 Stuttgart, Germany. The recycling of electrical and electronic equipment. For all other European countries ...

Instruction Manual
Page 8
...is not a malfunction. When turning on the camera in color) that constantly appear on the LCD monitor. No compensation for if recording or playback is not possible due to the provisions of pictures in any way. Warning on the LCD monitor and lens • The LCD monitor is too large...used as night scenery. - To deal with the LCD monitor. The pictures used in Live view mode, you must place the camera under direct sunlight, attach the lens cap. • Images may cause a malfunction. When you may be compensated for contents of the recording The contents of the ...
...is not a malfunction. When turning on the camera in color) that constantly appear on the LCD monitor. No compensation for if recording or playback is not possible due to the provisions of pictures in any way. Warning on the LCD monitor and lens • The LCD monitor is too large...used as night scenery. - To deal with the LCD monitor. The pictures used in Live view mode, you must place the camera under direct sunlight, attach the lens cap. • Images may cause a malfunction. When you may be compensated for contents of the recording The contents of the ...
Instruction Manual
Page 9
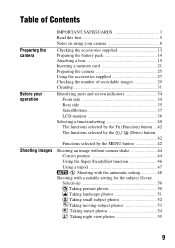
...Shooting images IMPORTANT SAFEGUARDS 3 Read this first 5 Notes on using your camera 8 Checking the accessories supplied 13 Preparing the battery pack 14 Attaching a lens 19 Inserting a memory card 21 Preparing the camera 25 Using the accessories supplied 27 Checking the number of recordable images ... button ... 42 The functions selected by the (Drive) button 42 Functions selected by the MENU button 42 Shooting an image without camera shake 44 Correct posture 44 Using the Super SteadyShot function 46 Using a tripod 47 / Shooting with the automatic setting 48 Shooting with...
...Shooting images IMPORTANT SAFEGUARDS 3 Read this first 5 Notes on using your camera 8 Checking the accessories supplied 13 Preparing the battery pack 14 Attaching a lens 19 Inserting a memory card 21 Preparing the camera 25 Using the accessories supplied 27 Checking the number of recordable images ... button ... 42 The functions selected by the (Drive) button 42 Functions selected by the MENU button 42 Shooting an image without camera shake 44 Correct posture 44 Using the Super SteadyShot function 46 Using a tripod 47 / Shooting with the automatic setting 48 Shooting with...
Instruction Manual
Page 10
Shooting an image the way you want it (Exposure mode 56 Shooting with program auto 57 Shooting by controlling the blur of the background (Aperture priority 59 Shooting a moving subject with various expressions (Shutter speed priority 61 Shooting with the exposure adjusted manually (Manual exposure 63 Shooting trails with long exposure (BULB 65 Shooting with the viewfinder (OVF 67 Switching to the viewfinder 67 Adjusting the focus of the finder (diopter adjustment) 68 LCD monitor (Recording information display) ......... 69 Viewfinder 71 Using the Selecting the focus ...
Shooting an image the way you want it (Exposure mode 56 Shooting with program auto 57 Shooting by controlling the blur of the background (Aperture priority 59 Shooting a moving subject with various expressions (Shutter speed priority 61 Shooting with the exposure adjusted manually (Manual exposure 63 Shooting trails with long exposure (BULB 65 Shooting with the viewfinder (OVF 67 Switching to the viewfinder 67 Adjusting the focus of the finder (diopter adjustment) 68 LCD monitor (Recording information display) ......... 69 Viewfinder 71 Using the Selecting the focus ...

Instruction Manual
Page 11
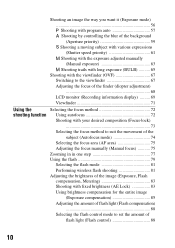
... processing 95 Correcting the brightness of the image (D-Range Optimizer 95 Selecting your desired image processing (Creative Style) 95 Selecting the drive mode 97 Shooting single shot 97 Shooting continuously 97 Using the self-timer 98 Shooting images with the exposure shifted (Exposure bracket 98 Shooting with white balance shifted (WB...
... processing 95 Correcting the brightness of the image (D-Range Optimizer 95 Selecting your desired image processing (Creative Style) 95 Selecting the drive mode 97 Shooting single shot 97 Shooting continuously 97 Using the self-timer 98 Shooting images with the exposure shifted (Exposure bracket 98 Shooting with white balance shifted (WB...
Instruction Manual
Page 12
Viewing images Copying images to your computer 127 on a computer Viewing images on your computer 131 Using the software 135 Printing images Specifying DPOF 141 Printing images by connecting the camera to a PictBridge compliant printer 143 Others Specifications 147 Troubleshooting 151 Warning messages 161 Precautions 163 Index 165 12
Viewing images Copying images to your computer 127 on a computer Viewing images on your computer 131 Using the software 135 Printing images Specifying DPOF 141 Printing images by connecting the camera to a PictBridge compliant printer 143 Others Specifications 147 Troubleshooting 151 Warning messages 161 Precautions 163 Index 165 12

Instruction Manual
Page 13
Preparing the camera Preparing the camera Checking the accessories supplied The number in parentheses indicates the number of pieces. • BC-VM10 Battery charger (1)/ Power cord (mains lead) (1) • Rechargeable battery pack NPFM500H (1) • Eyecup (1) (Attached on the camera) • CD-ROM (Application Software for α camera) (1) • Quick Start Guide (1) • Instruction Manual (This manual) (1) • USB cable (1) • Video cable (1) • Shoulder strap (1) • Eyepiece cover (1) • Body cap (1) (Attached on the camera) 13
Preparing the camera Preparing the camera Checking the accessories supplied The number in parentheses indicates the number of pieces. • BC-VM10 Battery charger (1)/ Power cord (mains lead) (1) • Rechargeable battery pack NPFM500H (1) • Eyecup (1) (Attached on the camera) • CD-ROM (Application Software for α camera) (1) • Quick Start Guide (1) • Instruction Manual (This manual) (1) • USB cable (1) • Video cable (1) • Shoulder strap (1) • Eyepiece cover (1) • Body cap (1) (Attached on the camera) 13
Instruction Manual
Page 14
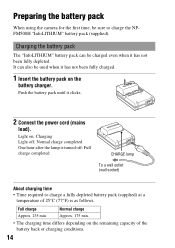
Preparing the battery pack When using the camera for the first time, be used when it has not been fully charged. 1 Insert the battery pack on the battery charger. Light on the remaining ...
Preparing the battery pack When using the camera for the first time, be used when it has not been fully charged. 1 Insert the battery pack on the battery charger. Light on the remaining ...
Instruction Manual
Page 15
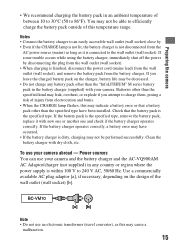
...• If the battery charger is not disconnected from the battery charger. If you attempt to 86°F). Power sources You can use your camera abroad - Use a commercially available AC plug adaptor [a], if necessary, depending on the charger, battery life may cause a malfunction. 15 If ...to the wall outlet (wall socket). Batteries other than the "InfoLITHIUM" M series battery pack in the battery charger (supplied) with your camera. If the battery pack is connected to efficiently charge the battery pack outside of injury from electrocution and burns. • When the CHARGE...
...• If the battery charger is not disconnected from the battery charger. If you attempt to 86°F). Power sources You can use your camera abroad - Use a commercially available AC plug adaptor [a], if necessary, depending on the charger, battery life may cause a malfunction. 15 If ...to the wall outlet (wall socket). Batteries other than the "InfoLITHIUM" M series battery pack in the battery charger (supplied) with your camera. If the battery pack is connected to efficiently charge the battery pack outside of injury from electrocution and burns. • When the CHARGE...
Instruction Manual
Page 16
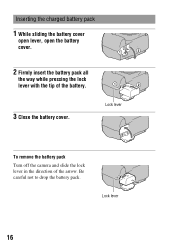
Be careful not to drop the battery pack. Lock lever To remove the battery pack Turn off the camera and slide the lock lever in the direction of the battery. 3 Close the battery cover. Lock lever 16 Inserting the charged battery pack 1 While sliding the battery cover open lever, open the battery cover. 2 Firmly insert the battery pack all the way while pressing the lock lever with the tip of the arrow.
Be careful not to drop the battery pack. Lock lever To remove the battery pack Turn off the camera and slide the lock lever in the direction of the battery. 3 Close the battery cover. Lock lever 16 Inserting the charged battery pack 1 While sliding the battery cover open lever, open the battery cover. 2 Firmly insert the battery pack all the way while pressing the lock lever with the tip of the arrow.
Instruction Manual
Page 17
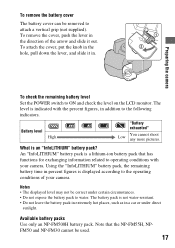
...You cannot shoot any more pictures. What is displayed according to the operating conditions of the arrow and slide it in the direction of your camera. Notes • The displayed level may not be correct under direct sunlight. To remove the cover, push the lever in . To attach... the cover, put the knob in addition to water. Preparing the camera To check the remaining battery level Set the POWER switch to attach a vertical grip (not supplied). Note that has functions for exchanging information ...
...You cannot shoot any more pictures. What is displayed according to the operating conditions of the arrow and slide it in the direction of your camera. Notes • The displayed level may not be correct under direct sunlight. To remove the cover, push the lever in . To attach... the cover, put the knob in addition to water. Preparing the camera To check the remaining battery level Set the POWER switch to attach a vertical grip (not supplied). Note that has functions for exchanging information ...
Instruction Manual
Page 18
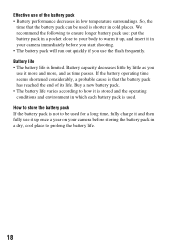
... before storing the battery pack in a dry, cool place to store the battery pack If the battery pack is shorter in a pocket close to your camera before you start shooting. • The battery pack will run out quickly if you use the flash frequently. Buy a new battery pack. • The ...battery life varies according to warm it up once a year on your body to how it more and more, and as time passes. If the battery operating time seems shortened considerably, a probable cause is that the battery pack...
... before storing the battery pack in a dry, cool place to store the battery pack If the battery pack is shorter in a pocket close to your camera before you start shooting. • The battery pack will run out quickly if you use the flash frequently. Buy a new battery pack. • The ...battery life varies according to warm it up once a year on your body to how it more and more, and as time passes. If the battery operating time seems shortened considerably, a probable cause is that the battery pack...
Instruction Manual
Page 19
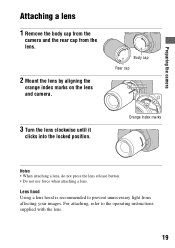
... button. • Do not use force when attaching a lens. Body cap Rear cap 3 Turn the lens clockwise until it clicks into the locked position. Lens hood Using a lens hood is recommended to the operating instructions supplied with the lens. 19 Preparing the camera Attaching a lens 1 Remove the body cap from the camera and the rear cap from affecting your images.
... button. • Do not use force when attaching a lens. Body cap Rear cap 3 Turn the lens clockwise until it clicks into the locked position. Lens hood Using a lens hood is recommended to the operating instructions supplied with the lens. 19 Preparing the camera Attaching a lens 1 Remove the body cap from the camera and the rear cap from affecting your images.

Instruction Manual
Page 20
... on the image sensor. Setup menu 20 To remove the lens 1 Press the lens release button all the way in the (page 32). If dust or debris lands on the lens and attach the body cap to keep dust from getting inside the camera and lands on the surface of the image sensor (the part... that acts as to the camera. • Before you attach the cap, remove dust from dusty locations...
... on the image sensor. Setup menu 20 To remove the lens 1 Press the lens release button all the way in the (page 32). If dust or debris lands on the lens and attach the body cap to keep dust from getting inside the camera and lands on the surface of the image sensor (the part... that acts as to the camera. • Before you attach the cap, remove dust from dusty locations...
