Instruction Manual
Page 6
...used with the equipment in order to comply with the limits for a digital device pursuant to which the receiver is disposed of correctly, you purchased the product. The supplied interface cable must be caused by one or more detailed information about recycling of ...conserve natural resources. These limits are designed to discontinue midway (fail), restart the application or disconnect and connect the communication cable (USB, etc.) again. For the State of electrical and electronic equipment. Attention The electromagnetic fields at the specific frequencies may influence...
...used with the equipment in order to comply with the limits for a digital device pursuant to which the receiver is disposed of correctly, you purchased the product. The supplied interface cable must be caused by one or more detailed information about recycling of ...conserve natural resources. These limits are designed to discontinue midway (fail), restart the application or disconnect and connect the communication cable (USB, etc.) again. For the State of electrical and electronic equipment. Attention The electromagnetic fields at the specific frequencies may influence...
Instruction Manual
Page 13
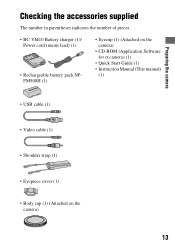
Preparing the camera Preparing the camera Checking the accessories supplied The number in parentheses indicates the number of pieces. • BC-VM10 Battery charger (1)/ Power cord (mains lead) (1) • Rechargeable battery pack NPFM500H (1) • Eyecup (1) (Attached on the camera) • CD-ROM (Application Software for α camera) (1) • Quick Start Guide (1) • Instruction Manual (This manual) (1) • USB cable (1) • Video cable (1) • Shoulder strap (1) • Eyepiece cover (1) • Body cap (1) (Attached on the camera) 13
Preparing the camera Preparing the camera Checking the accessories supplied The number in parentheses indicates the number of pieces. • BC-VM10 Battery charger (1)/ Power cord (mains lead) (1) • Rechargeable battery pack NPFM500H (1) • Eyecup (1) (Attached on the camera) • CD-ROM (Application Software for α camera) (1) • Quick Start Guide (1) • Instruction Manual (This manual) (1) • USB cable (1) • Video cable (1) • Shoulder strap (1) • Eyepiece cover (1) • Body cap (1) (Attached on the camera) 13

Instruction Manual
Page 27
... battery pack (page 14) • Battery charger, Power cord (mains lead) (page 14) • Eyecup (page 26) • USB cable (pages 120, 136) • Video cable (page 104) • CD-ROM (page 128) Attaching the shoulder strap Attach the both ends of the viewfinder, as in bulb exposure or... When the shutter is released without the use the shoulder strap and the eyepiece cover. Preparing the camera Using the accessories supplied This section describes how to use of the strap on the camera. • You can prevent light from entering through the viewfinder and affecting the exposure.
... battery pack (page 14) • Battery charger, Power cord (mains lead) (page 14) • Eyecup (page 26) • USB cable (pages 120, 136) • Video cable (page 104) • CD-ROM (page 128) Attaching the shoulder strap Attach the both ends of the viewfinder, as in bulb exposure or... When the shutter is released without the use the shoulder strap and the eyepiece cover. Preparing the camera Using the accessories supplied This section describes how to use of the strap on the camera. • You can prevent light from entering through the viewfinder and affecting the exposure.
Instruction Manual
Page 119
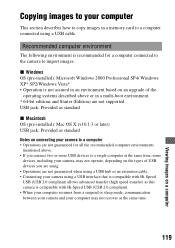
...of USB devices you connect two or more USB devices to a single computer at the same time, some devices, including your computer may not operate, depending on the types of the operating systems described above . • If you are using a USB cable. ...Viewing images on a computer Copying images to your computer This section describes how to copy images in a multi-boot environment. * 64-bit editions and Starter (Edition) are not guaranteed when using a USB hub or an extension cable. • Connecting your camera using a USB interface that is compatible with Hi-Speed USB (USB...
...of USB devices you connect two or more USB devices to a single computer at the same time, some devices, including your computer may not operate, depending on the types of the operating systems described above . • If you are using a USB cable. ...Viewing images on a computer Copying images to your computer This section describes how to copy images in a multi-boot environment. * 64-bit editions and Starter (Edition) are not guaranteed when using a USB hub or an extension cable. • Connecting your camera using a USB interface that is compatible with Hi-Speed USB (USB...
Instruction Manual
Page 120
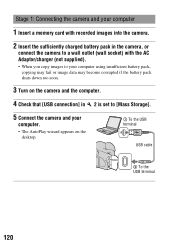
... your computer 1 Insert a memory card with recorded images into the camera. 2 Insert the sufficiently charged battery pack in the camera, or connect the camera to a wall outlet (wall socket) with the AC Adaptor/charger (not supplied). • When you copy images to your computer ... become corrupted if the battery pack shuts down too soon. 3 Turn on the camera and the computer. 4 Check that [USB connection] in 2 is set to [Mass Storage]. 5 Connect the camera and your computer. • The AutoPlay wizard appears on the desktop. 1 To the USB terminal USB cable 2 To the USB terminal 120
... your computer 1 Insert a memory card with recorded images into the camera. 2 Insert the sufficiently charged battery pack in the camera, or connect the camera to a wall outlet (wall socket) with the AC Adaptor/charger (not supplied). • When you copy images to your computer ... become corrupted if the battery pack shuts down too soon. 3 Turn on the camera and the computer. 4 Check that [USB connection] in 2 is set to [Mass Storage]. 5 Connect the camera and your computer. • The AutoPlay wizard appears on the desktop. 1 To the USB terminal USB cable 2 To the USB terminal 120

Instruction Manual
Page 124
... the confirmation window, then click [OK] t [OK] (unnecessary for Windows XP/Vista). Deleting the USB connection Perform the procedures listed below beforehand when: • Disconnecting the USB cable. • Removing the memory card. • Turning off the camera. The camera is disconnected. Confirm the device on the memory card. 124 x For Macintosh Drag and drop...
... the confirmation window, then click [OK] t [OK] (unnecessary for Windows XP/Vista). Deleting the USB connection Perform the procedures listed below beforehand when: • Disconnecting the USB cable. • Removing the memory card. • Turning off the camera. The camera is disconnected. Confirm the device on the memory card. 124 x For Macintosh Drag and drop...
Instruction Manual
Page 136
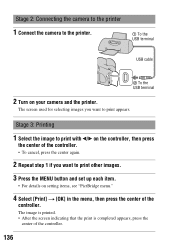
... the screen indicating that the print is completed appears, press the center of the controller. 136 Stage 2: Connecting the camera to the printer 1 Connect the camera to the printer. 1 To the USB terminal USB cable 2 To the USB terminal 2 Turn on setting items, see "PictBridge menu." 4 Select [Print] t [OK] in the menu, then press the center...
... the screen indicating that the print is completed appears, press the center of the controller. 136 Stage 2: Connecting the camera to the printer 1 Connect the camera to the printer. 1 To the USB terminal USB cable 2 To the USB terminal 2 Turn on setting items, see "PictBridge menu." 4 Select [Print] t [OK] in the menu, then press the center...
Instruction Manual
Page 137
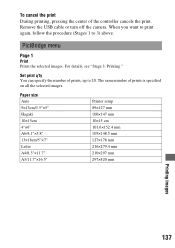
...×297 mm 297×420 mm Printing images 137 Set print q'ty You can specify the number of prints, up to 3) above. Remove the USB cable or turn off the camera.
...×297 mm 297×420 mm Printing images 137 Set print q'ty You can specify the number of prints, up to 3) above. Remove the USB cable or turn off the camera.
Instruction Manual
Page 147
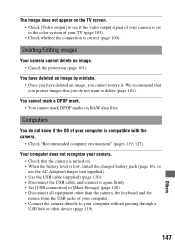
... that you protect images that the camera is turned on. • When the battery level is low, install the charged battery pack (page 16), or use the AC Adaptor/charger (not supplied). • Use the USB cable (supplied) (page 120). • Disconnect the USB cable, and connect it . Computers You... color system of your computer. • Connect the camera directly to [Mass Storage] (page 120). • Disconnect all equipment other than the camera, the keyboard and the mouse from the USB jacks of your computer without passing through a USB hub or other device (page 119). 147 Others The...
... that you protect images that the camera is turned on. • When the battery level is low, install the charged battery pack (page 16), or use the AC Adaptor/charger (not supplied). • Use the USB cable (supplied) (page 120). • Disconnect the USB cable, and connect it . Computers You... color system of your computer. • Connect the camera directly to [Mass Storage] (page 120). • Disconnect all equipment other than the camera, the keyboard and the mouse from the USB jacks of your computer without passing through a USB hub or other device (page 119). 147 Others The...
Instruction Manual
Page 150
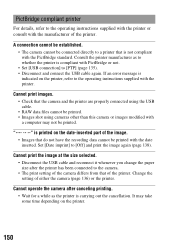
...image at the size selected. • Disconnect the USB cable and reconnect it whenever you change the paper size after canceling printing. • Wait for a while as to whether the printer is indicated on the date-inserted part of either the camera (page 136) or the printer. Change the setting... of the image. • Images that the camera and the printer are properly connected using the USB cable. • RAW data files cannot be printed with the printer. is...
...image at the size selected. • Disconnect the USB cable and reconnect it whenever you change the paper size after canceling printing. • Wait for a while as to whether the printer is indicated on the date-inserted part of either the camera (page 136) or the printer. Change the setting... of the image. • Images that the camera and the printer are properly connected using the USB cable. • RAW data files cannot be printed with the printer. is...
Instruction Manual
Page 153
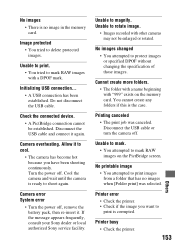
...create any folders if this is corrupted. Unable to mark. • You attempted to print is the case. Disconnect the USB cable and connect it to cool. • The camera has become hot because you want to mark RAW images on the memory card. Unable to rotate image. • Images ...of those images. Turn the power off , remove the battery pack, then re-insert it. If the message appears frequently, consult your Sony dealer or local authorized Sony service facility. No images changed • You attempted to mark RAW images with "999" exists on the PictBridge screen. Image protected &#...
...create any folders if this is corrupted. Unable to mark. • You attempted to print is the case. Disconnect the USB cable and connect it to cool. • The camera has become hot because you want to mark RAW images on the memory card. Unable to rotate image. • Images ...of those images. Turn the power off , remove the battery pack, then re-insert it. If the message appears frequently, consult your Sony dealer or local authorized Sony service facility. No images changed • You attempted to mark RAW images with "999" exists on the PictBridge screen. Image protected &#...

Marketing Specifications (DSLR-A200)
Page 2
... 71 mm) Supplied Accessories NP-FM500H rechargeable battery BC-VM10 battery charger Video and USB cables Shoulder strap with Flash HVL-F56AM, F36AM) Exposure: Program Shift: Yes, Command Dial Lens Type: Interchangeable A-mount Power Battery Type: NP-FM500H Lithium-ion rechargeable battery Battery Capacity...Sony BRAVIA® HDTV; Sony, the Sony logo, Alpha, "α", Bionz, BRAVIA, Clear Photo, Cyber-shot, Exmor, InfoLITHIUM, Memory Stick Duo, Memory Stick PRO Duo, Stamina, and SteadyShot INSIDE™ are included. Maximum 3 frames (RAW + JPEG); DSLR-A200 Digital Single Lens Reflex Camera...
... 71 mm) Supplied Accessories NP-FM500H rechargeable battery BC-VM10 battery charger Video and USB cables Shoulder strap with Flash HVL-F56AM, F36AM) Exposure: Program Shift: Yes, Command Dial Lens Type: Interchangeable A-mount Power Battery Type: NP-FM500H Lithium-ion rechargeable battery Battery Capacity...Sony BRAVIA® HDTV; Sony, the Sony logo, Alpha, "α", Bionz, BRAVIA, Clear Photo, Cyber-shot, Exmor, InfoLITHIUM, Memory Stick Duo, Memory Stick PRO Duo, Stamina, and SteadyShot INSIDE™ are included. Maximum 3 frames (RAW + JPEG); DSLR-A200 Digital Single Lens Reflex Camera...