
Operating Instructions
Page 4
...Electronics and Information Technology Industries Association). • Playback of images recorded or edited with an LCD finder) and lens • The LCD screen and the LCD finder are manufactured using the camera. Read this may render the "Memory Stick" unusable or image data breakdown, damage or loss may occur. ...Exposing the LCD screen, the finder or the lens to it may cause the malfunction of the camera may cause malfunctions which in some tiny black points and/or bright points (white, red, blue or green in sandy...
...Electronics and Information Technology Industries Association). • Playback of images recorded or edited with an LCD finder) and lens • The LCD screen and the LCD finder are manufactured using the camera. Read this may render the "Memory Stick" unusable or image data breakdown, damage or loss may occur. ...Exposing the LCD screen, the finder or the lens to it may cause the malfunction of the camera may cause malfunctions which in some tiny black points and/or bright points (white, red, blue or green in sandy...

Operating Instructions
Page 5
... a quality assurance system certified by Carl Zeiss in accordance with the quality standards of Carl Zeiss in Germany. Carl Zeiss lens This camera is equipped with a Carl Zeiss lens which is a trademark of Sony Corporation. • Microsoft, Windows, and Windows Media, and DirectX are either registered trademarks or trademarks of Microsoft Corporation in general...
... a quality assurance system certified by Carl Zeiss in accordance with the quality standards of Carl Zeiss in Germany. Carl Zeiss lens This camera is equipped with a Carl Zeiss lens which is a trademark of Sony Corporation. • Microsoft, Windows, and Windows Media, and DirectX are either registered trademarks or trademarks of Microsoft Corporation in general...

Operating Instructions
Page 8
You will be unable to firmly secure the camera to tripods having longer screws, and may damage the camera. Identifying the parts See the pages in parentheses for details of operation. 1 2 3 4 5 6 7 8 9 0 qa qs qd qf qg qh qj qk 8 A POWER button (17) B POWER ...lamp (17) C Shutter button (25) D Microphone E Self-timer lamp (29)/ AF illuminator (31, 114) F Lens G RESET button (96) H Speaker I ...
You will be unable to firmly secure the camera to tripods having longer screws, and may damage the camera. Identifying the parts See the pages in parentheses for details of operation. 1 2 3 4 5 6 7 8 9 0 qa qs qd qf qg qh qj qk 8 A POWER button (17) B POWER ...lamp (17) C Shutter button (25) D Microphone E Self-timer lamp (29)/ AF illuminator (31, 114) F Lens G RESET button (96) H Speaker I ...

Operating Instructions
Page 11
...+/-. • You cannot charge alkaline batteries using the battery charger. • Be sure to charge the Nickel-Metal Hydride batteries supplied with your camera before using them. • Connect the battery charger to an easily accessible wall outlet (wall socket) close by. • Even if the ...to the supplied Nickel-Metal Hydride batteries. For this case, replace the batteries with the lens portion extended when you use the batteries described above, we cannot guarantee full performance of the camera by disconnecting the plug from the AC power source (mains) as long as brownout of...
...+/-. • You cannot charge alkaline batteries using the battery charger. • Be sure to charge the Nickel-Metal Hydride batteries supplied with your camera before using them. • Connect the battery charger to an easily accessible wall outlet (wall socket) close by. • Even if the ...to the supplied Nickel-Metal Hydride batteries. For this case, replace the batteries with the lens portion extended when you use the batteries described above, we cannot guarantee full performance of the camera by disconnecting the plug from the AC power source (mains) as long as brownout of...

Operating Instructions
Page 17
... POWER lamp , Press POWER. The POWER lamp (green) lights up the menu or the SET UP screen (page 46), and use the control button Camera AF Mode: Digital Zoom: Date/Time: 1 Red Eye Reduction: 2 AF Illuminator: Auto Review: Single Smart Off Off Auto Off SELECT Setup 2 File Number: USB Connect: Video...MONO) jack How to use the control button to make the setting. When you push the RESET button, the lens portion moves. Turning off . • Do not leave the camera with the lens portion extended for the first time, the Clock Set screen appears (page 18). Auto power-off function If you ...
... POWER lamp , Press POWER. The POWER lamp (green) lights up the menu or the SET UP screen (page 46), and use the control button Camera AF Mode: Digital Zoom: Date/Time: 1 Red Eye Reduction: 2 AF Illuminator: Auto Review: Single Smart Off Off Auto Off SELECT Setup 2 File Number: USB Connect: Video...MONO) jack How to use the control button to make the setting. When you push the RESET button, the lens portion moves. Turning off . • Do not leave the camera with the lens portion extended for the first time, the Clock Set screen appears (page 18). Auto power-off function If you ...

Operating Instructions
Page 24
... Mode dial When shooting pictures with the camera, be careful so that your fingers do not block the lens portion, finder window, flash emitter, microphone or self-timer lamp/AF illuminator (page 8). 1 , Set the mode dial to , and turn on the power. • The lens cover opens when the power is turned ... indicated on the power or when the zoom function is working (page 26). • This camera can create new folders and select folders to be stored in the "Memory Stick" (page 47). 2 , Hold the camera steadily with both hands and position the subject in the center of the focus frame. •...
... Mode dial When shooting pictures with the camera, be careful so that your fingers do not block the lens portion, finder window, flash emitter, microphone or self-timer lamp/AF illuminator (page 8). 1 , Set the mode dial to , and turn on the power. • The lens cover opens when the power is turned ... indicated on the power or when the zoom function is working (page 26). • This camera can create new folders and select folders to be stored in the "Memory Stick" (page 47). 2 , Hold the camera steadily with both hands and position the subject in the center of the focus frame. •...

Operating Instructions
Page 26
Do not touch the lens portion while it is 3×. Digital zoom can be selected from the lens surface • The lens portion moves during zoom operation. The enlargement method and the zoom scale differ according to the image size and the zoom type, so ...may appear rough right after playback starts due to the subject Approx. 50 cm (19 3/4 inches) from smart zoom or precision digital zoom. The minimum focal distance to the image processing. Zoom Your camera is set [Digital Zoom] to the normal shooting mode, press lightly on the control button, then press z. When...
Do not touch the lens portion while it is 3×. Digital zoom can be selected from the lens surface • The lens portion moves during zoom operation. The enlargement method and the zoom scale differ according to the image size and the zoom type, so ...may appear rough right after playback starts due to the subject Approx. 50 cm (19 3/4 inches) from smart zoom or precision digital zoom. The minimum focal distance to the image processing. Zoom Your camera is set [Digital Zoom] to the normal shooting mode, press lightly on the control button, then press z. When...

Operating Instructions
Page 28
... frame. When the zoom is set all the way to the W side: Approx. 6 cm (2 3/8 inches) from the lens surface When the zoom is set to the zoom position. The indicator disappears from the lens surface 28 1 , Set the mode dial to focus on the control button. Press and hold the shutter button...
... frame. When the zoom is set all the way to the W side: Approx. 6 cm (2 3/8 inches) from the lens surface When the zoom is set to the zoom position. The indicator disappears from the lens surface 28 1 , Set the mode dial to focus on the control button. Press and hold the shutter button...

Operating Instructions
Page 51
...and aperture settings - Control button Advanced still image shooting 51 c Select 9 (Focus) with b/B, then select the distance to "Return", and the camera enters the manual exposure setup mode. If you select 1/6 second or slower shutter speeds, "NR" appears before the shutter speed indicator and the ... displayed on the LCD screen as the EV value (page 54). 0EV indicates the value judged as a reference. • If you point the lens up or down, the error increases. • The distance selection is approximate, and should be selected from the following distance settings. 0.5m, 1....
...and aperture settings - Control button Advanced still image shooting 51 c Select 9 (Focus) with b/B, then select the distance to "Return", and the camera enters the manual exposure setup mode. If you select 1/6 second or slower shutter speeds, "NR" appears before the shutter speed indicator and the ... displayed on the LCD screen as the EV value (page 54). 0EV indicates the value judged as a reference. • If you point the lens up or down, the error increases. • The distance selection is approximate, and should be selected from the following distance settings. 0.5m, 1....

Operating Instructions
Page 53
... light that the CCD of light is able to receive. This value changes according to prevent shaking. The proper amount of the digital still camera is called the "Aperture value (F value)". The correct exposure can be maintained by setting a faster shutter speed when the aperture ...; Moving objects appear to flow. Adjustment by shutter speed Shutter speed adjusts the time during which adjusts the amount of the lens part which light enters the camera. When setting a slower shutter speed, we recommend using a tripod to the combination of light is called the "correct exposure...
... light that the CCD of light is able to receive. This value changes according to prevent shaking. The proper amount of the digital still camera is called the "Aperture value (F value)". The correct exposure can be maintained by setting a faster shutter speed when the aperture ...; Moving objects appear to flow. Adjustment by shutter speed Shutter speed adjusts the time during which adjusts the amount of the lens part which light enters the camera. When setting a slower shutter speed, we recommend using a tripod to the combination of light is called the "correct exposure...

Operating Instructions
Page 97
... out of focus. • The subject is too close -ups (Macro) recording mode. does not function. p Disconnect the A/V connecting cable. Precision digital zoom • [Digital Zoom] is set to [Smart] or [Off] in the close . • The mode dial is set to [Precision] (pages 27, 46 ... the batteries correctly (page 13). • The AC Adaptor (not supplied) is on the camera. p Turn on the LCD screen (page 32). shooting movies. p Set to position the lens farther away from the subject than SET UP or (page 10). p Properly connect the AC Adaptor (page 16...
... out of focus. • The subject is too close -ups (Macro) recording mode. does not function. p Disconnect the A/V connecting cable. Precision digital zoom • [Digital Zoom] is set to [Smart] or [Off] in the close . • The mode dial is set to [Precision] (pages 27, 46 ... the batteries correctly (page 13). • The AC Adaptor (not supplied) is on the camera. p Turn on the LCD screen (page 32). shooting movies. p Set to position the lens farther away from the subject than SET UP or (page 10). p Properly connect the AC Adaptor (page 16...

Operating Instructions
Page 105
... moisture to evaporate before use the AC Adaptor (not supplied) (page 16). p Turn off the camera. The lens gets fogged. p Remove the batteries, then after one minute reinsert the batteries and turn off the camera and leave for about an hour at room temperature for the long time. If this does not...occurred. - p Check the indicator (pages 122 to a wall outlet (wall socket) (page 16). • The built-in microcomputer is on, but the camera does not work , press the RESET button located on the screen. The lens does not move when you use it securely to the DC IN jack of the...
... moisture to evaporate before use the AC Adaptor (not supplied) (page 16). p Turn off the camera. The lens gets fogged. p Remove the batteries, then after one minute reinsert the batteries and turn off the camera and leave for about an hour at room temperature for the long time. If this does not...occurred. - p Check the indicator (pages 122 to a wall outlet (wall socket) (page 16). • The built-in microcomputer is on, but the camera does not work , press the RESET button located on the screen. The lens does not move when you use it securely to the DC IN jack of the...

Operating Instructions
Page 107
...or the type of batteries, the indicator may flash even though there are still 5 to 10 minutes of remaining battery time left. • Camera shake may not be completed yet. If an error message is indicated on the circumstances, the connection may occur due to insufficient light. Check the...occurred, such as paper-out, paper-jam, etc. Check the device. • Depending on the printer, refer to the operating instructions supplied with the lens caused an error. • 640(Fine) size movies can be recorded only using "Memory Stick PRO." Disconnect and connect the USB cable again. Connect...
...or the type of batteries, the indicator may flash even though there are still 5 to 10 minutes of remaining battery time left. • Camera shake may not be completed yet. If an error message is indicated on the circumstances, the connection may occur due to insufficient light. Check the...occurred, such as paper-out, paper-jam, etc. Check the device. • Depending on the printer, refer to the operating instructions supplied with the lens caused an error. • 640(Fine) size movies can be recorded only using "Memory Stick PRO." Disconnect and connect the USB cable again. Connect...

Operating Instructions
Page 116
... surface with a soft cloth to remove fingerprints, dust, etc. Cleaning the lens Wipe the lens with an LCD cleaning kit (not supplied) to remove fingerprints, dust, etc. How to prevent moisture condensation When bringing the camera from an airconditioned room or car interior to a warm location, or is... or this may condense inside the lens, you attempt to shoot with rubber or vinyl for use the following places • In extremely hot place, such as in a car parked in some cases this may cause a malfunction of the camera. Touch the camera with a dry cloth. Precautions Do...
... surface with a soft cloth to remove fingerprints, dust, etc. Cleaning the lens Wipe the lens with an LCD cleaning kit (not supplied) to remove fingerprints, dust, etc. How to prevent moisture condensation When bringing the camera from an airconditioned room or car interior to a warm location, or is... or this may condense inside the lens, you attempt to shoot with rubber or vinyl for use the following places • In extremely hot place, such as in a car parked in some cases this may cause a malfunction of the camera. Touch the camera with a dry cloth. Precautions Do...
Operating Instructions
Page 120
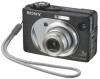
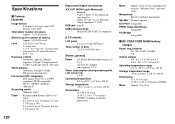
... mm (1/1.8 type) color CCD Primary color filter Total pixels number of camera Approx. 5 255 000 pixels Effective pixels number of camera Approx. 5 090 000 pixels Lens Carl Zeiss Vario-Tessar 3× zoom lens f = 7.9 - 23.7 mm (38 - 114 mm when converted to a 35 mm still camera) F2.8 - 5.2 Exposure control Automatic exposure, Manual exposure, Twilight, Twilight portrait...
... mm (1/1.8 type) color CCD Primary color filter Total pixels number of camera Approx. 5 255 000 pixels Effective pixels number of camera Approx. 5 090 000 pixels Lens Carl Zeiss Vario-Tessar 3× zoom lens f = 7.9 - 23.7 mm (38 - 114 mm when converted to a 35 mm still camera) F2.8 - 5.2 Exposure control Automatic exposure, Manual exposure, Twilight, Twilight portrait...

Service Manual
Page 1
... Therefore, schematic diagram, printed wiring board and electrical and 5-10 to 5-13 parts list of processing the flexible boards/harnesses are not shown. DIGITAL STILL CAMERA DSC-W1/W12 SERVICE MANUAL Ver 1.2 2004.08 Revision History How to use Acrobat Reader 2 LEVEL DSC-W1 US Model Canadian Model Hong Kong... SW-422, MS-204, MS-205 flexible, JK-263 and SP-045 flexible boards This service manual procides the information that is shown in Lens Frame Installation • Exchange Method of Barrier Assy • HELP: Sheet attachment positions and procedures of the CH-146, SY-102, SW-...
... Therefore, schematic diagram, printed wiring board and electrical and 5-10 to 5-13 parts list of processing the flexible boards/harnesses are not shown. DIGITAL STILL CAMERA DSC-W1/W12 SERVICE MANUAL Ver 1.2 2004.08 Revision History How to use Acrobat Reader 2 LEVEL DSC-W1 US Model Canadian Model Hong Kong... SW-422, MS-204, MS-205 flexible, JK-263 and SP-045 flexible boards This service manual procides the information that is shown in Lens Frame Installation • Exchange Method of Barrier Assy • HELP: Sheet attachment positions and procedures of the CH-146, SY-102, SW-...
Service Manual
Page 2
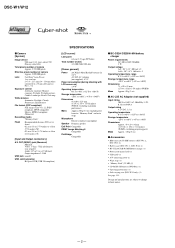
... mm (1/1.8 type) color CCD Primary color filter Total pixels number of camera Approx. 5 255 000 pixels Effective pixels number of camera Approx. 5 090 000 pixels Lens Carl Zeiss Vario-Tessar 3 zo om lens f = 7.9 - 23.7 mm (38 - 114 mm when converted to a 35 mm still camera) F2.8 - 5.2 Exposure control Automatic exposure, Manual exposure, Twilight, Twilight portrait...
... mm (1/1.8 type) color CCD Primary color filter Total pixels number of camera Approx. 5 255 000 pixels Effective pixels number of camera Approx. 5 090 000 pixels Lens Carl Zeiss Vario-Tessar 3 zo om lens f = 7.9 - 23.7 mm (38 - 114 mm when converted to a 35 mm still camera) F2.8 - 5.2 Exposure control Automatic exposure, Manual exposure, Twilight, Twilight portrait...
Service Manual
Page 4
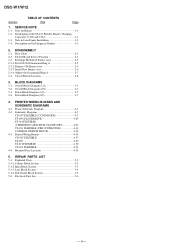
Note in Lens Frame Installation 1-2 1-4. SY-102 Board Service Position 2-3 2-3. Overall Block Diagram (1/2 3-1 3-2. Printed Wiring Boards 4-35 CD-507 FLEXIBLE 4-37 ST-100 4-49 ST-101 FLEXIBLE...-100 (FLASH DRIVE 4-29 ST-101 FLEXIBLE (CHARGING CAPACITOR, FLASH UNIT 4-29 US-011 FLEXIBLE (USB CONNECTOR 4-31 CONTROL SWITCH BLOCK 4-32 4-3. REPAIR PARTS LIST 5-1. Lens Block Section 5-4 5-1-4. Flow Chart 2-1 2-2. Remove Old Barrier Assy 2-6 2-3-3. Power Block Diagram (2/2 3-7 4. Note for Repair 1-1 1-2. Exchange Method of the ST-101 Flexible Board's Charging ...
Note in Lens Frame Installation 1-2 1-4. SY-102 Board Service Position 2-3 2-3. Overall Block Diagram (1/2 3-1 3-2. Printed Wiring Boards 4-35 CD-507 FLEXIBLE 4-37 ST-100 4-49 ST-101 FLEXIBLE...-100 (FLASH DRIVE 4-29 ST-101 FLEXIBLE (CHARGING CAPACITOR, FLASH UNIT 4-29 US-011 FLEXIBLE (USB CONNECTOR 4-31 CONTROL SWITCH BLOCK 4-32 4-3. REPAIR PARTS LIST 5-1. Lens Block Section 5-4 5-1-4. Flow Chart 2-1 2-2. Remove Old Barrier Assy 2-6 2-3-3. Power Block Diagram (2/2 3-7 4. Note for Repair 1-1 1-2. Exchange Method of the ST-101 Flexible Board's Charging ...

Service Manual
Page 6
...; C: ss: ss You can reverse the camera malfunction yourself. (However, contact your Sony dealer or local authorized Sony service facility when you cannot recover from the camera malfunction.) • E: ss: ss Contact your Sony dealer or local authorized Sony service facility. Insert a new "Memory Stick".... Unformatted memory stick is being charged. E:91:ss E:92:ss Checking of flash unit or replacement of lens drive circuit. Batteries...
...; C: ss: ss You can reverse the camera malfunction yourself. (However, contact your Sony dealer or local authorized Sony service facility when you cannot recover from the camera malfunction.) • E: ss: ss Contact your Sony dealer or local authorized Sony service facility. Insert a new "Memory Stick".... Unformatted memory stick is being charged. E:91:ss E:92:ss Checking of flash unit or replacement of lens drive circuit. Batteries...

Service Manual
Page 7
...1-215-869-11) 2 1 4 9 qa 8 0 4 2 5 3 1 Open two connectors (CN201, 701) 1 Lock ace screw (M1.7) x4 0 6 Claw x2 2 Claw x2 2 Claw 7 Strobo block 3 Lens block 3 Rear cabinet 4 Side cover 5 Sheet (S) HELP 1 Claw x1 qs 2 Claw x1 3 Control SW block 8 Tapping screw (M1.7) x1 9 DC ground plate (B) 0 Claw x2 4 CD...-507: CN701 5 Lens block flexible: CN201 6 Mic harness: CN102 4 Control SW block flexible: CN702 qa Claw x1 7 Lock ace screw (M1.7) x2 5 ST-101 flexible: CN601 qs...
...1-215-869-11) 2 1 4 9 qa 8 0 4 2 5 3 1 Open two connectors (CN201, 701) 1 Lock ace screw (M1.7) x4 0 6 Claw x2 2 Claw x2 2 Claw 7 Strobo block 3 Lens block 3 Rear cabinet 4 Side cover 5 Sheet (S) HELP 1 Claw x1 qs 2 Claw x1 3 Control SW block 8 Tapping screw (M1.7) x1 9 DC ground plate (B) 0 Claw x2 4 CD...-507: CN701 5 Lens block flexible: CN201 6 Mic harness: CN102 4 Control SW block flexible: CN702 qa Claw x1 7 Lock ace screw (M1.7) x2 5 ST-101 flexible: CN601 qs...


