Operating Instructions
Page 1
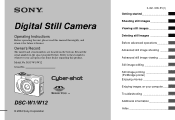
Digital Still Camera Operating Instructions Before operating the unit, please read this product. Refer to these numbers whenever you call upon your computer_________ Troubleshooting Additional information Index Owner's Record The model and serial numbers are located on your Sony dealer regarding this manual thoroughly, and... retain it for future reference. DSC-W1/W12 Serial No. Model No. DSC-W1/W12 © 2004 Sony Corporation 3-091-535-11(1) Getting started Shooting still ...
Digital Still Camera Operating Instructions Before operating the unit, please read this product. Refer to these numbers whenever you call upon your computer_________ Troubleshooting Additional information Index Owner's Record The model and serial numbers are located on your Sony dealer regarding this manual thoroughly, and... retain it for future reference. DSC-W1/W12 Serial No. Model No. DSC-W1/W12 © 2004 Sony Corporation 3-091-535-11(1) Getting started Shooting still ...

Operating Instructions
Page 5
... "Memory Stick," , "Memory Stick PRO", , "Memory Stick Duo", , "Memory Stick PRO Duo", , "MagicGate" and are trademarks of Sony Corporation. • Picture Package is capable of Carl Zeiss in the United States and/or other countries. • Macintosh, Mac OS, QuickTime,...174; marks are not used as examples of pictures in this camera. • Macromedia and Flash are not actual images shot using this manual. The pictures used in this manual The photographs used in all cases in this manual are reproduced images, and are trademarks or registered trademarks of Macromedia,...
... "Memory Stick," , "Memory Stick PRO", , "Memory Stick Duo", , "Memory Stick PRO Duo", , "MagicGate" and are trademarks of Sony Corporation. • Picture Package is capable of Carl Zeiss in the United States and/or other countries. • Macintosh, Mac OS, QuickTime,...174; marks are not used as examples of pictures in this camera. • Macromedia and Flash are not actual images shot using this manual. The pictures used in this manual The photographs used in all cases in this manual are reproduced images, and are trademarks or registered trademarks of Macromedia,...
Operating Instructions
Page 6
...8 Mode dial 10 Getting started Preparing batteries 11 Charging the batteries 11 Inserting the batteries 13 Using the AC adaptor 16 Using your camera abroad 16 Turning on a TV screen 39 Deleting still images Deleting images 41 Formatting a "Memory Stick 43 Before advanced operations How ...Adjusting color tones - White Balance 57 Adjusting the flash level - Using auto adjustment mode ..... 24 Checking the last image you shot - Manual Exposure 51 Adjusting the exposure - Picture Effect 60 Flash Level 58 Shooting continuously 59 Shooting in the SET UP screen 46 Deciding the ...
...8 Mode dial 10 Getting started Preparing batteries 11 Charging the batteries 11 Inserting the batteries 13 Using the AC adaptor 16 Using your camera abroad 16 Turning on a TV screen 39 Deleting still images Deleting images 41 Formatting a "Memory Stick 43 Before advanced operations How ...Adjusting color tones - White Balance 57 Adjusting the flash level - Using auto adjustment mode ..... 24 Checking the last image you shot - Manual Exposure 51 Adjusting the exposure - Picture Effect 60 Flash Level 58 Shooting continuously 59 Shooting in the SET UP screen 46 Deciding the ...

Operating Instructions
Page 10
...to the scene (page 34). In addition, you can easily shoot effective pictures according to allow easy shooting. SET UP (Set up) You can manually adjust the aperture value and the shutter speed (page 51). In addition, you can set various shooting functions using menus (pages 45 and 110).... can set the desired mark on the mode dial to [Fine] (page 46). Mode dial Before using your camera, set various shooting functions using menus (pages 45 and 111). M (Manual exposure shooting) You can change the focus and other adjustments as in the auto adjustment mode, but you can play...
...to the scene (page 34). In addition, you can easily shoot effective pictures according to allow easy shooting. SET UP (Set up) You can manually adjust the aperture value and the shutter speed (page 51). In addition, you can set various shooting functions using menus (pages 45 and 110).... can set the desired mark on the mode dial to [Fine] (page 46). Mode dial Before using your camera, set various shooting functions using menus (pages 45 and 111). M (Manual exposure shooting) You can change the focus and other adjustments as in the auto adjustment mode, but you can play...

Operating Instructions
Page 51
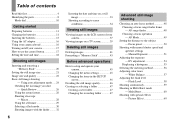
...Set the mode dial to "Return", and the camera enters the manual exposure setup mode. The "Set" indicator at the lower left of the LCD screen changes to M. c Select 9 (Focus) with b/B, then select the distance to the subject with manual shutter speed and aperture settings - Control button ... 1.0m 1.0m 0.5m Center AF Multi AF Focus WB ISO To return to 30 seconds. Shooting with v/V. c Select a shutter speed with v/ V. Manual Exposure You can be used as a reference. • If you select 1/6 second or slower shutter speeds, "NR" appears before the shutter speed indicator ...
...Set the mode dial to "Return", and the camera enters the manual exposure setup mode. The "Set" indicator at the lower left of the LCD screen changes to M. c Select 9 (Focus) with b/B, then select the distance to the subject with manual shutter speed and aperture settings - Control button ... 1.0m 1.0m 0.5m Center AF Multi AF Focus WB ISO To return to 30 seconds. Shooting with v/V. c Select a shutter speed with v/ V. Manual Exposure You can be used as a reference. • If you select 1/6 second or slower shutter speeds, "NR" appears before the shutter speed indicator ...
Operating Instructions
Page 54
... exposure In step 4, select [0EV]. • If a subject is being shot in the range from +2.0EV to P, , , , , , or . The compensation value can manually adjust the exposure determined by the camera. Adjust toward - b Press MENU. EV adjustment You can be set in 1/3EV steps in extremely bright or dark conditions, or the flash...
... exposure In step 4, select [0EV]. • If a subject is being shot in the range from +2.0EV to P, , , , , , or . The compensation value can manually adjust the exposure determined by the camera. Adjust toward - b Press MENU. EV adjustment You can be set in 1/3EV steps in extremely bright or dark conditions, or the flash...
Operating Instructions
Page 120
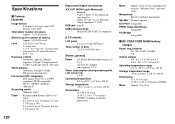
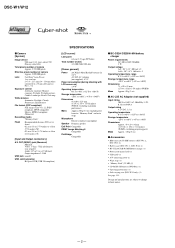
.... 5 090 000 pixels Lens Carl Zeiss Vario-Tessar 3× zoom lens f = 7.9 - 23.7 mm (38 - 114 mm when converted to a 35 mm still camera) F2.8 - 5.2 Exposure control Automatic exposure, Manual exposure, Twilight, Twilight portrait, Candle, Landscape, Beach, Soft snap White balance Automatic, Daylight, Cloudy, Fluorescent, Incandescent File format (DCF compliant) Still images: Exif...
.... 5 090 000 pixels Lens Carl Zeiss Vario-Tessar 3× zoom lens f = 7.9 - 23.7 mm (38 - 114 mm when converted to a 35 mm still camera) F2.8 - 5.2 Exposure control Automatic exposure, Manual exposure, Twilight, Twilight portrait, Candle, Landscape, Beach, Soft snap White balance Automatic, Daylight, Cloudy, Fluorescent, Incandescent File format (DCF compliant) Still images: Exif...

Service Manual
Page 1
... the CH-146, SY-102, SW-422, MS-204, MS-205 flexible, JK-263 and SP-045 flexible boards This service manual procides the information that is shown in Lens Frame Installation • Exchange Method of Barrier Assy • HELP: Sheet attachment positions ...WIRING BOARDS FRAME SCHEMATIC DIAGRAM REPAIR PARTS LIST SCHEMATIC DIAGRAMS • For ADJUSTMENTS (SECTION 6), refer to SERVICE MANUAL, ADJ (987673651.pdf). • For INSTRUCTION MANUAL, refer to SERVICE MANUAL, LEVEL 1 (987673641.pdf). • Reference No. DIGITAL STILL CAMERA Pages 4-54 and 4-55 and SP-045 flexible boards. service...
... the CH-146, SY-102, SW-422, MS-204, MS-205 flexible, JK-263 and SP-045 flexible boards This service manual procides the information that is shown in Lens Frame Installation • Exchange Method of Barrier Assy • HELP: Sheet attachment positions ...WIRING BOARDS FRAME SCHEMATIC DIAGRAM REPAIR PARTS LIST SCHEMATIC DIAGRAMS • For ADJUSTMENTS (SECTION 6), refer to SERVICE MANUAL, ADJ (987673651.pdf). • For INSTRUCTION MANUAL, refer to SERVICE MANUAL, LEVEL 1 (987673641.pdf). • Reference No. DIGITAL STILL CAMERA Pages 4-54 and 4-55 and SP-045 flexible boards. service...
Service Manual
Page 2
...case (DSC-W12 only) (1) See page 5-15. DSC-W1/W12 x Camera [System] Image device 9.04 mm (1/1.8 type) color CCD Primary color filter Total pixels number of camera Approx. 5 255 000 pixels Effective pixels number of camera Approx. 5 090 000 pixels Lens Carl Zeiss Vario-Tessar 3 zo om... lens f = 7.9 - 23.7 mm (38 - 114 mm when converted to a 35 mm still camera) F2.8 - 5.2 Exposure control Automatic exposure, Manual exposure, Twilight, Twilight portrait, Candle, Landscape, Beach, Soft snap White balance Automatic, Daylight, Cloudy, Fluorescent, Incandescent File format (DCF...
...case (DSC-W12 only) (1) See page 5-15. DSC-W1/W12 x Camera [System] Image device 9.04 mm (1/1.8 type) color CCD Primary color filter Total pixels number of camera Approx. 5 255 000 pixels Effective pixels number of camera Approx. 5 090 000 pixels Lens Carl Zeiss Vario-Tessar 3 zo om... lens f = 7.9 - 23.7 mm (38 - 114 mm when converted to a 35 mm still camera) F2.8 - 5.2 Exposure control Automatic exposure, Manual exposure, Twilight, Twilight portrait, Candle, Landscape, Beach, Soft snap White balance Automatic, Daylight, Cloudy, Fluorescent, Incandescent File format (DCF...

Service Manual
Page 55
...SW-422, MS-204, MS-205, FLEXIBLE, JK-263, SP-045 FLEXIBLE) 9-876-736-51 Sony EMCS Co. 2004D0500-1 ©2004.4 Published by DI Technical Support Section DISASSEMBLY a 3. Contents of Automatic...of the file name varies depending on the version of LEVEL 2 and LEVEL 3 Service Manual CONTENTS LEVEL 2 1. DSC-W1/W12 Ver 1.0 2004. 04 Revision History SECTION 6 ADJUSTMENTS ... items when replacing main parts and boards CAMERA SECTION ADJUSTMENTS PREPARATIONS BEFORE ADJUSTMENTS ADJUSTMENT PROGRAMS VIDEO SYSTEM ADJUSTMENTS CAMERA SYSTEM ADJUSTMENTS LCD SYSTEM ADJUSTMENTS ERROR INITIALIZATION OF...
...SW-422, MS-204, MS-205, FLEXIBLE, JK-263, SP-045 FLEXIBLE) 9-876-736-51 Sony EMCS Co. 2004D0500-1 ©2004.4 Published by DI Technical Support Section DISASSEMBLY a 3. Contents of Automatic...of the file name varies depending on the version of LEVEL 2 and LEVEL 3 Service Manual CONTENTS LEVEL 2 1. DSC-W1/W12 Ver 1.0 2004. 04 Revision History SECTION 6 ADJUSTMENTS ... items when replacing main parts and boards CAMERA SECTION ADJUSTMENTS PREPARATIONS BEFORE ADJUSTMENTS ADJUSTMENT PROGRAMS VIDEO SYSTEM ADJUSTMENTS CAMERA SYSTEM ADJUSTMENTS LCD SYSTEM ADJUSTMENTS ERROR INITIALIZATION OF...

Service Manual
Page 58
...imager) CD-507 board D101 (AF illumination LED) CH-146 board IC101 (Timing gen., CCD signal process) SY-102 board IC301 (Camera DSP) SY-102 board IC302 (Video amp.) MS-204 board IC801 (LCD driver) CD-507 board (COMPLETE) CH-146 board ...(Note 1) Initialization of data z z VIDEO adjustment Video output level adj. Perform it manually. Block replacement Replaced parts Mounted parts replacement Board replacement Flash memory replacement (Camera system control) (With built-in the following table. zz z z CAMERA adjustment 1 Flange back adj. z zz zz z z F No. Table 6-1-1 ...
...imager) CD-507 board D101 (AF illumination LED) CH-146 board IC101 (Timing gen., CCD signal process) SY-102 board IC301 (Camera DSP) SY-102 board IC302 (Video amp.) MS-204 board IC801 (LCD driver) CD-507 board (COMPLETE) CH-146 board ...(Note 1) Initialization of data z z VIDEO adjustment Video output level adj. Perform it manually. Block replacement Replaced parts Mounted parts replacement Board replacement Flash memory replacement (Camera system control) (With built-in the following table. zz z z CAMERA adjustment 1 Flange back adj. z zz zz z z F No. Table 6-1-1 ...

Service Manual
Page 64
... finishes. 6-8 The Automatic Adjustment Program automatically controls the adjustment operations that were formerly entered manually on Main Menu Screen When the Automatic Adjustment Program started in Fig. 6-1-8 will start automatically when the adjustment is adjusted with the camera via the SEUS. Start of Automatic Adjustment Program Double-click the application file (DSC...
... finishes. 6-8 The Automatic Adjustment Program automatically controls the adjustment operations that were formerly entered manually on Main Menu Screen When the Automatic Adjustment Program started in Fig. 6-1-8 will start automatically when the adjustment is adjusted with the camera via the SEUS. Start of Automatic Adjustment Program Double-click the application file (DSC...

Service Manual
Page 80
... to the flash memory failed. • Connection is faulty. • Power supply is displayed in the message, and [Save] them. (Cancel manually the data setting during adjustment.) • Check the connection. • Install the power supply correctly. 1-6-2. Precautions When an Error Occurred The Automatic ... button is displayed in Fig. 6-1-53, 54 and 55. When the data setting is display here. Video System Adjustment screen Fig. 6-1-53 Camera System Adjustment screen Fig. 6-1-54 LCD System Adjustment screen 6-24 Fig. 6-1-55 Fig. 6-1-52 data cannot be saved normally. (The data...
... to the flash memory failed. • Connection is faulty. • Power supply is displayed in the message, and [Save] them. (Cancel manually the data setting during adjustment.) • Check the connection. • Install the power supply correctly. 1-6-2. Precautions When an Error Occurred The Automatic ... button is displayed in Fig. 6-1-53, 54 and 55. When the data setting is display here. Video System Adjustment screen Fig. 6-1-53 Camera System Adjustment screen Fig. 6-1-54 LCD System Adjustment screen 6-24 Fig. 6-1-55 Fig. 6-1-52 data cannot be saved normally. (The data...

Service Manual
Page 82
..."00". 6) Select page: 00, address: 01, and set data: 00. 2. SERVICE MODE 1. In this case, the Test mode is not released even if the camera is turned off, thus requiring extreme care. • After completing adjustments/repairs, release the data setting. 1) Select page: 00, address: 01, and set data: 01... 23 Data 80 00 01 02 03 04 05 Function Normal Forced SET UP mode Forced MOVIE mode Forced PLAY mode Forced CAMERA (Auto) mode Forced CAMERA (Program Auto) mode Forced CAMERA (Manual) mode • Before setting the data, select page: 00, address: 01, and set data: 01. • For page: 2F, ...
..."00". 6) Select page: 00, address: 01, and set data: 00. 2. SERVICE MODE 1. In this case, the Test mode is not released even if the camera is turned off, thus requiring extreme care. • After completing adjustments/repairs, release the data setting. 1) Select page: 00, address: 01, and set data: 01... 23 Data 80 00 01 02 03 04 05 Function Normal Forced SET UP mode Forced MOVIE mode Forced PLAY mode Forced CAMERA (Auto) mode Forced CAMERA (Program Auto) mode Forced CAMERA (Manual) mode • Before setting the data, select page: 00, address: 01, and set data: 01. • For page: 2F, ...

