

Operating Instructions
Page 1
Refer to these numbers whenever you call upon your Sony dealer regarding this manual thoroughly, and retain it for future reference. Owner's Record The model and serial numbers are located on the bottom. Model No. DSC-S75/S85 Serial No DSC-S75/S85 ©2001 Sony Corporation Record the serial number in the space provided below. 3-068-188-11(1) Digital Still Camera Operating Instructions Before operating the unit, please read this product.
Refer to these numbers whenever you call upon your Sony dealer regarding this manual thoroughly, and retain it for future reference. Owner's Record The model and serial numbers are located on the bottom. Model No. DSC-S75/S85 Serial No DSC-S75/S85 ©2001 Sony Corporation Record the serial number in the space provided below. 3-068-188-11(1) Digital Still Camera Operating Instructions Before operating the unit, please read this product.

Operating Instructions
Page 3
... cover after you change the fuse. Consult the dealer or an experienced radio/TV technician for a Class B digital device, pursuant to comply with the limits for your nearest Sony service station. DISPOSAL OF LITHIUM ION BATTERY. Never use the plug without the fuse cover. However, there is...a 5 AMP fuse approved by turning the equipment off and on, the user is connected. - The supplied interface cable must be used with this camera. 3 If the plug supplied with the equipment in order to Part 15 of FCC Rules. Notice for using connection cables shorter than 3 meters....
... cover after you change the fuse. Consult the dealer or an experienced radio/TV technician for a Class B digital device, pursuant to comply with the limits for your nearest Sony service station. DISPOSAL OF LITHIUM ION BATTERY. Never use the plug without the fuse cover. However, there is...a 5 AMP fuse approved by turning the equipment off and on, the user is connected. - The supplied interface cable must be used with this camera. 3 If the plug supplied with the equipment in order to Part 15 of FCC Rules. Notice for using connection cables shorter than 3 meters....

Operating Instructions
Page 4
...to make a trial recording to make sure that the camera is not possible due to the provision of the movable lens This camera uses a movable lens. You cannot play back on your camera still images recorded on other 4 equipment on your camera on how to direct sunlight for if recording or ... established by the JEITA (Japan Electric and Information Technology Industries Association). Do not get the camera wet. However, there may be careful not to the lens portion. and Canada THIS CLASS B DIGITAL DEVICE COMPLIES WITH PART 15 OF THE FCC RULES AND THE CANADIAN ICES-003 OPERATION IS ...
...to make a trial recording to make sure that the camera is not possible due to the provision of the movable lens This camera uses a movable lens. You cannot play back on your camera still images recorded on other 4 equipment on your camera on how to direct sunlight for if recording or ... established by the JEITA (Japan Electric and Information Technology Industries Association). Do not get the camera wet. However, there may be careful not to the lens portion. and Canada THIS CLASS B DIGITAL DEVICE COMPLIES WITH PART 15 OF THE FCC RULES AND THE CANADIAN ICES-003 OPERATION IS ...

Operating Instructions
Page 5
...About the Carl Zeiss lens This camera is equipped with a Carl Zeiss lens which is capable of the subject gathered at the corresponding position in Germany, and Sony Corporation, and offers the same quality as other Carl Zeiss lenses. ∗ MTF is used for cameras developed jointly by Carl Zeiss, ...in the image. 5 The lens for this camera uses the MTF* measurement system for long periods ...
...About the Carl Zeiss lens This camera is equipped with a Carl Zeiss lens which is capable of the subject gathered at the corresponding position in Germany, and Sony Corporation, and offers the same quality as other Carl Zeiss lenses. ∗ MTF is used for cameras developed jointly by Carl Zeiss, ...in the image. 5 The lens for this camera uses the MTF* measurement system for long periods ...

Operating Instructions
Page 6
... for e-mail (E-MAIL): page 55 Records a moving picture (MPEG Movie or Clip Motion) according to your purpose The digital still camera can record a moving picture with your computer You can copy images onto your computer and view and modify images or attach images to e-mail... on your situation Creating Clip Motion Files: page 59 Adding audio files to still images (VOICE): page 56 Recording text documents (TEXT): page 57 Recording still images as uncompressed files (TIFF): page 58 6 Viewing images using the supplied USB cable and application software.
... for e-mail (E-MAIL): page 55 Records a moving picture (MPEG Movie or Clip Motion) according to your purpose The digital still camera can record a moving picture with your computer You can copy images onto your computer and view and modify images or attach images to e-mail... on your situation Creating Clip Motion Files: page 59 Adding audio files to still images (VOICE): page 56 Recording text documents (TEXT): page 57 Recording still images as uncompressed files (TIFF): page 58 6 Viewing images using the supplied USB cable and application software.

Operating Instructions
Page 7
...exposure (EXPOSURE 61 Adjusting the white balance (WHITE BALANCE 62 Enjoying picture effects (P. EFFECT 63 Recording the date and time on the still image (DATE/TIME 64 Using the spot light-metering function 65 B Various playback Playing back three or nine images at once 66 Enlarging... moving images 26 B Playback Playing back still images 28 Playing back moving image file (DIVIDE 78 Changing the setup settings (SETUP 80 Additional information Precautions 83 On "Memory Sticks 84 About "InfoLITHIUM" battery pack 85 Using your camera abroad 86 Troubleshooting 87 Warning and notice ...
...exposure (EXPOSURE 61 Adjusting the white balance (WHITE BALANCE 62 Enjoying picture effects (P. EFFECT 63 Recording the date and time on the still image (DATE/TIME 64 Using the spot light-metering function 65 B Various playback Playing back three or nine images at once 66 Enlarging... moving images 26 B Playback Playing back still images 28 Playing back moving image file (DIVIDE 78 Changing the setup settings (SETUP 80 Additional information Precautions 83 On "Memory Sticks 84 About "InfoLITHIUM" battery pack 85 Using your camera abroad 86 Troubleshooting 87 Warning and notice ...
Operating Instructions
Page 8
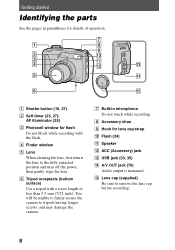
.... H Accessory shoe I Hook for details of less than 5.5 mm (7/32 inch). O Lens cap (supplied) Be sure to tripods having longer screws, and may damage the camera. Getting started Identifying the parts See the pages in microphone Do not touch while recording. You will be unable to firmly secure the... camera to remove the lens cap before recording. 8 D Finder window E Lens When cleaning the lens, first return the lens to the fully retracted position and turn ...
.... H Accessory shoe I Hook for details of less than 5.5 mm (7/32 inch). O Lens cap (supplied) Be sure to tripods having longer screws, and may damage the camera. Getting started Identifying the parts See the pages in microphone Do not touch while recording. You will be unable to firmly secure the... camera to remove the lens cap before recording. 8 D Finder window E Lens When cleaning the lens, first return the lens to the fully retracted position and turn ...

Operating Instructions
Page 10
.../"Memory Stick" cover. "InfoLITHIUM" M series battery packs have the mark. Preparing the power supply Installing the battery pack Your camera operates only with compatible video equipment. Slide the cover in the direction of Sony Corporation. 10 "InfoLITHIUM" is a lithium ion battery pack which can exchange information such as illustrated. 3 Close the battery...
.../"Memory Stick" cover. "InfoLITHIUM" M series battery packs have the mark. Preparing the power supply Installing the battery pack Your camera operates only with compatible video equipment. Slide the cover in the direction of Sony Corporation. 10 "InfoLITHIUM" is a lithium ion battery pack which can exchange information such as illustrated. 3 Close the battery...

Operating Instructions
Page 11
Battery remaining indicator The LCD screen on the conditions of your camera. This indication may not be entirely accurate depending on the camera shows the remaining time for which you can still record or play back images. The battery indicator flashes when charging begins. After charging the battery pack Disconnect the AC power adaptor...
Battery remaining indicator The LCD screen on the conditions of your camera. This indication may not be entirely accurate depending on the camera shows the remaining time for which you can still record or play back images. The battery indicator flashes when charging begins. After charging the battery pack Disconnect the AC power adaptor...

Operating Instructions
Page 12
...time to charge a completely discharged battery pack using a pocket heater, take care not to keep it warm, then insert the battery pack into the camera just before recording. When using the AC-L10A/B/C AC power adaptor at a temperature of 25°C (77°F). NP-FM50 battery pack When ...extremely cold location or using the LCD screen, the operating time becomes short. Battery life and number of images that can be recorded/played back Still image recording* LCD screen ON LCD screen OFF NP-FM50 (supplied) Battery life (min.) Number of images Approx. 150 Approx. 2500 Approx. ...
...time to charge a completely discharged battery pack using a pocket heater, take care not to keep it warm, then insert the battery pack into the camera just before recording. When using the AC-L10A/B/C AC power adaptor at a temperature of 25°C (77°F). NP-FM50 battery pack When ...extremely cold location or using the LCD screen, the operating time becomes short. Battery life and number of images that can be recorded/played back Still image recording* LCD screen ON LCD screen OFF NP-FM50 (supplied) Battery life (min.) Number of images Approx. 150 Approx. 2500 Approx. ...
Operating Instructions
Page 13
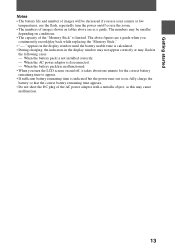
... usable time is calculated. • During charging, the indicators in the display window may not appear correctly or may be decreased if you use your camera at low temperatures, use the zoom. • The numbers of images shown on tables above figures are as this may cause malfunction. 13 The numbers...
... usable time is calculated. • During charging, the indicators in the display window may not appear correctly or may be decreased if you use your camera at low temperatures, use the zoom. • The numbers of images shown on tables above figures are as this may cause malfunction. 13 The numbers...

Operating Instructions
Page 14
Using a car battery Use Sony DC adaptor/charger (not supplied). When using the AC power adaptor Be sure to a wall outlet (mains). If a malfunction occurs, disconnect the plug from the wall outlet. 14 Using the AC power adaptor DC IN jack cover To the wall outlet (mains) Power cord (mains lead) AC-L10A/L10B/L10C AC power adaptor (supplied) 1 Open the DC IN jack cover and connect the DC connecting cable to the DC IN jack of your camera with the v mark facing up. 2 Connect the power cord (mains lead) to the AC power adaptor and then to use it near the wall outlet.
Using a car battery Use Sony DC adaptor/charger (not supplied). When using the AC power adaptor Be sure to a wall outlet (mains). If a malfunction occurs, disconnect the plug from the wall outlet. 14 Using the AC power adaptor DC IN jack cover To the wall outlet (mains) Power cord (mains lead) AC-L10A/L10B/L10C AC power adaptor (supplied) 1 Open the DC IN jack cover and connect the DC connecting cable to the DC IN jack of your camera with the v mark facing up. 2 Connect the power cord (mains lead) to the AC power adaptor and then to use it near the wall outlet.

Operating Instructions
Page 15
...) and perform the procedure from [Y/M/D] (year/month/day), [M/D/Y] (month/day/year) or [D/M/Y] (day/month/year). To change the date and time, set with v/V on your camera, set , the CLOCK SET screen appears whenever you turn on the LCD screen. CLOCK SET Y / M / D M / D /Y D / M /Y 2001 / 1 / 1 OK 12 : 00 OK AM CANCEL 15 If these... not set the date and time. The POWER ON/OFF (CHG) lamp (green) lights up. Setting the date and time When you first use your camera.
...) and perform the procedure from [Y/M/D] (year/month/day), [M/D/Y] (month/day/year) or [D/M/Y] (day/month/year). To change the date and time, set with v/V on your camera, set , the CLOCK SET screen appears whenever you turn on the LCD screen. CLOCK SET Y / M / D M / D /Y D / M /Y 2001 / 1 / 1 OK 12 : 00 OK AM CANCEL 15 If these... not set the date and time. The POWER ON/OFF (CHG) lamp (green) lights up. Setting the date and time When you first use your camera.

Operating Instructions
Page 18
Set the dial as follows before starting to operate your camera. : To record still images, VOICE mode audio data : To play back or edit images : To record moving images or Clip Motion images SET UP: To set the setup ...
Set the dial as follows before starting to operate your camera. : To record still images, VOICE mode audio data : To play back or edit images : To record moving images or Clip Motion images SET UP: To set the setup ...
Operating Instructions
Page 19
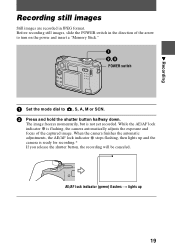
... button halfway down. AE/AF lock indicator (green) flashes t lights up and the camera is ready for recording.* If you release the shutter button, the recording will be canceled. Before recording still images, slide the POWER switch in JPEG format. While the AE/AF lock indicator z... is not yet recorded. B Recording Recording still images Still images are recorded in the direction of the captured image. POWER switch 1 Set the mode dial to turn on the power and insert a "Memory Stick." When the camera finishes the automatic adjustments, the AE/AF lock indicator ...
... button halfway down. AE/AF lock indicator (green) flashes t lights up and the camera is ready for recording.* If you release the shutter button, the recording will be canceled. Before recording still images, slide the POWER switch in JPEG format. While the AE/AF lock indicator z... is not yet recorded. B Recording Recording still images Still images are recorded in the direction of the captured image. POWER switch 1 Set the mode dial to turn on the power and insert a "Memory Stick." When the camera finishes the automatic adjustments, the AE/AF lock indicator ...
Operating Instructions
Page 20
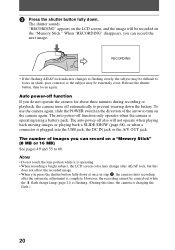
... the "Memory Stick." However, the recording cannot be extremely close. Auto power-off function If you do not operate the camera for about three minutes during recording or playback, the camera turns off automatically to focus on (dark, poor contrast) or the subject may be recorded on the...also will be difficult to prevent wearing down . Release the shutter button, then focus again. The auto power-off function only operates when the camera is charging the flash.) 20 3 Press the shutter button fully down the battery. Notes • Do not touch the lens portion while it...
... the "Memory Stick." However, the recording cannot be extremely close. Auto power-off function If you do not operate the camera for about three minutes during recording or playback, the camera turns off automatically to focus on (dark, poor contrast) or the subject may be recorded on the...also will be difficult to prevent wearing down . Release the shutter button, then focus again. The auto power-off function only operates when the camera is charging the flash.) 20 3 Press the shutter button fully down the battery. Notes • Do not touch the lens portion while it...
Operating Instructions
Page 22
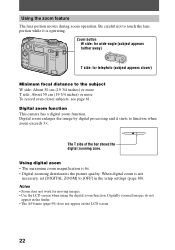
Digital zoom function This camera has a digital zoom function. W T The T side of the bar shows the digital zooming zone. When digital zoom is not necessary, set [DIGITAL ZOOM] to touch the lens portion while it starts to the subject W side: About 50 cm (19 3/4 inches) or more T side: ... the picture quality. Notes • Zoom does not work for telephoto (subject appears closer) Minimum focal distance to function when zoom exceeds 3×. Digitally zoomed images do not appear in the setup settings (page 80). Zoom button W side: for wide-angle (subject appears farther away) T side:...
Digital zoom function This camera has a digital zoom function. W T The T side of the bar shows the digital zooming zone. When digital zoom is not necessary, set [DIGITAL ZOOM] to touch the lens portion while it starts to the subject W side: About 50 cm (19 3/4 inches) or more T side: ... the picture quality. Notes • Zoom does not work for telephoto (subject appears closer) Minimum focal distance to function when zoom exceeds 3×. Digitally zoomed images do not appear in the setup settings (page 80). Zoom button W side: for wide-angle (subject appears farther away) T side:...
Operating Instructions
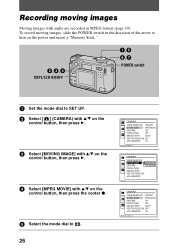
Page 26
... images with v/V on the control button, then press the center z. 5 Select the mode dial to . 26 CAMERA SCENE SELECTION: TWILIGHT MOVING IMAGE: MPEG MOVIE DATE/TIME: OFF DIGITAL ZOOM: OFF BRACKET STEP: ±0.7EV RED EYE REDUCTION: OFF AF ILLUMINATOR: ON PAGE SELECT... CAMERA SCENE SELECTION: MOVING IMAGE: MPEG MOVIE DATE/TIME: CLIP MOTION DIGITAL ZOOM: BRACKET STEP: RED EYE REDUCTION: AF ILLUMINATOR: OK CAMERA SCENE SELECTION: TWILIGHT MOVING IMAGE: MPEG MOVIE DATE/TIME: OFF DIGITAL ZOOM: OFF BRACKET STEP: ±0.7EV...
... images with v/V on the control button, then press the center z. 5 Select the mode dial to . 26 CAMERA SCENE SELECTION: TWILIGHT MOVING IMAGE: MPEG MOVIE DATE/TIME: OFF DIGITAL ZOOM: OFF BRACKET STEP: ±0.7EV RED EYE REDUCTION: OFF AF ILLUMINATOR: ON PAGE SELECT... CAMERA SCENE SELECTION: MOVING IMAGE: MPEG MOVIE DATE/TIME: CLIP MOTION DIGITAL ZOOM: BRACKET STEP: RED EYE REDUCTION: AF ILLUMINATOR: OK CAMERA SCENE SELECTION: TWILIGHT MOVING IMAGE: MPEG MOVIE DATE/TIME: OFF DIGITAL ZOOM: OFF BRACKET STEP: ±0.7EV...

Operating Instructions
Page 28
... changes as follows: all indicators on the LCD screen. 2 Select the desired still image with this camera images larger than the maximum image size that can be recorded with the control button b/B. The last recorded image (still or moving) appears on t indicators off t LCD screen off. LCD screen...; You might not be able to . Playing back still images B Playback DSPL/LCD ON/OFF POWER switch 1 Set the mode dial to correctly play back images recorded with this camera on other equipment. • You cannot play back on this camera. • A rough image is played back, followed...
... changes as follows: all indicators on the LCD screen. 2 Select the desired still image with this camera images larger than the maximum image size that can be recorded with the control button b/B. The last recorded image (still or moving) appears on t indicators off t LCD screen off. LCD screen...; You might not be able to . Playing back still images B Playback DSPL/LCD ON/OFF POWER switch 1 Set the mode dial to correctly play back images recorded with this camera on other equipment. • You cannot play back on this camera. • A rough image is played back, followed...

Operating Instructions
Page 31
... format • Depending on your application software, the file size may increase when you open a still image file. • When you copy the image to the camera from your computer, which are installed on your personal computer and the application software. Be sure to...press B. 4 Select the connection mode with v/V. Notes • Data recorded with your camera on a personal computer using the [NORMAL] setting. Make sure that applications that operations can be informed at the Sony website when PTP connection is supported. B Playback Viewing images using a personal computer You ...
... format • Depending on your application software, the file size may increase when you open a still image file. • When you copy the image to the camera from your computer, which are installed on your personal computer and the application software. Be sure to...press B. 4 Select the connection mode with v/V. Notes • Data recorded with your camera on a personal computer using the [NORMAL] setting. Make sure that applications that operations can be informed at the Sony website when PTP connection is supported. B Playback Viewing images using a personal computer You ...


